Bedrock+App Runner+CDK+Next.jsでLLMアプリを構築してみた
こんにちは。AlphaDrive で Web アプリケーションエンジニアをしている @fmatzy です。
2023年10月、Amazon Bedrock が東京リージョンで使えるようになり、AWS に閉じた形での LLM アプリの構築が可能になりました。弊社でも LLM のプロダクトへの活用を模索しており、技術検証の最中です。今回は Bedrock、App Runner、CDK と、AWS をフル活用して簡易的な LLM アプリ (AI 質問箱) を構築してみましたので、その記録をブログにします。
今回作成するもののイメージです。

使用した技術は以下の通りです。フロントエンド・バックエンド用のサーバーには Next.js を利用しました。本記事では割愛しますが、Next.js 13 で導入された Server Components 周りのキャッチアップに意外と苦労しました、、
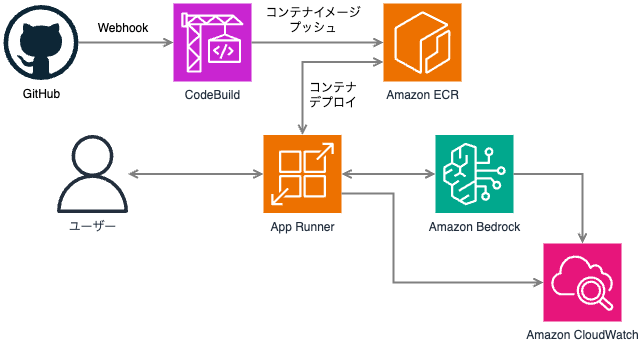
インフラ構成図はこんな感じです。構成要素が少ないので非常にシンプルですね。
パイプラインの作成
まず ECR のリポジトリを作成していきます。
cdk/lib/constructs/ImageRepository.ts
import { RemovalPolicy } from "aws-cdk-lib";
import { IRepository, Repository } from "aws-cdk-lib/aws-ecr";
import { Platform } from "aws-cdk-lib/aws-ecr-assets";
import {
  Destination,
  DockerImageDeployment,
  Source,
} from "cdk-docker-image-deployment";
import { Construct } from "constructs";
import { resolve } from "path";

export class ImageRepository extends Construct {
  repository: IRepository;

  constructor(scope: Construct, id: string) {
    super(scope, id);

    const withDeployment = scope.node.tryGetContext("withDeployment") as string;

    const repository = new Repository(this, "Repository", {
      repositoryName: "bedrock-apprunner-cdk-demo",
      removalPolicy: RemovalPolicy.DESTROY,
      autoDeleteImages: true,
    });

    if (withDeployment) {
      new DockerImageDeployment(this, "InitialDeployment", {
        source: Source.directory(resolve(__filename, "../../../.."), {
          platform: Platform.LINUX_AMD64,
        }),
        destination: Destination.ecr(repository, {
          tag: "latest",
        }),
      });
    }

    this.repository = repository;
  }
}
今回、CDK の初回デプロイ時にコンテナイメージも同時にデプロイするため、--context withDeployment=1 とすることで cdk-docker-image-deployment を使ったデプロイを行えるようにしています。
次に、GitHub に反応して ECR にイメージをプッシュする CodeBuild を作成します。この CodeBuild では、モノレポ内の Next.js 部分の変更にのみ反応してイメージをビルド・プッシュするようになっています。
cdk/lib/constructs/Pipeline.ts
import {
  BuildSpec,
  ComputeType,
  EventAction,
  FilterGroup,
  LinuxBuildImage,
  Project,
  Source,
} from "aws-cdk-lib/aws-codebuild";
import { IRepository } from "aws-cdk-lib/aws-ecr";
import { Construct } from "constructs";

export type PipelineProps = {
  repository: IRepository;
};

export class Pipeline extends Construct {
  constructor(scope: Construct, id: string, props: PipelineProps) {
    super(scope, id);

    const { repository } = props;

    const owner = scope.node.tryGetContext("githubOwner") as string;
    const repo = scope.node.tryGetContext("githubRepo") as string;
    if (!owner || !repo) {
      throw new Error("Missing GitHub owner or repo in context");
    }

    const project = new Project(this, "Project", {
      buildSpec: BuildSpec.fromSourceFilename("buildspec.yml"),
      source: Source.gitHub({
        owner,
        repo,
        reportBuildStatus: true,
        cloneDepth: 1,
        webhook: true,
        webhookFilters: [
          FilterGroup.inEventOf(EventAction.PUSH)
            .andHeadRefIs("^refs/heads/main$")
            .andFilePathIs("^next-app/.*|^Dockerfile$|^buildspec.yml$"),
        ],
      }),
      concurrentBuildLimit: 1,
      environment: {
        buildImage: LinuxBuildImage.AMAZON_LINUX_2_5,
        computeType: ComputeType.SMALL,
        privileged: true,
      },
      environmentVariables: {
        IMAGE_REPO_NAME: {
          value: repository.repositoryName,
        },
      },
    });

    repository.grantPush(project);
  }
}
buildspec.yml
version: 0.2

env:
  variables:
    DOCKER_BUILDKIT: 1

phases:
  pre_build:
    commands:
      - AWS_ACCOUNT_ID=$(echo ${CODEBUILD_BUILD_ARN} | cut -f 5 -d :)
      - echo Logging in to Amazon ECR...
      - aws ecr get-login-password --region $AWS_DEFAULT_REGION | docker login --username AWS --password-stdin $AWS_ACCOUNT_ID.dkr.ecr.$AWS_DEFAULT_REGION.amazonaws.com
  build:
    commands:
      - IMAGE_REPO_URI=$AWS_ACCOUNT_ID.dkr.ecr.$AWS_DEFAULT_REGION.amazonaws.com/$IMAGE_REPO_NAME
      - docker build -t $IMAGE_REPO_URI:$CODEBUILD_RESOLVED_SOURCE_VERSION .
      - docker tag $IMAGE_REPO_URI:$CODEBUILD_RESOLVED_SOURCE_VERSION $IMAGE_REPO_URI:latest
    on-failure: ABORT
  post_build:
    commands:
      - docker push $IMAGE_REPO_URI:$CODEBUILD_RESOLVED_SOURCE_VERSION
      - docker push $IMAGE_REPO_URI:latest
App Runner の作成
App Runner 部分のコードはこちらです。
autoDeploymentsEnabled による ECR へのプッシュをトリガとした自動デプロイには ecr:DescribeImages 権限が足りないため、Repository.grantRead() により 追加で付与しています。
また、standalone モードでビルドした Next.js のイメージを App Runner にデプロイすると、HOSTNAME が正しくないせいでエラーになるという問題があるため、明示的に HOSTNAME=0.0.0.0 を設定することで回避しました。
cdk/lib/constructs/DemoApp.ts
import { Service, Source } from "@aws-cdk/aws-apprunner-alpha";
import { IRepository } from "aws-cdk-lib/aws-ecr";
import {
  Effect,
  PolicyStatement,
  Role,
  ServicePrincipal,
} from "aws-cdk-lib/aws-iam";
import { Construct } from "constructs";


export type DemoAppProps = {
  repository: IRepository;
};

export class DemoApp extends Construct {
  constructor(scope: Construct, id: string, props: DemoAppProps) {
    super(scope, id);

    const { repository } = props;

    const accessRole = new Role(this, "AccessRole", {
      assumedBy: new ServicePrincipal("build.apprunner.amazonaws.com"),
    });
    // autoDeploymentsEnabled の権限で ecr:DescribeImages が必要なため、
    // 追加で付与する。
    repository.grantRead(accessRole);

    const service = new Service(this, "Service", {
      source: Source.fromEcr({
        repository,
        imageConfiguration: {
          port: 3000,
          environmentVariables: {
            HOSTNAME: "0.0.0.0",
          },
        },
        tagOrDigest: "latest",
      }),
      autoDeploymentsEnabled: true,
      accessRole,
    });

    service.addToRolePolicy(
      new PolicyStatement({
        effect: Effect.ALLOW,
        actions: [
          "bedrock:InvokeModel",
          "bedrock:InvokeModelWithResponseStream",
        ],
        resources: ["*"],
      }),
    );
  }
}
補足: App Runner の IP制限
App Runner では、WAF のルールを追加することでアクセスする IP を制限することもできます。今回は上記のコードに加えて、社内からのアクセスに限定するよう IP 制限も施しました。
    const ubIpSet = new CfnIPSet(this, "UbIpSet", {
      addresses: [
        // ここにアクセス許可する IP アドレスを記述する。
      ],
      ipAddressVersion: "IPV4",
      scope: "REGIONAL",
      name: "bedrock-apprunner-cdk-demo-ip-set",
      description: "Demo app IP whitelist",
    });

    let priority = 0;
    const webAcl = new CfnWebACL(this, "WebAcl", {
      defaultAction: {
        block: {},
      },
      scope: "REGIONAL",
      name: "bedrock-apprunner-cdk-demo-web-acl",
      visibilityConfig: {
        cloudWatchMetricsEnabled: true,
        metricName: "bedrock-apprunner-cdk-demo-web-acl",
        sampledRequestsEnabled: true,
      },
      rules: [
        {
          name: "bedrock-apprunner-cdk-demo-ip-set-rule",
          priority: priority++,
          action: { allow: {} },
          statement: {
            ipSetReferenceStatement: {
              arn: ubIpSet.attrArn,
            },
          },
          visibilityConfig: {
            cloudWatchMetricsEnabled: true,
            metricName: "bedrock-apprunner-cdk-demo-ip-set-rule",
            sampledRequestsEnabled: true,
          },
        },
      ],
    });

    const association = new CfnWebACLAssociation(this, "WebAclAssociation", {
      resourceArn: service.serviceArn,
      webAclArn: webAcl.attrArn,
    });
    association.addDependency(service.node.defaultChild as CfnResource);
    association.addDependency(webAcl);
スタックの作成
以上のリソースをデプロイするスタックです。
cdk/lib/stack.ts
import { Stack, StackProps } from "aws-cdk-lib";
import { Construct } from "constructs";
import { DemoApp } from "./constructs/DemoApp";
import { ImageRepository } from "./constructs/ImageRepository";
import { Pipeline } from "./constructs/Pipeline";

export class DemoAppStack extends Stack {
  constructor(scope: Construct, id: string, props?: StackProps) {
    super(scope, id, props);

    const imageRepository = new ImageRepository(this, "ImageRepository");

    const app = new DemoApp(this, "DemoApp", {
      repository: imageRepository.repository,
    });
    app.node.addDependency(imageRepository);

    new Pipeline(this, "Pipeline", {
      repository: imageRepository.repository,
    });
  }
}
初回デプロイについては、リソースのデプロイと同時にコンテナイメージのビルド・プッシュも行います。
npx cdk deploy --context withDeployment=1
2 回目以降は --context によるオプションをつけずに実行することで、イメージのビルド・プッシュを担うカスタムリソースが削除され、Next.js のコンテナについては GitHub へのプッシュをトリガとしたデプロイのみが行われます。
npx cdk deploy
Next.js によるサンプルアプリの作成
Route Handlers によって POST を受け付ける API と、それを使用するページを作成しました。モデルに Anthropic Claude を使う場合、プロンプトが独特なので注意が必要です。
next-app/app/api/questions/route.ts
import { BedrockRuntime } from "@aws-sdk/client-bedrock-runtime";
import { NextRequest, NextResponse } from "next/server";
import { z } from "zod";

type BedrockAnthropicResponse = {
  completion: string;
  stop_reason: string;
  stop: string;
};

const client = new BedrockRuntime({
  region: "ap-northeast-1",
});

const postSchema = z.object({
  input: z.string(),
});

const createPrompt = (input: string) => `

Human:
<question></question>で囲まれた質問に答えてください。回答にあたっては、<rule></rule>で囲まれたルールを必ず守ってください。

<question>
${input}
</question>

<rule>
- 回答は、<answer></answer>タグで囲んでください。
- 回答は 300 文字以内としてください。
- このルールについての説明を含めてはいけません。
<rule>

Assistant:
`;

export async function POST(req: NextRequest) {
  try {
    const input = await req.json();
    const parsed = postSchema.safeParse(input);
    if (!parsed.success) {
      console.error(req.body);
      return NextResponse.json({ error: parsed.error }, { status: 400 });
    }

    const prompt = createPrompt(parsed.data.input);

    const res = await client.invokeModel({
      modelId: "anthropic.claude-instant-v1",
      body: JSON.stringify({
        prompt,
        max_tokens_to_sample: 1000,
        temperature: 1,
        top_k: 250,
        top_p: 0.999,
        stop_sequences: ["\n\nHuman:"],
        anthropic_version: "bedrock-2023-05-31",
      }),
      accept: "application/json",
      contentType: "application/json",
    });

    const body = JSON.parse(
      Buffer.from(res.body).toString("utf-8")
    ) as BedrockAnthropicResponse;
    const { completion } = body;
    if (!completion) {
      return NextResponse.json(
        { error: "invalid Bedrock response" },
        { status: 500 }
      );
    }

    const [, answer] = /<answer>(.*)<\/answer>/s.exec(completion) ?? [];
    if (!answer) {
      return NextResponse.json(
        { error: "invalid Bedrock response" },
        { status: 500 }
      );
    }
    return NextResponse.json({
      answer: answer.trim(),
    });
  } catch (e: any) {
    console.error(e.message);
    return NextResponse.json({ error: e.message }, { status: 500 });
  }
}
next-app/app/page.tsx
"use client";

import { useCallback, useState } from "react";

export default function Home() {
  const [input, setInput] = useState("");
  const [answer, setAnswer] = useState("");
  const [loading, setLoading] = useState(false);

  const fetchData = useCallback(async () => {
    if (loading) return;

    setLoading(true);
    try {
      const res = await fetch("/api/questions", {
        method: "POST",
        body: JSON.stringify({
          input,
        }),
        headers: {
          "Content-Type": "application/json",
        },
      });
      if (!res.ok || res.status !== 200) {
        setAnswer("エラーが発生しました");
        return;
      }
      const data = await res.json();
      setAnswer(data.answer);
    } finally {
      setLoading(false);
    }
  }, [input, loading]);

  return (
    <main className="flex min-h-screen flex-col items-center justify-between p-24">
      <h1 className="text-3xl font-bold text-gray-900 items-center">
        AI 質問箱
      </h1>
      <div className="flex flex-col justify-center items-center pt-6 w-10/12 h-full flex-grow mb-0">
        <button
          className="border-transparent bg-gray-800 text-white py-2 px-4 rounded-md hover:opacity-80 focus:outline-none focus:ring-2 focus:ring-offset-blue-900 focus:ring-opacity-90"
          onClick={() => fetchData()}
        >
          投稿
        </button>
        <div className="flex mt-6 flex-grow w-full flex-row justify-center space-x-6">
          <div className="flex flex-col w-1/2">
            <h2 className="font-semibold text-gray-900 text-center">入力</h2>
            <textarea
              className="w-full flex-grow rounded-md resize-none text-sm p-3 mt-1 focus:outline-none focus:ring-2 focus:ring-offset-blue-900 focus:ring-opacity-90"
              placeholder="質問を入力してください..."
              value={input}
              onChange={(e) => setInput(e.target.value)}
            />
          </div>
          <div className="flex flex-col w-1/2">
            <h2 className="font-semibold text-gray-900 text-center">出力</h2>
            <div className="flex-grow overflow-x-scroll whitespace-pre-wrap text-sm rounded-md p-3 mt-1 bg-white text-gray-800">
              {loading ? "回答生成中..." : answer}
            </div>
          </div>
        </div>
      </div>
    </main>
  );
}
完成!
このように、Bedrock + App Runner + CDK + Next.js で非常に簡単に AI 質問箱を作成することができました。ここからプロンプトを変更したり、RAG 構成にしたり認証をつけたりと、さらなる開発の可能性が広がっていきます。
本記事が皆さんの LLM アプリ開発の参考になれば幸いです!
Discussion