OktaとCognito Hosted-UIを使って100行くらいでSSOを実現する
この記事は、Finatextグループ Advent Calendar 2024の15日目の記事です。
はじめに
こんにちは。株式会社Finatextでアーキテクトをしている大島です。今回は、Okta[1]とAmazon Cognito[2] の Hosted UIを使用したSSO(シングルサインオン)というテーマで執筆しました。
弊社では、社内で使用しているさまざまなツール(SlackやKiteRa、社内専用AIチャットボット「Alfred Chat」)を使用する際のSSOの手段として、Oktaを利用しています。
近々新たに自社サービスで使用する管理画面を作成することになり、同様にOktaを使ったSSOによって弊社社員がスムーズにシステムを利用できるよう、Okta・Amazon Cognitoを利用したSSOを検証しました。
実装概要
OktaをIdPとして利用した、OktaとCognitoのフェデレーションを設定します。
また、簡易的なローカルサーバhttp://localhost:8080を立て、Amazon Cognito間にてPKCEを使用した認可コードフローを実装します。
手順
Cognitoユーザープール・アプリケーション作成
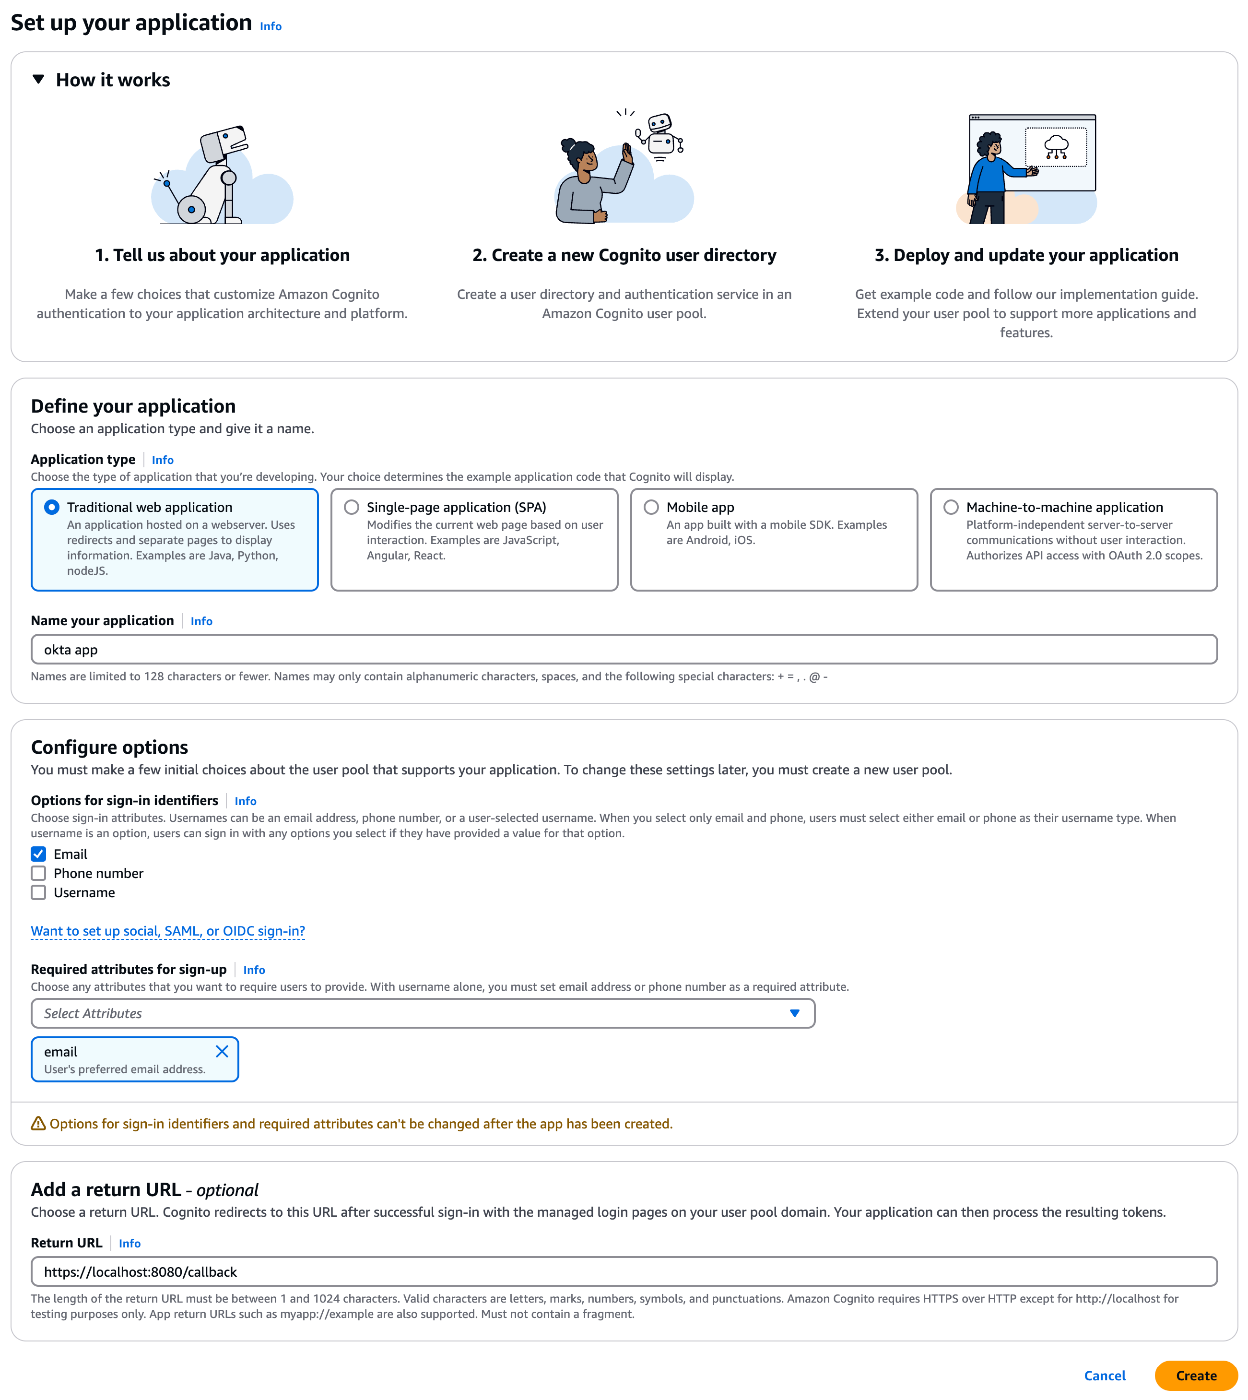
まずはAmazon Cognitoコンソール右上のCreate user poolを押下し、アプリケーションとユーザープールをセットアップします。

以下を選択・入力後、右下のCreateを押下し、アプリケーションとユーザープールを作成します。
- Define your application:
Traditional web application - Return URL:
http://localhost:8080/callback※後ほど立てるローカルサーバ

Oktaの設定
続いて、Okta側の設定を進めます。事前準備として、OktaのDeveloperアカウントを用意します。
Okta側のアプリケーションを作成
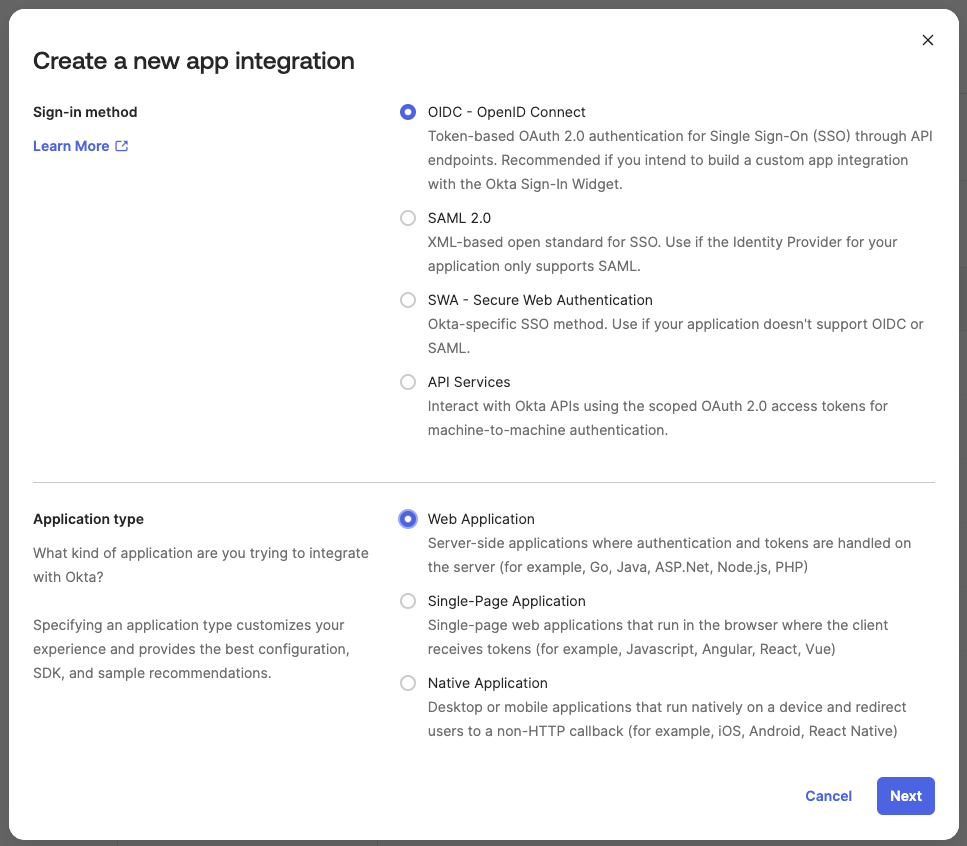
Oktaダッシュボードの Applications > Applicationsから、Create App Integration を選択します。

以下を選択します。
- Sign-in method:
OIDC - OpenID Connect - Application type:
Web Application
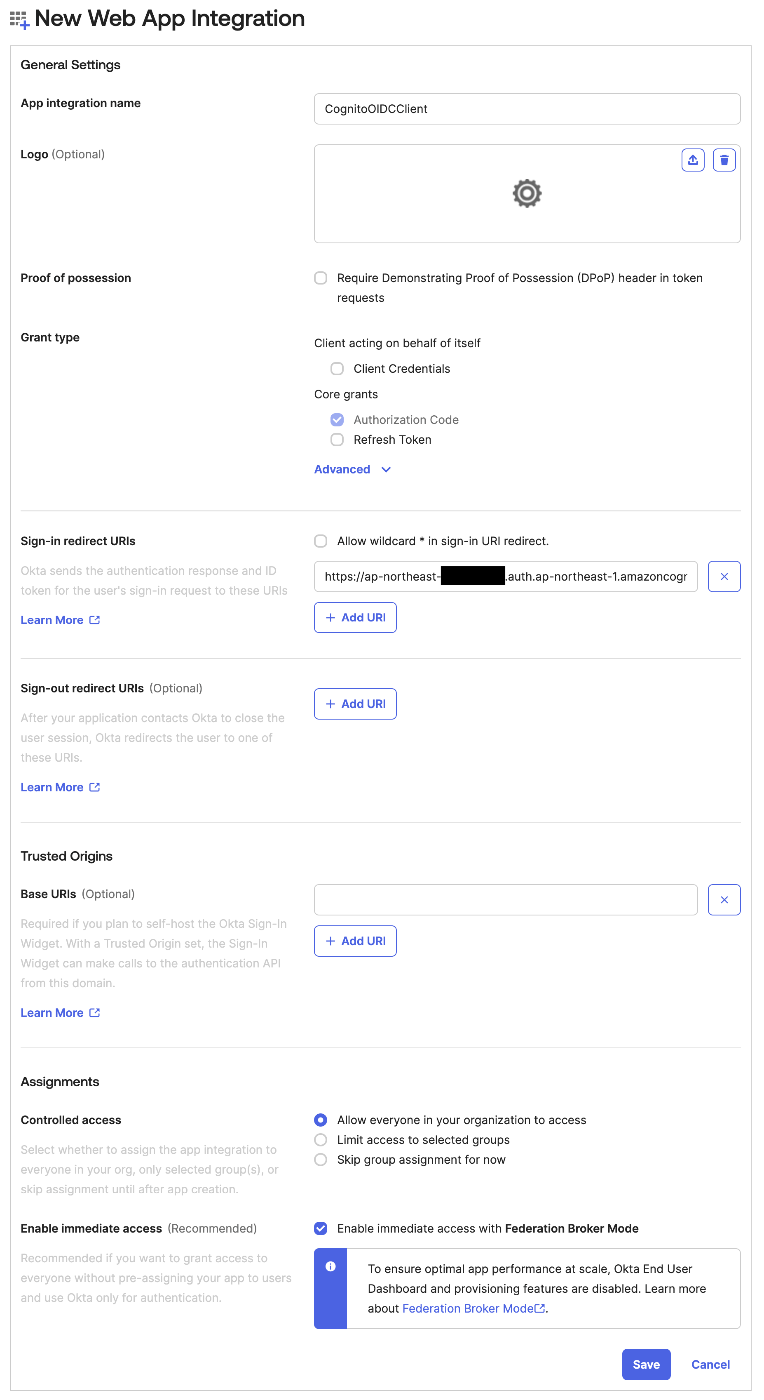
以下を入力して保存します。
- Sign-in redirect URIs[3]:
https://mydomain.us-east-1.amazoncognito.com/oauth2/idpresponse - Sign-out redirect URIs(Optional):今回は使用しないので❌ボタンで削除
- Controlled access:
Allow everyone in your organization to access
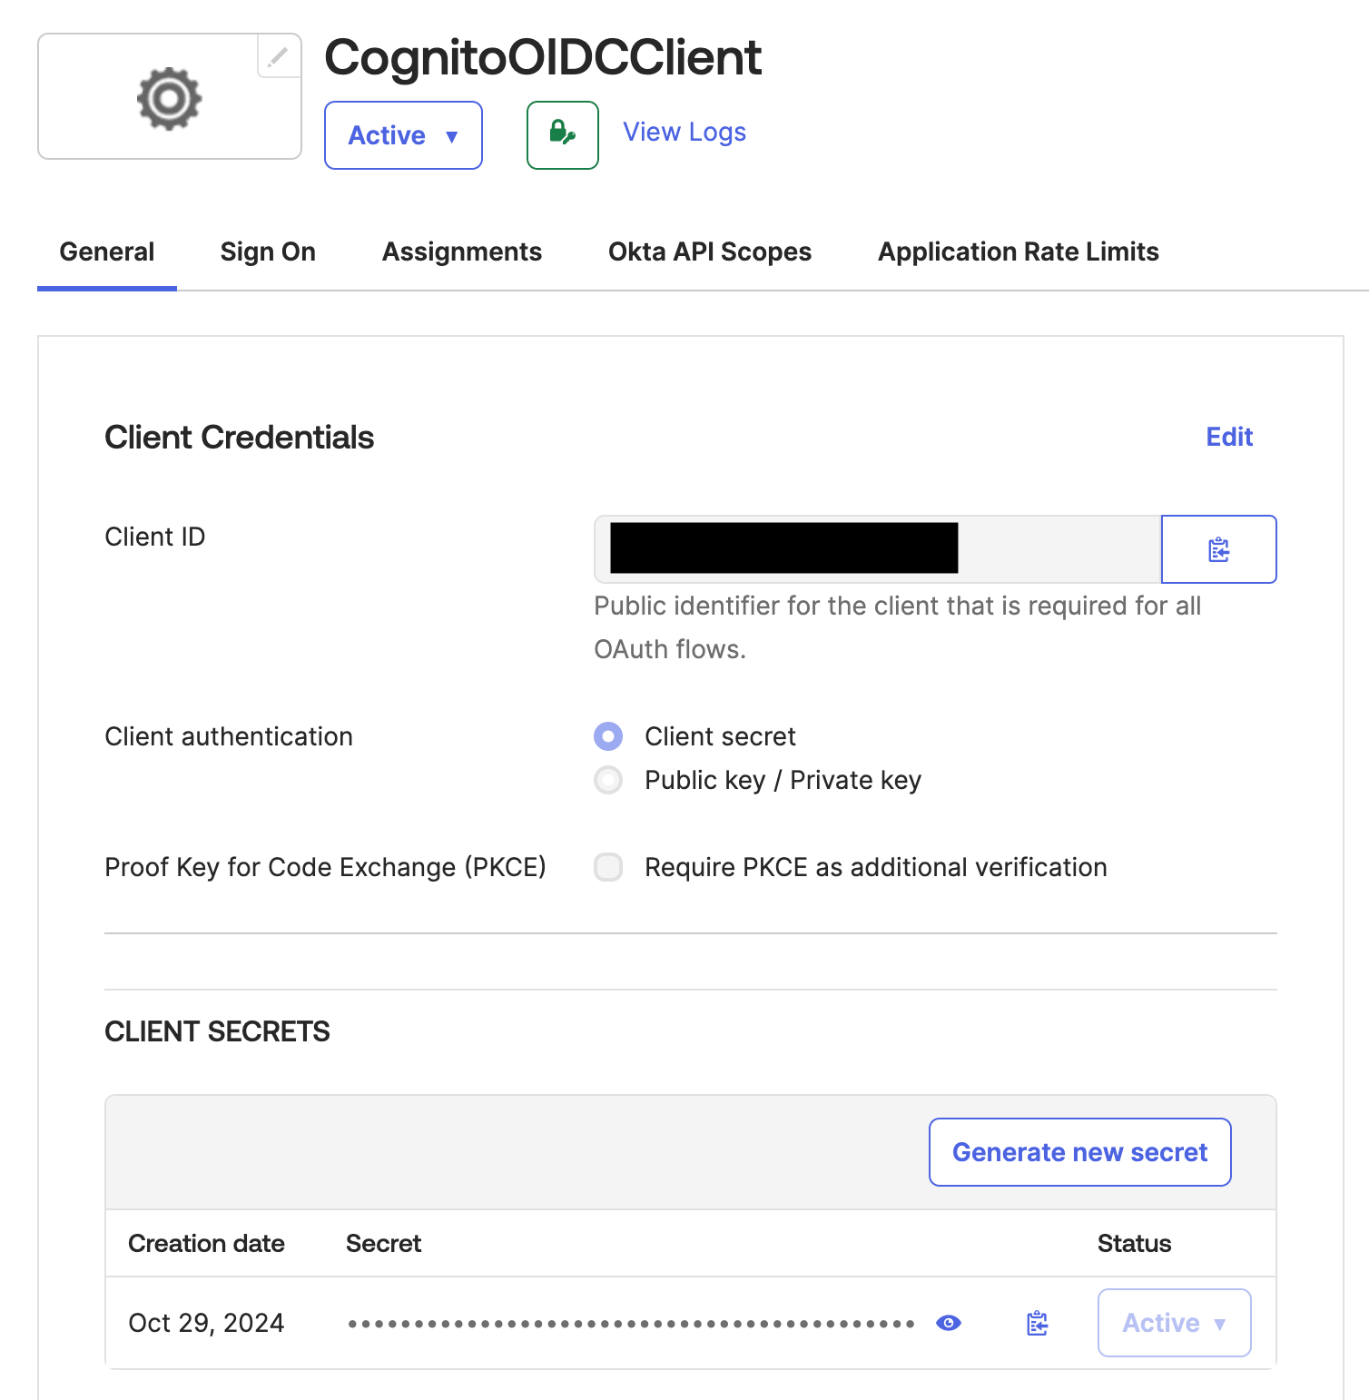
Oktaダッシュボードの Applications > Applicationsにて、作成したアプリケーションを選択すると、詳細を閲覧できます。なお、Client ID, Client Secretは、次のステップ「OktaをIdPとして設定」にて使用します。
Cognitoの設定
OktaをIdPとして設定
続いて、Cognitoコンソール画面にて、OktaをIdPとして設定します。 Authentication > Social and external providers を選択し、Add identity providerを押下します。

以下を入力し、保存します。
- Identity provider:
OpenID Connect(OIDC) - Client ID:
<Oktaで作成したアプリケーションのClient ID> - Client Secret:
<Oktaで作成したアプリケーションのClient Secret> - Authorized scopes:
openid profile email - Issuer URL:
<Okta Org authorization server の Discovery endpoint(https://{yourOktaOrg}/.well-known/openid-configuration) から返却されたissuer>[4]

Cognito Hosted-UIの設定
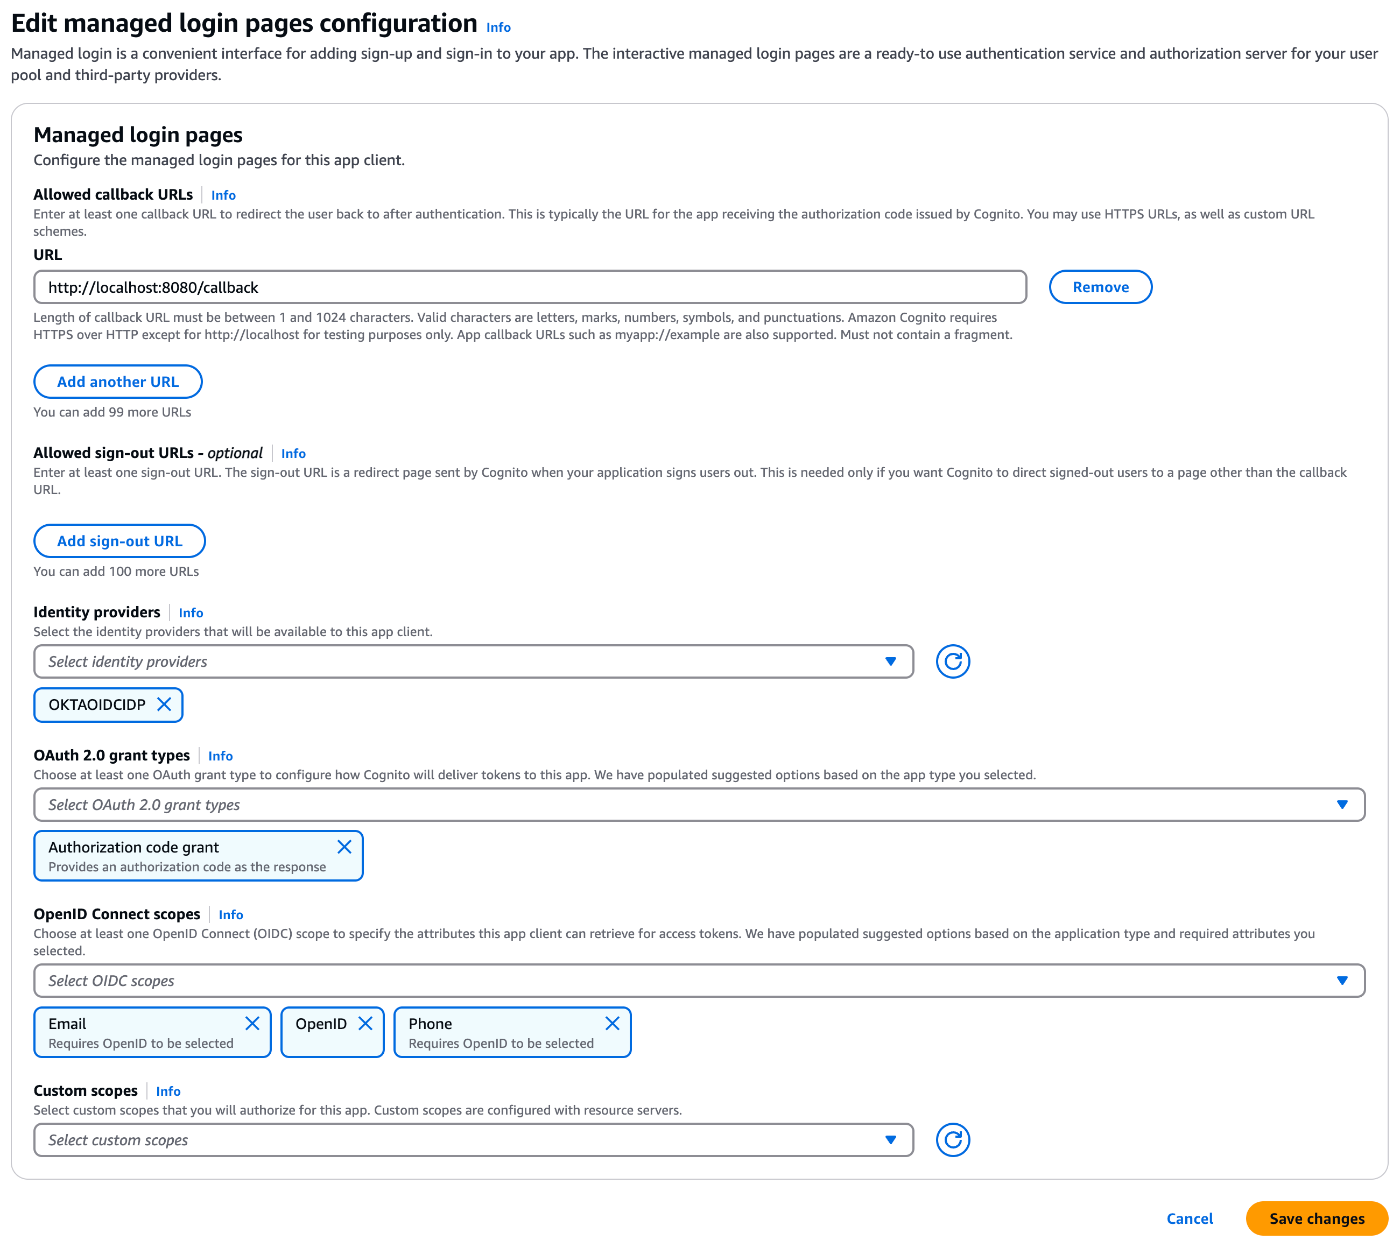
Applications > App clientsから最初に作成したアプリケーションを選択します。Login pagesタブのEditを押下します。

以下を設定し、保存します。
- Allowed callback URLs:
http://localhost:8080/callback - Identity providers:
<前ステップで作成したIdP> - OAuth 2.0 grant types:
Authorization code grant
PKCEを使用した認可コードフローを実装
最後に、PKCEを使用した認可コードフローを実装し、ローカルサーバを立てます。実装は、弊社の主な技術スタックの一つであるGoで行いました。
使用したコード
Amazon Cognitoコンソールの Applications > App client > Quick setup guideに記載のGoサンプルコードをベースに、こんな感じで実装しています。
package main

import (
	"context"
	"crypto/sha256"
	"encoding/base64"
	"fmt"
	"html/template"
	"log"
	"math/rand"
	"net/http"
	"time"

	"github.com/coreos/go-oidc"
	"github.com/golang-jwt/jwt/v4"
	"golang.org/x/oauth2"
)

type ClaimsPage struct {
	AccessToken string
	Claims      jwt.MapClaims
}

var (
	clientID      = "<Cognito App Client ID>"
	clientSecret  = "<Cognito App Client Secret>"
	redirectURL   = "http://localhost:8080/callback" // Cognito Hosted-UIに設定したcallback URLと一致させる
	issuerURL     = "https://cognito-idp.ap-northeast-1.amazonaws.com/<Cognito User pool ID>"
	provider      *oidc.Provider
	oauth2Config  oauth2.Config
	codeVerifier  string
	codeChallenge string
)

func init() {
	// Initialize OIDC provider
	provider, err := oidc.NewProvider(context.Background(), issuerURL)
	if err != nil {
		log.Fatalf("Failed to create OIDC provider: %v", err)
	}

	// Set up OAuth2 config
	oauth2Config = oauth2.Config{
		ClientID:     clientID,
		ClientSecret: clientSecret,
		RedirectURL:  redirectURL,
		Endpoint:     provider.Endpoint(),
		Scopes:       []string{oidc.ScopeOpenID, "phone", "openid", "email"},
	}
}

func main() {
	http.HandleFunc("/", handleHome)
	http.HandleFunc("/login", handleLogin)
	http.HandleFunc("/callback", handleCallback)
	log.Fatal(http.ListenAndServe(":8080", nil))
}

func handleHome(w http.ResponseWriter, r *http.Request) {
	html := `
        <html>
        <body>
            <h1>Welcome to Cognito OIDC Go App</h1>
            <a href="/login">Login with Cognito</a>
        </body>
        </html>`
	fmt.Fprint(w, html)
}

func handleLogin(writer http.ResponseWriter, request *http.Request) {
	// Generate code_verifier, code_challenge
	codeVerifier = generateRandomString(43)
	codeChallenge = generateCodeChallenge(codeVerifier)

	state := generateRandomString(16)
	http.SetCookie(writer, &http.Cookie{
		Name:  "oauth_state",
		Value: state,
		Path:  "/",
	})

	url := oauth2Config.AuthCodeURL(state, oauth2.AccessTypeOffline, oauth2.SetAuthURLParam("code_challenge", codeChallenge), oauth2.SetAuthURLParam("code_challenge_method", "S256"))
	http.Redirect(writer, request, url, http.StatusFound)
}

func handleCallback(writer http.ResponseWriter, request *http.Request) {
	ctx := context.Background()
	code := request.URL.Query().Get("code")
	state := request.URL.Query().Get("state")

	// Retrieve the state from the cookie
	cookie, err := request.Cookie("oauth_state")
	if err != nil {
		http.Error(writer, "State cookie not found", http.StatusBadRequest)
		return
	}

	// Validate the state
	if cookie.Value != state {
		http.Error(writer, "Invalid state", http.StatusBadRequest)
		return
	}

	// Exchange the authorization code for a token
	rawToken, err := oauth2Config.Exchange(ctx, code, oauth2.SetAuthURLParam("code_verifier", codeVerifier))
	if err != nil {
		http.Error(writer, "Failed to exchange token: "+err.Error(), http.StatusInternalServerError)
		return
	}
	tokenString := rawToken.AccessToken

	// Parse the token (do signature verification for your use case in production)
	p := &jwt.Parser{}
	token, _, err := p.ParseUnverified(tokenString, jwt.MapClaims{})
	if err != nil {
		http.Error(writer, "Error parsing token: "+err.Error(), http.StatusBadRequest)
		return
	}

	// Check if the token is valid and extract claims
	claims, ok := token.Claims.(jwt.MapClaims)
	if !ok {
		http.Error(writer, "Invalid claims", http.StatusBadRequest)
		return
	}

	// Prepare data for rendering the template
	pageData := ClaimsPage{
		AccessToken: tokenString,
		Claims:      claims,
	}

	// Define the HTML template
	tmpl := `
    <html>
        <body>
            <h1>User Information</h1>
            <h1>JWT Claims</h1>
            <p><strong>Access Token:</strong> {{.AccessToken}}</p>
            <ul>
                {{range $key, $value := .Claims}}
                    <li><strong>{{$key}}:</strong> {{$value}}</li>
                {{end}}
            </ul>
        </body>
    </html>`

	// Parse and execute the template
	t := template.Must(template.New("claims").Parse(tmpl))
	t.Execute(writer, pageData)
}

func generateRandomString(length int) string {
	const charset = "abcdefghijklmnopqrstuvwxyzABCDEFGHIJKLMNOPQRSTUVWXYZ0123456789-._~"
	seed := time.Now().UnixNano()
	r := rand.New(rand.NewSource(seed))
	b := make([]byte, length)
	for i := range b {
		b[i] = charset[r.Intn(len(charset))]
	}
	return string(b)
}

func generateCodeChallenge(codeVerifier string) string {
	hash := sha256.Sum256([]byte(codeVerifier))
	return base64.RawURLEncoding.EncodeToString(hash[:])
}
サンプルコードへ追記・削除したコードの概要
- PKCEに必要なcode verifier, code challengeに関する処理の追記
- stateをランダム文字列にする処理の追記
- サンプルコードのうち、logout関連のコードは今回の記事では使用しないので削除
実行結果
まずは、実装したhttp://localhost:8080を立ち上げ、リンクLogin with Cognitoを押下します。

Cognitoのログイン画面に遷移するので、Continue with <IdP name>を選択し、Oktaアカウントでログインします。

Oktaへログイン後、無事コールバックURLとして設定したhttp://localhost:8080/callback へ遷移しました。
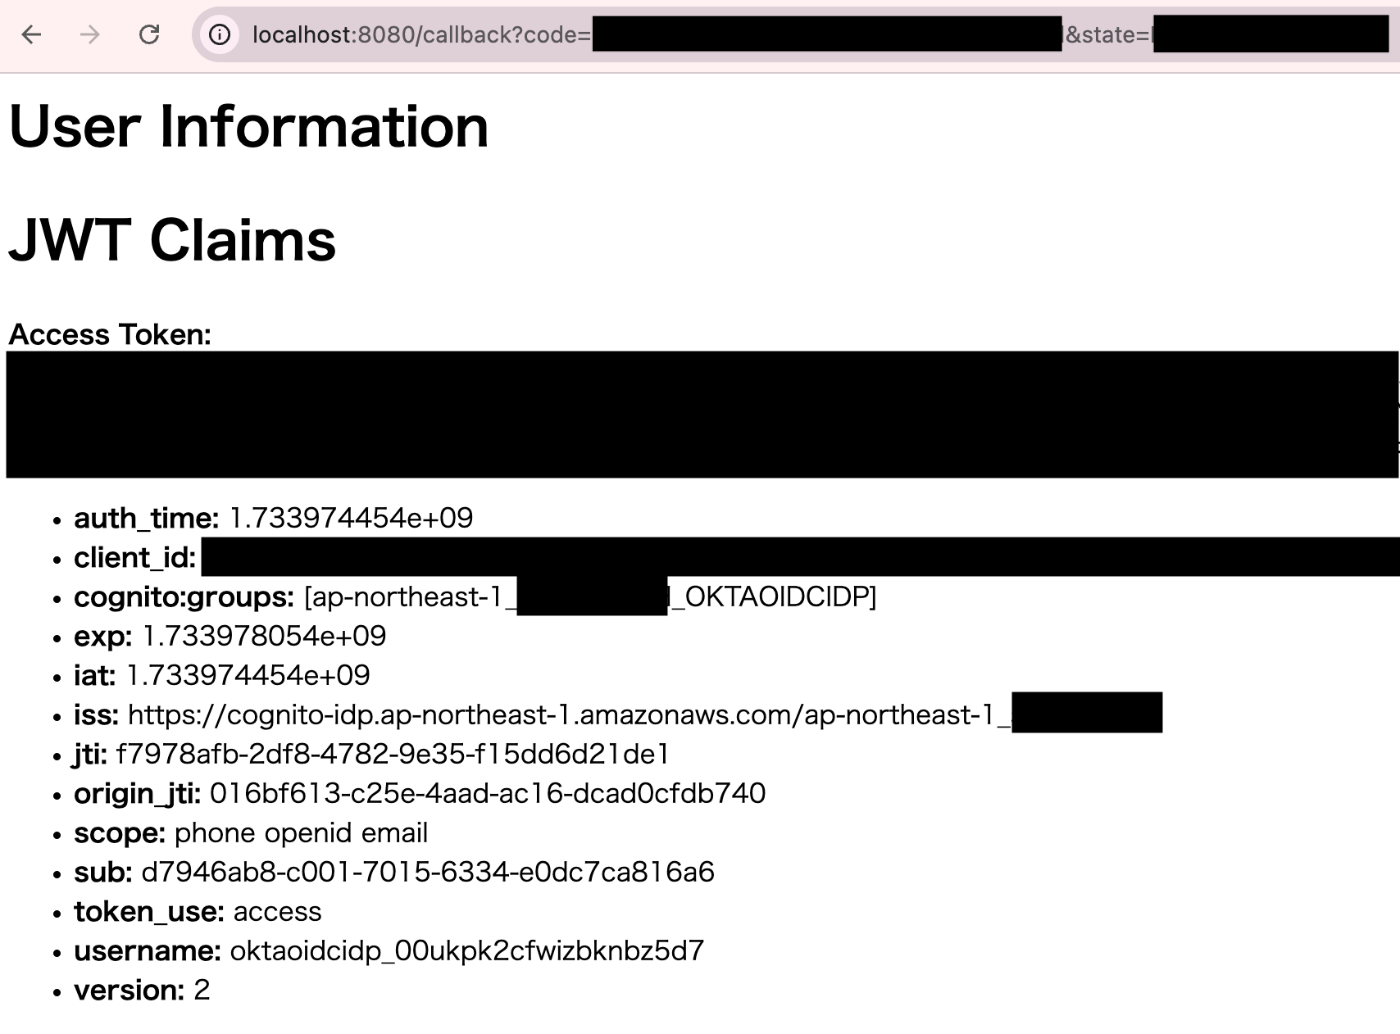
Cognitoのユーザープールでは、該当ユーザーが作成されていることが確認できました。

おわりに
OktaとCognito Hosted-UIを使ったSSOの実装方法を紹介しました。
今回の実装はかなり簡易的なので、これから最終目的である「自社サービスで利用する管理画面」への適用に向けて手を加えていく予定です。最後までご覧いただきありがとうございました!
参考文献
-
IDやパスワードの管理、認証を行うクラウド型IDaaSサービス。 ↩︎
-
AWSが提供する、Web・モバイルアプリ用のアイデンティティプラットフォーム ↩︎
-
https://docs.aws.amazon.com/ja_jp/cognito/latest/developerguide/cognito-user-pools-oidc-idp.html#cognito-user-pools-oidc-idp-step-1 2. 参照 ↩︎
-
https://developer.okta.com/docs/concepts/auth-servers/#discovery-endpoints-org-authorization-servers 参照 ↩︎
Discussion