Next.js で認証機能 NextAuth を試してみる
Next.js で認証機能をSSR (Server Side Rendering) で実装する場合、NextAuth.js というライブラリが良さそうなので少し動作確認してみました。
実行環境
- Next.js バージョン 12.2.4
- NextAuth.js バージョン 4.10.3
動作確認
1. プロジェクトを作成
% npx create-next-app NextAuth-starter --typescript
% cd NextAuth-starter
2. NextAuth のインストール
% npm install next-auth
メール認証も試すため、必要なライブラリをインストールします。
今回、アダプタは Prisma、データベースは sqlite を選択しました。
% npm install nodemailer sqlite3 prisma @prisma/client @next-auth/prisma-adapter
3. 認証用データベースの準備
認証用データベースを使えるように設定してきます。
まず、prisma を初期化します。
% npx prisma init
.env と prisma/schema.prisma ファイルが生成するので、下記を参考にスキーマファイルなどを記載します。
https://next-auth.js.org/adapters/prisma
なお、sqlite では属性 @db.Text はエラーになるため外します。
sqlite のデータベースファイル名は、nextauth.db とします。
DATABASE_URL="file:./nextauth.db"
generator client {
  provider = "prisma-client-js"
}

datasource db {
  provider = "sqlite"
  url      = env("DATABASE_URL")
}

model Account {
  id                 String  @id @default(cuid())
  userId             String
  type               String
  provider           String
  providerAccountId  String
  refresh_token      String?
  access_token       String?
  expires_at         Int?
  token_type         String?
  scope              String?
  id_token           String?
  session_state      String?

  user User @relation(fields: [userId], references: [id], onDelete: Cascade)

  @@unique([provider, providerAccountId])
}

model Session {
  id           String   @id @default(cuid())
  sessionToken String   @unique
  userId       String
  expires      DateTime
  user         User     @relation(fields: [userId], references: [id], onDelete: Cascade)
}

model User {
  id            String    @id @default(cuid())
  name          String?
  email         String?   @unique
  emailVerified DateTime?
  image         String?
  accounts      Account[]
  sessions      Session[]
}

model VerificationToken {
  identifier String
  token      String   @unique
  expires    DateTime

  @@unique([identifier, token])
}
データベースのマイグレーションを実行します。
% npx prisma migrate dev
Prisma Studio を立ち上げると、データベースが作成されているのが確認できます。
% npx prisma studio
Environment variables loaded from .env
Prisma schema loaded from prisma\schema.prisma
Prisma Studio is up on http://localhost:5555
4. SMTP Server エミュレータの作成
次にメール認証用の SMTP Server のエミュレータを Python で作成します。
% pip install aiosmtpd
from aiosmtpd.controller import Controller
import sys
import quopri

class SMTPHandler:
    async def handle_DATA(self, server, session, envelope):
        print('Message from %s' % envelope.mail_from)
        print('Message to %s' % envelope.rcpt_tos)
        print('Message data:\n')
        for ln in envelope.content.decode('utf8', errors='replace').splitlines():
            ln = quopri.decodestring(ln)
            print(f'> {ln}'.strip())
        print()
        print('End of message')
        return '250 Message accepted for delivery'

if __name__ == '__main__':
    controller = Controller(handler=SMTPHandler(), hostname='127.0.0.1', port=8025)
    controller.start()
    try:
        input('Press enter to Exit\n')
    except SyntaxError:
        controller.stop()
        sys.exit(0)
% python py/smtp-server.py
5. プロジェクトファイル
NextAuth のマニュアルに沿ってメール認証と Github の OAuth による認証を設定します。
なお、Github の ID, SECRET の取得方法は割愛します。
.env に環境変数を設定します。
SMTP_HOST=127.0.0.1
SMTP_PORT=8025
SMTP_FROM=noreply@hoge.com

NEXTAUTH_URL=http://localhost:3000
NEXTAUTH_SECRET=(適当にシークレットキーを設定)

GITHUB_ID=(GIT HUBで生成したIDを設定)
GITHUB_SECRET=(GIT HUBで生成したSECRETを設定)
Component にセッションプロバイダを設定します。
import '../styles/globals.css';
import type { AppProps } from 'next/app';
import { SessionProvider } from 'next-auth/react';

function MyApp({ Component, pageProps: { session, ...pageProps } }: AppProps) {
    return (
        <SessionProvider session={session}>
            <Component {...pageProps} />
        </SessionProvider>
    );
}

export default MyApp;
Home にログインボタンとログアウトボタンを設置します。
import type { NextPage } from 'next';
import { signIn, signOut, useSession } from 'next-auth/react';

const Home: NextPage = () => {
    const { data: session, status } = useSession();

    if (status === 'authenticated') {
        return (
            <div>
                <p>Signed in as {session.user!.email}</p>
                <p>Expires: {session.expires}</p>
                <button onClick={() => signOut()}>Sign out</button>
            </div>
        );
    } else {
        return (
            <div>
                <p>Not signed in</p>
                <button onClick={() => signIn()}>Sign in</button>
            </div>
        );
    }
};

export default Home;
認証機能を実装します。
認証方式は、データベースプロバイダを設定しない場合はデフォルトでステートレスの JWT (Json Web Token) 認証が選択され、データベースプロバイダを設定することでステートフルのセッション認証が選択されます。strategy の設定により Github などの OAuth 認証は JWT 認証セッション認証を選択できますが、メール認証はセッション認証のみとなるためデータベースプロバイダを設定する必要があります。
import NextAuth, { NextAuthOptions } from 'next-auth';
import { PrismaAdapter } from '@next-auth/prisma-adapter';
import { PrismaClient } from '@prisma/client';
import EmailProvider from 'next-auth/providers/email';
import GithubProvider from 'next-auth/providers/github';

const prisma = new PrismaClient();

export const authOptions: NextAuthOptions = {
    debug: true,
    session: {
        strategy: 'database',
        maxAge: 60 * 60 * 24, // 24 hours
    },
    adapter: PrismaAdapter(prisma),
    // Configure one or more authentication providers
    providers: [
        EmailProvider({
            server: {
                host: process.env.SMTP_HOST,
                port: process.env.SMTP_PORT,
                secure: false,
            },
            from: process.env.SMTP_FROM,
        }),
        GithubProvider({
            clientId: process.env.GITHUB_ID ?? '',
            clientSecret: process.env.GITHUB_SECRET ?? '',
        }),
    ],
};

export default NextAuth(authOptions);
6. 動作確認
ホーム画面

サインインボタンを押すと、NextAuth のログイン画面が表示されます。

メールを入力すると事前に立ち上げておいた SMTP Server エミュレータにメールが飛んでくるため、メールに記載された URL にアクセスしてメール認証を行います。
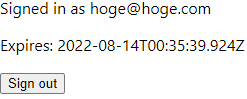
Github の OAuth 認証は記載割愛しますが、問題なく認証できました。
7. まとめ
以上、非常に簡単に認証機能を実装できました。Next.js の API 対応や認証メールやログインページのカスタマイズも出来るようなので、次回の実装時には積極的に組み込んでいこうと思いました。
今回検証したコードはこちらに置いておきます。
https://github.com/Fehde/NextAuth-starter.git
参考
https://zenn.dev/furai_mountain/articles/b54c83f3dd4558
https://tech.mof-mof.co.jp/blog/next-auth-intro/
Discussion