【Flutter Widget of the Week #3】Wrapを使ってみた
はじめに
Flutter Widget of the Week #3 Wrap についてまとめましたので、紹介します。
Wrapとは
Flutter でレイアウトをするときに便利な Widget である Row や Column ですが、画面の大きさを超えるほど多くの Widget を並べると超えた分は見切れてしまうことがあります。
そんなときに便利な Widget が今回紹介する Wrap です。 Wrap の和訳に「折り返し」とあるようにスペースがなくなったら次の行に折り返ししてくれます。
使い方も Row や Column と同じように Children Widget を配置すれば良いだけなので簡単。
以下で実際に使ってみましょう。
Wrap なしの場合
まずは Wrap を使わず Row だけで実行してみましょう。
class NoWrapSample extends StatelessWidget {
const NoWrapSample({super.key});
Widget build(BuildContext context) {
return Scaffold(
body: Container(
margin: EdgeInsets.only(top: 100),
child: Row(
children: <Widget>[
Chip(
avatar: CircleAvatar(
backgroundColor: Colors.blue.shade900,
child: const Text('AH'),
),
label: const Text('Hamilton'),
),
Chip(
avatar: CircleAvatar(
backgroundColor: Colors.blue.shade900,
child: const Text('ML'),
),
label: const Text('Lafayette'),
),
Chip(
avatar: CircleAvatar(
backgroundColor: Colors.blue.shade900,
child: const Text('HM'),
),
label: const Text('Mulligan'),
),
Chip(
avatar: CircleAvatar(
backgroundColor: Colors.blue.shade900,
child: const Text('JL'),
),
label: const Text('Laurens'),
),
],
),
),
);
}
}
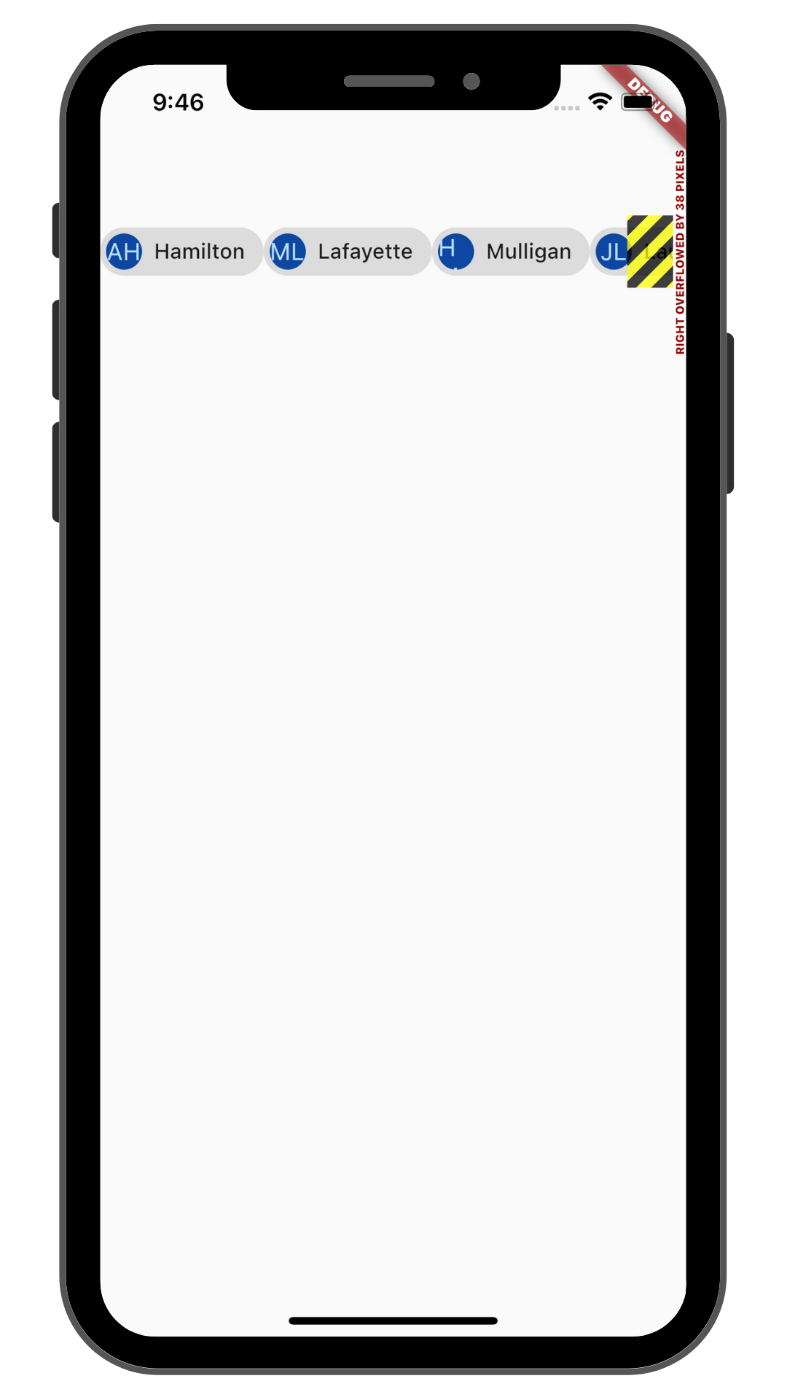
Wrapなしの場合
ご覧の通り、Row の子要素が4つ以上になるとサイズオーバーの表示がされてしまいました。
次に Row を Wrap に変えて試してみましょう。
Wrap ありの場合
class WrapSample extends StatelessWidget {
const WrapSample({super.key});
Widget build(BuildContext context) {
return Scaffold(
body: Container(
margin: EdgeInsets.only(top: 100),
child: Wrap( //←ここを Row から Wrap に変更
children: <Widget>[
Chip(
avatar: CircleAvatar(
backgroundColor: Colors.blue.shade900,
child: const Text('AH'),
),
label: const Text('Hamilton'),
),
Chip(
avatar: CircleAvatar(
backgroundColor: Colors.blue.shade900,
child: const Text('ML'),
),
label: const Text('Lafayette'),
),
Chip(
avatar: CircleAvatar(
backgroundColor: Colors.blue.shade900,
child: const Text('HM'),
),
label: const Text('Mulligan'),
),
Chip(
avatar: CircleAvatar(
backgroundColor: Colors.blue.shade900,
child: const Text('JL'),
),
label: const Text('Laurens'),
),
],
),
),
);
}
}

Wrapありの場合
Wrap を入れることでスペースがなくなったときに次の行に折り返しがされ、サイズオーバーのエラーがなくなりました。
Wrap を入れる。それだけでサイズオーバーを気にしなくて良くなる便利な Widget ですね。
Wrap のプロパティについて
Wrap にはいくつかのプロパティがありますので紹介します。
(new) Wrap Wrap({
  Key? key,
  Axis direction = Axis.horizontal,
  WrapAlignment alignment = WrapAlignment.start,
  double spacing = 0.0,
  WrapAlignment runAlignment = WrapAlignment.start,
  double runSpacing = 0.0,
  WrapCrossAlignment crossAxisAlignment = WrapCrossAlignment.start,
  TextDirection? textDirection,
  VerticalDirection verticalDirection = VerticalDirection.down,
  Clip clipBehavior = Clip.none,
  List<Widget> children = const <Widget>[],
})
alignment
子要素 Widget の配置を指定するためのプロパティです。
入れられる値は WrapAlignment の列挙型として宣言されている start, center, end, spaceEvenly, spaceBetween, spaceAround などがあります。
サンプルコードはこちらが分かりやすかったため参考にさせていただきました。
class WrapSample extends StatelessWidget {
const WrapSample({super.key});
Widget build(BuildContext context) {
double width = MediaQuery.of(context).size.width * 0.25;
return Scaffold(
body: Container(
margin: EdgeInsets.only(top: 100),
child: Wrap(
alignment: WrapAlignment.start, //←ここの値を変えていく
children: <Widget>[
Container(
width: width,
height: width,
color: Colors.blue,
),
Container(
width: width,
height: width,
color: Colors.green,
),
Container(
width: width,
height: width,
color: Colors.red,
),
Container(
width: width,
height: width,
color: Colors.orange,
),
Container(
width: width,
height: width,
color: Colors.yellow,
),
Container(
width: width,
height: width,
color: Colors.deepPurple,
),
],
),
),
);
}
}
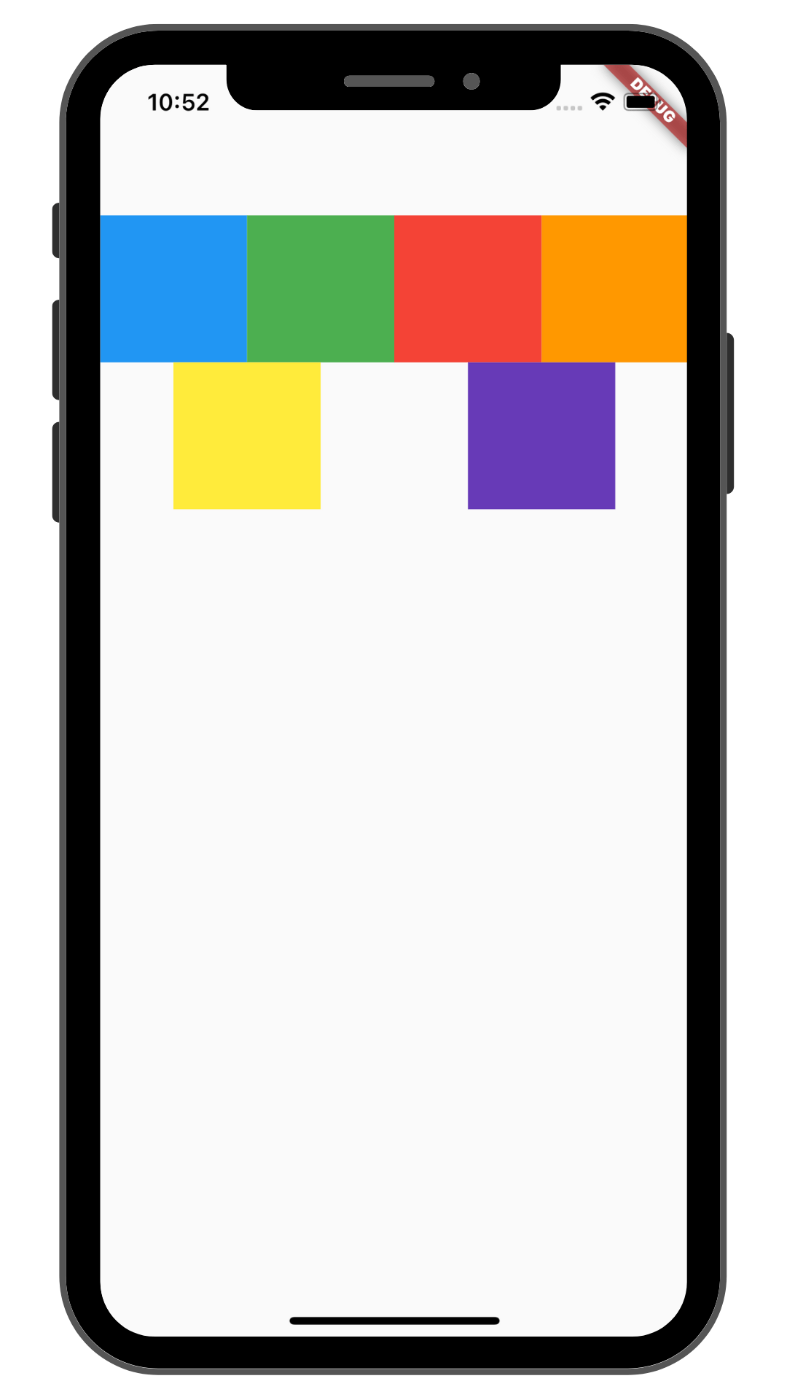
wrapAlignment.start の場合(デフォルト)
開始位置に寄せて配置する
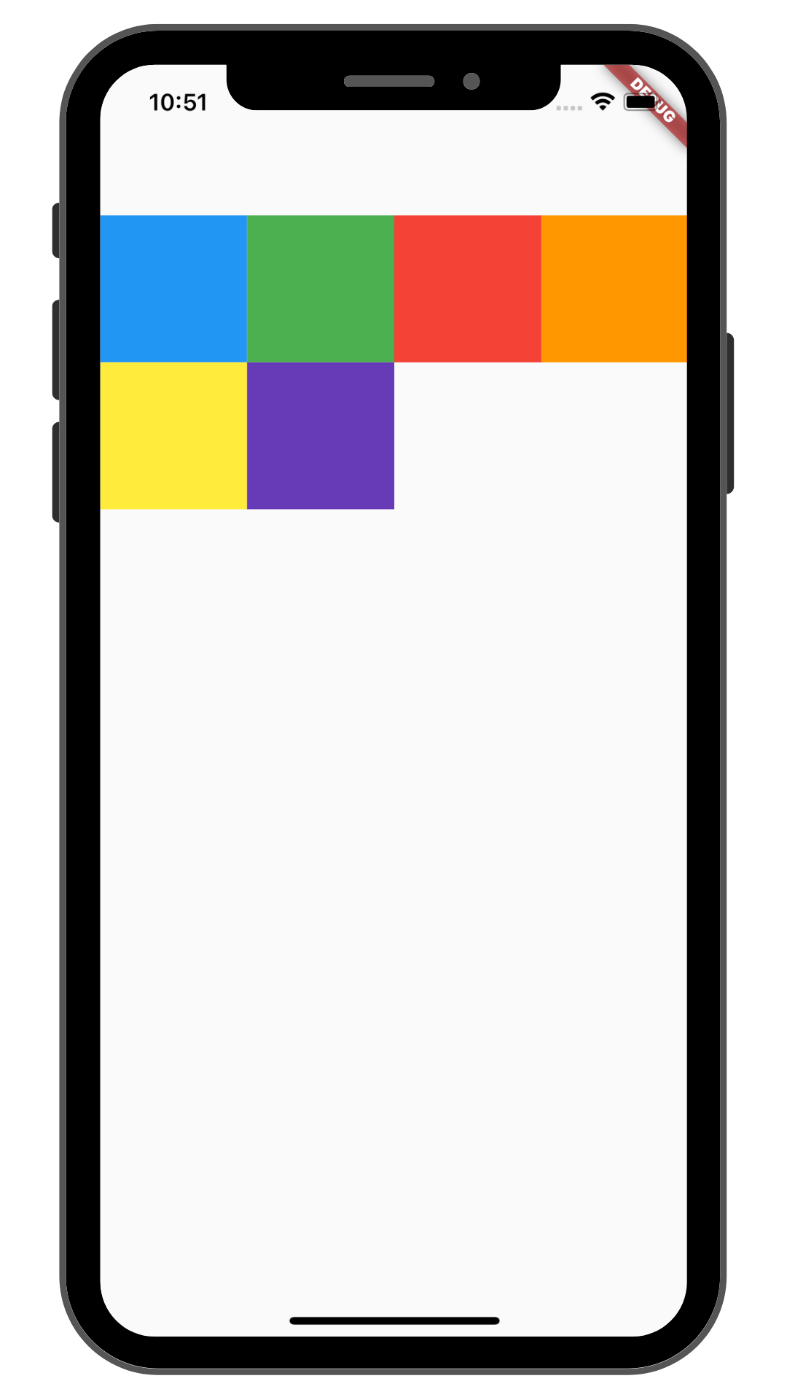
wrapAlignment.start の場合
wrapAlignment.center の場合
中央に寄せて配置する

wrapAlignment.center の場合
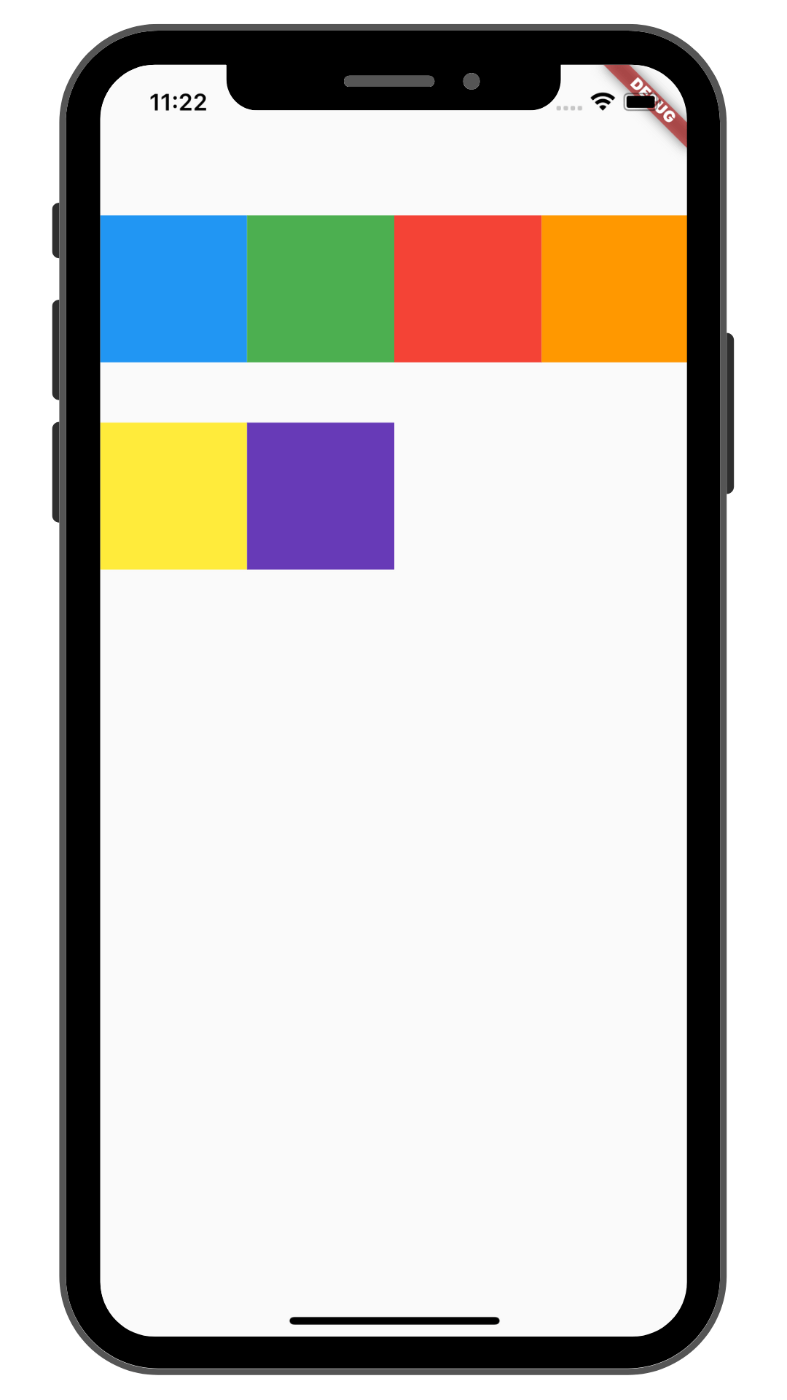
wrapAlignment.end の場合
終了位置に寄せて配置する

wrapAlignment.end の場合
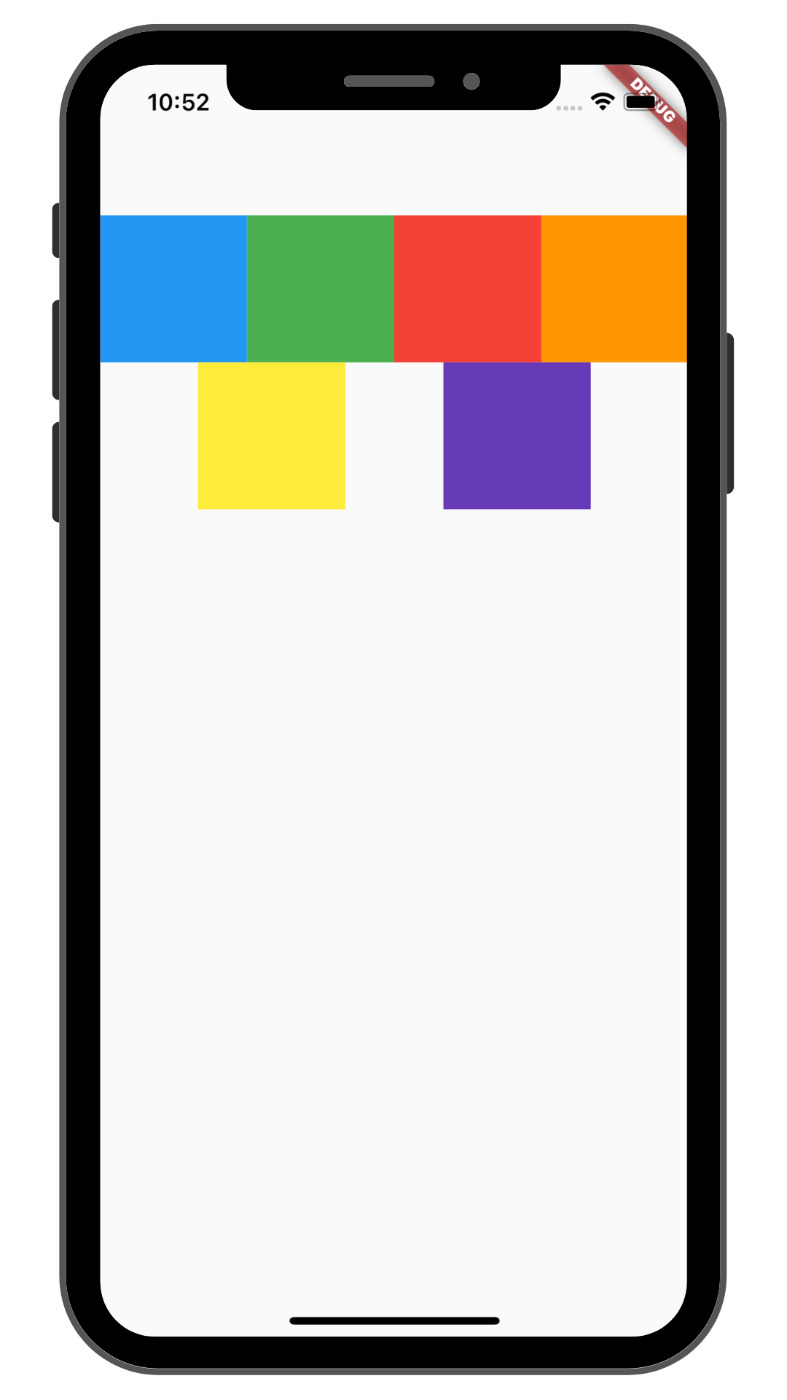
wrapAlignment.spaceEvenly の場合
開始、終了、子要素間のスペースを均等に配置する
wrapAlignment.spaceEvenly の場合
wrapAlignment.spaceBetween の場合
開始/終了位置にはスペースを設けずに、並べた子要素間のスペースが均等になるように配置する
wrapAlignment.spaceBetween の場合
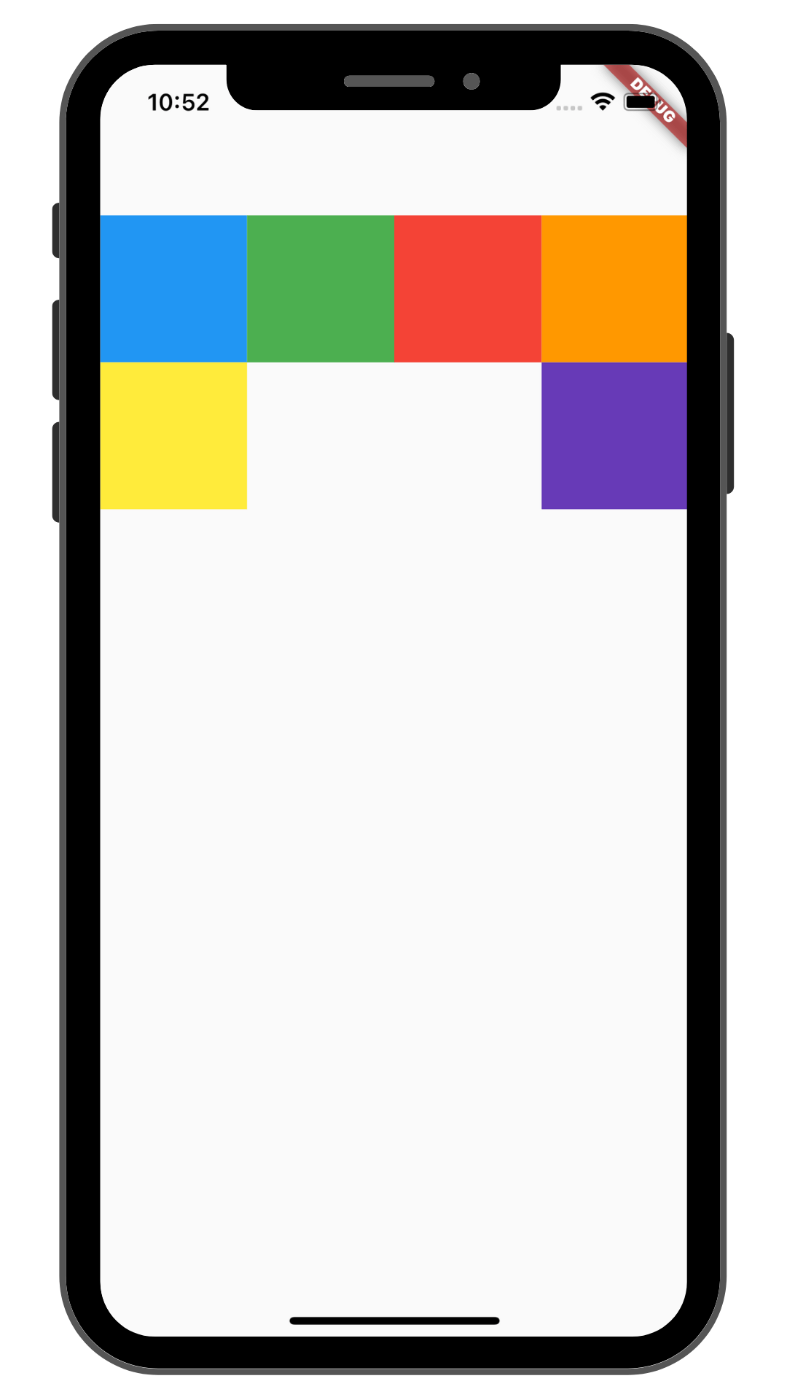
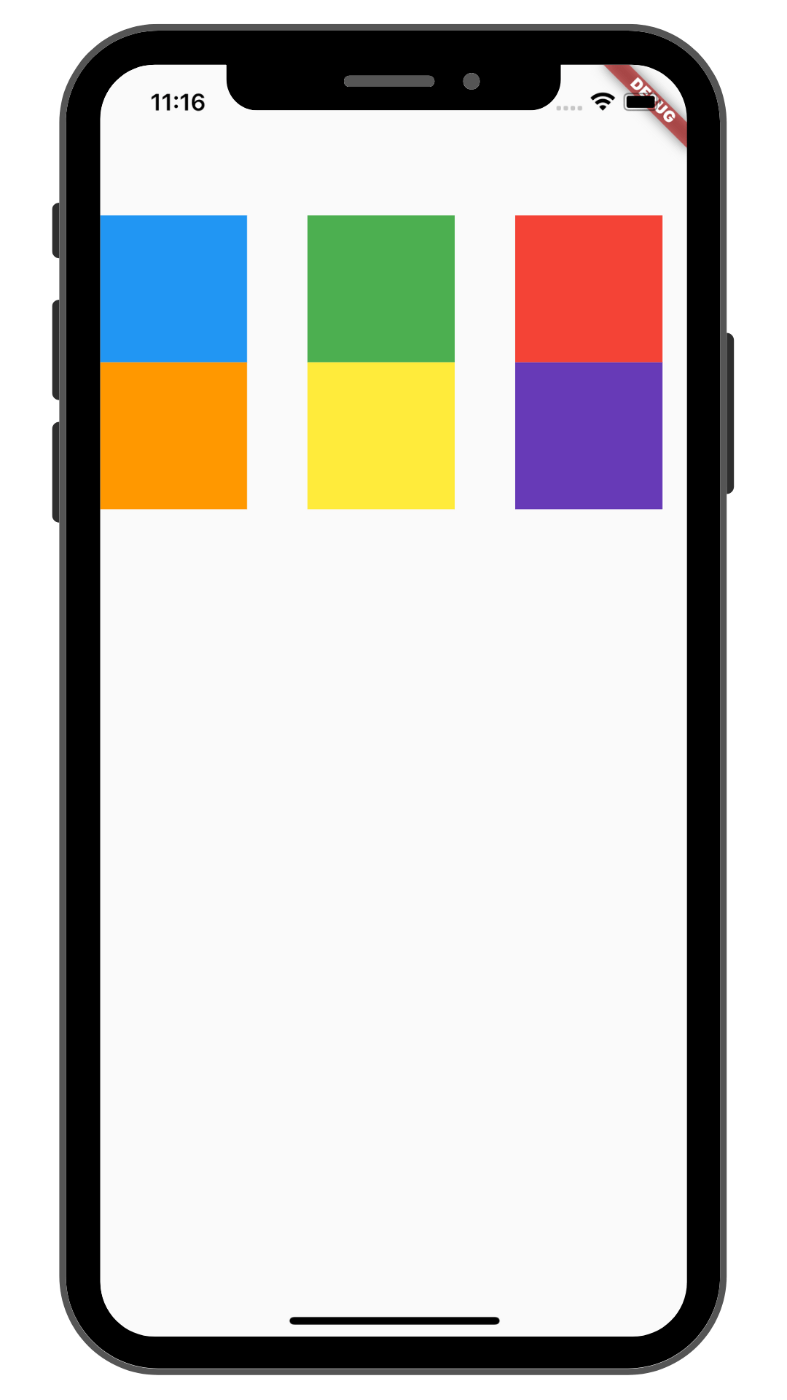
wrapAlignment.spaceAround の場合
並べた子要素間のスペースを均等に配置する
wrapAlignment.spaceAround の場合
※上記の space〜 の部分で言うスペースは微妙に異なります。本記事では説明しませんが、気になる人は以下が分かりやすかったので見てみてください。
spacing
子要素 Widget 間のスペースの大きさを指定するためのプロパティです。
入れる値は数値です。
class WrapSample extends StatelessWidget {
const WrapSample({super.key});
Widget build(BuildContext context) {
double width = MediaQuery.of(context).size.width * 0.25;
return Scaffold(
body: Container(
margin: EdgeInsets.only(top: 100),
child: Wrap(
spacing: 40, //←ここでスペースを指定
children: <Widget>[
〜〜〜〜〜〜〜 省略 〜〜〜〜〜〜〜〜
spacing なしの場合(デフォルト)

spacing なしの場合
spacing ありの場合
spacing ありの場合
direction
主軸を. vertical(縦)と horizontal(横)どちらにするかを指定するためのプロパティです。
入れられる値は Axis の列挙型として宣言されている vertical, horizontal があります。
class WrapSample extends StatelessWidget {
const WrapSample({super.key});
Widget build(BuildContext context) {
double width = MediaQuery.of(context).size.width * 0.25;
return Scaffold(
body: Container(
margin: EdgeInsets.only(top: 100),
child: Wrap(
direction: 40, //←ここで方向を指定
children: <Widget>[
〜〜〜〜〜〜〜 省略 〜〜〜〜〜〜〜〜
horizontal の場合(デフォルト)
横方向に並べていく表示になります
horizontal の場合
vertical の場合
縦方向に並べていく表示になります
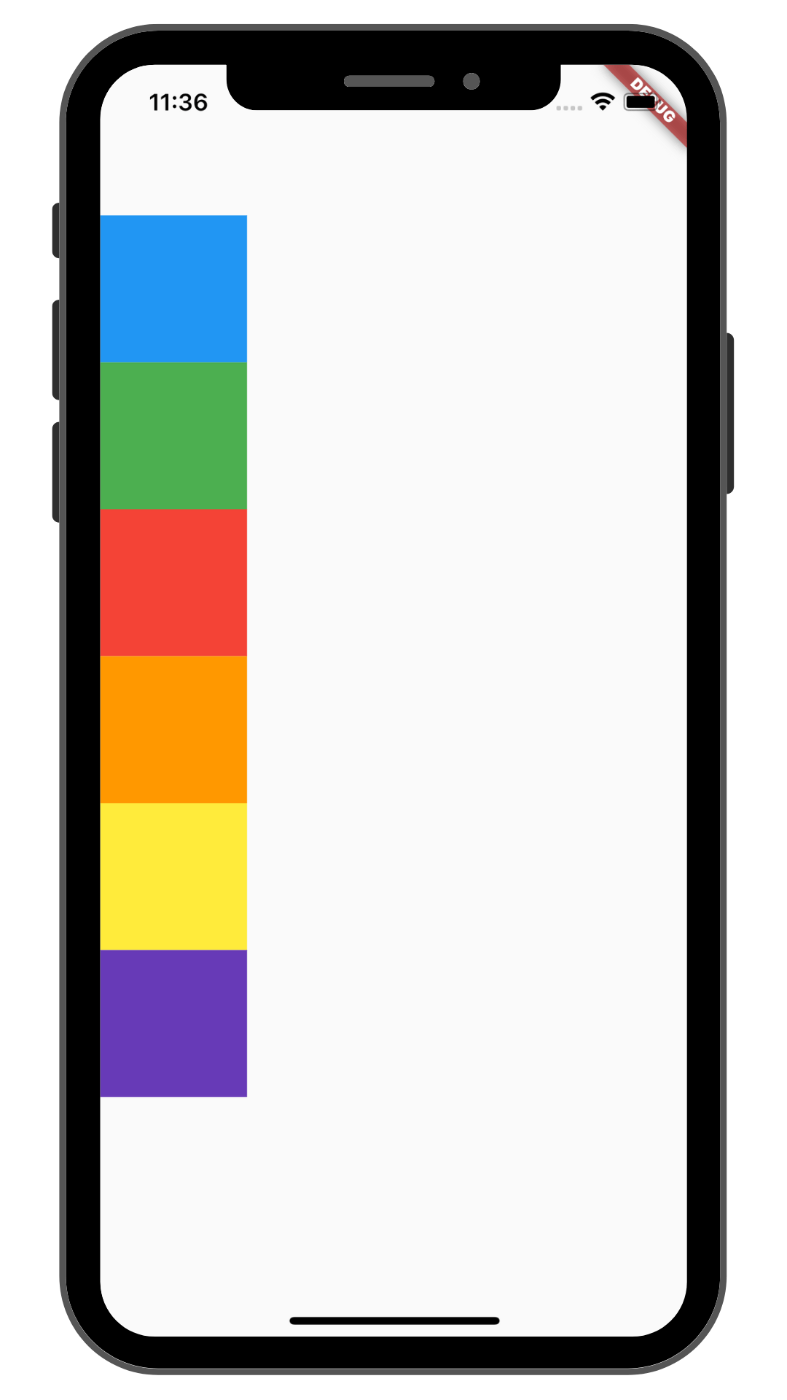
vertical の場合
runSpacing
行または列の間のスペースの大きさを指定するためのプロパティです。
入れる値は数値です。
class WrapSample extends StatelessWidget {
const WrapSample({super.key});
Widget build(BuildContext context) {
double width = MediaQuery.of(context).size.width * 0.25;
return Scaffold(
body: Container(
margin: EdgeInsets.only(top: 100),
child: Wrap(
runSpacing: 40, //←ここでスペースを指定
children: <Widget>[
〜〜〜〜〜〜〜 省略 〜〜〜〜〜〜〜〜
runSpacing なしの場合(デフォルト)
runSpacing なしの場合
runSpacing ありの場合
runSpacing ありの場合
最後に
今回は Wrap を紹介しました。サイズオーバーの対策は前回の Expanded も含めて様々です。いつかサイズオーバーの対策としてこんなときにはこれを使うというような区分けができたらと思います。
次は #4 AnimatedContainer です。またお会いしましょう。
参考記事
Discussion