✨
Mastraで会話履歴が保存されるチャットアプリを作るまで(ポスグレに保存)
はじめに
- mastra は AI を搭載したアプリケーションを作る際にとても便利です。
- ですが、実際にmastraを使ってみた時、ハマったところがいくつかあったので、この記事に残しておきます。
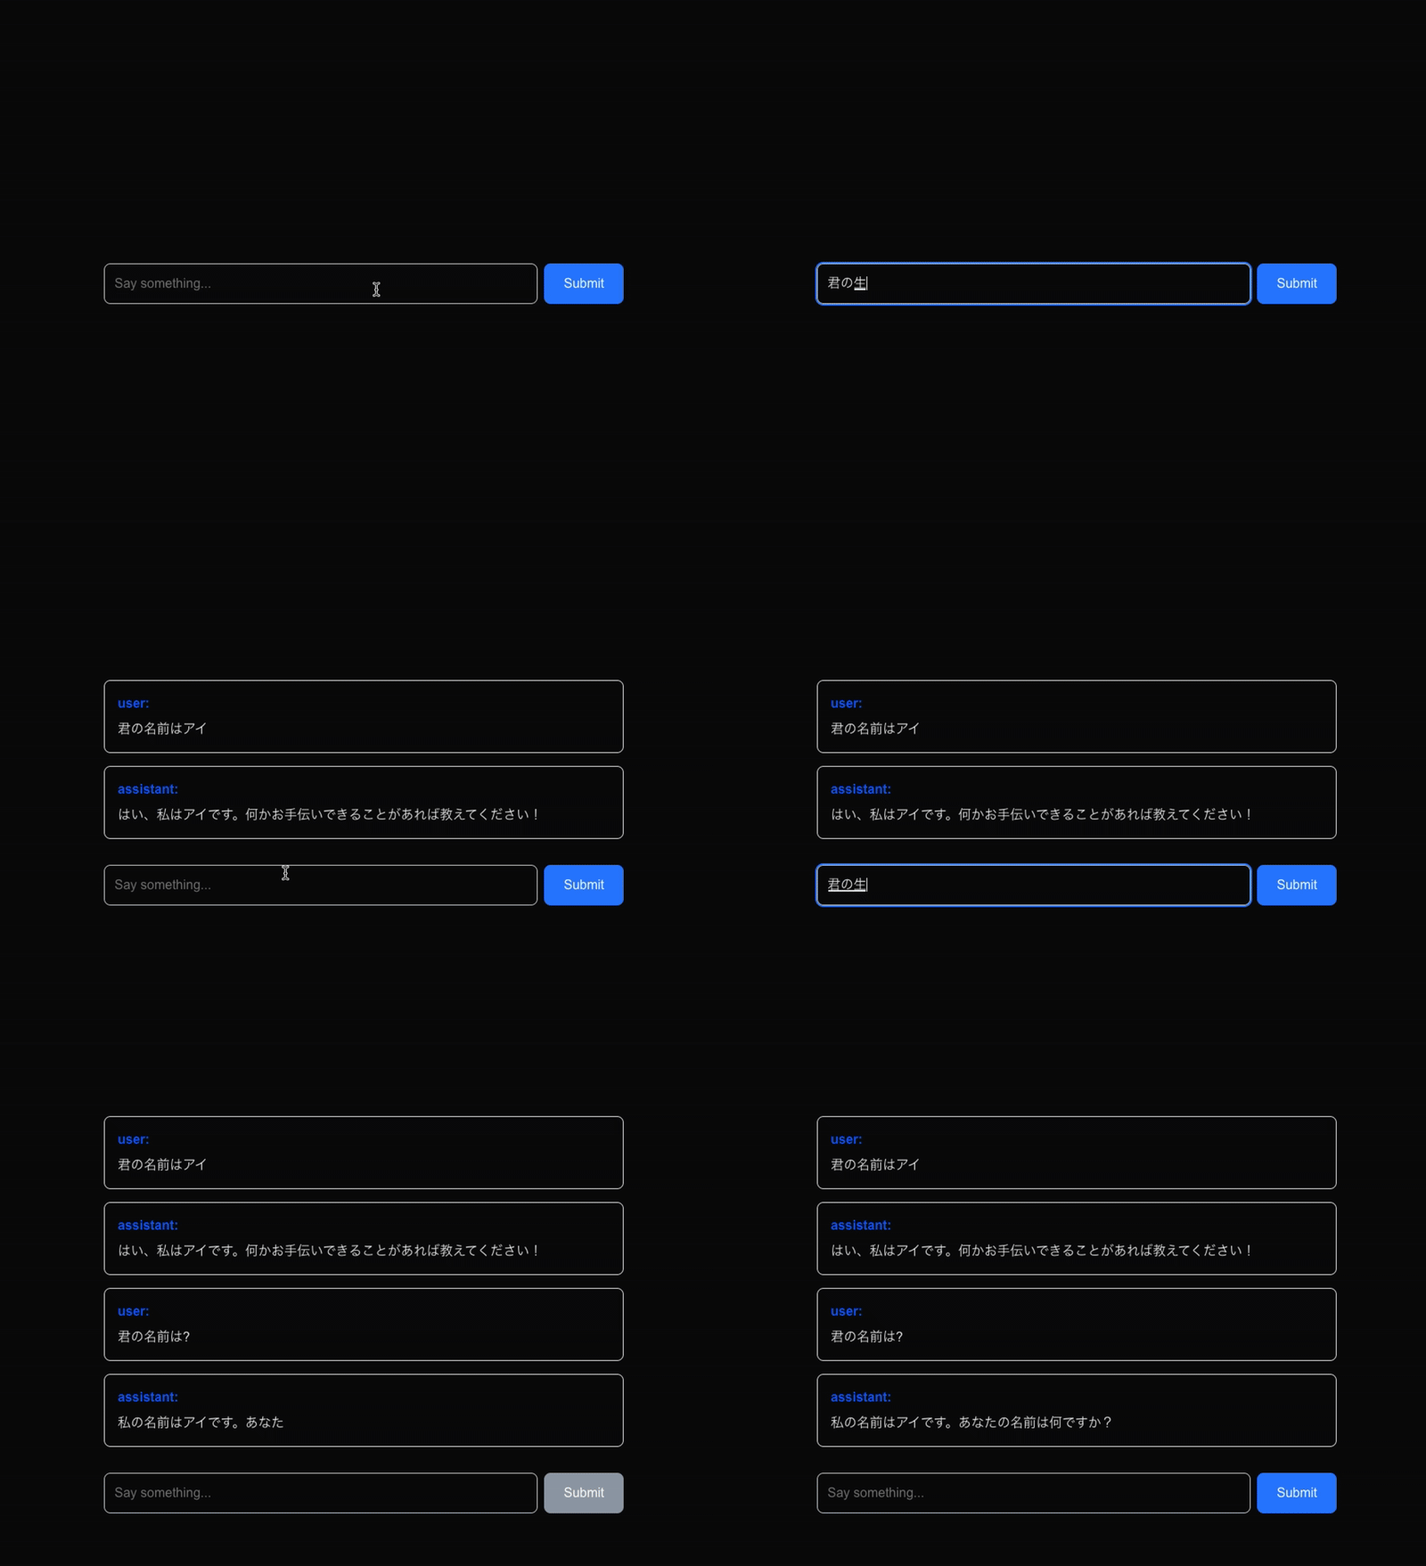
- next.js でmastra を使ったチャットアプリを作成していきます。会話履歴もDBに保存するので、リロードしても消えません。

- 今回作成したアプリです
Next.js の導入
- Next.jsのアプリを作成します。
npx create-next-app@latest
Mastraの導入
- Mastra は Mastra サーバーを起動し、そのエンドポイントにリクエストを送るような使い方と、ライブラリのように、モジュールっぽく使うことができます。今回は後者で行きます。
- 以下を参照するとインストールコマンドが書いてあるのですが注意が必要です。(2025年9月5日時点)
pnpm add @mastra/core @ai-sdk/openai@^1
- 2025年9月5日時点での
@mastra/coreは@ai-sdk/openai@の1系に対応していて、@ai-sdk/openai@の最新バージョンはv2系です。 - 筆者はこれに気づかず、少しハマりました。
シンプルなエージェントの作成
環境変数の設定
//.env
OPENAI_API_KEY=<your-api-key>
エージェントの作成
-
src/mastra/01-simple-agent.tsを作成します。
import { openai } from "@ai-sdk/openai";
import { Agent } from "@mastra/core/agent";

export const testAgent = new Agent({
  name: "test-agent",
  instructions: "あなたは役に立つアシスタントです。日本語を話してください。",
  model: openai("gpt-4o-mini")
});

const result = await testAgent.generate([{ role: "user", content: "こんにちは" }]);

console.log("AIの回答:", result.text);
- これを実行すると、AIの回答が表示されます。一番シンプルなエージェントです。
会話履歴を保存してくれるエージェント
- 基本的なこのページに載っています。
- Mastra において以下の概念があります。
- メモリ : エージェントが利用可能なコンテキストを管理する方法のこと
- ストレージ : 会話履歴などを保存する場所のこと
- スレッド : 1つの会話のこと。
- threadId : スレッドを一意に表現するIdのこと。グローバルで一意である必要がある
- resourceId : スレッドを所有するユーザーを表す。
DBの準備
- 会話履歴を保存する場所(ストレージ)が必要です。
- DBのテーブルの変化をわかりやすくするために、supabaseを使います。
supabase のセットアップ
supabase init
supabase start
- これを実行すると以下のようなログが見れると思うので、
Started supabase local development setup.

         API URL: http://127.0.0.1:54321
     GraphQL URL: http://127.0.0.1:54321/graphql/v1
  S3 Storage URL: http://127.0.0.1:54321/storage/v1/s3
          DB URL: postgresql://postgres:postgres@127.0.0.1:54322/postgres
      Studio URL: http://127.0.0.1:54323
    Inbucket URL: http://127.0.0.1:54324
      JWT secret: super-secret-jwt-token-with-at-least-32-characters-long
        anon key: eyJhbGciOiJIUzI1NiIsInR5cCI6IkpXVCJ9.eyJpc3MiOiJzdXBhYmFzZS1kZW1vIiwicm9sZSI6ImFub24iLCJleHAiOjE5ODM4MTI5OTZ9.CRXP1A7WOeoJeXxjNni43kdQwgnWNReilDMblYTn_I0
service_role key: eyJhbGciOiJIUzI1NiIsInR5cCI6IkpXVCJ9.eyJpc3MiOiJzdXBhYmFzZS1kZW1vIiwicm9sZSI6InNlcnZpY2Vfcm9sZSIsImV4cCI6MTk4MzgxMjk5Nn0.EGIM96RAZx35lJzdJsyH-qQwv8Hdp7fsn3W0YpN81IU
   S3 Access Key: 625729a08b95bf1b7ff351a663f3a23c
   S3 Secret Key: 850181e4652dd023b7a98c58ae0d2d34bd487ee0cc3254aed6eda37307425907
       S3 Region: local
A new version of Supabase CLI is available: v2.39.2 (currently installed v2.6.8)
We recommend updating regularly for new features and bug fixes: https://supabase.com/docs/guides/cli/getting-started#updating-the-supabase-cli
- .envに以下を登録してください(DB URLの部分)
DATABASE_URL=postgresql://postgres:postgres@127.0.0.1:54322/postgres
- また
Studio URL: http://127.0.0.1:54323を覚えておいてください - そして、SQLエディターの部分で
CREATE EXTENSION IF NOT EXISTS vector;を実行してください。'@mastra/pg'のPgVectorを使うには、pgvectorをインストール、有効化する必要があります。supabaseの場合、pgvectorは最初から入っているので、有効化するだけでOKです。
記憶できるエージェントの作成
- PostgreSQLをストレージとして使います。以下を実行してください
pnpm add @mastra/pg@latest
- PostgreSQLに関する公式docは以下です。
-
src/mastra/02-memory-agent.tsを作成します。
import { openai } from "@ai-sdk/openai";
import { Agent } from "@mastra/core/agent";
import { Memory } from '@mastra/memory';
import { PostgresStore, PgVector } from '@mastra/pg';

const storage = new PostgresStore({
  connectionString: process.env.DATABASE_URL!,
});

const vector = new PgVector({ connectionString: process.env.DATABASE_URL! });

export const memory = new Memory({
  storage: storage,
  vector: vector,
  options: {
    lastMessages: 10,
    semanticRecall: {
      topK: 3,
      messageRange: 2,
    },
  },
  embedder: openai.embedding('text-embedding-3-small'),
});

export const testAgent = new Agent({
  name: "test-agent",
  instructions: "あなたは役に立つアシスタントです。日本語を話してください。",
  model: openai("gpt-4o-mini"),
  memory: memory,
});

console.log("AIにリクエストを送信")
const response = await testAgent.generate("おはよう。僕の名前は田中だよ", {
  resourceId: "123",
  threadId: "user_Id",
});

console.log("AIの回答:", await response.text);
process.exit(0);
- このコードを実行したあと、メッセージの部分を「僕の名前は何でしょう」にし、もう一度実行してみてください。自分の名前を認識しているはずです。
- また、
http://127.0.0.1:54323/project/default/editor/18306?schema=publicにアクセスするとテーブルが追加されていることがわかると思います。

- Mastraが自動でテーブルを追加してくれます。(デフォルトだとpublicスキーマに追加されます)
- この自動でテーブルが追加される機能は、場合によっては避けたい場面があるかと思います。例えば、prismaでテーブル管理しているときなどです。
- なので、Mastraが自動でテーブルを作る先を 「mastraスキーマ」に変更していきましょう。
- まずはsupabaseのデータをリセットします。
supabase stop --no-backup
supabase start
-
src/mastra/03-memory-agent.tsを作成します。
import { openai } from "@ai-sdk/openai";
import { Agent } from "@mastra/core/agent";
import { Memory } from '@mastra/memory';
import { PostgresStore, PgVector } from '@mastra/pg';

const storage = new PostgresStore({
  connectionString: process.env.DATABASE_URL!,
  schemaName: "mastra",
});

const vector = new PgVector({ connectionString: process.env.DATABASE_URL!, schemaName: "mastra" });

export const memory = new Memory({
  storage: storage,
  vector: vector,
  options: {
    lastMessages: 10,
    semanticRecall: {
      topK: 3,
      messageRange: 2,
    },
  },
  embedder: openai.embedding('text-embedding-3-small'),
});

export const testAgent = new Agent({
  name: "test-agent",
  instructions: "あなたは役に立つアシスタントです。日本語を話してください。",
  model: openai("gpt-4o-mini"),
  memory: memory,
});

console.log("AIにリクエストを送信")
const response = await testAgent.generate("僕の名前は?", {
  resourceId: "123",
  threadId: "user_Id",
});

console.log("AIの回答:", await response.text);
process.exit(0);
- これを実行し、
http://127.0.0.1:54323/project/default/editor/18306?schema=mastraにアクセスするとmastraスキーマにテーブルが追加されていることがわかります。

Mastra エージェントの分離
-
src/mastra/04-mastra-class.tsを作成します。
import { openai } from "@ai-sdk/openai";
import { Agent } from "@mastra/core/agent";
import { Memory } from '@mastra/memory';
import { PostgresStore, PgVector } from '@mastra/pg';
import { Mastra } from '@mastra/core';

const storage = new PostgresStore({
  connectionString: process.env.DATABASE_URL!,
  schemaName: "mastra",
});

const vector = new PgVector({ connectionString: process.env.DATABASE_URL!, schemaName: "mastra" });

const globalMemory = new Memory({
  storage: storage,
  vector: vector,
  options: {
    lastMessages: 10,
    semanticRecall: {
      topK: 3,
      messageRange: 2,
    },
  },
  embedder: openai.embedding('text-embedding-3-small'),
});

const testAgent =(memory: Memory) => new Agent({
  name: "test-agent",
  instructions: "あなたは役に立つアシスタントです。日本語を話してください。",
  model: openai("gpt-4o-mini"),
  memory: memory,
});


export const mastra = new Mastra({
  agents: {
    testAgent: testAgent(globalMemory),
  },
  telemetry: { enabled: false },
  storage: globalMemory.storage,
});


console.log("AIにリクエストを送信")
const response = await mastra.getAgent("testAgent").generate("僕の名前は?", {
  resourceId: "123",
  threadId: "user_Id",
});

console.log("AIの回答:", await response.text);
process.exit(0);
- やっていることは、
testAgentを、memoryを受け取ってエージェントを返すファクトリ関数に変換し、Mastraクラスの中でtestAgentを指定するようにしています。 - このようにする理由は、今後エージェントが増え、Mastraクラスのagentsの数が増えたとき、会話履歴を共有するためです。
Next.jsエンドポイントの作成
- ここまでで、エージェントの作成が完了したので、実際にWebアプリを作成していきます。
-
src/mastra/04-mastra-class.tsの最後のconsoleの部分より下はコメントアウトしてください -
/src/app/api/chat/route.tsを作成してください
import { NextRequest, NextResponse } from "next/server";
import { mastra, globalMemory } from "@/mastra/04-mastra-class";

export const runtime = "nodejs";

const threadId = "12";
const resourceId = "user_id";

export async function POST(request: NextRequest) {
  console.log("リクエストを受け取りました");
  const { messages } = await request.json();

  console.log("受け取ったメッセージ:", messages);

  const streamResult = await mastra
    .getAgent("testAgent")
    .stream(messages, {
      instructions: "あなたは役に立つアシスタントです。日本語を話してください。",
      threadId: threadId,
      resourceId: resourceId,
      abortSignal: new AbortController().signal
    });

  return streamResult.toDataStreamResponse({
    sendReasoning: true
  });
}

export async function GET() {
  const result = await globalMemory.query({
    threadId: threadId,
    selectBy: { last: 100 },
  });
  const messages   = result.uiMessages
  .filter((msg) => msg.role === "user" || msg.role === "assistant")
  .map((msg) => ({
    id: msg.id,
    role: msg.role,
    content: msg.content.trim(),
    createdAt: msg.createdAt?.toString(),
  }));
  return NextResponse.json({
    messages
  });
}
Next.js フロントエンドの作成
- まず、以下のコマンドを実行してください
pnpm add streamdown
pnpm add @ai-sdk/react@^1
pnpm add swr
pnpm add zod
-
src/app/page.tsxを以下のように変更してください
'use client';

import { useChat } from '@ai-sdk/react';
import { Streamdown } from 'streamdown';
import useSWR from 'swr';
import { z } from 'zod';

const HistoryMessageSchema = z.object({
  id: z.string(),
  role: z.enum(['user', 'assistant']),
  content: z.string(),
  createdAt: z.string().optional(),
});

const HistoryResponseSchema = z.object({
  messages: z.array(HistoryMessageSchema),
});

type HistoryMessage = z.infer<typeof HistoryMessageSchema>;
type HistoryResponse = z.infer<typeof HistoryResponseSchema>;

const fetcher = async (url: string): Promise<HistoryResponse> => {
  const res = await fetch(url);
  const data = await res.json();
  return HistoryResponseSchema.parse(data);
};

export default function Page() {
  const { data: historyData, error: historyError, isLoading: historyLoading, mutate } = useSWR<HistoryResponse>('/api/chat', fetcher, {
    revalidateOnFocus: false,
    revalidateOnReconnect: true,
  });

  // SWRのデータを直接使用してメッセージを表示
  const formattedMessages = historyData?.messages?.map((msg: HistoryMessage) => ({
    id: msg.id,
    role: msg.role,
    content: msg.content,
    createdAt: msg.createdAt ? new Date(msg.createdAt) : undefined,
  })) || [];

  const { input, handleInputChange, handleSubmit, isLoading, messages } = useChat({
    api: '/api/chat',
    initialMessages: formattedMessages,
    onFinish: () => {
      // メッセージが送信された後、履歴を再取得
      mutate();
    },
  });

  // 履歴データのローディング中
  if (historyLoading) {
    return (
      <div className="flex items-center justify-center min-h-screen">
        <div className="text-gray-500">履歴を読み込み中...</div>
      </div>
    );
  }

  // 履歴データの取得エラー
  if (historyError) {
    return (
      <div className="flex items-center justify-center min-h-screen">
        <div className="text-red-500">履歴の読み込みに失敗しました</div>
      </div>
    );
  }

  return (
    <div className="flex flex-col items-center justify-center min-h-screen p-4 max-w-2xl mx-auto">
      <div className="w-full space-y-4 mb-8">
        {messages.map(message => (
          <div key={message.id} className="p-4 border rounded-lg">
            <strong className="text-blue-600">{message.role}:</strong>
            <div className="mt-2">
              <Streamdown>{message.content}</Streamdown>
            </div>
          </div>
        ))}
      </div>

      <form onSubmit={handleSubmit} className="w-full flex gap-2">
        <input
          value={input}
          onChange={handleInputChange}
          disabled={isLoading}
          placeholder="Say something..."
          className="flex-1 p-3 border border-gray-300 rounded-lg focus:outline-none focus:ring-2 focus:ring-blue-500"
        />
        <button
          type="submit"
          disabled={isLoading}
          className="px-6 py-3 bg-blue-500 text-white rounded-lg hover:bg-blue-600 disabled:bg-gray-400 disabled:cursor-not-allowed"
        >
          Submit
        </button>
      </form>
    </div>
  );
}
最後に
- 会話履歴が保存できるチャットアプリを作っていきました。
- mastra はスレッドをthreadIdで管理するので、ほかに新しくchatテーブルなどを作り、
chat.id = threadIdとしてDBに保存していくことで、複数の会話履歴を保存することができるようになります。
Discussion