やりたいこと
- Githubで開発ドキュメントの変更管理をしたい
- Sphinx(reStructuredText)でドキュメントを書きたい
- reStructuredText形式で記載したテキストをいい感じにHTMLやPDFにビルドしたい
- ドキュメント内に
- 画面遷移図やシーケンス図を組み込みたい
- OpenAPI仕様書を組み込みたい
- SphinxによってビルドしたHTMLをWebサーバにデプロイして共有したい
- CloudFront + S3
- GithubPage
Sphinxの紹介
Sphinx は、主に Python プロジェクト向けに開発されたドキュメント生成ツールです。
reStructuredText 形式で記述したソースから、HTML や PDF など多様な形式のドキュメントを自動で生成でき、豊富な拡張機能やテーマを活用して一貫性のあるドキュメント作成ができる。
reStructuredText(reST)は、シンプルかつ読みやすいテキストベースの軽量マークアップ言語で、以下のような特徴がある。
-
記述のシンプルさ: 普通のテキストエディタで簡単に記述でき、特別なフォーマットの知識がなくても扱いやすい。
-
文書の構造化: 見出し、リスト、引用、リンク、テーブルなどの要素を自然な記法で表現でき、文書の構造を明確にする。
-
多様な出力形式: Sphinx などのツールを利用すると、reST で記述した内容をHTML、PDF、LaTeXなどの多様なフォーマットに変換できる。
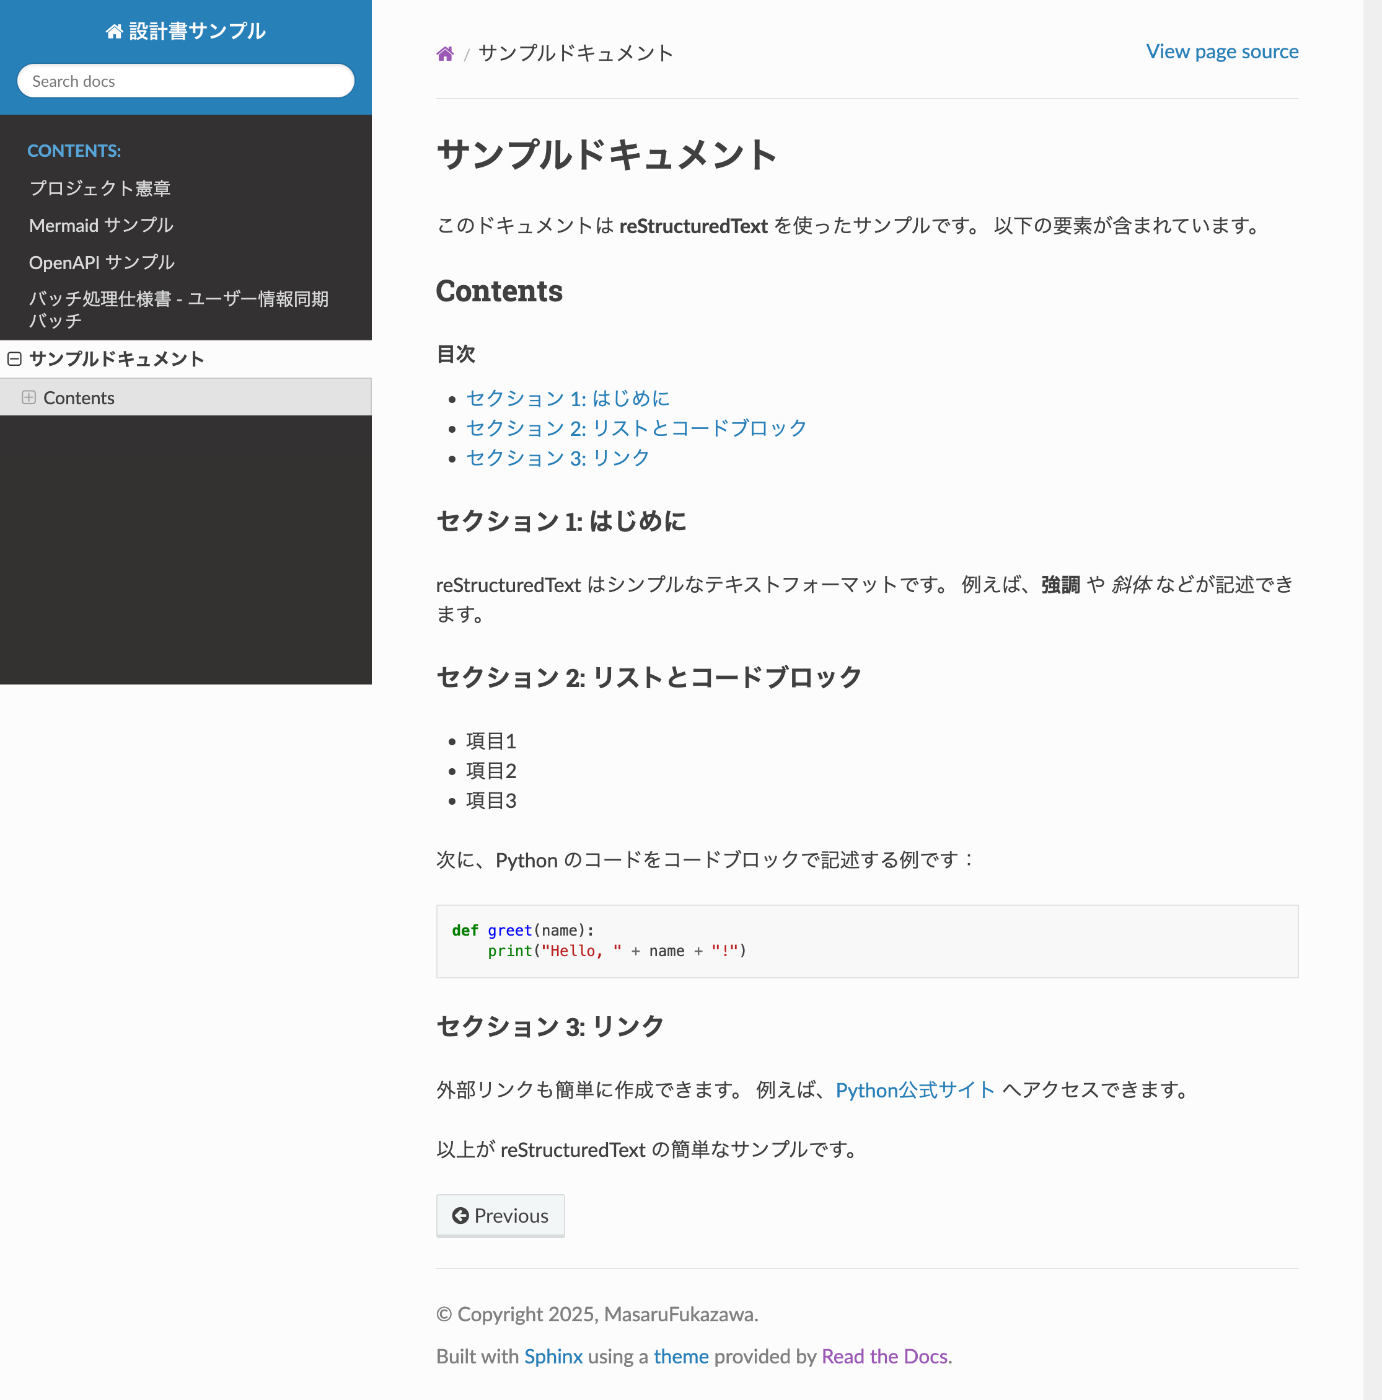
reStructuredText例
====================================
 サンプルドキュメント
====================================

このドキュメントは **reStructuredText** を使ったサンプルです。
以下の要素が含まれています。

Contents
=========
.. contents:: 目次
   :depth: 2
   :local:

セクション 1: はじめに
-------------------------------------
reStructuredText はシンプルなテキストフォーマットです。
例えば、**強調** や *斜体* などが記述できます。

セクション 2: リストとコードブロック
-------------------------------------
- 項目1
- 項目2
- 項目3

次に、Python のコードをコードブロックで記述する例です:

.. code-block:: python

    def greet(name):
        print("Hello, " + name + "!")

セクション 3: リンク
-------------------------------------
外部リンクも簡単に作成できます。
例えば、`Python公式サイト <https://www.python.org>`_ へアクセスできます。

以上が reStructuredText の簡単なサンプルです。
HTML出力例
- テンプレート拡張 : read the docs テンプレート使用
画面遷移図やシーケンス図を書く
開発系のドキュメントを書く場合、画面遷移図やシーケンス図などをつくる必要が出てくる
Figmaなどので作図して画像として出力してドキュメントに取り込むこともできるが、 Sphinxには、 Mermaidを利用できる拡張があり、これを用いることで reStructuredText 内で作図も可能となる。
Mermaid記述例
Mermaid サンプル
================

画面遷移図
----------

.. mermaid::

   graph LR
       A[入力画面] --> B[確認画面]
       B --> C[完了画面]
       B --> A[エラー時、入力画面に戻る]


シーケンス図
------------

.. mermaid::

    sequenceDiagram
        participant User as ユーザー
        participant Screen1 as 画面1
        participant Screen2 as 画面2
        participant Screen3 as 画面3

        User->>Screen1: 画面1にアクセス
        Screen1-->>User: 画面1を表示
        User->>Screen2: 画面2に遷移
        Screen2-->>User: 画面2を表示
        User->>Screen3: 画面3に遷移
        Screen3-->>User: 画面3を表示


ER図
----

.. mermaid::

    erDiagram
        CUSTOMER ||--o{ ORDER : has
        ORDER ||--|{ LINE-ITEM : contains
        CUSTOMER }|..|{ ADDRESS : "Delivers to"


.. _sequence-diagram:

ユースケース図
--------------

アクター説明
~~~~~~~~~~~~

- ユーザー: システムを利用するユーザー
- 管理者: システムを管理するユーザー

ユースケース
~~~~~~~~~~~~

ユーザー
^^^^^^^^

.. mermaid::

    graph LR
        ユーザー((ユーザー)) --> |ログイン| ログイン処理
        ユーザー --> |検索| 商品検索
        ユーザー --> |カートに追加| カート操作
        ユーザー --> |購入| 購入処理
        ユーザー --> |レビュー| 商品レビュー
        ユーザー --> |ログアウト| ログアウト処理
        ユーザー --> |会員登録| 会員登録処理
        ユーザー --> |会員情報変更| 会員情報変更処理
        ユーザー --> |会員情報削除| 会員情報削除処理
        ユーザー --> |パスワード変更| パスワード変更処理

管理者
^^^^^^

.. mermaid::

    graph LR
        管理者 --> |商品登録| 商品登録処理
        管理者 --> |商品削除| 商品削除処理
        管理者 --> |商品変更| 商品変更処理
        管理者 --> |ユーザー管理| ユーザー管理処理


業務フロー
----------

.. mermaid::

    flowchart LR
        subgraph ユーザー
            A[商品を検索]
            B[商品を購入]
        end

        subgraph 営業部
            C[受注処理]
            D[請求書発行]
        end

        subgraph 倉庫
            E[出荷準備]
            F[出荷]
        end

        A --> B --> C --> D
        C --> E --> F


ロバスト図
----------

.. mermaid::

    flowchart LR
        subgraph アクター
            User[👤 ユーザー]
        end

        subgraph 境界
            UI[🧱 商品購入画面]
        end

        subgraph 制御
            UC[🧠 商品購入ユースケース]
            CheckStock[🧠 在庫チェック処理]
            CreateOrder[🧠 注文作成処理]
            UpdateStock[🧠 在庫更新処理]
        end

        subgraph エンティティ
            Stock[🗄️ 在庫]
            Order[🗄️ 注文]
        end

        User --> UI
        UI --> UC
        UC --> CheckStock
        CheckStock --> Stock
        CheckStock -- OK --> CreateOrder
        CreateOrder --> Order
        CreateOrder --> UpdateStock
        UpdateStock --> Stock
        UpdateStock --> UC
        CheckStock -- NG --> UI
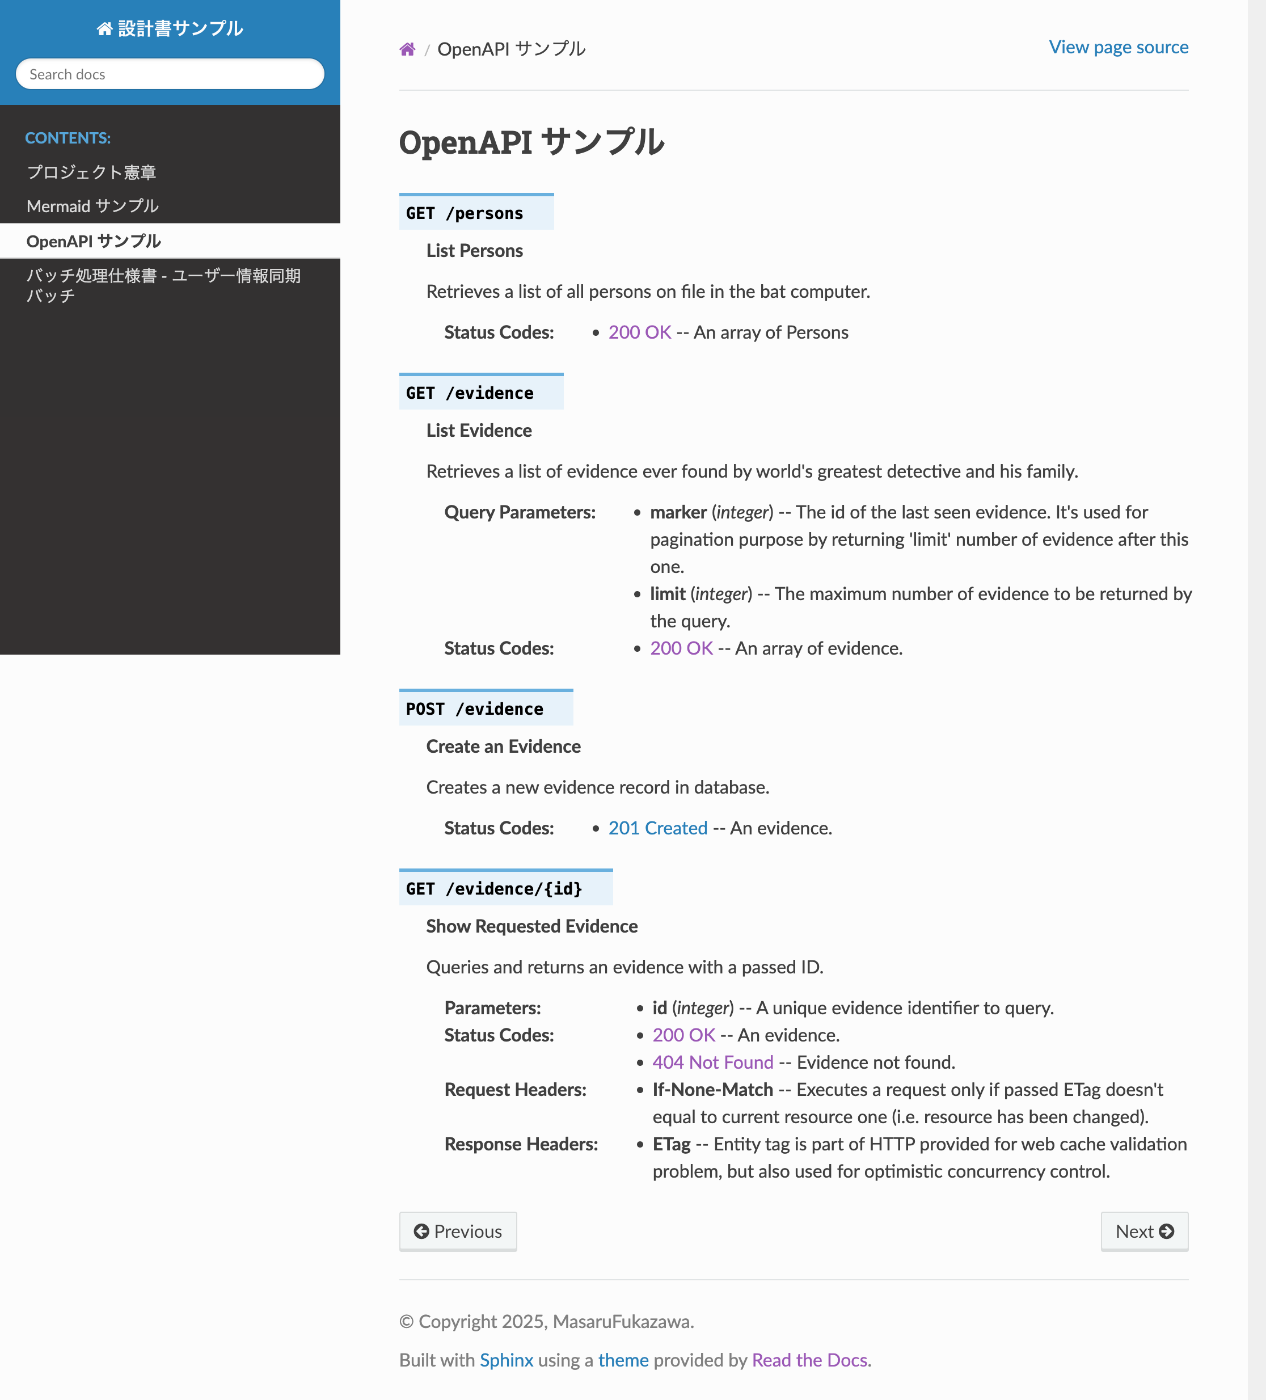
HTML出力例

OpenAPI仕様書をSphinxドキュメント内に読み込むこと
また、OpenAPI仕様書 をSphinxドキュメント内に読み込むための拡張も用意されている。
サンプルファイル
- openapi.yaml を用意する
※ sphinxcontrib-openapi内のサンプルを拝借している
openapi: "3.0.3"
info:
  title: Sample API
  version: "1.0.0"
servers:
  - url: https://api.○○○○.com
paths:
  /persons:
    get:
      summary: List Persons
      description: |
        Retrieves a list of all persons on file in the bat computer.
      responses:
        '200':
          description: An array of Persons
          content:
            application/json:
              schema:
                type: array
                items:
                  $ref: '#/components/schemas/Person'
  /evidence:
    get:
      summary: List Evidence
      description: |
        Retrieves a list of evidence ever found by world's greatest detective and his family.
      parameters:
        - name: marker
          in: query
          description: |
            The id of the last seen evidence. It's used for pagination purpose by returning 'limit' number of evidence after this one.
          required: false
          schema:
            type: integer
            format: int64
            minimum: -1
            default: -1
        - name: limit
          in: query
          description: |
            The maximum number of evidence to be returned by the query.
          required: false
          schema:
            type: integer
            format: int32
            minimum: 1
            maximum: 1000
            default: 20
      responses:
        '200':
          description: An array of evidence.
          content:
            application/json:
              schema:
                type: array
                items:
                  $ref: '#/components/schemas/Evidence'
    post:
      summary: Create an Evidence
      description: |
        Creates a new evidence record in database.
      requestBody:
        description: Evidence object to add
        required: true
        content:
          application/json:
            schema:
              $ref: '#/components/schemas/Evidence'
      responses:
        '201':
          description: An evidence.
          content:
            application/json:
              schema:
                $ref: '#/components/schemas/Evidence'
  /evidence/{id}:
    get:
      summary: Show Requested Evidence
      description: |
        Queries and returns an evidence with a passed ID.
      parameters:
        - name: id
          in: path
          description: A unique evidence identifier to query.
          required: true
          schema:
            type: integer
            format: int64
        - name: If-None-Match
          in: header
          description: |
            Executes a request only if passed ETag doesn't equal to current resource one (i.e. resource has been changed).
          required: false
          schema:
            type: string
      responses:
        '200':
          description: An evidence.
          headers:
            ETag:
              description: |
                Entity tag is part of HTTP provided for web cache validation problem, but also used for optimistic concurrency control.
              schema:
                type: string
          content:
            application/json:
              schema:
                $ref: '#/components/schemas/Evidence'
        '404':
          description: Evidence not found.
          content:
            application/json:
              schema:
                $ref: '#/components/schemas/Error'
components:
  schemas:
    Evidence:
      type: object
      properties:
        id:
          type: integer
          format: int64
          description: A unique evidence identifier.
        case:
          type: string
          description: A case when the evidence is found.
        data:
          type: string
          format: binary
          description: An evidence itself.
    Error:
      type: object
      properties:
        code:
          type: string
          description: A unique identifier of error.
        message:
          type: string
          description: A human readable error message.
    Person:
      type: object
      properties:
        id:
          type: integer
          format: int64
          description: Unique ID for a person
        name:
          type: string
          description: Name of a person
サンプルファイルをreStructuredTextで読み込む
OpenAPI サンプル
================

.. openapi:: ./openapi.yaml
HTML出力例
- 良い感じに出力されていそうだが、responses の contents 部分が出力されていない。
- swagger だと出力されるので記述方法による制限があるのかもしれない。
デプロイ先の環境の用意
今回、CloudFront+S3 と GithubPage の2つを試した。
というよりも、CloudFront+S3を試している途中で、GithubPageという存在を知った。
環境構築方法については、本記事では特に触れない。
GithubActionからS3に対してビルドした静的コンテンツのアップロードとCloudFrontのキャッシュクリアをするためのIAMユーザの作って、アクセスキーを生成しておく。
{
	"Version": "2012-10-17",
	"Statement": [
		{
			"Effect": "Allow",
			"Action": [
				"s3:PutObject",
				"s3:DeleteObject",
				"s3:ListBucket"
			],
			"Resource": [
				"arn:aws:s3:::[バケット名]",
				"arn:aws:s3:::[バケット名]/*"
			]
		},
		{
			"Effect": "Allow",
			"Action": [
				"cloudfront:CreateInvalidation"
			],
			"Resource": "*"
		}
	]
}
ドキュメントをHTMLにビルドしてサーバのデプロイする
GithubActionでは、mainブランチにpushされたタイミングで以下のことを行う。
- Sphinxを用いてreStructuredTextからHTMLをビルドする
- S3に静的コンテンツをアップロードする
- CloudFrontでキャッシュクリアをする
- GithubPageに静的コンテンツをアップロードする
workflow 例
name: Deploy Sphinx Docs to S3 and GitHub Pages

on:
  push:
    branches:
      - main

permissions:
  contents: read
  pages: write
  id-token: write

concurrency:
  group: "pages"
  cancel-in-progress: false

jobs:
  build:
    runs-on: ubuntu-latest

    steps:
      - name: Checkout source
        uses: actions/checkout@v3

      - name: Set up Python
        uses: actions/setup-python@v4
        with:
          python-version: '3.11'

      - name: Install dependencies
        run: |
          python -m pip install --upgrade pip
          pip install -r requirements.txt

      - name: Build Sphinx HTML
        run: make html

      - name: Upload artifact (for S3)
        uses: actions/upload-artifact@v4
        with:
          name: sphinx-docs
          path: build/html

      - name: Upload artifact (for GitHub Pages)
        uses: actions/upload-pages-artifact@v3
        with:
          path: build/html

  deploy:
    needs: build
    runs-on: ubuntu-latest
    environment:
      name: github-pages
      url: ${{ steps.deploy-pages.outputs.page_url }}

    steps:
      - name: Download artifact (for S3)
        uses: actions/download-artifact@v4
        with:
          name: sphinx-docs
          path: build/html

      - name: Sync to S3
        uses: jakejarvis/s3-sync-action@master
        with:
          args: --delete
        env:
          AWS_S3_BUCKET: ${{ secrets.AWS_S3_BUCKET }}
          AWS_ACCESS_KEY_ID: ${{ secrets.AWS_ACCESS_KEY_ID }}
          AWS_SECRET_ACCESS_KEY: ${{ secrets.AWS_SECRET_ACCESS_KEY }}
          AWS_REGION: ${{ secrets.AWS_REGION }}
          SOURCE_DIR: build/html

      - name: Invalidate CloudFront cache
        run: |
          aws cloudfront create-invalidation \
            --distribution-id ${{ secrets.CLOUDFRONT_DISTRIBUTION_ID }} \
            --paths "/*"
        env:
          AWS_ACCESS_KEY_ID: ${{ secrets.AWS_ACCESS_KEY_ID }}
          AWS_SECRET_ACCESS_KEY: ${{ secrets.AWS_SECRET_ACCESS_KEY }}
          AWS_REGION: ${{ secrets.AWS_REGION_FOR_CLOUDFRONT }}

      - name: Deploy to GitHub Pages
        id: deploy-pages
        uses: actions/deploy-pages@v4
CloudFron+S3環境にアップロードしたコンテンツ
まとめ
もともとSphinxは使用していたツールであったが、GithubActionを使った継続的デプロイは個人に初だったため勉強になった。
また、Sphinxの拡張(Mermaid/OpenAPI)についても知ることができてよかった。
常々Word/Excelから脱却したいと思っていたので、これを期にまずは会社の所属ユニットに布教していきたいところである。

ENECHANGEグループは、「エネルギー革命」を技術革新により推進し、より良い世界を創出することをミッションとするエネルギーベンチャー企業です。 enechange.co.jp/
Discussion