はじめに
OpenAIのRealtime APIは、2025年8月に正式版(gpt-realtime)としてリリースされました。
(参考:Introducing gpt-realtime and Realtime API updates for production voice agents)
これまで音声対話アプリケーションを作る場合は、
1 音声認識(speech-to-text)でテキスト化
2 テキストをLLMに渡して応答を生成
3 応答を音声合成(text-to-speech)で再生
といった複数の処理をつないで構成していました。
一方で、Realtime APIは単一のモデルとAPIで音声の入出力を直接扱えるのが大きな特徴です。
このため、レスポンスの遅延が大幅に減り、より自然なインタラクションが可能になります。
Azure OpenAI Serviceでも正式版が利用できるようになったため、Azure環境でgpt-realtimeをセットアップし、プレイグラウンドやサンプルコードを通して動作を確認してみました。
Realtime APIの主要アップデート
正式版リリースにあわせて、Realtime APIには多くの機能追加と改善が行われました。ここでは主なポイントを整理します。
-
gpt-realtimeモデル
音声から直接推論・生成を行うモデルです。従来に比べて、複雑な指示の理解や感情表現の自然さが大幅に向上しています。カスタマーサポート、パーソナルアシスタンス、教育など、実際のユースケースを意識したトレーニングが施されています。 -
低遅延応答
音声→テキスト→音声と変換を挟まないため、応答までの時間が短縮されました。人と会話する感覚に近いスピードでやりとりできます。 -
マルチモーダル入力
音声に加えて画像やテキストを同時に扱えます。会話の流れの中で写真やスクリーンショットを渡し、その内容に基づいた応答を得ることが可能です。たとえば「この画面に表示されているエラーメッセージを読んで」といった依頼に対応できます。 -
Function Callingの強化
音声対話中に関数呼び出しを行えます。正式版では非同期呼び出しに対応し、外部ツールの処理結果を待ちながら自然に会話を継続できます。 -
MCP(Model Context Protocol)サーバー対応
リモートMCPサーバーを利用できるようになり、外部ツールや社内システムとの接続が容易になりました。 -
SIP通話サポート
Session Initiation Protocolを用いた電話回線との接続に対応。リアルタイムの音声エージェントを電話越しに利用できるようになります。 -
新しい音声と既存音声の改善
「Cedar」「Marin」といった新しいボイスが追加され、既存の音声も自然さ・表現力が強化されています。話し方のスタイル指定(例:「速くプロフェッショナルに」「フランス語のアクセントで共感的に」)にも柔軟に応じられます。 -
命令遵守の強化
開発者から与える細かい指示に対して、より正確に従うよう改善されています。 -
プロンプトの再利用
セッション全体でプロンプトを保存・再利用できる仕組みが追加され、会話をまたいだコンテキスト維持が容易になりました。 -
安全性とプライバシー
多層的なセーフガードと緩和策が導入され、誤用や情報漏えいのリスクに対する耐性が高まっています。
OpenAI Realtime API のアーキテクチャと接続方式
Realtime APIの技術的なアーキテクチャと実装時の接続方式についてまとめました。
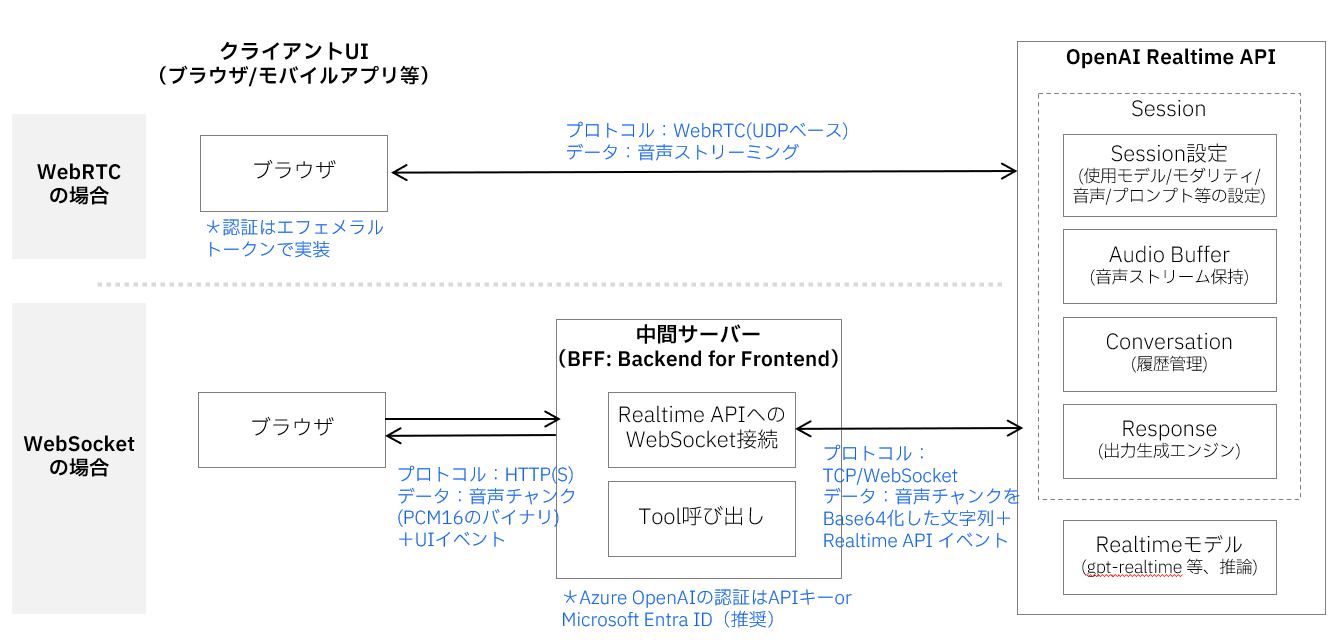
Realtime API 概要図
この図では、音声やテキストなどのデータがクライアントからインプットされ、Realtime APIで処理されて、音声やテキストの応答が返されるまでの全体的な流れを表しています。クライアントとRealtime APIの間のデータ受け渡しには WebRTC と WebSocket の2つの方式があり、それぞれ以下のような特徴があります。なお、SIP(Session Initiation Protocol)を用いた電話回線との接続も可能ですが、ここでは割愛します。
接続方式
- WebRTC:ブラウザ/モバイルからモデルへ 低遅延の音声ストリーム+制御イベント を双方向でやりとりします。(Use the GPT Realtime API via WebRTC )
- WebSocket:UI⇔BFF(Backend For Frontend)、BFF⇔Realtimeの 音声チャンク+制御イベント を双方向に中継する方式で、サーバーサイドでの制御に適しています。(Use the GPT Realtime API via WebSockets)
Realtime API内部には、音声対話を実現するための5つの主要コンポーネントがあります。Session(設定管理)、Audio Buffer(音声バッファ)、Conversation(会話履歴)、Response(応答生成エンジン)、そしてModel(音声対話モデル)です。これらが連携して、リアルタイムの音声対話を実現しています。(Realtime conversations)
Realtimeコンポーネント
-
Session:音声対話セッション全体の設定を管理します。使用するモデル、音声の種類、プロンプト、VAD(Voice Activity Detection:音声区間検出)の有効/無効、音声フォーマットなどを制御し、セッション開始時に
session.updateイベントで初期化されます。 -
Audio Buffer:入力音声を一時的に蓄積・管理するバッファです。クライアントから送られた音声データを
input_audio_buffer.appendで蓄積し、commitで処理を開始、clearでリセットします。VADが有効な場合、音声の終端検出が自動的にコミットのトリガーになります。 -
Conversation:会話の履歴を保持・管理するコンポーネントです。ユーザーの入力、AIの応答、Fuction Callingの結果など、すべての会話要素が
conversation.item.*イベントによって管理され、対話のコンテキストを維持します。 -
Response:AIの応答を生成・配信するエンジンです。Audio Bufferからの入力コミット(VAD有効時)または
response.createイベント(VAD無効時)によって起動し、pending → streaming → completed/canceled/errorの状態遷移を経て応答を生成します。生成された応答は最終的にConversationに記録されます。 - Model:実際の音声対話処理を行うAIモデルです(gpt-realtime)。音声からテキストへの変換、意味理解、応答生成、テキストから音声への変換を統合的に処理し、従来の複数ステップ処理を単一モデルで実現します。
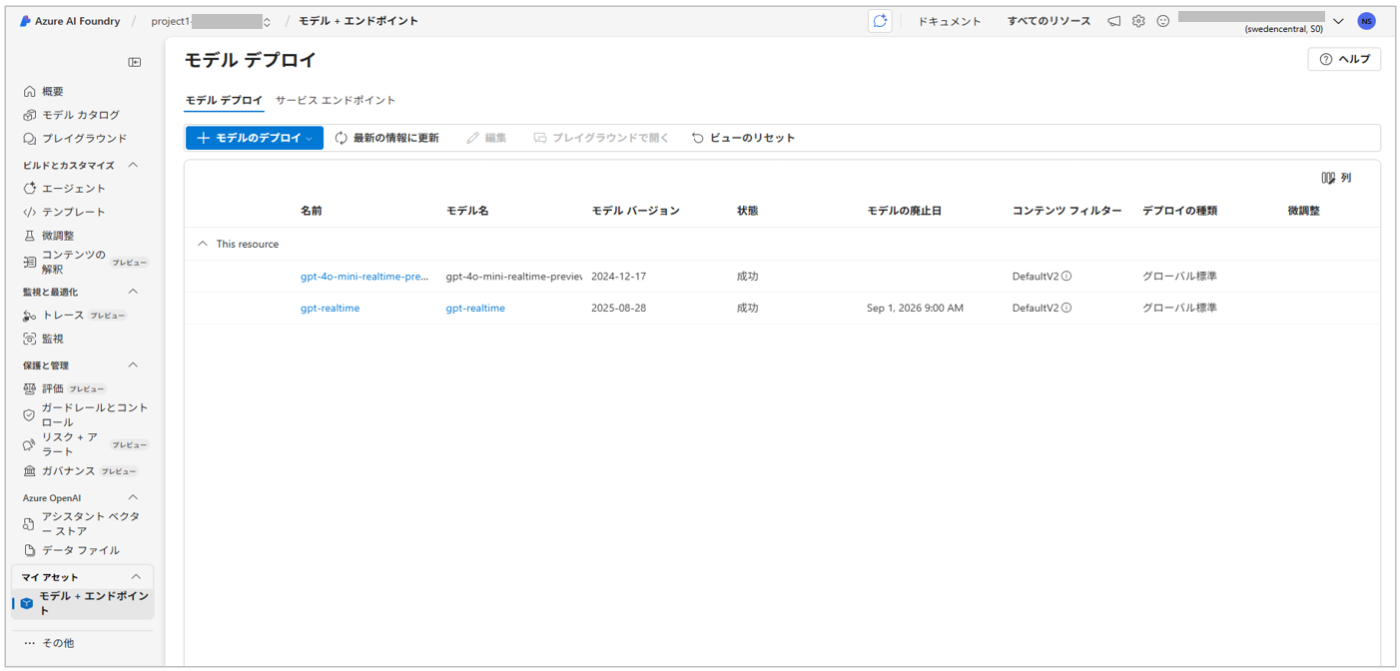
Azureでのセットアップ
セットアップの基本的な流れはシンプルでモデルをデプロイするだけです。公式ドキュメントに手順がまとまっているので、ここでは詳細手順は省略します。
実際にAzure AI Foundryポータルでモデルをデプロイすると、以下のような画面が表示されます。
プレイグラウンドで試す
Azure AI Foundryには、Realtime APIをすぐにテストできるオーディオ プレイグラウンドが用意されています。
初回アクセス時は、「マイクを有効にする」をクリックすると、ブラウザからマイク使用の許可を求められるので「許可」を選んでください。これだけで音声対話が可能になります。
デプロイした gpt-realtime モデルを選択し、「聞き取りを開始」をクリックすると、ブラウザ上から音声入力・音声出力を試せます。

サンプルコードで試す(WebSocket版)
Azureの公式ドキュメントには、Realtime APIをPythonから利用するためのWebSocketサンプルコードが公開されています。
このサンプルは、テキストをインプットし、音声のバイト列をテキストでアウトプットするシンプルなプログラムです。
修正ポイント
正式版に合わせて一部イベント名などの仕様が変更されています。そのため、公開されているサンプルをそのまま実行するとエラーになりました。
私の環境で実行した修正版を添付します。
.env
コードの実行前に、エージェントの接続情報を .env ファイルに記述しておきます。
AZURE_OPENAI_ENDPOINT="https://xxxxxxx"
AZURE_OPENAI_API_KEY="asst_xxxxxxxx"
それぞれの値は以下の場所から確認できます。
- AZURE_OPENAI_ENDPOINT:Azure AI Foundry > 「プロジェクト」 > 「概要」 > 「エンドポイントとキー」 > 「Azure OpenAI エンドポイント」
- AZURE_OPENAI_API_KEY:Azure AI Foundry > 「プロジェクト」 > 「概要」 > 「エンドポイントとキー」 > 「APIキー」
サンプルプログラム
import os
import base64
import asyncio
from openai import AsyncAzureOpenAI

## 追加:envファイルの読み込み
from dotenv import load_dotenv
load_dotenv()

async def main() -> None:
    """
    When prompted for user input, type a message and hit enter to send it to the model.
    Enter "q" to quit the conversation.
    """

    client = AsyncAzureOpenAI(
        azure_endpoint=os.environ["AZURE_OPENAI_ENDPOINT"],
        api_key=os.environ["AZURE_OPENAI_API_KEY"],
        ## 変更点:api_versionを2025-08-28にするとエラーになる
        ## websockets.exceptions.InvalidStatus: server rejected WebSocket connection: HTTP 404
        #api_version="2025-08-28",
        api_version="2025-04-01-preview"

    )
    async with client.beta.realtime.connect(
        model="gpt-realtime",  # deployment name of your model
    ) as connection:
        ## 変更点:output_modalitiesをmodalitiesに変更(型の仕様が変更された)
        ## https://learn.microsoft.com/en-us/azure/ai-foundry/openai/realtime-audio-reference
        await connection.session.update(session={"modalities": ["text", "audio"]})
        while True:
            user_input = input("Enter a message: ")
            if user_input == "q":
                break

            await connection.conversation.item.create(
                item={
                    "type": "message",
                    "role": "user",
                    "content": [{"type": "input_text", "text": user_input}],
                }
            )
            await connection.response.create()
            async for event in connection:
                ## 変更点:event.typeの名称が変更された
                ## https://learn.microsoft.com/en-us/azure/ai-foundry/openai/realtime-audio-reference
                #if event.type == "response.output_text.delta":
                if event.type == "response.text.delta":
                    print(event.delta, flush=True, end="")
                #elif event.type == "response.output_audio.delta":
                elif event.type == "response.audio.delta":

                    audio_data = base64.b64decode(event.delta)
                    print(f"Received {len(audio_data)} bytes of audio data.")
                #elif event.type == "response.output_audio_transcript.delta":
                elif event.type == "response.audio_transcript.delta":
                    print(f"Received text delta: {event.delta}")
                #elif event.type == "response.output_text.done":
                #    print()

                elif event.type == "error" or event.type.endswith(".error"):
                    print(f"[error] {getattr(event, 'error', event)}")

                elif event.type == "response.done":
                    break

asyncio.run(main())
出力結果
このプログラムを実行すると以下のような出力になります。
Enter a message: こんにちは
Received text delta: こんにちは
Received text delta: !
Received 4800 bytes of audio data.
Received 7200 bytes of audio data.
Received 12000 bytes of audio data.
Received text delta: 元
Received text delta: 気
Received text delta: です
Received text delta: か
Received text delta: ?
Received 12000 bytes of audio data.
Received 12000 bytes of audio data.
Received 12000 bytes of audio data.
Received 12000 bytes of audio data.
Received 12000 bytes of audio data.
Received text delta: 今日は
Received text delta: ど
Received text delta: んな
Received text delta: お
Received text delta: 手
Received text delta: 伝
Received text delta: い
Received text delta: を
Received 12000 bytes of audio data.
Received 12000 bytes of audio data.
Received 12000 bytes of audio data.
Received 12000 bytes of audio data.
Received 12000 bytes of audio data.
Received 12000 bytes of audio data.
Received text delta: しま
Received text delta: しょう
Received text delta: か
Received text delta: ?
Received 12000 bytes of audio data.
Received 12000 bytes of audio data.
Received 12000 bytes of audio data.
Received 12000 bytes of audio data.
Received 12000 bytes of audio data.
Received 12000 bytes of audio data.
Received 24000 bytes of audio data.
Enter a message: q
サンプルコードで試す(WebRTC版)
公式ドキュメントでは、WebSocket版よりもWebRTC版の利用が推奨されています。
WebRTCを使うことで、ブラウザや音声デバイスとの連携がスムーズになり、より安定した低遅延の音声対話が実現できるのが理由のようです。
In most cases, we recommend using the Realtime API via WebRTC for real-time audio streaming in client-side applications such as a web application or mobile app. WebRTC is designed for low-latency, real-time audio streaming and is the best choice for most use cases.
WebRTC版もサンプルが提供されています。
このサンプルは、ブラウザから音声を入力として送信し、音声とテキストを同時に受け取る構成になっています。
実際に動かしてみると、マイクから話した内容に対して、モデルが即座に音声で返してくれました。
修正ポイント
こちらはサンプルの下記3か所に自分の環境の設定を追加すれば、問題なく動作しました。
- エンドポイントURL
YourAzureOpenAIResourceName を自分のAzure環境のURLに置き換えます。
- const SESSIONS_URL="https://YourAzureOpenAIResourceName.openai.azure.com/openai/realtimeapi/sessions?api-version=2025-04-01-preview"
+ const SESSIONS_URL = "https://<自分の環境のURL>/openai/realtimeapi/sessions?api-version=2025-04-01-preview"
- APIキー
サンプルのプレースホルダを、自分のAzure OpenAIリソースのAPIキーに差し替えます。
- const API_KEY = "YOUR_API_KEY_HERE";
+ const API_KEY = "<APIキーを設定>";
- デプロイ名
gpt-4o-mini-realtime-previewではなく、正式版のgpt-realtimeを指定します。
- const DEPLOYMENT = "gpt-4o-mini-realtime-preview"
+ const DEPLOYMENT = "gpt-realtime"
おわりに
この記事では、Azure OpenAI Serviceでの gpt-realtime のセットアップから、アーキテクチャの整理、プレイグラウンドやRealtime APIのサンプルコードでの動作確認までを紹介しました。
Realtime API を利用して音声チャットアプリを作りましたので、よろしければ参考にしてください。
Realtime APIのプロンプトガイドが出ています。このガイドを活用して、Function Callingも試してみました。

Discussion