【Flutter】SupabaseでSign in with Appleを実装
記事の概要
本記事では、2023/04/13にこちらで発表されている通り、SupabaseでNativeのAppleログイン機能(Sign in with Apple)を利用できるようになっているため、Flutterアプリを用いてその具体的な実装方法を解説する。
※1 本記事では、Supabaseの基本事項に関する説明(新規プロジェクトの作成方法など)は省略するため、Supabaseの基本を知りたい方は、先にこちらの動画などを参考にする。
※2 NativeのAppleログイン機能の利用にはApple Developerアカウントが必要なため、Apple Developer Programへ参加していることが前提である。
前提知識
Sign in with Appleとは
Sign in with Appleでは、AppleがApple IDを利用した認証システムを提供している。ユーザはパスワード不要でFace ID/Touch IDでアプリに登録、ログインができるようになる。
Sign in with Appleを利用することで、アプリの提供側はすでに承認されているApple IDを利用できるため、認証機能の実装において様々な利点を得ることができる。
開発環境
Flutter 3.7.0
iphone実機(iOS 16.4.1)
Sign in with Apple利用のためのセットアップ
1. AppIDの登録
Apple Developerにアクセスし、Accountタブから自身のDeveloperアカウントにログインし、以下の手順でAppIDを登録する。
- Certificates, Identifiers&Profiles > Identifiersを開く
- +ボタンをタップ
- App IDsを選択し、Continue
- Appを選択し、Continue
- Descriptionに任意の説明を入力
- BundleIDにFlutterアプリのBundleIDを入力
- Capabilitiesタブから「Sign In with Apple」にチェック
- Continue
- Register
2. ServiceIDの登録
同様にApple Developerから以下の手順でServiceIDを登録する。
- Certificates, Identifiers&Profiles > Identifiersを開く
- +ボタンをタップ
- Service IDsを選択し、Continue
- Descriptionに任意の説明を入力
- IdentifierにBundleIDの先頭に「app.」を追加したIDを入力(例 app.com.test.project)
※AppIDの作成時に利用したBundleIDと同じものは使えないためapp.などを追加して対応する。 - Continue
- Register
3. SecretKeyの取得
同様にApple Developerから以下の手順でSecretKeyを取得する。
- Certificates, Identifiers&Profiles > Keysを開く
- +ボタンをタップ
- Key Nameに任意の名前を入力
- 「Sign In with Apple」にチェック
- 「Sign In with Apple」の右側のConfigureをタップ
- アプリのApp IDを選択
- Save
- Continue
- Register
- Download
4. client_secretの生成
client_secretの生成にruby-jwtを利用する。Rubyがインストールされていない場合はこちらから事前にインストールする。
以下の手順でclient_secretを生成する。
- 以下のコマンドでruby-jwtをインストールする。
・sudo gem install jwt - 任意のテキストエディタを開き、以下の内容でsecret_gen.rbファイルを作成する。
key_file :「3.SecretKeyの取得」でダウンロードしたAuthKey_XXXXXXXXXX.p8ファイルのパス
team_id : TeamID。App Developerの自身のアカウント名の右に表示されているID。
client_id : Certificates, Identifiers&Profiles > Identifiers > Service IDs > IDENTIFIERに表示されているID
key_id : Certificates, Identifiers&Profiles > Keys > 作成したKeyの詳細 > Key ID
require "jwt"

key_file = "Path to the private key"
team_id = "Your Team ID"
client_id = "The Service ID of the service you created"
key_id = "The Key ID of the private key"

validity_period = 180 # In days. Max 180 (6 months) according to Apple docs.

private_key = OpenSSL::PKey::EC.new IO.read key_file

token = JWT.encode(
	{
		iss: team_id,
		iat: Time.now.to_i,
		exp: Time.now.to_i + 86400 * validity_period,
		aud: "https://appleid.apple.com",
		sub: client_id
	},
	private_key,
	"ES256",
	header_fields=
	{
		kid: key_id
	}
)
puts token
- secret_gen.rbのあるパスで以下のコマンドを実行し、client_secretを生成する。
・ruby secret_gen.rb > client_secret.txt
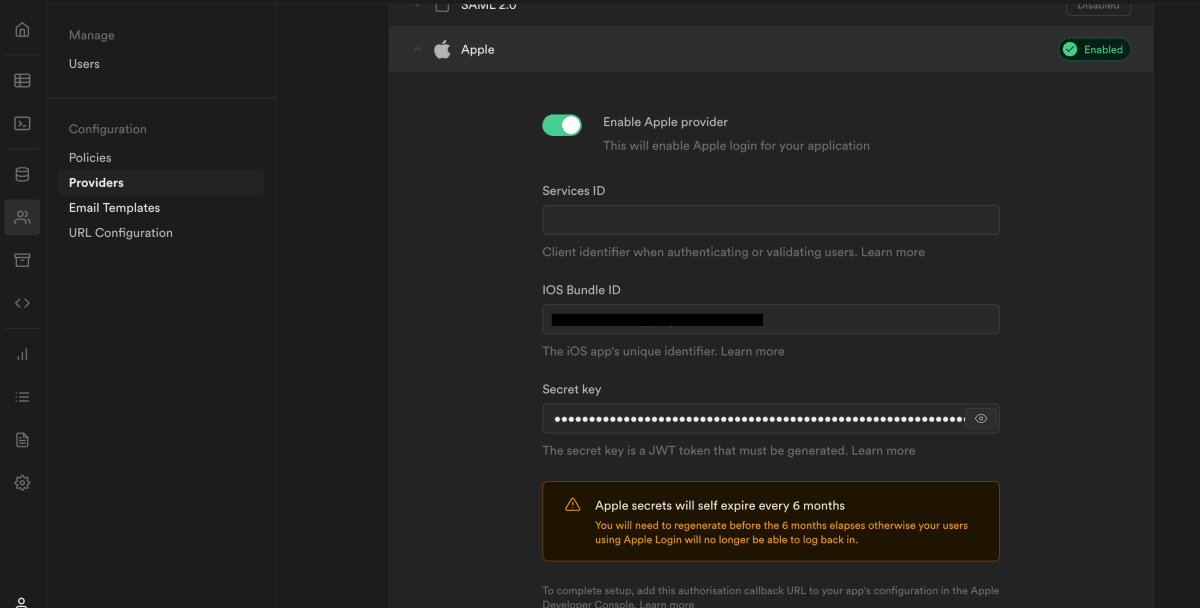
5. SupabaseプロジェクトでSign in with Appleの有効化
Supabaseのアプリのプロジェクトにアクセスし、Authentication > Providers > Appleから"Enable Apple provider"をオンにし、以下の設定内容で保存する。
IOS Bundle ID : FlutterアプリのBundle ID
Secret key : 「4. client_secretの生成」で作成した、client_secret.txtの内容
Flutterアプリ側の実装手順
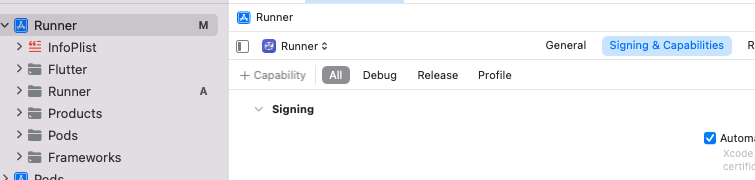
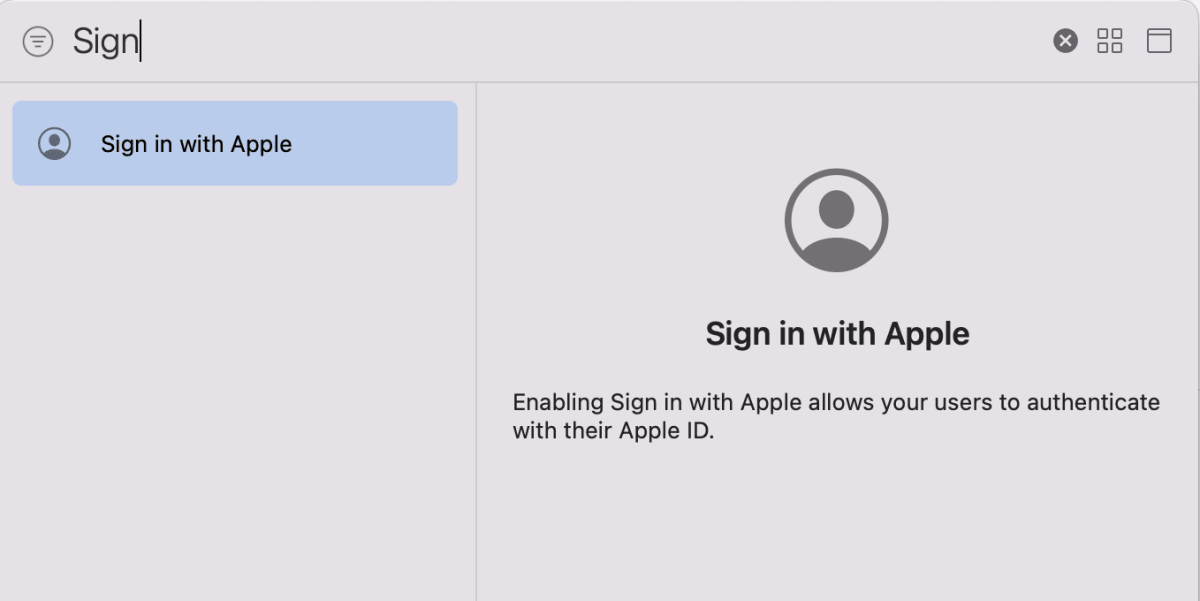
1. Sign in with Appleの有効化
XcodeでFlutterアプリを開き、「+Capability」をタップ、「Sign In with Apple」をダブルクリックして登録する。
2. ライブラリのインストール
※Sign in with Appleの利用にはsupabase_flutter 1.7.0以上が必要。
dependencies:
  supabase_flutter: ^1.8.1
3. main.dartの実装
以下の関数を用いてSign in with Appleを実装することができる。
await supabase.auth.signInWithApple();
※signInWithApple関数はiOSもしくはMacOS上でのみ動作する。他のプラットフォームでAppleアカウントを利用したサインインを実装する場合は、signInWithOAuth関数を利用する。
main.dartの実装コード全文は以下である。
main.dart
import 'package:flutter/material.dart';
import 'package:supabase_flutter/supabase_flutter.dart';
void main() async {
await Supabase.initialize(
// ①Supabaseの初期化処理
url: //自身のSupabaseプロジェクトのProject URLの値,
anonKey: //自身のSupabaseプロジェクトのProject API keysのanon keyの値,
);
runApp(MyApp());
}
// ②Supabaseクライアントの作成
final supabase = Supabase.instance.client;
class MyApp extends StatelessWidget {
MyApp({super.key});
Widget build(BuildContext context) {
return MaterialApp(
theme: ThemeData(
primarySwatch: Colors.blue,
),
home: MyHomePage(title: 'Sign in with Apple'),
);
}
}
class MyHomePage extends StatefulWidget {
MyHomePage({required this.title}) : super();
final String title;
_MyHomePageState createState() => _MyHomePageState();
}
class _MyHomePageState extends State<MyHomePage> {
String _loginStatus = 'ログインしていません';
void _changeLoginStatus() {
setState(() {
_loginStatus = 'ログインしました';
});
}
Widget build(BuildContext context) {
return Scaffold(
appBar: AppBar(
title: Text(widget.title),
),
body: Center(
child: Column(
mainAxisAlignment: MainAxisAlignment.center,
children: <Widget>[
Text(
_loginStatus,
),
ElevatedButton(
child: const Text('Sign in with Apple'),
onPressed: () async {
try {
// ③Sign in with Appleを呼び出す関数
await supabase.auth.signInWithApple();
// ④サインインできた場合Stateを更新
_changeLoginStatus();
} on AuthException catch (error) {
debugPrint(error.toString());
} catch (error) {
debugPrint(error.toString());
}
},
),
],
),
),
);
}
}
動作確認
※動作確認のためのデバッグでは、シュミレータではなくiphone実機(iOS:16.4.1)を利用。
-
アプリ起動

-
Sign in with Appleのボタンからサインイン


-
Supabase上でアカウントが作成されていることが確認できる

まとめ
Supabaseを利用して、FlutterでSign in with Appleを実装した。本記事では、実装する際の導入方法を主に解説しているため簡単な動作確認のみとなっているが、実際のアプリで利用する際は、supabase.auth.onAuthStateChangeを使ってユーザの認証ステータスを監視するリスナーを貼ることで、サインアップ完了後に画面遷移するなどアプリのログインフローを実装することができる。
参考
開発者を魅了するオープンソースソフトウェア Supabase とは | AWS Dev Day 2022 Japan
Supabase -Login with Apple
Discussion