Auth0を使ってログイン機能を作る
はじめに
Cloud9とAuth0を使って認証画面を作成するチュートリアルとなります。
Auth0の準備
Auth0を使用するためにまずはサインアップします。
以下のURLにアクセスして無料トライアルをクリックし、サインアップします。
Roleの情報を入力します。

Auth0にログインします。
ダッシュボードが表示されればOKです。

Applicationsを選択してDefault Appをクリックします。

Settingsタブで確認できるDomainとClient IDをあとで使うのでメモします。

Application PropertiesのApplication TypeでSingle Page Applicationを選択し、画面最下部のSave Changesをクリックします。

Quick Startタブに移動してVueをクリックします。

Vueを使ったAuth0のチュートリアルが表示されればOKです。

Vue チュートリアル
Vueのチュートリアルの手順を実施します。
Cloud9では「Create a Sample Application」の項から実施します。

基本的にはチュートリアルの通りに実施しますが、Cloud9では追加で必要となる設定があります。
以下にチュートリアルを補足しながら説明します。
Create a Sample Application
# Vue CLIのインストール
npm install -g @vue/cli

# Vue CLIを使ってアプリケーションを作成する
vue create my-app

# プリセットは【[Vue 2] babel, eslint】を選択
Vue CLI v4.5.13
? Please pick a preset: (Use arrow keys)
❯ Default ([Vue 2] babel, eslint) # ココを選択している状態でEnter
  Default (Vue 3) ([Vue 3] babel, eslint)
  Manually select features
Warning: Gitが表示された場合はYesを選択します。

# my-appディレクトリに移動
cd my-app

# Vue Routerを追加
vue add router

# WARNが表示された場合は y を入力してEnter
WARN  There are uncommitted changes in the current repository, it's recommended to commit or stash them first.
? Still proceed? (y/N)

# そのままEnter
? Use history mode for router? (Requires proper server setup for index fallback in production) (Y/n)
Install the SDK
Auth0 Client SDKをインストールします。
npm install @auth0/auth0-spa-js
Start the application
ここで一旦アプリケーションが動作するか確認します。
プロジェクトディレクトリ直下にvue.config.jsを作成します。
module.exports = {
  devServer: {
    disableHostCheck: true
  }
}

Cloud9ではテストサーバ実行時のポートの指定は行いません。
以下を使用します。
npm run serve
Cloud9のプレビューボタンをクリックして表示できたらOKです。

プレビュー画面の右上のボタンをクリックすると別タブで大きく表示できます。


Create an Authentication Wrapper
テストサーバをctrl + cで停止します。
srcディレクトリにauthディレクトリを追加します。
追加したauthディレクトリに以下の内容のindex.jsを作成します。
import Vue from "vue";
import createAuth0Client from "@auth0/auth0-spa-js";

/** Define a default action to perform after authentication */
const DEFAULT_REDIRECT_CALLBACK = () =>
  window.history.replaceState({}, document.title, window.location.pathname);

let instance;

/** Returns the current instance of the SDK */
export const getInstance = () => instance;

/** Creates an instance of the Auth0 SDK. If one has already been created, it returns that instance */
export const useAuth0 = ({
  onRedirectCallback = DEFAULT_REDIRECT_CALLBACK,
  redirectUri = window.location.origin,
  ...options
}) => {
  if (instance) return instance;

  // The 'instance' is simply a Vue object
  instance = new Vue({
    data() {
      return {
        loading: true,
        isAuthenticated: false,
        user: {},
        auth0Client: null,
        popupOpen: false,
        error: null
      };
    },
    methods: {
      /** Authenticates the user using a popup window */
      async loginWithPopup(options, config) {
        this.popupOpen = true;

        try {
          await this.auth0Client.loginWithPopup(options, config);
          this.user = await this.auth0Client.getUser();
          this.isAuthenticated = await this.auth0Client.isAuthenticated();
          this.error = null;
        } catch (e) {
          this.error = e;
          // eslint-disable-next-line
          console.error(e);
        } finally {
          this.popupOpen = false;
        }

        this.user = await this.auth0Client.getUser();
        this.isAuthenticated = true;
      },
      /** Handles the callback when logging in using a redirect */
      async handleRedirectCallback() {
        this.loading = true;
        try {
          await this.auth0Client.handleRedirectCallback();
          this.user = await this.auth0Client.getUser();
          this.isAuthenticated = true;
          this.error = null;
        } catch (e) {
          this.error = e;
        } finally {
          this.loading = false;
        }
      },
      /** Authenticates the user using the redirect method */
      loginWithRedirect(o) {
        return this.auth0Client.loginWithRedirect(o);
      },
      /** Returns all the claims present in the ID token */
      getIdTokenClaims(o) {
        return this.auth0Client.getIdTokenClaims(o);
      },
      /** Returns the access token. If the token is invalid or missing, a new one is retrieved */
      getTokenSilently(o) {
        return this.auth0Client.getTokenSilently(o);
      },
      /** Gets the access token using a popup window */

      getTokenWithPopup(o) {
        return this.auth0Client.getTokenWithPopup(o);
      },
      /** Logs the user out and removes their session on the authorization server */
      logout(o) {
        return this.auth0Client.logout(o);
      }
    },
    /** Use this lifecycle method to instantiate the SDK client */
    async created() {
      // Create a new instance of the SDK client using members of the given options object
      this.auth0Client = await createAuth0Client({
        ...options,
        client_id: options.clientId,
        redirect_uri: redirectUri
      });

      try {
        // If the user is returning to the app after authentication..
        if (
          window.location.search.includes("code=") &&
          window.location.search.includes("state=")
        ) {
          // handle the redirect and retrieve tokens
          const { appState } = await this.auth0Client.handleRedirectCallback();

          this.error = null;

          // Notify subscribers that the redirect callback has happened, passing the appState
          // (useful for retrieving any pre-authentication state)
          onRedirectCallback(appState);
        }
      } catch (e) {
        this.error = e;
      } finally {
        // Initialize our internal authentication state
        this.isAuthenticated = await this.auth0Client.isAuthenticated();
        this.user = await this.auth0Client.getUser();
        this.loading = false;
      }
    }
  });

  return instance;
};

// Create a simple Vue plugin to expose the wrapper object throughout the application
export const Auth0Plugin = {
  install(Vue, options) {
    Vue.prototype.$auth = useAuth0(options);
  }
};
プロジェクトディレクトリ直下にauth_config.jsonを作成します。
Auth0のチュートリアルに記載されているauth_config.jsonの内容には、環境ごとのDomain、Client IDが反映されているのでそのままコピーして使っていただいてもOKです。
{
  "domain": "メモしたDomain",
  "clientId": "メモしたClient ID"
}
srcディレクトリのmain.jsを以下のように変更します。
import Vue from 'vue'
import App from './App.vue'
import router from './router'

// 以下追加
import { domain, clientId } from "../auth_config.json";

import { Auth0Plugin } from "./auth";

Vue.use(Auth0Plugin, {
  domain,
  clientId,
  onRedirectCallback: appState => {
    router.push(
      appState && appState.targetUrl
        ? appState.targetUrl
        : window.location.pathname
    );
  }
});
// 以上追加

Vue.config.productionTip = false

new Vue({
  router,
  render: h => h(App)
}).$mount('#app')
Log in to the App
画面にログイン/ログアウトボタンを追加します。
src/views/Home.vueを以下のように変更します。
<template>
  <div class="home">
    <img alt="Vue logo" src="../assets/logo.png">
    <HelloWorld msg="Welcome to Your Vue.js App"/>
    <!--以下追加-->
    <!-- Check that the SDK client is not currently loading before accessing is methods -->
    <div v-if="!$auth.loading">
      <!-- show login when not authenticated -->
      <button v-if="!$auth.isAuthenticated" @click="login">Log in</button>
      <!-- show logout when authenticated -->
      <button v-if="$auth.isAuthenticated" @click="logout">Log out</button>
    </div>
    <!--以上追加-->
  </div>
</template>

<script>
// @ is an alias to /src
import HelloWorld from '@/components/HelloWorld.vue'

export default {
  name: 'Home',
  components: {
    HelloWorld
  }, // ←の「,」と、以下追加
  methods: {
    // Log the user in
    login() {
      this.$auth.loginWithRedirect();
    },
    // Log the user out
    logout() {
      this.$auth.logout({
        returnTo: window.location.origin
      });
    }
  }
  // 以上追加
}
</script>
テストサーバを実行します。
npm run serve
ページ下部にログインボタンが追加されていればOKです。

なお、この時点ではログインボタンを押してもエラーになります。

Auth0のURL設定
ログインボタンを押すと表示されるエラーはAuth0にCloud9のURLを設定すると解消します。
アプリケーションプレビュー画面のアドレスバーをクリックしてURLをコピーします。

Auth0のSettingsタブに移動しApplication URIsの以下の項目にコピーしたURLを貼り付け、設定を保存します。
- Allowed Callback URLs
- Allowed Logout URLs
- Allowed Web Origins

上記設定後にブラウザをリロードします。
Log inボタンを押してログイン画面が表示されればOKです。
ユーザーの管理
ダッシュボードのUser Managementを選択してUsersをクリックします。
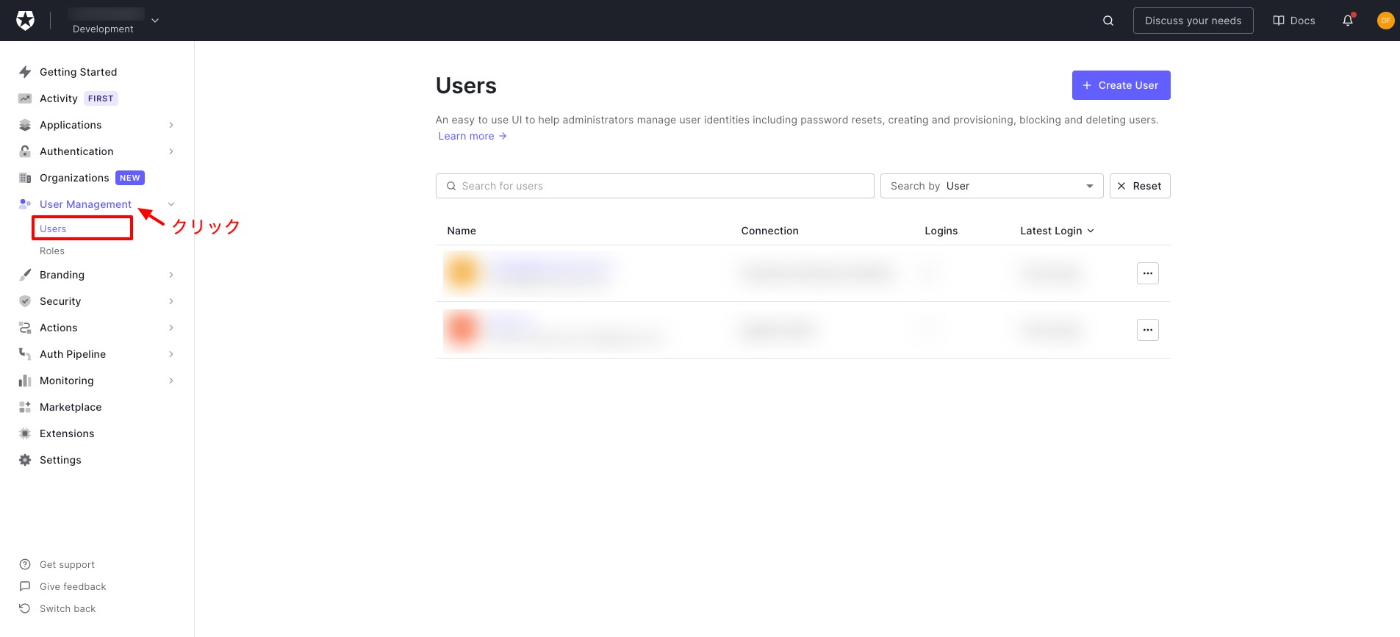
サインアップ済みユーザの確認や、新たにユーザを追加することができます。
ログイン画面のカスタマイズ
自由にユーザーを作成できないようにしたいのでサインアップ機能とソーシャルログイン機能を無効にします。
以下の記事を参考にAuth0の設定を変更します。
ログイン画面からサインアップとソーシャルログインの表示がなくなればOKです。
Discussion