概要
Cloud Run のサイドカーが 2023/5/16 に Public Preview となりました🎉
Google Cloud Blog では、サイドカーを使った Nasdaq の事例が紹介されています。
Nasdaq の事例ではEnvoyを使っています。それを Nginx と Node.js によって実際に解決できるのか検証してみます。
最終的な構成は以下のとおりです。
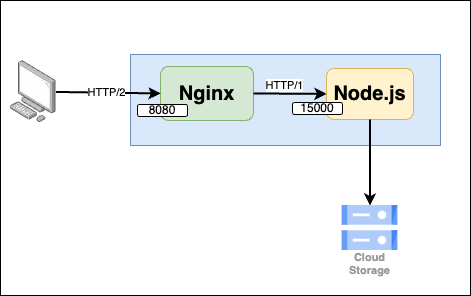
構成図
検証に使うアプリケーション
検証には Node.js, Express を使ったアプリケーションを作成します。
コードは以下のとおりです。
-
GET /healthはヘルスチェック用のエンドポイントです。 -
POST /uploadは、ファイルアップロード用のエンドポイントです。アップロードされたファイルは、Cloud Storage へ保存されるよう構成しています。 -
GET /sleepは時間のかかる処理を想定したエンドポイントです。
32MiB の上限を確認してみる
Cloud Storage を作成する
ファイルのアップロード先となる 公開 Cloud Storage バケットを作成します。
BUCKET_NAME=upload-file-2023-09-03
gcloud storage buckets create gs://$BUCKET_NAME \
  --location=asia-northeast1 \
  --uniform-bucket-level-access
gcloud storage buckets add-iam-policy-binding gs://$BUCKET_NAME \
  --member=allUsers \
  --role=roles/storage.objectViewer
通常デプロイする
アプリケーションをまずは通常の Cloud Run としてデプロイしてみます。
gcloud run deploy | Google Cloud CLI Documentation
# デプロイ
gcloud run deploy http1-test --source . \
  --project http2-cloudrun-test \
  --region asia-northeast1 \
  --allow-unauthenticated
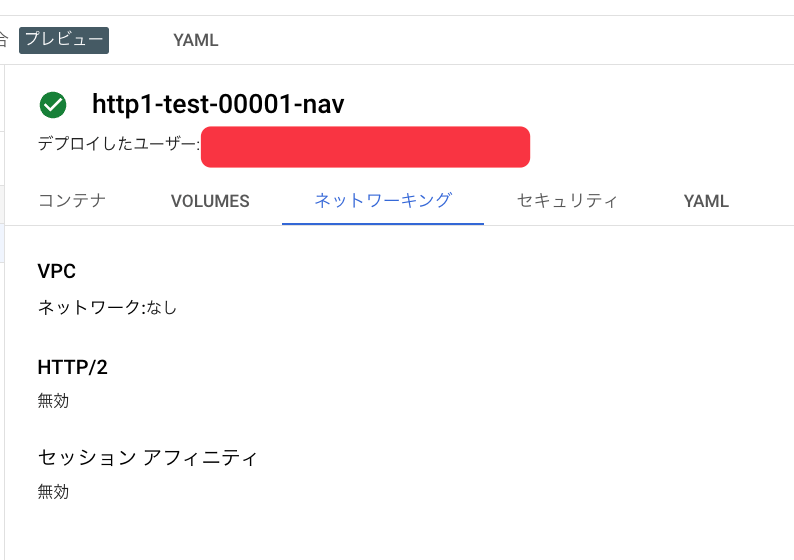
デプロイできたか確認してみます。ネットワークは HTTP/2 が「無効」になっていますね。
ヘルスチェックが通るか確認します。問題なさそうです。
$ curl -XGET https://http1-test-xxxxxxxx.run.app/health
OK
画像のアップロードを検証する
いよいよ 32MiB 上限を検証します。軽い画像(10MB)と重い画像(100MB)をアップロードしてみますが、重い画像は失敗してしまいます。
# 軽い画像
curl --location 'https://http1-test-xxxxxxxx.run.app/upload' \
--form 'file=@"./image/10MB.png"'
File uploaded! https://storage.googleapis.com/upload-file-2023-09-03/10MB.png%

# 重い画像
curl --location 'https://http1-test-xxxxxxxx.run.app/upload' \
--form 'file=@"./image/100MB.png"'

<html><head>
<meta http-equiv="content-type" content="text/html;charset=utf-8">
<title>413 Request Entity Too Large</title>
</head>
<body text=#000000 bgcolor=#ffffff>
<h1>Error: Request Entity Too Large</h1>
<h2>Your client issued a request that was too large.
</h2>
<h2><script>
  (function() { var c=function(a,d,b){a=a+"=deleted; path="+d;null!=b&&(a+="; domain="+b);document.cookie=a+"; expires=Thu, 01 Jan 1970 00:00:00 GMT"};var g=function(a){var d=e,b=location.hostname;c(d,a,null);c(d,a,b);for(var f=0;;){f=b.indexOf(".",f+1);if(0>f)break;c(d,a,b.substring(f+1))}};var h;if(4E3<unescape(encodeURI(document.cookie)).length){for(var k=document.cookie.split(";"),l=[],m=0;m<k.length;m++){var n=k[m].match(/^\s*([^=]+)/);n&&l.push(n[1])}for(var p=0;p<l.length;p++){var e=l[p];g("/");for(var q=location.pathname,r=0;;){r=q.indexOf("/",r+1);if(0>r)break;var t=q.substring(0,r);g(t);g(t+"/")}"/"!=q.charAt(q.length-1)&&(g(q),g(q+"/"))}h=!0}else h=!1;
h&&setTimeout(function(){if(history.replaceState){var a=location.href;history.replaceState(null,"","/");location.replace(a)}},1E3); })();
</script>
</h2>
</body></html>
HTTP/2 で画像のアップロードを検証する
アプリケーションの変更をせずに HTTP/2 にした場合はどうなるでしょうか。
HTTP/2 リクエストを「有効化」してみます。
gcloud run services update http1-test --use-http2 \
  --project http2-cloudrun-test \
  --region asia-northeast1
ヘルスチェックが通るか確認すると、失敗しますね。
アプリケーションの改修なしでは、HTTP/2 リクエストは受け付けてもらえないことを確認できました。
curl -XGET https://http1-test-xxxxxxxx.run.app/health
upstream connect error or disconnect/reset before headers. reset reason: protocol error%
まとめ
- HTTP/1 の場合は 32MiB のリクエストサイズ上限があること
- HTTP/1 を想定したアプリケーションをそのまま HTTP/2 では動かせないこと
サイドカーを使った Cloud Run Service をデプロイする
では、いよいよ サイドカーを使って Node.js アプリケーションを構成してみます。
今回は、プロキシサーバーとして Nginx を利用します。
サイドカーを使用した Cloud Run サービスをデプロイするためには、YAML ファイルを作成する必要がありますので、以下の2つを作成します。
- Nginx のビルド環境とコンテナイメージ
- Cloud Run をデプロイするための YAML ファイル
Nginx のイメージを作成する
default.conf を作成して、HTTP/2 を有効化します。Node.js へは 15000 番ポートで転送するように構成します。
server {
    listen 8080;
    http2  on;
    server_name _;
    location / {
        proxy_pass   http://localhost:15000;
    }
}
次に、Nginx 用の Dockerfile を作成します。
Nginx 用のイメージを格納するため、Artifact Registry を作成します。
gcloud artifacts repositories create my-repo \
  --location=asia-northeast1 \
  --repository-format=docker
Nginx イメージは Cloud Build で Kaniko を使って、ビルドします。
高速化するほどでもないですが、イメージの push までを簡略化したいので利用します。
- dockerfile は 作成した Dockerfile を指定します
- destination は push 先の先程作成した Artifact Registry を指定します
- context に nginx ディレクトリを指定します
Kaniko キャッシュの使用 | Cloud Build のドキュメント | Google Cloud
Cloud Build を実行します。
gcloud builds submit --project=http2-cloudrun-test \
  --config ./cloudbuild.yaml
Cloud Run をデプロイするための YAML ファイルを構成する
Nginx のイメージのビルドが終わったので、Cloud Run サービスの YAML ファイルを作成します。
デプロイ済みの Cloud Run から YAML ファイルを取得します。
gcloud run services describe Google Cloud CLI Documentation
gcloud run services describe http1-test \
  --region=asia-northeast1 \
  --format=export > service.yaml
取得したファイルから不要な値を削除し、サイドカーを構成します。
Cloud Run YAML Reference | Cloud Run Documentation | Google Cloud
apiVersion: serving.knative.dev/v1
kind: Service
metadata:
  annotations:
    run.googleapis.com/ingress: all
-    run.googleapis.com/ingress-status: all
-    run.googleapis.com/operation-id: 7664691a-4065-4014-9f49-cb0fafdfdda6
+    # プレビューなので BETA が必要です
+    run.googleapis.com/launch-stage: BETA
  labels:
    cloud.googleapis.com/location: asia-northeast1
  name: http2-test
spec:
  template:
    metadata:
      annotations:
        autoscaling.knative.dev/maxScale: '100'
-        run.googleapis.com/client-name: gcloud
-        run.googleapis.com/client-version: 446.0.1
+        # Node.js アプリケーションが起動してから Nginx が起動するようにします
+        run.googleapis.com/container-dependencies: '{"proxy":["application"]}'
      labels:
        run.googleapis.com/startupProbeType: Default
    spec:
      containerConcurrency: 80
      containers:
-        - image: asia-northeast1-docker.pkg.dev/http2-cloudrun-test/cloud-run-source-deploy/http1-test@sha256:cc4d761a82778c52f8295a2993f54c5
731baf37769b75e76c76992c7e2edbc48
+        # 先程デプロイした Nginx イメージを指定します
+        - image: asia-northeast1-docker.pkg.dev/http2-cloudrun-test/my-repo/nginx-proxy:latest
+          name: proxy
           ports:
             - containerPort: 8080
+            # HTTP/2 を有効化します
-              name: http1
+              name: h2c
          resources:
            limits:
              cpu: 1000m
              memory: 512Mi
          startupProbe:
            failureThreshold: 1
            periodSeconds: 240
            tcpSocket:
              port: 8080
            timeoutSeconds: 240
+        # はじめにデプロイしたアプリケーションのイメージを指定します
+        - image: asia-northeast1-docker.pkg.dev/http2-cloudrun-test/cloud-run-source-deploy/http1-test:latest
+          name: application
+          resources:
+            limits:
+              cpu: 2000m
+              memory: 2Gi
+          env:
+            # 8080 は Nginx で使うので Node.js は 15000 で起動するように環境変数を設定します
+            - name: PORT
+              value: '15000'
+          startupProbe:
+            failureThreshold: 1
+            periodSeconds: 240
+            tcpSocket:
+              port: 15000
+            timeoutSeconds: 240
+          livenessProbe:
+            failureThreshold: 3
+            httpGet:
+              path: /health
+              port: 15000
+            initialDelaySeconds: 60
+            periodSeconds: 10
+            timeoutSeconds: 10
      serviceAccountName: サービスアカウントのメールアドレス
      timeoutSeconds: 300
  traffic:
    - latestRevision: true
      percent: 100
デプロイします、更に未認証のリクエストを許可します。
# デプロイ
gcloud run services replace --region=asia-northeast1 service.yaml
# 未認証の許可
gcloud run services add-iam-policy-binding http2-test \
  --region=asia-northeast1 \
  --member="allUsers" --role="roles/run.invoker"
動作確認をしてみます。ヘルスチェックは通りましたが Nginx のエラーが返ってきました。
curl -XGET https://http2-test-xxxxxxxx.run.app/health
OK

curl --location 'https://http2-test-xxxxxxxx.run.app/upload' \
--form 'file=@"./image/10MB.png"'

<html>
<head><title>413 Request Entity Too Large</title></head>
<body>
<center><h1>413 Request Entity Too Large</h1></center>
<hr><center>nginx/1.25.1</center>
</body>
</html>
「413 Request Entity Too Large」 を解決する
Cloud Run へのリクエストは通過しているようですが、Nginx でリクエストが止まってしまっているようです。client_max_body_size を Nginx の設定に追加します。
client_max_body_size
Module ngx_http_core_module
Default: client_max_body_size 1m;
Sets the maximum allowed size of the client request body. If the size in a request exceeds the configured value, the 413 (Request Entity Too Large) error is returned to the client.
server {
    listen 8080;
    http2  on;
    server_name _;
    location / {
        client_max_body_size 1024M;
        proxy_pass   http://localhost:15000;
    }
}
もう一度、Nginx のイメージをビルドしましょう。ビルドが完了したらservice.yaml の Nginx のイメージを更新し、Cloud Run サービスをデプロイします。もう一度、画像のアップロードを試します。
curl --location 'https://http2-test-xxxxxxxx.run.app/upload' \
--form 'file=@"./100MB.png"'
File uploaded! https://storage.googleapis.com/upload-file-2023-09-03/100MB.png%
32MiB を超えたファイルのアップロードも成功しました。
Nginx を挟むことでおきた問題
ところで、32MiB を超えたファイルをアップロードできましたが、別の問題がおきる可能性があります。たとえば、GET /sleep に対してリクエストしてみましょう。
curl -XGET https://http2-test-xxxxxxxx.run.app/sleep
<html>
<head><title>504 Gateway Time-out</title></head>
<body>
<center><h1>504 Gateway Time-out</h1></center>
<hr><center>nginx/1.25.1</center>
</body>
</html>
タイムアウトしてしまいました。「Nginx 504 Gateway Time-out」で検索するとたくさんの事例を見つけられると思います。
今回は、proxy_read_timeout を設定します。
proxy_read_timeout
Module ngx_http_proxy_module
Default: proxy_read_timeout 60s;
Defines a timeout for reading a response from the proxied server. The timeout is set only between two successive read operations, not for the transmission of the whole response. If the proxied server does not transmit anything within this time, the connection is closed.
これはデフォルトで 60 秒の設定なので、それより大きな値にしましょう。今度は正常にレスポンスを受け取れました。
curl -XGET https://http2-test-xxxxxxxx.run.app/sleep
END sleep%
まとめ
- サイドカーでプロキシサーバーを挟むことと 32 MiB 上限を突破できる
- プロキシサーバーの設定は事前に十分検証しよう
まだプレビューですが、これを機に CloudRun への移行を検討してみてもいいかもしれませんね😀

Discussion