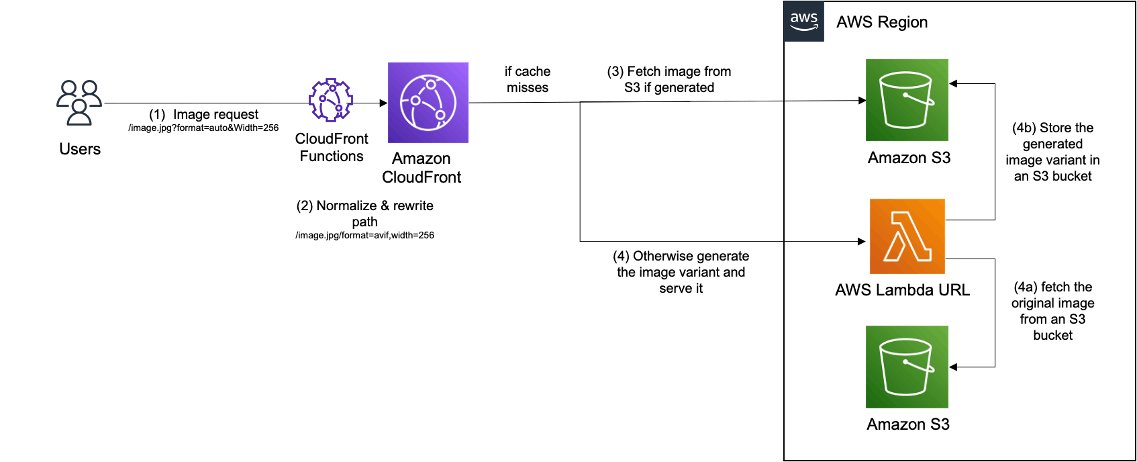
CloudFront Functions + Lambda でリアルタイムに画像変換するCDNを実現する
はじめに
こんにちは、クラシル比較でエンジニアをやってる福島です。
今回は、画像変換基盤を CloudFront Functions + Lambda の構成にリプレイスした話を紹介したいと思います。
画像変換基盤とは、画像ファイルのフォーマットやサイズを適切に変換してキャッシュ配信するための仕組みです。
WEBサイトのSEOを向上させる過程において、画像の扱いは非常に重要で、画像を描画するElementのwidthやheightに合わせて、画像も適切なサイズを選択する必要があります。
私たちと同じように、画像の取り扱いに課題を感じてる方の参考になれば幸いです。
リプレイスのきっかけ
クラシル比較はもともとCloudFront + S3の一般的な構成で、バックエンド(Rails)にて、carrierwave gemを使ってアップローダーを実装していました。
CloudFrontで画像をキャッシュさせることで、画像表示のパフォーマンスを改善し、コストを削減することはできています。
しかし、この構成では「フォーマットやサイズを適切に変換」の部分の柔軟性が低いです。
この構成でフォーマットやサイズを最適化する場合、画像アップロード時に複数パターンの画像を生成し、S3に配置しておく必要があります。
# 例
bucket_a/
    ...path/
        |- original_image.jpeg
        |- small_image.webp
        |- medium_image.webp
        |- large_image.webp
しばらく運用していると、こんな不便が出てきます
- フォーマットや画像サイズをアップローダー実装時に決定しないといけない
- 途中でパターンを追加したくなった時、既存レコードに対して画像変換処理を一括でかける必要がある
- アップローダーの処理がAPIパフォーマンスのボトルネックになりがち
上記の課題を解決して、画像変換の柔軟性、パフォーマンス、コスト、運用にかかるリソースなどをクリアできる構成にしたい!と思ったのがリプレイスを検討し始めたきっかけです。
画像が増えるほどリプレイスにかかるコストも膨れ上がっていくので、やるなら早いうちにという心理もありました。
アーキテクチャの検討
調べたところ、以下のような選択肢がありました。
- ImageFlux や imgix のようなSaaSを導入する
- Lambda@Edge を活用して画像変換を実現する
SaaSの導入
SaaSを導入する場合、画像変換をマネージドにやってくれるので開発・運用にかかるリソースはガッツリ削減できますね。
ただし価格設定がお高めで、大量の画像を配信するようなサービスだとコストが嵩んでしまいそうでした。
とはいえマネージドにやってくれるのは魅力的で、あまり多くの画像を扱わないサービスや、コストかけても運用リソースを削減したい方にはかなり良い選択肢かも知れません。
Lambda@Edge
次にLambda@Edgeについて。こちらは5~6年前に公式ドキュメントでも紹介されており、他社さんのテックブログでも結構見かけました。

https://aws.amazon.com/jp/blogs/news/resizing-images-with-amazon-cloudfront-lambdaedge-aws-cdn-blog/
AWSリソースだけで完結できるため、コストも抑えられるし、IAMによる権限制御もやりやすいです。
... しかしこの構成は若干無駄が多いようにも思いました。
例えば画像がCloudFrontでキャッシュヒットしなかった場合、S3にオリジン画像が存在する・しないに関わらずLambdaが起動することになります。
それと、Lambda@Edgeだと(この記事の執筆時点では)環境変数ができなかったり、コンテナイメージを実行できなかったりの制限があります。
⭐︎ CloudFront Functions + Lambda
どちらも採用するには至らないなあ、、、とそんな時に見つけたのがこちらです

キーとなる機能は以下の通りです。
- CloudFront Functions ... URLパラメータの正規化・バリデーションを行う
- CloudFront オリジンフェイルオーバー ... 変換後の画像がない場合、Lambdaの関数URLにリクエストを送る
- Lambda OAC ... CloudFrontからのリクエストのみを許可することで、関数URLをセキュアに運用できる
この構成だと無駄なLambdaの起動がなく、またLambda@EdgeよりもGB-秒あたりのコストが安いです。(参照)
また、環境変数使えたりコンテナイメージも実行できて、実装・検証が楽になると言う点でメリットあるかと思います。
実装
では実際に、Terraform, CloudFront Functions, Lambdaを用いて、画像のURLパラメータに基づいて任意のフォーマットや縦横サイズに変換した画像をレスポンスするCDNを実装してみようと思います。
🚧🚧🚧🚧
サンプルコードなのでこのままではエラーになります。コメント(NOTE)書いてる箇所を適宜補完しつつ実装してください
🚧🚧🚧🚧
Terraform
### CloudFront ###
resource "aws_cloudfront_distribution" "assets-converted" {
  # オリジンの定義
  origin {
    # NOTE: 変換後の画像を格納するS3リソースを指定してください
    domain_name = aws_s3_bucket.assets-converted.bucket_regional_domain_name
    origin_id   = aws_s3_bucket.assets-converted.id

    origin_access_control_id = aws_cloudfront_origin_access_control.s3.id # OACの設定(cloudfront)
  }

  origin {
    domain_name = aws_lambda_function_url.image_processing.domain_name
    origin_id   = aws_lambda_function_url.image_processing.domain_name

    origin_access_control_id = aws_cloudfront_origin_access_control.lambda.id # OACの設定(lambda)
  }

  # オリジングループの定義
  origin_group {
    origin_id = "assets-converted-bucket"
    failover_criteria {
      status_codes = [403, 500, 503, 504]
    }
    member {
      # NOTE: 変換後の画像を格納するS3リソースを指定してください
      origin_id = aws_s3_bucket.assets-converted.id # Primary
    }
    member {
      origin_id = aws_lambda_function_url.image_processing.domain_name # Secondary
    }
  }

  default_cache_behavior {
    target_origin_id = "image-converted-origin-group"

    function_association {
      # CloudFront Functionsを紐付け
      event_type = "viewer-request"
      function_arn = aws_cloudfront_function.rewrite_url.arn
    }
  }
}

resource "aws_cloudfront_origin_access_control" "s3" {
  name                              = "s3" # NOTE: 適宜変更してください
  origin_access_control_origin_type = "s3"
  signing_behavior                  = "always"
  signing_protocol                  = "sigv4"
}

resource "aws_cloudfront_origin_access_control" "lambda" {
  name                              = "lambda" # NOTE: 適宜変更してください
  origin_access_control_origin_type = "lambda"
  signing_behavior                  = "always"
  signing_protocol                  = "sigv4"
}

### CloudFront Functions ###
resource "aws_cloudfront_function" "rewrite_url" {
  name    = "rewrite-url"
  runtime = "cloudfront-js-2.0"
  publish = true
  # NOTE: CloudFront Functionsを定義してるファイルのパスを指定してください
  code    = file("${path.module}/cloudfront_functions/rewrite_url.js")
}

### Lambda ###
resource "aws_lambda_function" "image_processing" {
  function_name = "image_processing"
  role          = "lambda_role_arn"
  package_type  = "Image"
  # NOTE: Dockerイメージを保管してるECRリポジトリのURLを指定してください
  image_uri     = "ecr_lambda_image_uri"
}

resource "aws_lambda_permission" "image_processing_url" {
  statement_id  = "AllowCloudFrontServicePrincipal"
  action        = "lambda:InvokeFunctionUrl"
  function_name = aws_lambda_function.image_processing.function_name
  principal     = "cloudfront.amazonaws.com"
  source_arn    = aws_cloudfront_distribution.assets-converted.arn

  function_url_auth_type = "AWS_IAM"
}

resource "aws_lambda_function_url" "image_processing" {
  function_name      = aws_lambda_function.image_processing.function_name
  authorization_type = "AWS_IAM"
}
CloudFront Functions
CloudFront Functions は JavaScript のみ対応してるので、JavaScript で実装していきます。
実行タイミングはCloudFrontのviewer requestに紐付けています。
function handler(event) {
  const request = event.request;
  const originalImagePath = request.uri;
  const normalizedOperations = {};

  if (request.querystring) {
    Object.keys(request.querystring).forEach(operation => {
      switch (operation.toLowerCase()) {
        case 'format':
          if (request.querystring[operation]['value']) {
            normalizedOperations['format'] = request.querystring[operation]['value'].toLowerCase();
          }
          break;
        case 'width':
          if (request.querystring[operation]['value']) {
            const width = parseInt(request.querystring[operation]['value']);
            if (!isNaN(width) && (width > 0)) {
              normalizedOperations['width'] = width.toString();
            }
          }
          break;
        case 'height':
          if (request.querystring[operation]['value']) {
            const height = parseInt(request.querystring[operation]['value']);
            if (!isNaN(height) && (height > 0)) {
              normalizedOperations['height'] = height.toString();
            }
          }
          break;
        default: break;
      }
    });
    if (Object.keys(normalizedOperations).length > 0) {
      let normalizedOperationsArray = [];
      if (normalizedOperations.format) normalizedOperationsArray.push('format='+normalizedOperations.format);
      if (normalizedOperations.width) normalizedOperationsArray.push('width='+normalizedOperations.width);
      if (normalizedOperations.height) normalizedOperationsArray.push('height='+normalizedOperations.height);
      request.uri = originalImagePath + '/' + normalizedOperationsArray.join(',');
    } else {
      request.uri = originalImagePath + '/original';
    }
  } else {
    request.uri = originalImagePath + '/original';
  }
  request['querystring'] = {};
  return request;
}
Lambda
Pythonで実装します。
LambdaはDockerで動かしています。
Dockerで動かす場合、Zipで動かす場合のパフォーマンスの差について言及されてる記事もありましたが、両者そこまで差はないようだったので、ローカルでの検証もしやすいDockerでの運用を選びました。
FROM public.ecr.aws/lambda/python:3.9
COPY requirements.txt main.py /var/task/
RUN yum upgrade -y && \
pip install --upgrade pip && \
pip install --no-cache-dir -r requirements.txt
CMD [ "main.lambda_handler" ]
client = boto3.client('s3')

def lambda_handler(event, context):
    object_path = event['requestContext']['http']['path']

    image_path_array = object_path.split('/')
    operations_prefix = image_path_array.pop()
    image_path_array.pop(0)
    original_image_path = '/'.join(image_path_array)

    try:
        response = client.get_object(Bucket=S3_ORIGINAL_IMAGE_BUCKET, Key=original_image_path)
        original_image_body = response['Body'].read()
        content_type = response['ContentType']
    except Exception as e:
        return send_error(500, 'Error downloading original image', str(e))

    try:
        image = Image.open(BytesIO(original_image_body))
        w, h = image.size
        operations = dict(op.split('=') for op in operations_prefix.split(','))

        if 'width' in operations or 'height' in operations:
            # Maintain aspect ratio
            if 'width' in operations and 'height' in operations:
                width = int(operations['width'])
                height = int(operations['height'])
            elif 'width' in operations:
                width = int(operations['width'])
                height = int(float(operations['width']) * h / w)
            else:
                height = int(operations['height'])
                width = int(float(operations['height']) * w / h)

            image = image.resize((width, height))

        image = ImageOps.exif_transpose(image)
        output_buffer = BytesIO()

        if 'format' in operations:
            image_format = operations['format']
            content_type = f'image/{image_format}'
            options = { 'format': image_format }
            image.save(output_buffer, **options)

        converted_image = output_buffer.getvalue()
    except Exception as e:
        return send_error(500, 'Error transforming image', str(e))

    return {
        'statusCode': 200,
        'body': base64.b64encode(converted_image).decode('utf-8'),
        'isBase64Encoded': True,
        'headers': {
            'Content-Type': content_type,
            'Cache-Control': CONVERTED_IMAGE_CACHE_TTL
        }
    }

def send_error(status_code, message, error=None):
    print(f'APPLICATION ERROR: {message}')
    if error:
        print(error)
    return {
        'statusCode': status_code,
        'body': message
    }
これで、画像のURLパラメータに基づいて画像を任意のフォーマット、サイズに変換して表示させられるようになります。
(元画像はすべて横幅1280pxくらいのファイルです)

?format=webp&width=700

?format=webp&width=400

?format=webp&width=500
簡単ですね!
おわり
今回はCloudFront Functions + Lambdaの画像変換基盤について紹介しました。
リプレイスにあたりご協力いただいたAWSサポートの方にも感謝ですmm
クラシル比較開発チームでは他にも様々な技術改善を行っているので、引き続き紹介していきたいと思います。
以上です、読んでいただきありがとうございました!
Discussion