EKS & CiliumでENABLE_PREFIX_DELEGATIONする
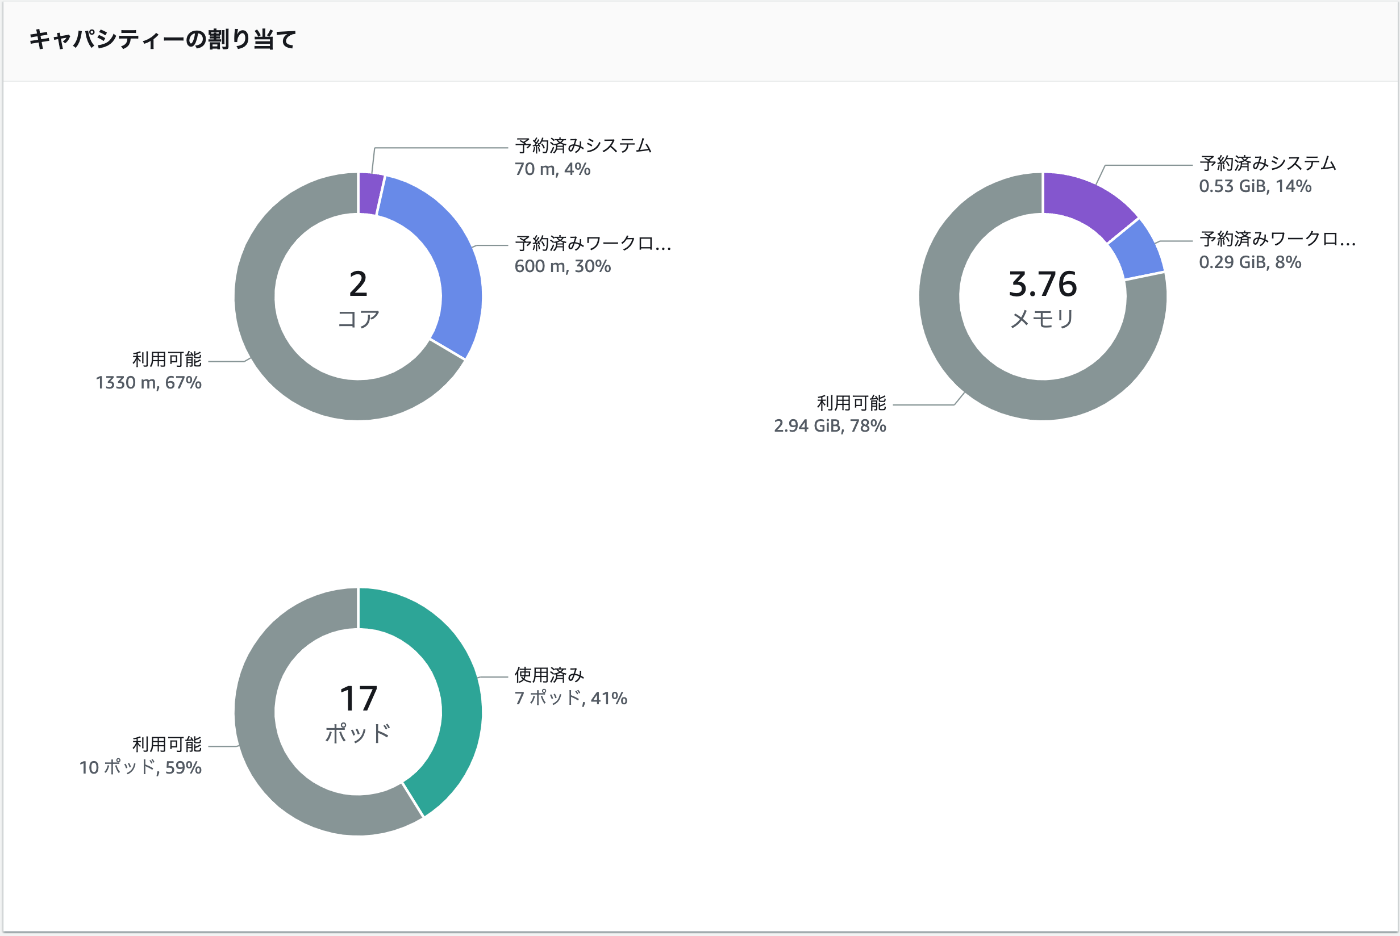
EKSを運用されている方には当たり前なのかもしれないが、EKSでは利用するEC2のインスタンスタイプによってクラスター内で利用できるIPの数が変わる。例えばt3.mediumだったら17個(たぶんIPv6の場合も同様)。
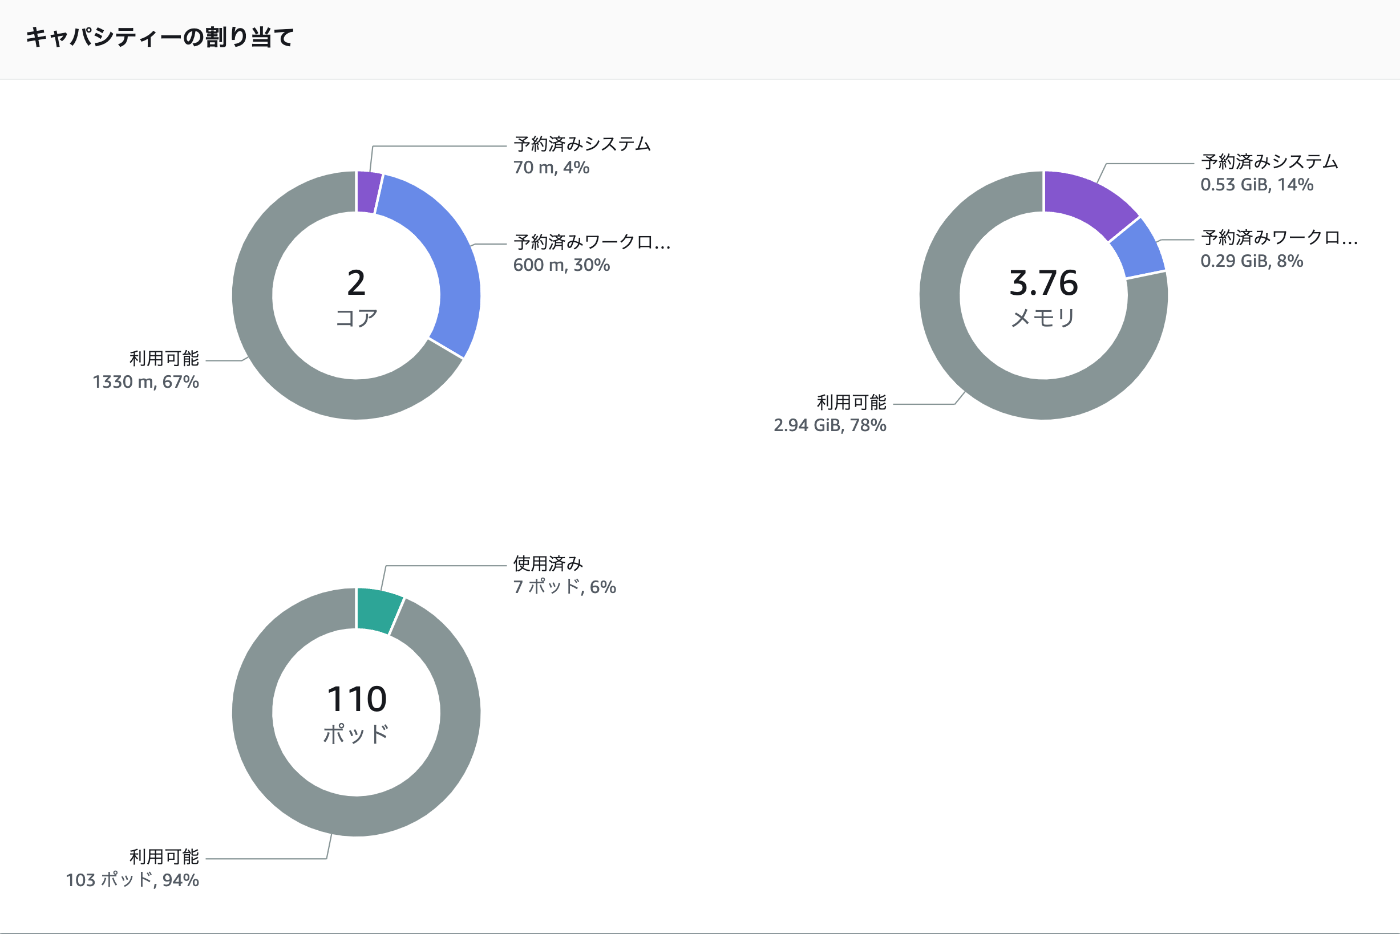
これは厳しいということで、EKSでIP管理をしているaws-nodeというDaemonsetにENABLE_PREFIX_DELEGATIONというフラグが用意されており、これを有効にすることでt3.mediumなら110個までIPを利用できるようになる。
詳しい仕組みは理解していないが、公式情報は以下。
以上前提で、以下本題。
Ciliumを利用する場合はaws-nodeよるIP管理をCiliumが行うようになる。
そのためaws-nodeのDaemonsetに対して以下のようなPatchを当てて、無効化する手順が公式にも書かれている。
kubectl -n kube-system patch daemonset aws-node --type='strategic' -p='{"spec":{"template":{"spec":{"nodeSelector":{"io.cilium/aws-node-enabled":"true"}}}}}'
ではCiliumがENABLE_PREFIX_DELEGATIONに相当するフラグがあるかというと、あるらしい。
以下のPRでマージされている。
helmにもフラグがちゃんと用意されているが、デフォルトではfalseになっている。
| Key | Description | Type | Default |
|---|---|---|---|
| eni.awsEnablePrefixDelegation | Enable ENI prefix delegation | bool | false |
というわけでこのフラグを有効化してインストールした上で100個近いpodがたてられるか検証する。
Helmのコマンドは以下になると思う。
実際には訳あってPulumi経由でHelmを呼んでいるが、実行されるコマンドは同じはず。
最新のv1.15.0で追加になった機能が必要なためRCだがバージョンを指定している。理由は割愛。
helm install cilium cilium/cilium --version v1.15.0-rc.0 \
  --namespace kube-system \
  --set eni.enabled=true \
  --set eni.awsEnablePrefixDelegation =true \
  --set ipam.mode=eni \
  --set egressMasqueradeInterfaces=eth0 \
  --set routingMode=native
実際のPulumiのソースコードは以下。
フラグの差異についてはコード上のコメントで察してほしい。
import * as k8s from "@pulumi/kubernetes"
import * as pulumi from "@pulumi/pulumi"

export type KuberneteCiliumArgs = {
  clusterEndpoint: pulumi.Input<string>
}

export class KuberneteCilium extends pulumi.ComponentResource {
  public opts: pulumi.ResourceOptions
  public release: k8s.helm.v3.Release

  constructor(
    name: string,
    args: KuberneteCiliumArgs,
    opts?: pulumi.ResourceOptions,
  ) {
    super("stack8:kubernetes:Cilium", name, undefined, opts)

    this.opts = { ...opts, parent: this }

    const disabledAWSNode = new k8s.apps.v1.DaemonSetPatch(
      "disabled-aws-node",
      {
        metadata: {
          namespace: "kube-system",
          name: "aws-node",
        },
        spec: {
          template: {
            spec: {
              nodeSelector: {
                node: "non-existing",
              },
            },
          },
        },
      },
      this.opts,
    )

    const disabledKubeProxy = new k8s.apps.v1.DaemonSetPatch(
      "disabled-kube-proxy",
      {
        metadata: {
          namespace: "kube-system",
          name: "kube-proxy",
        },
        spec: {
          template: {
            spec: {
              nodeSelector: {
                node: "non-existing",
              },
            },
          },
        },
      },
      this.opts,
    )

    this.release = new k8s.helm.v3.Release(
      "release",
      {
        chart: "cilium",
        namespace: "kube-system",
        version: "v1.15.0-rc.0",
        repositoryOpts: {
          repo: "https://helm.cilium.io/",
        },
        values: {
          // NOTE: For running in EKS
          eni: {
            enabled: true,
            awsEnablePrefixDelegation: true,
          },
          ipam: {
            mode: "eni",
          },
          egressMasqueradeInterfaces: "eth0",
          routingMode: "native",
          // NOTE: For replacing kube-proxy with eBPF
          kubeProxyReplacement: true,
          k8sServiceHost: args.clusterEndpoint,
          k8sServicePort: "443",
          // NOTE: For getting better performance
          loadBalancer: {
            algorithm: "maglev",
          },
        },
      },
      { ...this.opts, dependsOn: [disabledAWSNode, disabledKubeProxy] },
    )
  }
}
この状態でコンソールを確認するとPodは17個までだよ感を出されていて不安になるが、一旦試してみる。

以下のyamlでとりあえず30個のnginxのPodを立ててみる。
apiVersion: apps/v1
kind: Deployment
metadata:
  namespace: my-nginx
  name: my-nginx
spec:
  selector:
    matchLabels:
      run: my-nginx
  replicas: 30
  template:
    metadata:
      labels:
        run: my-nginx
    spec:
      containers:
      - name: my-nginx
        image: nginx
        ports:
        - containerPort: 80
案の定、IPの割当がされないPodがいる。
✗ kubectl get pods -n my-nginx -l run=my-nginx -o wide
NAME                        READY   STATUS    RESTARTS   AGE   IP            NODE                                            NOMINATED NODE   READINESS GATES
my-nginx-684dd4dcd4-2wfrq   1/1     Running   0          69s   10.0.48.182   ip-10-0-63-82.ap-northeast-1.compute.internal   <none>           <none>
my-nginx-684dd4dcd4-88knn   1/1     Running   0          69s   10.0.48.186   ip-10-0-63-82.ap-northeast-1.compute.internal   <none>           <none>
my-nginx-684dd4dcd4-9fxpv   1/1     Running   0          69s   10.0.43.134   ip-10-0-42-43.ap-northeast-1.compute.internal   <none>           <none>
my-nginx-684dd4dcd4-9klkr   0/1     Pending   0          69s   <none>        <none>                                          <none>           <none>
my-nginx-684dd4dcd4-ctsnp   1/1     Running   0          69s   10.0.48.191   ip-10-0-63-82.ap-northeast-1.compute.internal   <none>           <none>
my-nginx-684dd4dcd4-d2fcm   1/1     Running   0          69s   10.0.48.178   ip-10-0-63-82.ap-northeast-1.compute.internal   <none>           <none>
my-nginx-684dd4dcd4-d4dqd   1/1     Running   0          69s   10.0.43.143   ip-10-0-42-43.ap-northeast-1.compute.internal   <none>           <none>
my-nginx-684dd4dcd4-dj5ms   1/1     Running   0          69s   10.0.48.179   ip-10-0-63-82.ap-northeast-1.compute.internal   <none>           <none>
my-nginx-684dd4dcd4-ffvh2   0/1     Pending   0          69s   <none>        <none>                                          <none>           <none>
my-nginx-684dd4dcd4-flgd4   1/1     Running   0          69s   10.0.43.142   ip-10-0-42-43.ap-northeast-1.compute.internal   <none>           <none>
my-nginx-684dd4dcd4-gpmgg   1/1     Running   0          69s   10.0.48.189   ip-10-0-63-82.ap-northeast-1.compute.internal   <none>           <none>
my-nginx-684dd4dcd4-jcnt7   0/1     Pending   0          69s   <none>        <none>                                          <none>           <none>
my-nginx-684dd4dcd4-jzbkk   0/1     Pending   0          69s   <none>        <none>                                          <none>           <none>
my-nginx-684dd4dcd4-m5td4   1/1     Running   0          69s   10.0.48.188   ip-10-0-63-82.ap-northeast-1.compute.internal   <none>           <none>
my-nginx-684dd4dcd4-m87lv   1/1     Running   0          69s   10.0.43.139   ip-10-0-42-43.ap-northeast-1.compute.internal   <none>           <none>
my-nginx-684dd4dcd4-mjmwj   1/1     Running   0          69s   10.0.48.177   ip-10-0-63-82.ap-northeast-1.compute.internal   <none>           <none>
my-nginx-684dd4dcd4-mmtcs   0/1     Pending   0          69s   <none>        <none>                                          <none>           <none>
my-nginx-684dd4dcd4-ntvhc   1/1     Running   0          69s   10.0.48.176   ip-10-0-63-82.ap-northeast-1.compute.internal   <none>           <none>
my-nginx-684dd4dcd4-qr226   1/1     Running   0          69s   10.0.43.128   ip-10-0-42-43.ap-northeast-1.compute.internal   <none>           <none>
my-nginx-684dd4dcd4-qz79t   1/1     Running   0          69s   10.0.43.138   ip-10-0-42-43.ap-northeast-1.compute.internal   <none>           <none>
my-nginx-684dd4dcd4-stsdz   1/1     Running   0          69s   10.0.43.133   ip-10-0-42-43.ap-northeast-1.compute.internal   <none>           <none>
my-nginx-684dd4dcd4-v82h6   1/1     Running   0          69s   10.0.43.136   ip-10-0-42-43.ap-northeast-1.compute.internal   <none>           <none>
my-nginx-684dd4dcd4-v9vkk   0/1     Pending   0          69s   <none>        <none>                                          <none>           <none>
my-nginx-684dd4dcd4-wcl4d   0/1     Pending   0          69s   <none>        <none>                                          <none>           <none>
my-nginx-684dd4dcd4-wqv9l   1/1     Running   0          69s   10.0.48.187   ip-10-0-63-82.ap-northeast-1.compute.internal   <none>           <none>
my-nginx-684dd4dcd4-wrwz8   0/1     Pending   0          69s   <none>        <none>                                          <none>           <none>
my-nginx-684dd4dcd4-ww2mg   1/1     Running   0          69s   10.0.43.137   ip-10-0-42-43.ap-northeast-1.compute.internal   <none>           <none>
my-nginx-684dd4dcd4-xftcr   1/1     Running   0          69s   10.0.43.132   ip-10-0-42-43.ap-northeast-1.compute.internal   <none>           <none>
my-nginx-684dd4dcd4-zhf47   0/1     Pending   0          69s   <none>        <none>                                          <none>           <none>
my-nginx-684dd4dcd4-zt28x   1/1     Running   0          69s   10.0.48.180   ip-10-0-63-82.ap-northeast-1.compute.internal   <none>           <none>
いったんnsごと消しておく
✗ kubectl delete namespace my-nginx
namespace "my-nginx" deleted
原因調査。
こちらの記事をみると、まずaws-nodeのDeamonSetに対して以下コマンドでENABLE_PREFIX_DELEGATION=trueを設定している。
kubectl set env daemonset aws-node -n kube-system ENABLE_PREFIX_DELEGATION=true
自分の環境を見てみると、ENABLE_PREFIX_DELEGATIONはfalseになっている
✗ kubectl describe daemonset aws-node -n kube-system | grep ENABLE_PREFIX_DELEGATION
      ENABLE_PREFIX_DELEGATION:               false
Ciliumのipam.mode=eniだと、aws-nodeに依存しているのかな?
後で理解を深めるとして、まずはこいつをtrueにしてみよう。
kubectl set env daemonset aws-node -n kube-system ENABLE_PREFIX_DELEGATION=true
設定後にNodeGroupを再作成しないと有効にならないらしい。
NodeGroupをいったん削除して、作成し直してみる。
削除に10分、再作成に5分ほどかかる。
結果、110Podの作成が可能になっているっぽい。

もう一度nginxの30Pod立ててみる。
✗ kubectl get pods -n my-nginx | grep Running | wc -l
30
いい感じ。
replicaを100にしてやってみる。
-  replicas: 30
+  replicas: 100
✗ kubectl get pods -n my-nginx | grep Running | wc -l
100
問題なくOK。
コマンドでENABLE_PREFIX_DELEGATION=trueにする & NodeGroupの作り直しで有効化できることは確認できたので、Pulumi(IaC)で再現性をもたせられるようにしたい。
その前に仕組みをもう少し理解しておきたいが、公式にも手順はあるが解説的なものはない。ManagedなNodeGroup(通常のNodeGroup)では、aws-nodeのDeamonSetに設定されたENABLE_PREFIX_DELEGATION=trueを見て、EC2インスタンスをたてるときのkubelet-extra-argsにmax-pods=110を渡してくれる、ということなのかもしれない。個人的にはなんか変な感じがするが。
EKS BluePrintの例を見ると、vpc-cniのaddonをbefore_compute=trueという属性を有効にして設定することで、NodeGroupが作成される前にaddonを適用しているっぽい。
やはり1. ENABLE_PREFIX_DELEGATION=trueの設定、2. NodeGroupをつくる の順序を守るのが一番お手軽そうな感じである。
Pulumi(Terraform)なのでDependsOnでうまく制御できると思われる。
細部は割愛するが、以下の実装でチャレンジしてみる。
+ this.vpcCniAddon = new aws.eks.Addon(
+   "vpc-cni-addon",
+   {
+     clusterName: this.cluster.name,
+     addonName: "vpc-cni",
+     addonVersion: "v1.16.0-eksbuild.1",
+     resolveConflictsOnCreate: "OVERWRITE",
+     resolveConflictsOnUpdate: "OVERWRITE",
+     configurationValues: JSON.stringify({
+       env: {
+         ENABLE_PREFIX_DELEGATION: "true",
+         WARM_PREFIX_TARGET: "1",
+       },
+     }),
+   },
+   this.opts,
+ )

  this.nodeGroup = new aws.eks.NodeGroup(
    "node-group",
    {
      ...
    },
-   this.opts,
+   { ...this.opts, dependsOn: [this.vpcCniAddon] },
  )
一度pulumi destoryで全リソースを削除してから、上記の変更を追加した状態で再作成してみる。
作成順は EKS Cluster -> VpcCniAddon -> NodeGroup の順番で制御されていた。
作成後、Podの作成可能数が110になっていることも確認。
✗ kubectl describe node ip-10-0-33-84.ap-northeast-1.compute.internal
...
Allocatable:
  cpu:                1930m
  ephemeral-storage:  18242267924
  hugepages-1Gi:      0
  hugepages-2Mi:      0
  memory:             3388352Ki
  pods:               110
...
100個のnginxのPodをたてられることも無事確認できた。
✗ kubectl get pods -n my-nginx | grep Running | wc -l
100
最後に以下のようなメモをVpcCniAddon部分に付与して完了にする。
// NOTE:
// Since we use Cilium, there is essentially no need to install the vpc-cni add-on,
// but we use it because it is the easiest way to set up NodeGroup after setting ENABLE_PREFIX_DELEGATION
// to increase the number of pods that can be created in one Node.