これは何?
前回書いた記事で立ち上げたMLflowサーバーに、無事モデルの情報を保存できたので、必要な手順の備忘録を残しておきます。
これにより、Snowflakeのコンピューティングリソースのみを使用して、イケてるUIで機械学習モデルの管理ができるようになります。
想定対象読者
- Snowflakeの使用経験があり、Snowpark Container Servicesに興味がある方(=Snowflake上でコンテナを動かしたい方)
- Dockerの使用経験がある方
前回の振り返り(3行)
- Snowpark Container Servicesは、Snowflake上のリソースを使って、フルマネージドでコンテナを動かせるサービスだよ
- MLflowは、統計、機械学習の実験管理をはじめとしたMLOpsができるPython オープンソースライブラリだよ
- Snowpark Container Servicesを使って、MLflowサーバーを立ち上げたよ
今回やりたいこと
- JupyterLabサーバーも立ち上げる
- JupyterLab内でサクッと機械学習モデルを作って、実験の結果をMLflowサーバーに保存する
(前回作成したリソースをそのまま利用しています。)
1. Jupyter Labサーバーも立ち上げる
前回と同様、
- ローカルでコンテナイメージをビルド
- SnowflakeのImage Repositoryにプッシュ
- サービスを作成
の流れで作成していきます。
ローカルでコンテナイメージをビルド
いい感じにdockerfileとrequirement.txtを書いていきます。
FROM python:3.11

# Copy the packages file into the build
WORKDIR /app
COPY ./ /app/

# run the install using the packages manifest file
RUN pip install --no-cache-dir -r requirements.txt

# Open port 8888
EXPOSE 8888

# When the container launches run the jupyterlab app
CMD ["jupyter-lab", "--allow-root", "--ip=0.0.0.0", "--port=8888", "--no-browser", "--NotebookApp.token=''", "--notebook-dir=/workspace"]
jupyterlab
JPype1
pandas
numpy
seaborn
scipy
matplotlib
seaborn
pyNetLogo
SALib
snowflake-snowpark-python[pandas]
snowflake-connector-python
scikit-learn
mlflow
いい感じに書けたら、Docker Imageをビルドします。linux/amd64じゃないと動かないので注意。
docker build --platform=linux/amd64 -t camay/jupyterlab:latest .
SnowflakeのImage Repositoryにプッシュ
先ほど作成したコンテナにタグをつけて、Image Repositoryにプッシュします。
この辺りのお作法は公式のQuick Startに倣っています。
docker login <snowflake_registry_hostname> -u <user_name>
docker tag camay/jupyterlab:latest  <snowflake_registry_hostname>/container_hol_db/public/image_repo/jupyterlab:ver1
docker push <snowflake_registry_hostname>/container_hol_db/public/image_repo/jupyterlab:ver1
サービスを作成
前回作ったspecファイルに、JupyterLabコンテナの情報も追記します。
spec:
  containers:
  - name: mlflow
    image: <snowflake_registry_hostname>/container_hol_db/public/image_repo/mlflow:ver2
    command:
      - mlflow
      - server
      - --host
      - 0.0.0.0
      - --port
      - 5000
      - --backend-store-uri=mlruns
      - --artifacts-destination
      - ./mlartifacts
      - --default-artifact-root
      - http://0.0.0.0:5000/api/2.0/mlflow-artifacts/artifacts/experiments
      - --gunicorn-opts
      - "--log-level debug"
    volumeMounts:
        - name: artifacts-store
          mountPath: /mlartifacts
        - name: mlruns
          mountPath: /mlruns
  - name: jupyterlab
    image: <snowflake_registry_hostname>/container_hol_db/public/image_repo/jupyterlab:ver1
    env:
      DISABLE_AUTH: true
    volumeMounts:
        - name: jupyter-home
          mountPath: /root/jupyter
        - name: notebook-dir
          mountPath: /workspace
  endpoints:
  - name: snowpark-mlflow
    port: 5000
    public: true
  - name: jupyter
    port: 8888
    public: true
  volumes:
  - name: artifacts-store
    source: "@volumes/mlflow/artifacts_store"
  - name: mlruns
    source: "@volumes/mlflow/mlruns"
  - name: jupyter-home
    source: "@volumes/jupyterlab/jupyter"
  - name: notebook-dir
    source: "@volumes/jupyterlab/workspace"
  networkPolicyConfig:
    allowInternetEgress: true
いい感じに書けたので、こちらのyamlをstageに配置していきます。
CLIを叩くのが面倒な場合は、SnowSightのWebUI上でドラッグ&ドロップしても良いです。
snow object stage copy jupyterlab-mlflow.yaml @specs --overwrite --connection "CONTAINER_hol"
ではサービスを作っていきましょう。
drop service CONTAINER_HOL_DB.PUBLIC.jupyterlab_mlflow;
create service CONTAINER_HOL_DB.PUBLIC.jupyterlab_mlflow
    in compute pool CONTAINER_HOL_POOL
    from @specs
    spec='jupyterlab-mlflow.yaml';

-- 以下のメッセージが返ってきたらとりあえずサービスは作成できている
-- Service JUPYTERLAB_MLFLOW successfully created.
サービスが作成されたのち、利用できるようになるまでは時間がかかります。僕はせっかちなので、サービスの状況を観察するために以下コマンドを連打します。
CALL SYSTEM$GET_SERVICE_STATUS('CONTAINER_HOL_DB.PUBLIC.jupyterlab_mlflow');
-- statusが'Ready'になるまで連打
立ち上がったら、Endpointを教えてもらいます。
SHOW ENDPOINTS IN SERVICE jupyterlab_mlflow;
表示されたエンドポイントにアクセスすると、JupyterLabサーバーとMLflowサーバーがそれぞれ立ち上がっています。

2. MLflowサーバーに実験の情報を保存する
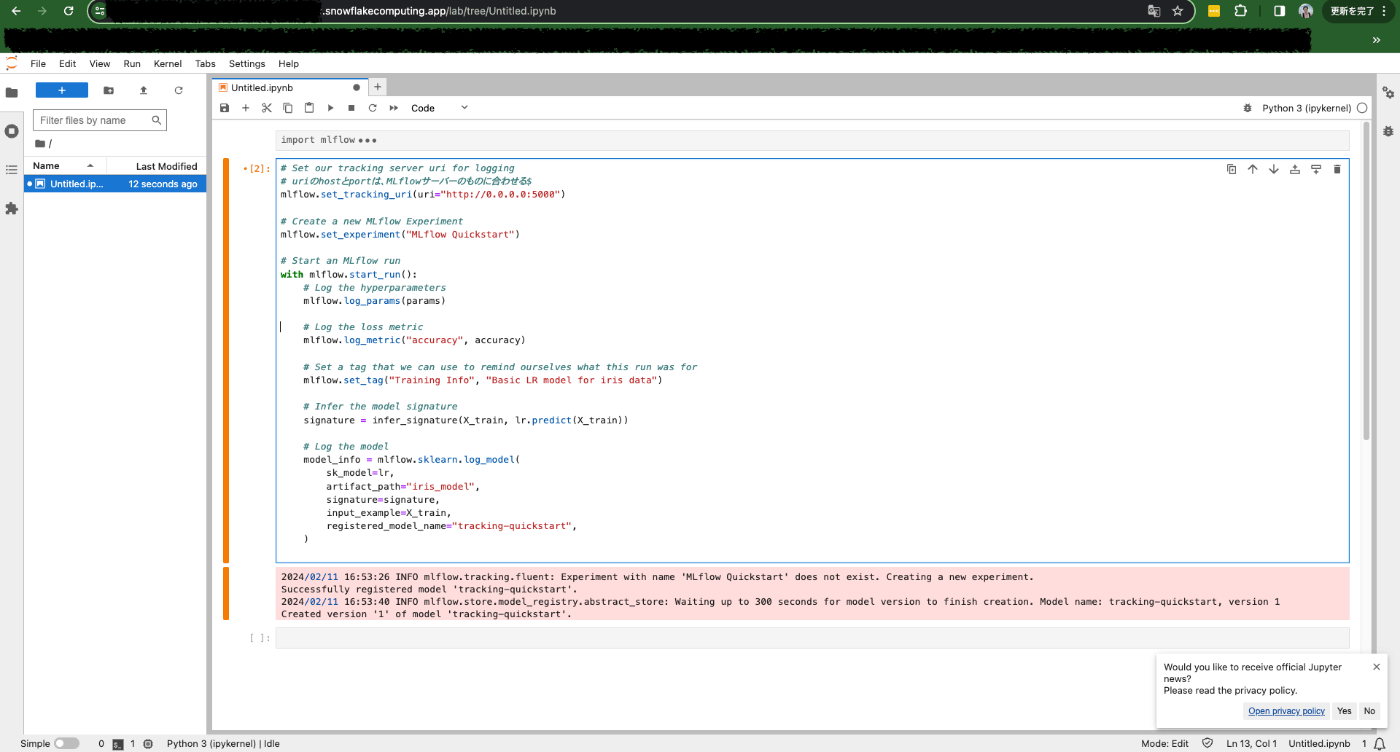
JupyterLab内で、MLflowサーバーに記録してみましょう。
MLflowの公式チュートリアルに従って、サクッとロジスティック回帰モデルを作成してみます。
import mlflow
from mlflow.models import infer_signature

import pandas as pd
from sklearn import datasets
from sklearn.model_selection import train_test_split
from sklearn.linear_model import LogisticRegression
from sklearn.metrics import accuracy_score, precision_score, recall_score, f1_score


# Load the Iris dataset
X, y = datasets.load_iris(return_X_y=True)

# Split the data into training and test sets
X_train, X_test, y_train, y_test = train_test_split(
    X, y, test_size=0.2, random_state=42
)

# Define the model hyperparameters
params = {
    "solver": "lbfgs",
    "max_iter": 1000,
    "multi_class": "auto",
    "random_state": 8888,
}

# Train the model
lr = LogisticRegression(**params)
lr.fit(X_train, y_train)

# Predict on the test set
y_pred = lr.predict(X_test)

# Calculate metrics
accuracy = accuracy_score(y_test, y_pred)
無事モデルが作成できたので、使用したパラメータやメトリクスをMLflowサーバーに保存してみます。
# Set our tracking server uri for logging
mlflow.set_tracking_uri(uri="http://0.0.0.0:5000")

# Create a new MLflow Experiment
mlflow.set_experiment("MLflow Quickstart")

# Start an MLflow run
with mlflow.start_run():
    # Log the hyperparameters
    mlflow.log_params(params)

    # Log the loss metric
    mlflow.log_metric("accuracy", accuracy)

    # Set a tag that we can use to remind ourselves what this run was for
    mlflow.set_tag("Training Info", "Basic LR model for iris data")

    # Infer the model signature
    signature = infer_signature(X_train, lr.predict(X_train))

    # Log the model
    model_info = mlflow.sklearn.log_model(
        sk_model=lr,
        artifact_path="iris_model",
        signature=signature,
        input_example=X_train,
        registered_model_name="tracking-quickstart",
    )
MLflowサーバーの方を見に行ってみると、しっかりモデルの情報が保存されていることが確認できます。
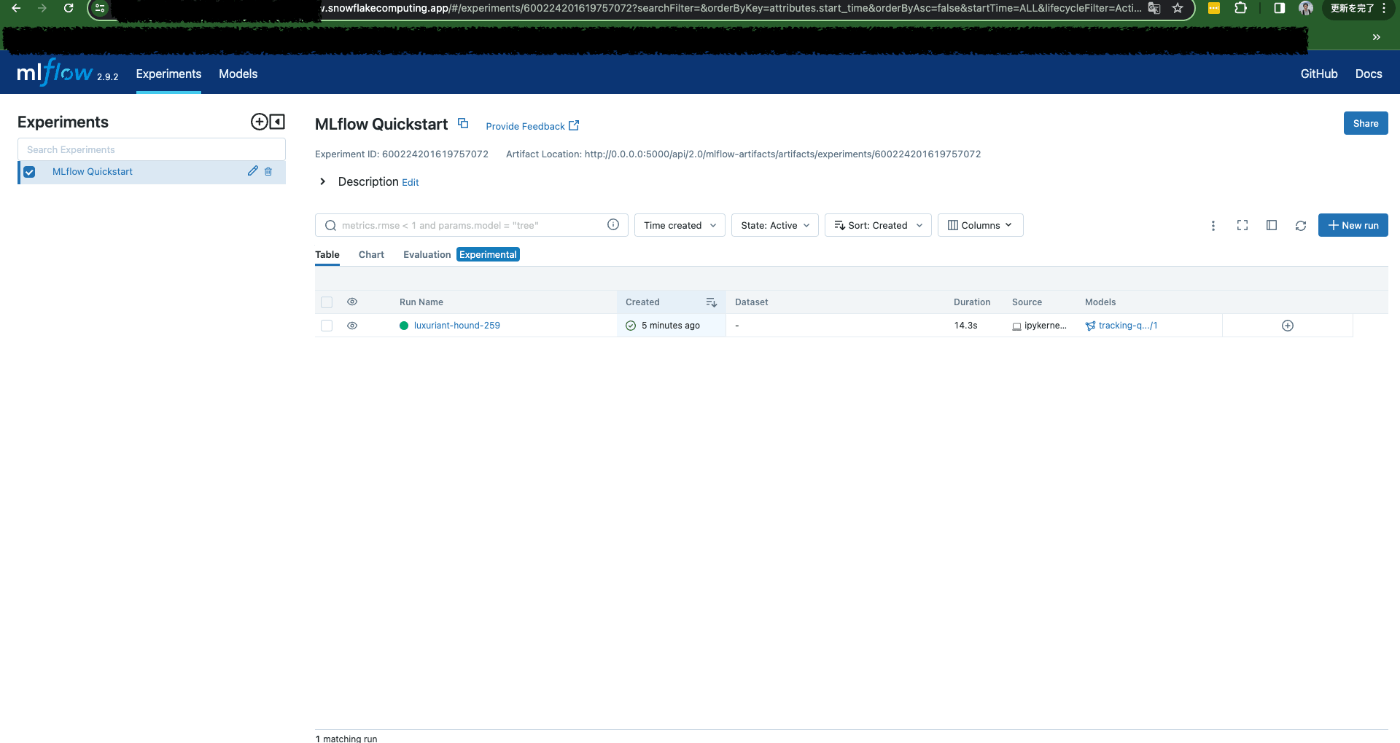
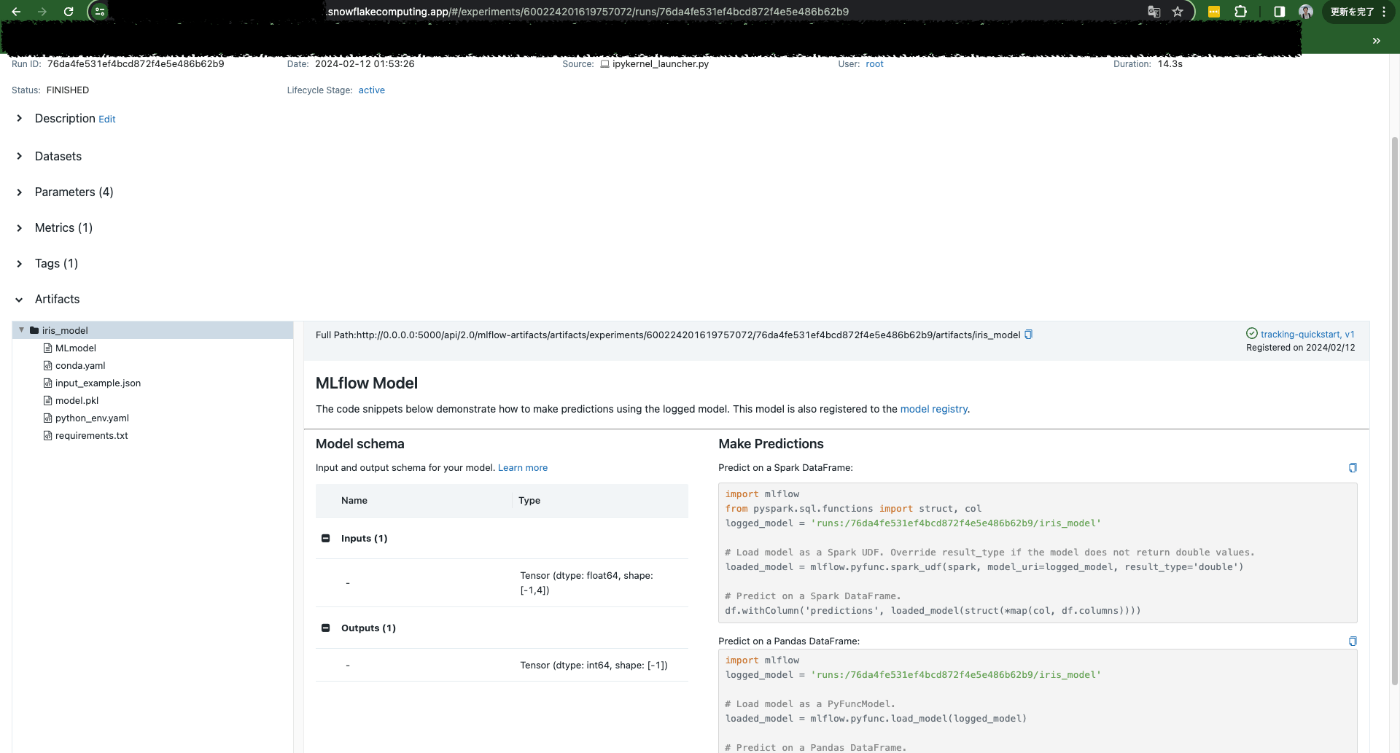
今回の設定ではSnowflakeの内部ステージをマウントしており、今回記録した情報は全てマウント先のステージに保存されています。すなわち、(コンテナ)サービスを再起動しても、作成したnotebookや記録したメトリクス等の情報は保存されています。 やったー!
まとめ
Snowflake上でJupyterLab serverとMLflowサーバーを立ち上げることに成功しました。
2024年2月12日現在、公式のModel Registory機能がPublic Previewとなっていますが、今回ご紹介した方法はUIベースでの操作、確認ができるのが便利かと思われます。
ぜひお試しください!

Discussion