Connecting Glue job to Snowflake Private Endpoint using Private Link
Background
When you want to transform data in Snowflake for your data analytics use case, you would usually implement data transformation logic in SQL and create a view or table. On the other hand, if the logic is too complicated to implement in SQL, Snowpark, which is Snowflake version of Data Frame API, would comes in handy. Your data transformation logic in Data Frame will be transformed into SQL then your data will be processed in Snowflake.
However, only Snowpark Scala API is in generally available as of May 2022, Snowpark Python API is still in Private Preview, which is not available in production system. As an alternative solution of Snowpark Python API, AWS Glue, which is serverless Spark service in AWS, would be very useful.
In this article, I will explain how to connect Glue job with Snowflake, especially via VPC endpoint using AWS Private Link. AWS Private Link is widely used in large enterprises to connect VPCs in their own AWS accounts with 3rd party services in AWS. If you are using Private Link for your Snowflake account, your Glue job requires custom Glue connection with VPC configuration to connect with Snowflake private endpoint.
Network configuration
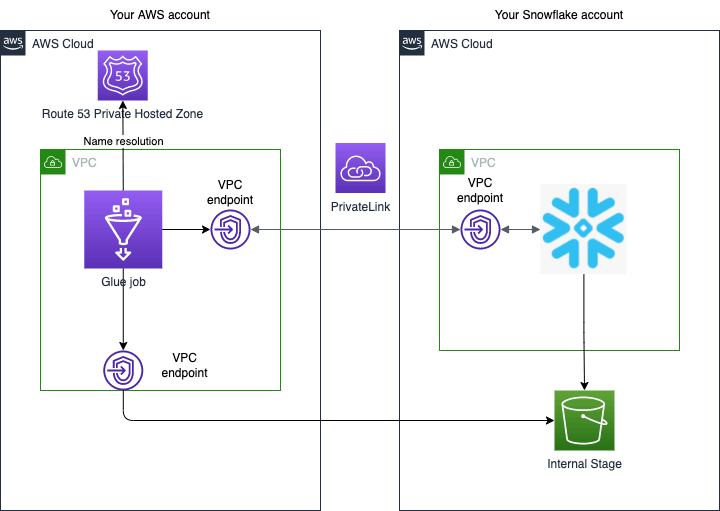
Assume that you have network configuration as follows.

- Your Snowflake account must be deployed in AWS.
- VPCs in both AWS accounts are already connected by AWS Private Link. Please follow the below instruction for how to set up Private Link.
- Your Glue job will be deployed in your AWS VPC then connect to your Snowflake account via VPC endpoint using Private Link. Note that you need a Glue connection in a VPC when your target JDBC database is also in the VPC. https://docs.aws.amazon.com/glue/latest/dg/connection-JDBC-VPC.html
- As far as I know, Glue connection does not support Snowflake JDBC URL directly. In this case, you need to create a Glue connector first then create a Glue connection for Snowflake JDBC URL from the connection. https://docs.aws.amazon.com/glue/latest/ug/connectors-chapter.html
Glue job Set up
In this section, I will explain how to set up Glue job that can connect to Snowflake private endpoint using Private Link.
Private Link must be set up in advance
Assume that you have already completed the following configurations.
- Private Link between your own AWS VPC and Snowflake's VPC.
- You can connect to Snowflake via Private Endpoint.
If not, please follow the instructions below.
- https://docs.aws.amazon.com/vpc/latest/privatelink/endpoint-services-overview.html
- https://docs.snowflake.com/en/user-guide/admin-security-privatelink.html
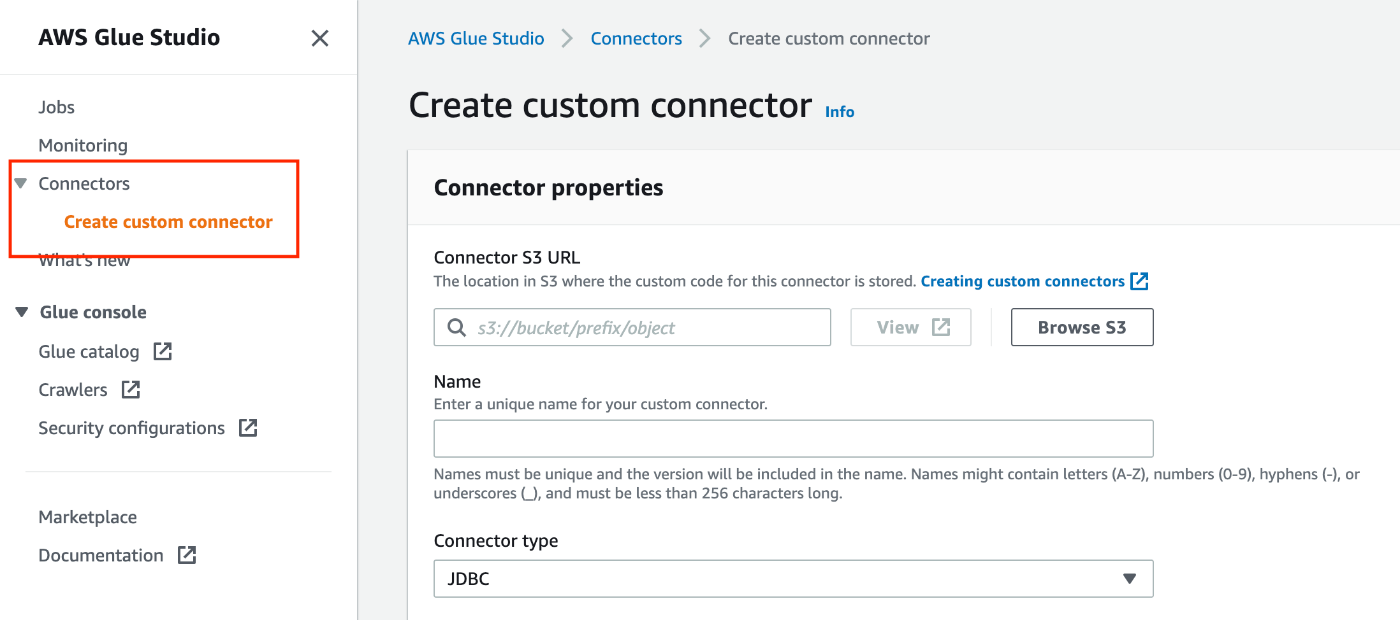
Create a Glue connector
As mentioned previously, you need to create a Glue connector before you create a Glue connection for Snowflake JDBC. To create a Glue connector, please follow the following instruction.

- Connector S3 URL: S3 URL you upload custom code
- Name: Connector name
- Connector type: JDBC
- Class name:
net.snowflake.client.jdbc.SnowflakeDriver - JDBC URL base:
https://$account-id.$region-name.privatelink.snowflakecomputing.com:443/-
$account-idand$region-namemust be replaced with appropriate values.
-
- URL parameter delimiter:
&
Create a Glue connection
You can create a Glue connection in the details page of the Glue connector you previously created. Please follow this instruction to create a Glue connection.
- Name: Connection Name
- Description: (Optional)
- Connection access
- Connection credential type: default
- Additional URL parameters: (Optional)
- You can add parameters to your JDBC URL. Please refer this URL for more details.
- https://docs.snowflake.com/en/user-guide/jdbc-configure.html#jdbc-driver-connection-string
- Network options
- VPC: Choose the VPC you set up Private Link
- Subnet: Choose a subnet from the VPC
- Security groups: Choose a security group for a Glue job
- The security group must have inbound and outbound configurations mentioned in this URL.
- https://docs.aws.amazon.com/glue/latest/dg/setup-vpc-for-glue-access.html
Download Snowflake JDBC/Spark Driver
The following drivers (jar files) are required to connect to Snowflake using JDBC and load data into Data Frame.
- JDBC https://docs.snowflake.com/en/user-guide/jdbc-download.html
- Spark https://docs.snowflake.com/en/user-guide/spark-connector-install.html
- Choose
spark-snowflake_2.12since Glue version 3.0 only support Scala version 2.12.
- Choose
Then upload the jar files to your S3 bucket.
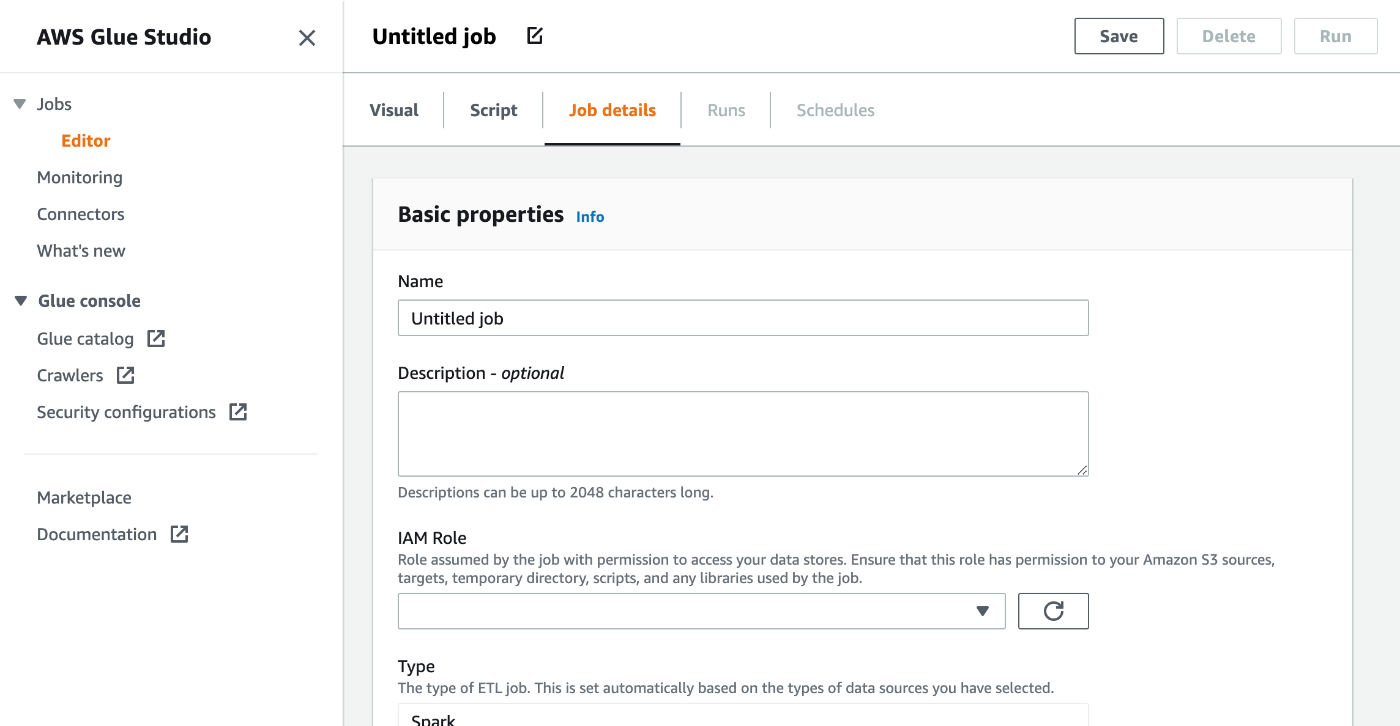
Create a Glue job
You can create a new Glue job from the Glue connection details page.

- Basic properties
- Name: Glue job name
- Description: (Optional)
- IAM Role: Choose an IAM role for the Glue job
- Minimum requirement of the IAM role is
AWSGlueServiceRoleand read access to the driver jar files on the s3 bucket. - If you need to access more AWS resources, please attach more IAM policy.
- https://docs.aws.amazon.com/glue/latest/dg/using-identity-based-policies.html#access-policy-examples-aws-managed
- Minimum requirement of the IAM role is
- Type: Spark
- Glue version: 3.0
- Please refer this URL for more details about each Glue version.
- https://docs.aws.amazon.com/glue/latest/dg/release-notes.html?icmpid=docs_glue_studio_helppanel
- Language: Python 3
- Advanced properties
- Script filename: (default name is the same as job name)
- Script path: S3 URL for Glue job script
- Spark UI logs path: S3 URL for Spark UI logs
- Temporary path: S3 URL for working directory
- Connections: Choose the Glue connection you created
- Libraries
- Dependent JARs path: S3 URLs for JDBC and dSpark drivers. You need to use
,to specify more than 1 URL.s - e.g.
s3://mybucket/snowflake-jdbc-xxx.jar,s3://mybucket/snowflake-spark-xxx.jar
- Dependent JARs path: S3 URLs for JDBC and dSpark drivers. You need to use
- Job parameters
- It would be better to provide Snowflake connection parameters for better reusability. I will provide password as a parameter this time but the password should be provide as a secret in Secret Manager.
- URL:
https://$account-id.$region-name.privatelink.snowflakecomputing.com:443/-
$account-idand$region-namemust be replaced with appropriate values.
-
- ACCOUNT: Snowflake account name
- WAREHOUSE: Warehouse name
- DB: Database name
- SCHEMA: Schema name
- USERNAME: User name
- PASSWORD: Password
- Script
- Unlock the script editor and paste the following sample code.
-
"table_name"is a source table and"new_table_name"is a target table for the Glue job. - This sample code assume that the Snowflake user has READ access for the source table and write access to the target table.
- https://community.snowflake.com/s/article/How-To-Use-AWS-Glue-With-Snowflake
import sys
from awsglue.transforms import *
from awsglue.utils import getResolvedOptions
from pyspark.context import SparkContext
from awsglue.context import GlueContext
from awsglue.job import Job
from py4j.java_gateway import java_import
SNOWFLAKE_SOURCE_NAME = "net.snowflake.spark.snowflake";

## @params: [JOB_NAME, URL, ACCOUNT, WAREHOUSE, DB, SCHEMA, USERNAME, PASSWORD]
args = getResolvedOptions(sys.argv, ['JOB_NAME', 'URL', 'ACCOUNT', 'WAREHOUSE', 'DB', 'SCHEMA', 'USERNAME', 'PASSWORD'])
sc = SparkContext()
glueContext = GlueContext(sc)
spark = glueContext.spark_session
job = Job(glueContext)
job.init(args['JOB_NAME'], args)
java_import(spark._jvm, "net.snowflake.spark.snowflake")

## uj = sc._jvm.net.snowflake.spark.snowflake
spark._jvm.net.snowflake.spark.snowflake.SnowflakeConnectorUtils.enablePushdownSession(spark._jvm.org.apache.spark.sql.SparkSession.builder().getOrCreate())
sfOptions = {
"sfURL" : args['URL'],
"sfAccount" : args['ACCOUNT'],
"sfUser" : args['USERNAME'],
"sfPassword" : args['PASSWORD'],
"sfDatabase" : args['DB'],
"sfSchema" : args['SCHEMA'],
"sfWarehouse" : args['WAREHOUSE'],
}

## Read from a Snowflake table into a Spark Data Frame
df = spark.read.format(SNOWFLAKE_SOURCE_NAME).options(**sfOptions).option("dbtable", "table_name").load()

## Perform any kind of transformations on your data and save as a new Data Frame: df1 = df.[Insert any filter, transformation, or other operation]
## Write the Data Frame contents back to Snowflake in a new table
df.write.format(SNOWFLAKE_SOURCE_NAME).options(**sfOptions).option("dbtable", "new_table_name").mode("overwrite").save() job.commit()
Run the Glue job
After you save the Glue job, you can run the job by pushing the Run button. If no issues with your configuration, the job will complete successfully with Succeeded status. Please check if the target table is created in the schema.
Conclusion
This article introduced AWS Glue job for complex data processing solution.
- If you connect from Glue job to Snowflake private endpoint using Private Link, you need to create a Glue connection with VPC configuration.
- Glue connection does not directly support Snowflake JDBC URL so you need to create custom Glue connection from Glue connector.
Hope this article for you to set up a Glue job for Snowflake private endpoint.
Snowflake データクラウドのユーザ会 SnowVillage のメンバーで運営しています。 Publication参加方法はこちらをご参照ください。 zenn.dev/dataheroes/articles/db5da0959b4bdd
Discussion