【挑戦】Laravel 8 でLINEの様なチャットサービスを作ってみた
はじめに
プログラムの勉強をするにあたり、作りたいものが明確にあったりすると良いと思うのですが、なかなか思いつかない事が多いと思います。
そこで、凝ったものやこの世にないものではなく、本当にありきたりなものをお題にして作っていこうと思います。
まずは、アウトプットする事やプログラミングの手を止めない事を目的に挑戦していく過程を記録していけたらと思っています。
つくるもの
まずは、手始めにとてもシンプルなチャットのシステムを作っていこうと思います。
一応のイメージは”LINE”の様なチャットアプリ風にしたいと思います。
機能
- ログインする必要がなく、直ぐにチャットを開始できる
- コメントが吹き出しで表示される
- 自分のコメントと他人のコメントが左右に分かれて表示される
環境について
| 開発環境 |
|---|
| XAMPP v3.3.0 |
| composer 2.1.3 |
| VS Code |
| 言語関係 |
|---|
| PHP |
| Laravel 8 |
| tailwind |
インストールと環境設定
この辺はどこにでも書いてある事なので割愛しますが、Laravel 8 のインストールは、ReaDoubleさんのページを参考にcomposerでインストールをしつつ、言語設定等のちょっとした環境設定を行っていきます。
画面構成や簡単な動きについて
画面の上部8割程にチャットログ部分を表示させて、下部2割程度にコメントの入力部分を表示させます。
コメント入力部分にコメントを入力して送信を押すと、自身のコメントを送信すると共に画面を更新して表示させます。
データベースの構成
chats テーブル
| id | user_name | user_identifier | message | created_at | updated_at |
|---|---|---|---|---|---|
| bigint | varchar(20) | varchar(20) | varchar(200) | timestamp | timestamp |
github連携
作成中のコード等はgithubでも公開してみようと思います。
ページを表示させるまで
いよいよコードを書いていくのですが、下記の通りで進めていきます。
- リソースコントローラの作成
- ルート設定
- ページ作成
リソースコントローラの作成
コマンド入力で下記コマンドを打ち込むとリソースコントローラを作成する事ができます。
php artisan make:controller ChatController --resource
※詳細は、ReaDoubleさんのページをご参考ください。
<?php

namespace App\Http\Controllers;

use Illuminate\Http\Request;

class ChatController extends Controller
{
    /**
     * Display a listing of the resource.
     *
     * @return \Illuminate\Http\Response
     */
    public function index()
    {
        //
    }

    /**
     * Show the form for creating a new resource.
     *
     * @return \Illuminate\Http\Response
     */
    public function create()
    {
        //
    }

    /**
     * Store a newly created resource in storage.
     *
     * @param  \Illuminate\Http\Request  $request
     * @return \Illuminate\Http\Response
     */
    public function store(Request $request)
    {
        //
    }

    /**
     * Display the specified resource.
     *
     * @param  int  $id
     * @return \Illuminate\Http\Response
     */
    public function show($id)
    {
        //
    }

    /**
     * Show the form for editing the specified resource.
     *
     * @param  int  $id
     * @return \Illuminate\Http\Response
     */
    public function edit($id)
    {
        //
    }

    /**
     * Update the specified resource in storage.
     *
     * @param  \Illuminate\Http\Request  $request
     * @param  int  $id
     * @return \Illuminate\Http\Response
     */
    public function update(Request $request, $id)
    {
        //
    }

    /**
     * Remove the specified resource from storage.
     *
     * @param  int  $id
     * @return \Illuminate\Http\Response
     */
    public function destroy($id)
    {
        //
    }
}
ルート設定
ページが表示できる様にする為に、web.phpを編集します。
Laraveのウェルカムページを表示させず、チャット画面にリダイレクトする様に設定しています。
また、チャットへのルート設定はresourceを使っています。
<?php
use Illuminate\Support\Facades\Route;
+ use App\Http\Controllers\ChatController;
/*
|--------------------------------------------------------------------------
| Web Routes
|--------------------------------------------------------------------------
|
| Here is where you can register web routes for your application. These
| routes are loaded by the RouteServiceProvider within a group which
| contains the "web" middleware group. Now create something great!
|
*/
- Route::get('/', function () {
- return view('welcome');
- });
+ Route::redirect('/', '/chat');
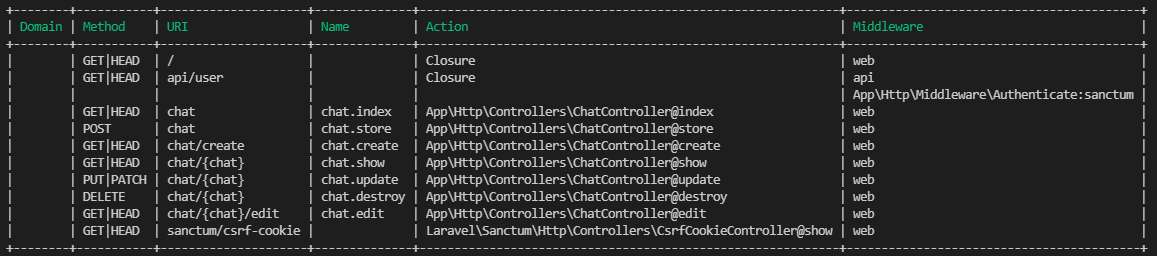
+ Route::resource('/chat', ChatController::class);
結果はこんな感じです。
ページ作成
viewsフォルダの中にchatフォルダを作成し、その中にindex.blade.phpを作成します。
views
└chat
└index.blade.php
基本のhtmlを書いていきます。
welcome.blade.phpを参考にすると良いと思います。
<!DOCTYPE html>
<html lang="{{ str_replace('_', '-', app()->getLocale()) }}">
    <head>
        <meta charset="utf-8">
        <meta name="viewport" content="width=device-width, initial-scale=1">

        <title>{{env('APP_NAME')}}</title>

        <!-- Fonts -->
        <link href="https://fonts.googleapis.com/css2?family=Nunito:wght@400;600;700&display=swap" rel="stylesheet">

        <!-- Styles -->
        <link href="{{ asset('css/app.css') }}" rel="stylesheet">
        <script src="{{ asset('js/app.js') }}"></script>
    </head>
    <body class="w-4/5 md:w-3/5 lg:w-2/5 m-auto">
        <h1 class="my-4 text-3xl font-bold">{{env('APP_NAME')}}</h1>
        <div class="my-4 p-4 rounded-lg bg-blue-200">
            <ul>
                <li class="truncate">2021-11-03 23:03:56 @Guest Hello World !</li>
                <li class="truncate">2021-11-03 23:03:56 @Guest Hello World !</li>
                <li class="truncate">2021-11-03 23:03:56 @Guest Hello World !</li>
            </ul>
        </div>
        <form class="my-4 py-2 px-4 rounded-lg bg-gray-300 text-sm flex flex-col md:flex-row flex-grow" action="/chat" method="POST">
            @csrf
            <input type="hidden" name="user_identifier" value="test">
            <input class="py-1 px-2 rounded text-center flex-initial" type="text" name="user_name" placeholder="UserName" maxlength="20">
            <input class="mt-2 md:mt-0 md:ml-2 py-1 px-2 rounded flex-auto" type="text" name="message" placeholder="Input message." maxlength="200">
            <button class="mt-2 md:mt-0 md:ml-2 py-1 px-2 rounded text-center bg-gray-500 text-white" type="submit">Send</button>
        </form>
    </body>
</html>
作成したページが表示できる様に、ChatController.phpのindexへ下記の記述を追加します。
    public function index()
    {
-        //
+        return view('chat/index');
    }
ブラウザで「localhost:8000」にアクセスしてここまでの成果を確認します。
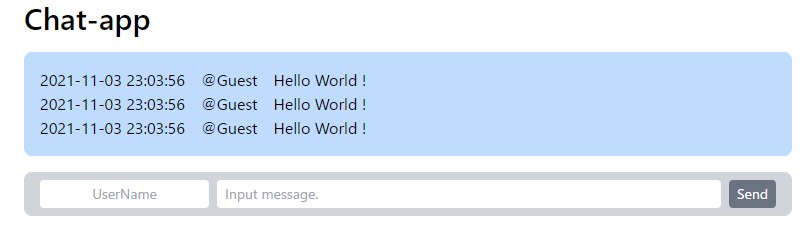
この後の展開で、チャット用のテーブルを構築して、データの取得表示とデータの追加入力をしていける様にしたいと思います。
今後の為にインプットすべきところ
これまでは認証機能を有した状態でダッシュボード画面のブレードをコピーして他画面を作っていました。
ですが、今回は認証機能は利用しない為、ダッシュボード画面がありません。
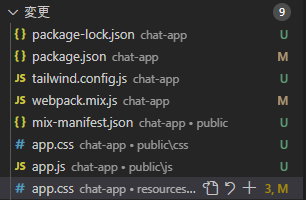
また、自身でTailWind CSSをインストールして使う事になりましたが、ReaDoubleさんのページを参考にしても全くダメでした。。。
そこで、SEの休日さんのページを参考にしてみたところ、無事にTailWind CSSをインストールする事が出来ました。
チャットができる様になるまで
作成したページでチャットができる様にする為に、下記の流れで進めていきます。
- データベース連携(テーブル構築)
- フォームによるデータ入力
- 入力されたデータを画面に表示させる
データベース連携(テーブル構築)
テーブル構築とは言っても、larabelではモデルとテーブルが対の関係で、モデルを作成する際にマイグレーションファイルも作成する事ができる様になっている様です。
※詳細はReaDoubleさんのページをご参考ください。
コマンド入力で下記コマンドを打ち込むと実行する事ができます。
php artisan make:model Chat --migration
<?php

namespace App\Models;

use Illuminate\Database\Eloquent\Factories\HasFactory;
use Illuminate\Database\Eloquent\Model;

class Chat extends Model
{
    use HasFactory;
}
<?php

use Illuminate\Database\Migrations\Migration;
use Illuminate\Database\Schema\Blueprint;
use Illuminate\Support\Facades\Schema;

class CreateChatsTable extends Migration
{
    /**
     * Run the migrations.
     *
     * @return void
     */
    public function up()
    {
        Schema::create('chats', function (Blueprint $table) {
            $table->id();
            $table->timestamps();
        });
    }

    /**
     * Reverse the migrations.
     *
     * @return void
     */
    public function down()
    {
        Schema::dropIfExists('chats');
    }
}
作成されたマイグレーションファイルを編集していきます。
    public function up()
    {
        Schema::create('chats', function (Blueprint $table) {
-            $table->id();
-            $table->timestamps();
+            $table->bigIncrements('id');
+            $table->string('user_name', 20)->default('noname');
+            $table->string('user_identifier', 20);
+            $table->string('message', 200);
+            $table->timestamp('created_at')->useCurrent()->nullable();
+            $table->timestamp('updated_at')->useCurrent()->nullable();
        });
    }
最後に下記のコマンドにてテーブルを作成していきます。
php artisan migrate
フォームによるデータ入力
フォーム入力によるpostされた後の処理を書いていきます。
Chat.phpを下記の通り編集します。
class Chat extends Model
{
    use HasFactory;
+    protected $fillable = ['user_name','user_identifier','message'];
+
+    public function scopeGetData($query)
+    {
+        return $this->created_at . ' @' . $this->user_name . ' ' . $this->message;
+    }
}
次にChatController.phpを下記の通り編集します。
    public function store(Request $request)
    {
-        //
+        $chat = new Chat;
+        $form = $request->all();
+        $chat->fill($form)->save();
+        return redirect('/chat');
    }
入力されたデータを画面に表示させる
入力されたチャット情報を表示できる様にChatsテーブルから情報を取得して表示させます。
ChatController.phpを下記の通り編集します。
    public function index()
    {
+        // データーベースの件数を取得
+        $length = Chat::all()->count();
+
+        // 表示する件数を代入
+        $display = 5;
+
+        $chats = Chat::offset($length-$display)->limit($display)->get();
-        return view('chat/index');
+        return view('chat/index',compact('chats'));
    }
index.blade.phpを下記の通り編集します。
    <body class="w-4/5 md:w-3/5 lg:w-2/5 m-auto">
        <h1 class="my-4 text-3xl font-bold">{{env('APP_NAME')}}</h1>
        <div class="my-4 p-4 rounded-lg bg-blue-200">
            <ul>
-                <li class="truncate">2021-11-03 23:03:56 @Guest Hello World !</li>
-                <li class="truncate">2021-11-03 23:03:56 @Guest Hello World !</li>
-                <li class="truncate">2021-11-03 23:03:56 @Guest Hello World !</li>
+                @foreach ($chats as $chat)
+                    <li class="truncate">{{$chat->getData()}}</li>
+                @endforeach
            </ul>
        </div>
        <form class="my-4 py-2 px-4 rounded-lg bg-gray-300 text-sm flex flex-col md:flex-row flex-grow" action="/chat" method="POST">
            @csrf
            <input type="hidden" name="user_identifier" value="test">
            <input class="py-1 px-2 rounded text-center flex-initial" type="text" name="user_name" placeholder="UserName" maxlength="20">
            <input class="mt-2 md:mt-0 md:ml-2 py-1 px-2 rounded flex-auto" type="text" name="message" placeholder="Input message." maxlength="200">
            <button class="mt-2 md:mt-0 md:ml-2 py-1 px-2 rounded text-center bg-gray-500 text-white" type="submit">Send</button>
        </form>
    </body>
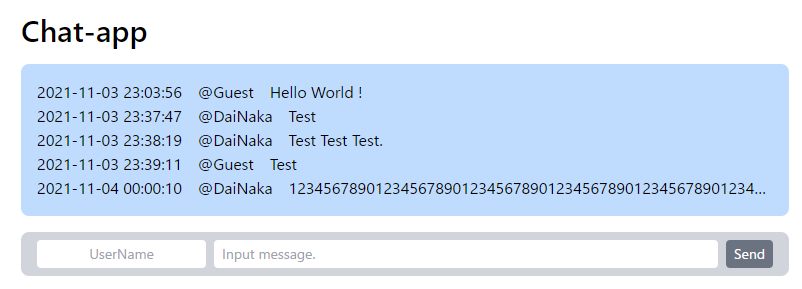
これまでの結果で、こんな感じに表示される様になります。
ここでは、5件のデータが表示される様にしていますが、ChatController.phpにて表示される件数を調整する事が可能です。
LINE風にチャット画面を変えてみる
正直なところ、CSSはまだまだ勉強中なので、吹き出し風についてはネットで検索してきたものをアレンジして作成しようと思います。
そこで、css 吹き出し風と検索するとcatnoseさんが運営しているサイトを発見したので、参考にしたいと思います。
実際には、まずは左右の吹き出しCSSを書いて、その後に自身の投稿なのか、他人の投稿なのかによって左右に分かれる様に書いています。
<head>~</head>内に下記をまるまる追記しています。
        <style>
            .other::before {
                content: "";
                position: absolute;
                top: 90%;
                left: -15px;
                margin-top: -30px;
                border: 5px solid transparent;
                border-right: 15px solid #c7deff;
            }

            .self::after {
                content: "";
                position: absolute;
                top: 50%;
                left: 100%;
                margin-top: -15px;
                border: 3px solid transparent;
                border-left: 9px solid #c7deff;
            }
        </style>
その後、チャットのコメント部分を下記の様に編集しています。
ここでは、一旦、DaiNakaというuser_nameだった場合に、自身の投稿と判定しています。
            <ul>
                @foreach ($chats as $chat)
-                    <li class="truncate">{{$chat->getData()}}</li>
+                    <p class="text-xs @if($chat->user_name == 'DaiNaka') text-right @endif">{{$chat->created_at}} @{{$chat->user_name}}</p>
+                    <li class="w-max mb-3 p-2 rounded-lg bg-blue-200 relative @if($chat->user_name == 'DaiNaka') self ml-auto @else other @endif">
+                        {{$chat->message}}
+                    </li>
                @endforeach
            </ul>
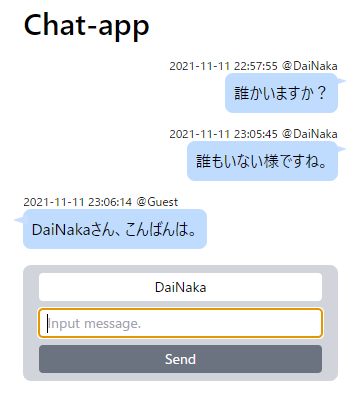
結果はこんな感じで表示される様になりました。
上:Before、下:Afterです。

Before
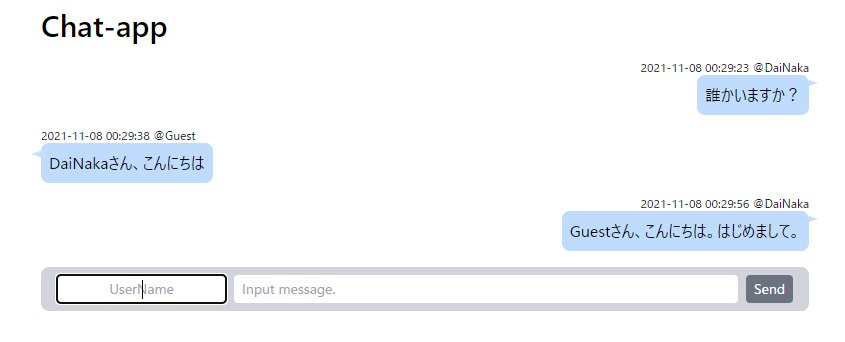
After
自身のコメントの判別ロジック
これまでは、user_nameを使って自身のコメントか否かを判別していました。
それでは、名前を変えてしまうと違う人と判別されてしまいます。
@foreach ($chats as $chat)
    <p class="text-xs @if($chat->user_name == 'DaiNaka') text-right @endif">{{$chat->created_at}} @{{$chat->user_name}}</p>
    <li class="w-max mb-3 p-2 rounded-lg bg-blue-200 relative @if($chat->user_name == 'DaiNaka') self ml-auto @else other @endif">
        {{$chat->message}}
    </li>
@endforeach
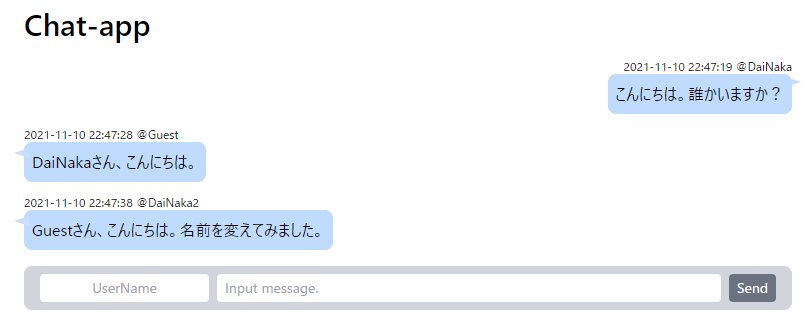
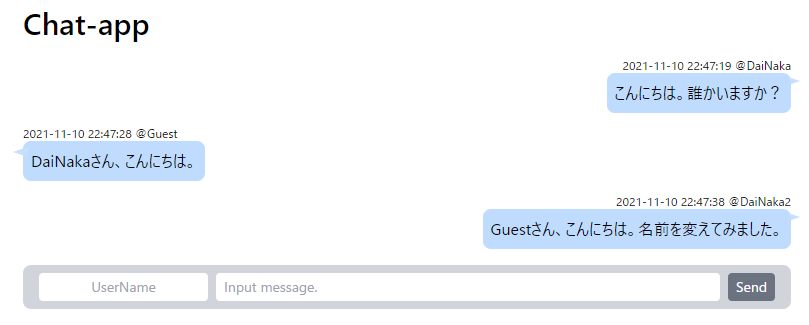
そこで、user_identifier(ユーザー識別子)を使って自身のコメントか否かを判別させてみます。
流れとしては、ランダムな文字列でユーザーIDを生成してセッションに追加します。
+ use Illuminate\Support\Str;    //ランダムな文字列を生成するメソッドを使用する為に追加(上部)

-   public function index()
+   public function index(Request $request)
    {
+       // ユーザーIDをセッションに登録
+       $user_identifier = $request->session()->get('user_identifier', Str::random(20));
+       session(['user_identifier' => $user_identifier]);

        // データーベースの件数を取得
        $length = Chat::all()->count();

        // 表示する件数を代入
        $display = 5;

        $chats = Chat::offset($length-$display)->limit($display)->get();
-       return view('chat/index',compact('chats'));
+       return view('chat/index',compact('chats','user_identifier'));
    }
追加したセッションをuser_identifierという名前の入力フォームに値として登録し、誰のコメントかを判別できる様にします。
        <form class="my-4 py-2 px-4 rounded-lg bg-gray-300 text-sm flex flex-col md:flex-row flex-grow" action="/chat" method="POST">
            @csrf
-           <input type="hidden" name="user_identifier" value="test">
+           <input type="hidden" name="user_identifier" value={{$user_identifier}}>
            <input class="py-1 px-2 rounded text-center flex-initial" type="text" name="user_name" placeholder="UserName" maxlength="20">
            <input class="mt-2 md:mt-0 md:ml-2 py-1 px-2 rounded flex-auto" type="text" name="message" placeholder="Input message." maxlength="200">
            <button class="mt-2 md:mt-0 md:ml-2 py-1 px-2 rounded text-center bg-gray-500 text-white" type="submit">Send</button>
        </form>
最後にコメントのuser_identifierとsessionに登録されたuser_identifierの値をチェックして自身のコメントかを判別します。
@foreach ($chats as $chat)
    <p class="text-xs @if($chat->user_identifier == session('user_identifier')) text-right @endif">{{$chat->created_at}} @{{$chat->user_name}}</p>
    <li class="w-max mb-3 p-2 rounded-lg bg-blue-200 relative @if($chat->user_identifier == session('user_identifier')) self ml-auto @else other @endif">
        {{$chat->message}}
    </li>
@endforeach
ユーザー名の保存とメッセージフォームへのオートフォーカス
ユーザラビティーを考えると、今のままではとても使いづらいです。
例えば、一言コメントを打ち込む度にユーザー名フォームへ移動してユーザー名を打ち込み、メッセージフォームへ移動してメッセージを打ち込む必要があります。。。
そこで、ユーザー名もセッションを使って保存される様にします。
まずは、セッションに値があればセッションの値を、なければGuestという固定値をuser_name変数に登録します。
    public function index(Request $request)
    {

        // ユーザーIDをセッションに登録
        $user_identifier = $request->session()->get('user_identifier', Str::random(20));
        session(['user_identifier' => $user_identifier]);

+       // ユーザー名を変数に登録(デフォルト値:Guest)
+       $user_name = $request->session()->get('user_name', 'Guest');

        // データーベースの件数を取得
        $length = Chat::all()->count();

        // 表示する件数を代入
        $display = 5;

        $chats = Chat::offset($length-$display)->limit($display)->get();
-       return view('chat/index',compact('chats', 'user_identifier'));
+       return view('chat/index',compact('chats', 'user_identifier', 'user_name'));
    }
次にユーザー名フォームにuser_name変数の値と登録しておきます。
ついでにメッセージフォームへオートフォーカスします。
        <form class="my-4 py-2 px-4 rounded-lg bg-gray-300 text-sm flex flex-col md:flex-row flex-grow" action="/chat" method="POST">
            @csrf
            <input type="hidden" name="user_identifier" value={{$user_identifier}}>
-           <input class="py-1 px-2 rounded text-center flex-initial" type="text" name="user_name" placeholder="UserName" maxlength="20">
+           <input class="py-1 px-2 rounded text-center flex-initial" type="text" name="user_name" placeholder="UserName" maxlength="20" value="{{$user_name}}">
-           <input class="mt-2 md:mt-0 md:ml-2 py-1 px-2 rounded flex-auto" type="text" name="message" placeholder="Input message." maxlength="200">
+           <input class="mt-2 md:mt-0 md:ml-2 py-1 px-2 rounded flex-auto" type="text" name="message" placeholder="Input message." maxlength="200" autofocus>
            <button class="mt-2 md:mt-0 md:ml-2 py-1 px-2 rounded text-center bg-gray-500 text-white" type="submit">Send</button>
        </form>
最後にPOSTされた後にユーザー名フォームに入力された値を取得してセッションへ登録します。
    public function store(Request $request)
    {
+       // ユーザー名をフォームから取得してセッションに登録
+       session(['user_name' => $request->user_name]);

        $chat = new Chat;
        $form = $request->all();
        $chat->fill($form)->save();
        return redirect('/chat');
    }
バグフィックス
現状だと、ユーザー名とメッセージが空白のまま送信する事が出来てしまいます。
更にはエラーになってしまいます。
そこで、index.blade.phpを下記の通り編集します。
        <form class="my-4 py-2 px-4 rounded-lg bg-gray-300 text-sm flex flex-col md:flex-row flex-grow" action="/chat" method="POST">
            @csrf
            <input type="hidden" name="user_identifier" value={{$user_identifier}}>
-           <input class="py-1 px-2 rounded text-center flex-initial" type="text" name="user_name" placeholder="UserName" maxlength="20" value="{{$user_name}}">
+           <input class="py-1 px-2 rounded text-center flex-initial" type="text" name="user_name" placeholder="UserName" maxlength="20" value="{{$user_name}}" required>
-           <input class="mt-2 md:mt-0 md:ml-2 py-1 px-2 rounded flex-auto" type="text" name="message" placeholder="Input message." maxlength="200" autofocus>
+           <input class="mt-2 md:mt-0 md:ml-2 py-1 px-2 rounded flex-auto" type="text" name="message" placeholder="Input message." maxlength="200" autofocus required>
            <button class="mt-2 md:mt-0 md:ml-2 py-1 px-2 rounded text-center bg-gray-500 text-white" type="submit">Send</button>
        </form>
その結果、ユーザー名やメッセージを空白で送信しようとすると、入力を求められる様になります。
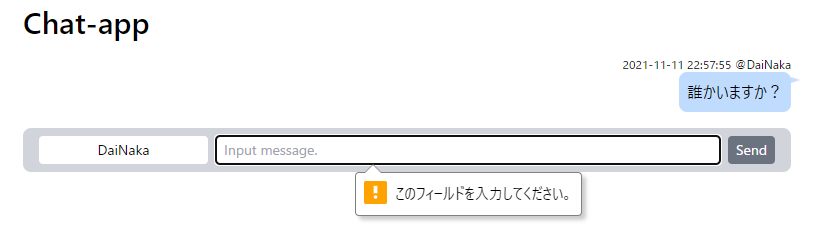
POST後のバリデーションで処理をしても良いですが、それだと送信した後、エラーになってしまうので、使い勝手が悪くなる印象です。
そこで、フォームの機能を利用して入力を促しています。
モバイルで表示するとこんな感じになりました。
だいぶLINEに近づけたのではないかと思います。
リファクタリング
ここからは一気に不要な行を削除したり、一部の処理を更新して完成に近づけていきます。
ユーザー識別子やユーザー名を設定するのに変数を噛ましていましたが、セッションだけで処理させています。
-      // ユーザーIDをセッションに登録
-      $user_identifier = $request->session()->get('user_identifier', Str::random(20));
-      session(['user_identifier' => $user_identifier]);
+      // ユーザー識別子がなければランダムに生成してセッションに登録
+       if($request->session()->missing('user_identifier')){ session(['user_identifier' => Str::random(20)]); }

-      // ユーザー名を変数に登録(デフォルト値:Guest)
-      $user_name = $request->session()->get('user_name', 'Guest');
+       // ユーザー名を変数に登録(デフォルト値:Guest)
+       if($request->session()->missing('user_name')){ session(['user_name' => 'Guest']); }
        <form class="my-4 py-2 px-4 rounded-lg bg-gray-300 text-sm flex flex-col md:flex-row flex-grow" action="/chat" method="POST">
            @csrf
-           <input type="hidden" name="user_identifier" value={{$user_identifier}}>
+           <input type="hidden" name="user_identifier" value={{session('user_identifier')}}>
-           <input class="py-1 px-2 rounded text-center flex-initial" type="text" name="user_name" placeholder="UserName" maxlength="20" value="{{$user_name}}" required>
+           <input class="py-1 px-2 rounded text-center flex-initial" type="text" name="user_name" placeholder="UserName" maxlength="20" value="{{session('user_name')}}" required>
            <input class="mt-2 md:mt-0 md:ml-2 py-1 px-2 rounded flex-auto" type="text" name="message" placeholder="Input message." maxlength="200" autofocus required>
            <button class="mt-2 md:mt-0 md:ml-2 py-1 px-2 rounded text-center bg-gray-500 text-white" type="submit">送信</button>
        </form>
最終コード
<?php

use Illuminate\Support\Facades\Route;
use App\Http\Controllers\ChatController;

/*
|--------------------------------------------------------------------------
| Web Routes
|--------------------------------------------------------------------------
|
| Here is where you can register web routes for your application. These
| routes are loaded by the RouteServiceProvider within a group which
| contains the "web" middleware group. Now create something great!
|
*/

Route::redirect('/', '/chat');
Route::resource('/chat', ChatController::class);
<?php

namespace App\Http\Controllers;

use Illuminate\Http\Request;
use Illuminate\Support\Str;
use App\Models\Chat;

class ChatController extends Controller
{
    public function index(Request $request)
    {

        // ユーザー識別子がなければランダムに生成してセッションに登録
        if($request->session()->missing('user_identifier')){ session(['user_identifier' => Str::random(20)]); }

        // ユーザー名を変数に登録(デフォルト値:Guest)
        if($request->session()->missing('user_name')){ session(['user_name' => 'Guest']); }

        // データーベースの件数を取得
        $length = Chat::all()->count();

        // 画面に表示する件数を代入
        $display = 5;

        // 最新のチャットを画面に表示する分だけ取得して変数に代入
        $chats = Chat::offset($length-$display)->limit($display)->get();

        // チャットデータをビューに渡して表示
        return view('chat/index',compact('chats'));
    }

    public function store(Request $request)
    {
        // フォームに入力されたユーザー名をセッションに登録
        session(['user_name' => $request->user_name]);

        // フォームに入力されたチャットデータをデータベースに登録
        $chat = new Chat;
        $form = $request->all();
        $chat->fill($form)->save();

        // 最初の画面にリダイレクト
        return redirect('/chat');
    }
}
<?php

namespace App\Models;

use Illuminate\Database\Eloquent\Factories\HasFactory;
use Illuminate\Database\Eloquent\Model;

class Chat extends Model
{
    use HasFactory;
    protected $fillable = ['user_name','user_identifier','message'];
}
<!DOCTYPE html>
<html lang="{{ str_replace('_', '-', app()->getLocale()) }}">
    <head>
        <meta charset="utf-8">
        <meta name="viewport" content="width=device-width, initial-scale=1">

        <title>{{env('APP_NAME')}}</title>

        <!-- Fonts -->
        <link href="https://fonts.googleapis.com/css2?family=Nunito:wght@400;600;700&display=swap" rel="stylesheet">

        <!-- Styles -->
        <link href="{{ asset('css/app.css') }}" rel="stylesheet">
        <script src="{{ asset('js/app.js') }}"></script>

        <style>
            /* 他人のコメントの吹き出し */
            .other::before {
                content: "";
                position: absolute;
                top: 90%;
                left: -15px;
                margin-top: -30px;
                border: 5px solid transparent;
                border-right: 15px solid #c7deff;
            }

            /* 自身のコメントの吹き出し */
            .self::after {
                content: "";
                position: absolute;
                top: 50%;
                left: 100%;
                margin-top: -15px;
                border: 3px solid transparent;
                border-left: 9px solid #c7deff;
            }
        </style>
    </head>
    <body class="w-4/5 md:w-3/5 lg:w-2/5 m-auto">
        {{-- アプリのタイトル(.envに設定されているアプリ名を取得) --}}
        <h1 class="my-4 text-3xl font-bold">{{env('APP_NAME')}}</h1>
            <ul>
                {{-- チャットデータを繰り返し表示 --}}
                @foreach ($chats as $chat)
                    <p class="text-xs @if($chat->user_identifier == session('user_identifier')) text-right @endif">{{$chat->created_at}} @{{$chat->user_name}}</p>
                    <li class="w-max mb-3 p-2 rounded-lg bg-blue-200 relative @if($chat->user_identifier == session('user_identifier')) self ml-auto @else other @endif">
                        {{$chat->message}}
                    </li>
                @endforeach
            </ul>
        </div>

        {{-- 入力フォーム --}}
        <form class="my-4 py-2 px-4 rounded-lg bg-gray-300 text-sm flex flex-col md:flex-row flex-grow" action="/chat" method="POST">
            @csrf
            {{-- ユーザー識別子を隠しパラメータで保有 --}}
            <input type="hidden" name="user_identifier" value={{session('user_identifier')}}>
            {{-- ユーザー名フォーム --}}
            <input class="py-1 px-2 rounded text-center flex-initial" type="text" name="user_name" placeholder="UserName" maxlength="20" value="{{session('user_name')}}" required>
            {{-- メッセージフォーム --}}
            <input class="mt-2 md:mt-0 md:ml-2 py-1 px-2 rounded flex-auto" type="text" name="message" placeholder="Input message." maxlength="200" autofocus required>
            {{-- 送信ボタン --}}
            <button class="mt-2 md:mt-0 md:ml-2 py-1 px-2 rounded text-center bg-gray-500 text-white" type="submit">送信</button>
        </form>
    </body>
</html>
<?php

use Illuminate\Database\Migrations\Migration;
use Illuminate\Database\Schema\Blueprint;
use Illuminate\Support\Facades\Schema;

class CreateChatsTable extends Migration
{
    /**
     * Run the migrations.
     *
     * @return void
     */
    public function up()
    {
        Schema::create('chats', function (Blueprint $table) {
            $table->bigIncrements('id');
            $table->string('user_name', 20)->default('noname');
            $table->string('user_identifier', 20);
            $table->string('message', 200);
            $table->timestamp('created_at')->useCurrent()->nullable();
            $table->timestamp('updated_at')->useCurrent()->nullable();
        });
    }

    /**
     * Reverse the migrations.
     *
     * @return void
     */
    public function down()
    {
        Schema::dropIfExists('chats');
    }
}
CacheとSessionとCookieについて
別記事にしてアップしました。
デモサイト
作成したデモサイトは下記にデプロイしてあります。
ご自由に書き込みをテストしてください。
なお、テスト書き込みが多くなってきた為、一度データをクリアしています。