MongoDB の初体験環境を FerretDB で構築してみた
前説
下記の記事を拝見しまして、ちょっと試してみるかと思いたちました。「やってみた」記事です。
MongoDBの名前自体はだいぶ前から聞いてはいましたが、なにぶん実務で使う機会がなかった[1]こともあり、個人開発での用途もちょっと思いつかなかったので、なかなか手をつけられずにいました。
MongoDB はスキーマを持たないドキュメント形式のデータベースということなんですが、記事によるとそのバックエンドにRDBであるpostgresqlを使うという・・・これはちょっとどういう仕組みになっているのか興味が湧きました。
構築
あっさりしたファイル構成です。FerretDBはDockerfileを作って、他のコンテナはcompose.ymlのみで構成しました。
.
└── ferretdb
    ├── compose.yml
    ├── Dockerfile.ferretdb
    └── .env
compose.yml
こんな感じになりました。
services:
  postgres:
    image: postgres:14
    env_file: .env
    environment:
      POSTGRES_DB: ferretdb
      TZ: "Asia/Tokyo"
    ports:
      - 5432:5432
    volumes:  # persistent は docker volume で
      - postgres-bg-ferretdb:/var/lib/postgresql/data
    healthcheck:  # コンテナの起動チェック
      test: ["CMD-SHELL", "pg_isready -U ${POSTGRES_USER:-postgres}"]
      interval: 5s
      retries: 3
    networks:
      - ferretdb-dev

  ferretdb:
    build:
      context: .
      dockerfile: Dockerfile.ferretdb
    restart: on-failure
    ports:
      - 27017:27017
    environment:
      FERRETDB_POSTGRESQL_URL: postgres://${POSTGRES_USER}:${POSTGRES_PASSWORD}@postgres:5432/ferretdb
      TZ: "Asia/Tokyo"
    networks:
      - ferretdb-dev
    depends_on:
      postgres:
        condition: service_healthy  # postgres がちゃんと起動したら start

volumes:
  postgres-bg-ferretdb:

networks:
  ferretdb-dev:
    external: true  # <- 後述
内容は下記の公式ドキュメントを参考に、いくらか要素を追加しております。
postgresql 環境変数の抽出
postgresql のユーザ名やパスワードは.envに記述するようにして、compose.ymlからは逃がしています。
.envの内容は以下のような感じです。
POSTGRES_USER=postgres
POSTGRES_PASSWORD=password
コンテナの起動順の制御
先日公開しましたこちらの記事の方法で、コンテナの起動順を制御しています。
起動と動作確認
サービスの開始
ferretdb下でdocker compose up -dします。
docker compose up -d

[+] Running 2/2
 ✔ Container ferretdb-postgres-1  Healthy                                                                                                                                                                                             5.9s
 ✔ Container ferretdb-ferretdb-1  Started                                                                                                                                                                                             6.2s
無事に起動したようです!
クライアント環境の構築
今回は各DBに接続する環境を VSCode の Dev Container で作りました。.devcontainerの構成は下記のような感じで、各ファイルを説明します。
├── .devcontainer
│   ├── compose.yml
│   ├── devcontainer.json
│   └── Dockerfile
{
    "name": "FerretDb",
    "dockerComposeFile": [
        "compose.yml"
    ],
    "service": "app",
    "features": {
        "ghcr.io/devcontainers/features/common-utils:1": {
            "installZsh": "true",
            "username": "vscode",
            "uid": "1000",
            "gid": "1000",
            "upgradePackages": "true"
        },
        "ghcr.io/devcontainers/features/node:1": {
            "version": "none"
        },
        "ghcr.io/devcontainers/features/git:1": {
            "version": "latest",
            "ppa": "false"
        },
        "ghcr.io/devcontainers/features/common-utils:2": {}
    },
    "customizations": {
        "vscode": {
            "extensions": [
                "eamodio.gitlens",
                "usernamehw.errorlens",
                "davidanson.vscode-markdownlint",
                "yzhang.markdown-all-in-one",
                "gruntfuggly.todo-tree",
                "mongodb.mongodb-vscode",  // <- MongoDBクライアント
                "ckolkman.vscode-postgres" // <- postgresqlクライアント
            ],
        }
    },
    "workspaceFolder": "/workspace",
    "remoteUser": "vscode"
}
本記事の内容とは直接関連しませんが、せっかくなのでFerretDBを使っていろいろ試せるように、Gitの拡張機能やErrorLensもインストールしてみました。また後述する各DB用の拡張機能もここでインストールしておきます。
version: '3'

services:
  app:
    build: .
    command: sleep infinity
    volumes:
    - type: bind
      source: ..
      target: /workspace
    networks:
      - ferretdb-dev

networks:
  ferretdb-dev:
    external: true
compose.ymlでは Dockerfile を使ってコンテナを起動して、各DBのコンテナと接続するためのNetworkを定義しています。(ここで使うために前述のコンテナ定義ではNetworkを作ってexposeしておいたのでした)
Dockerfileについて
Dockerfileの内容はなんでもよくて、どんなアーキテクチャ/言語で FerretDB に接続したいかで、自由に構成いただけるかと思います。(.devcontainerで作業ディレクトリを/workspaceと定義していますので、そこは合わせた方がよいかもしれません)
ちなみに今回私が行った作業では、ゆくゆくGoでつなげてみようと思ってGoの実行環境を構築してみました。ご参考まで。
ARG VARIANT=1.19-bullseye
FROM golang:${VARIANT}

RUN apt update && apt install git vim -y && apt clean

# [Optional] Uncomment the next line to use go get to install anything else you need
# RUN go get -x <your-dependency-or-tool>
RUN go install github.com/ramya-rao-a/go-outline@latest
RUN go install github.com/cweill/gotests/gotests@latest
RUN go install github.com/fatih/gomodifytags@latest
RUN go install github.com/josharian/impl@latest
RUN go install github.com/haya14busa/goplay/cmd/goplay@latest
RUN go install github.com/go-delve/delve/cmd/dlv@latest
RUN go install honnef.co/go/tools/cmd/staticcheck@latest
RUN go install golang.org/x/tools/gopls@latest

ENV WORK_PATH /workspace

WORKDIR $WORK_PATH

RUN { \
    echo "source /usr/share/bash-completion/completions/git"; \
    echo "export PATH=$HOME/command:$PATH"; \
} >> ~/.bashrc
FerretDB(MongoDB)、postgresql のクライアントはVSCodeの拡張機能を使いました。
FerretDB への接続
「MongoDB for VS Code」が有効になると、左側のメニューに葉っぱ🌱のマークが表示されるのでクリックします。
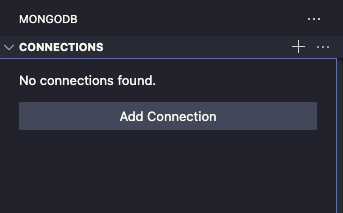
「Add Connection」をクリックすると下記のような画面が表示されます。
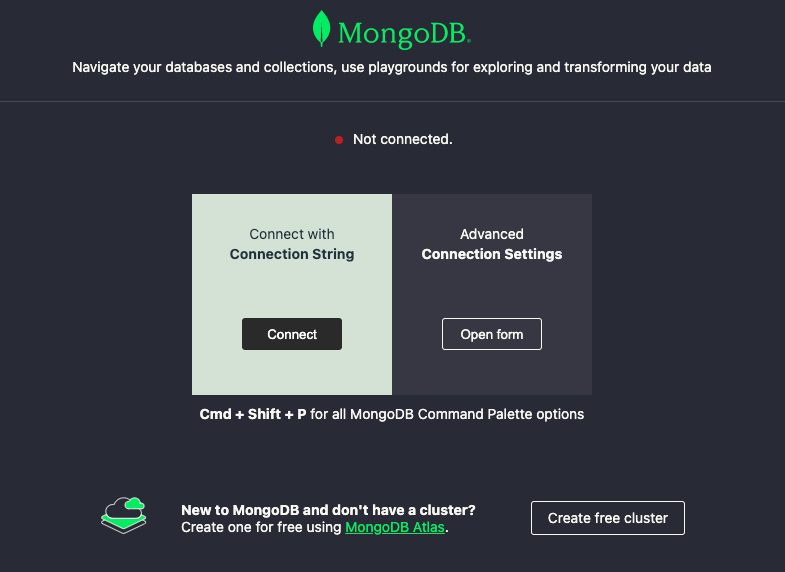
「Connect with Connection String」をクリックすると、VSCodeのコマンドパレットでConnection String(接続文字列)の入力を求められますので、mongodb://ferretdb/ferretdbと入力してenterです。
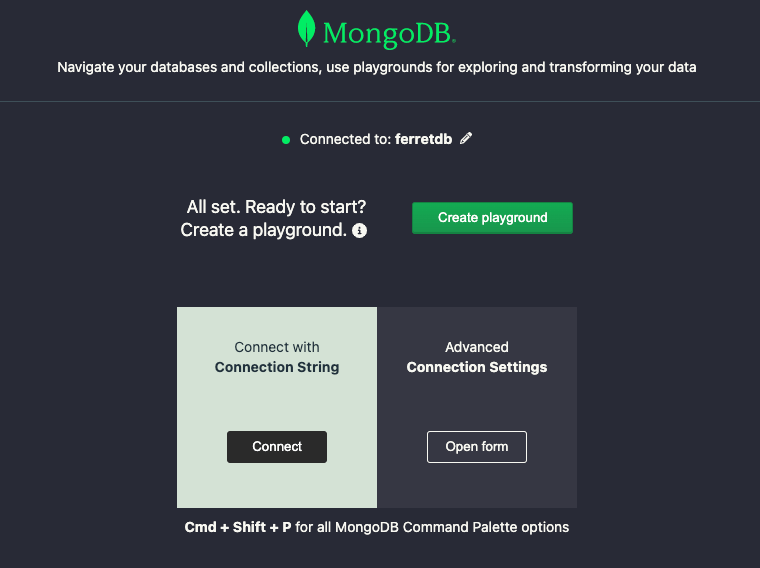
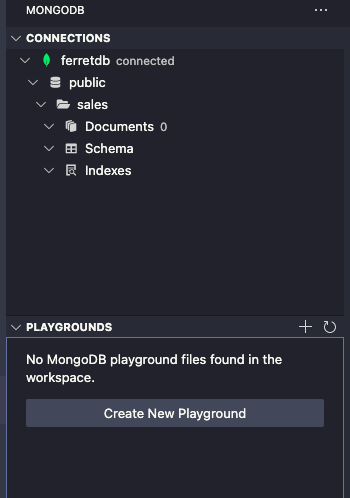
接続に成功するとNot Connectedの部分がConnected to: ...に変わって、さらに左のメニュー部にコネクションが追加されます。
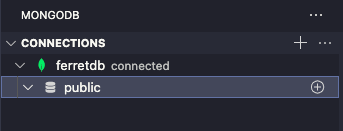
接続した直後なので、コレクションはなにもない状態
以上の手順で、FerretDBへの接続、コレクションの作成、ドキュメントの投入までを試すことができました。
postgresql への接続
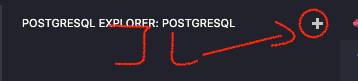
postgresql拡張機能の「+」ボタンをクリックして、コネクションの追加を始めます。
順を追って記載しますので、詳細は画像のキャプションをご参考ください。

ホスト名の入力。今回の環境はpostgresになります。Dev Container、かつ同じ Docker Network に接続しているので、コンテナのサービス名でアクセスできます。

接続するユーザ名の入力。今回はホスト名と同じになります。

パスワードの入力。表示されていませんが、.envの設定にしたがって入力します。
手順どおりならpasswordとなります。

ポート番号はデフォルトの5432です。変更している場合は合わせて指定してください。

接続の種類。ローカルでの動作なのでふつうにStandard Connetionを選択します。
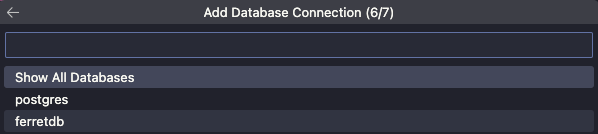
どのデータベースに接続するか選択。とりあえず目的のferretdbを選択します。Show All DatabasesでもOKです。前の手順までで接続がうまくいっていないと、この選択肢と違う場合があります。

コネクションの表示名を入力します。ここはなんでもよいですが、わかりやすくpostgres-ferretdbのようにしてみました。
ここまで問題なく完了すると、コネクションが作成されます。
動かしてみる
FerretDB のコレクション作成とドキュメントのinsert
MongoDB の拡張機能を開き、publicの右側の「+」マークをクリックすると、データベースにコレクションを追加するためのコードが生成されます。
/* global use, db */
// MongoDB Playground
// Use Ctrl+Space inside a snippet or a string literal to trigger completions.

const database = 'public';
const collection = 'sales';

// The current database to use.
use(database);

// Create a new collection.
db.createCollection(collection);

// The prototype form to create a collection:
/* db.createCollection( <name>,
  {
    capped: <boolean>,
    autoIndexId: <boolean>,
    size: <number>,
    max: <number>,
    storageEngine: <document>,
    validator: <document>,
    validationLevel: <string>,
    validationAction: <string>,
    indexOptionDefaults: <document>,
    viewOn: <string>,
    pipeline: <pipeline>,
    collation: <document>,
    writeConcern: <document>,
    timeseries: { // Added in MongoDB 5.0
      timeField: <string>, // required for time series collections
      metaField: <string>,
      granularity: <string>,
      bucketMaxSpanSeconds: <number>, // Added in MongoDB 6.3
      bucketRoundingSeconds: <number>, // Added in MongoDB 6.3
    },
    expireAfterSeconds: <number>,
    clusteredIndex: <document>, // Added in MongoDB 5.3
  }
)*/

// More information on the `createCollection` command can be found at:
// https://www.mongodb.com/docs/manual/reference/method/db.createCollection/
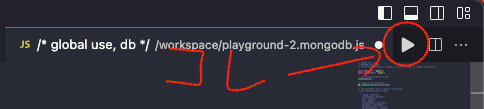
コード中ではコメントでcreateCollectionのオプションがさまざま紹介されていますが、今回はとりあえずこのまま実行してみます。
実行には右上の「▶️」ボタンをクリックします。[2]
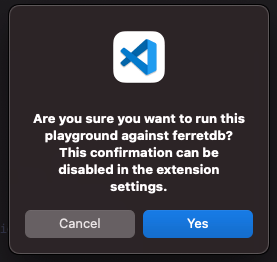
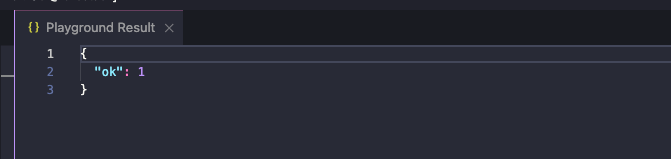
ボタンをクリックすると、実行前の確認メッセージが表示されます。あわてず騒がず、Yesをクリックします。
処理が完了するとPlayground Resultと題されてDBからの応答が表示されます。
先ほどのDBツリーを表示すると、新しくコレクションが追加されていることがわかります。

次にデータの投入を試してみます。MongoDB拡張機能の「PLAYGROUND」を開き、Create New Playgroundをクリックします。
先ほどと似た感じで、サンプルデータを投入するjsファイルが生成されるかと思います。
/* global use, db */
// MongoDB Playground

// Select the database to use.
use('public');

// Insert a few documents into the sales collection.
db.getCollection('sales').insertMany([
  { 'item': 'abc', 'price': 10, 'quantity': 2, 'date': new Date('2014-03-01T08:00:00Z') },
  { 'item': 'jkl', 'price': 20, 'quantity': 1, 'date': new Date('2014-03-01T09:00:00Z') },
  { 'item': 'xyz', 'price': 5, 'quantity': 10, 'date': new Date('2014-03-15T09:00:00Z') },
  { 'item': 'xyz', 'price': 5, 'quantity': 20, 'date': new Date('2014-04-04T11:21:39.736Z') },
  { 'item': 'abc', 'price': 10, 'quantity': 10, 'date': new Date('2014-04-04T21:23:13.331Z') },
  { 'item': 'def', 'price': 7.5, 'quantity': 5, 'date': new Date('2015-06-04T05:08:13Z') },
  { 'item': 'def', 'price': 7.5, 'quantity': 10, 'date': new Date('2015-09-10T08:43:00Z') },
  { 'item': 'abc', 'price': 10, 'quantity': 5, 'date': new Date('2016-02-06T20:20:13Z') },
]);

// Run a find command to view items sold on April 4th, 2014.
const salesOnApril4th = db.getCollection('sales').find({
  date: { $gte: new Date('2014-04-04'), $lt: new Date('2014-04-05') }
}).count();

// Print a message to the output window.
console.log(`${salesOnApril4th} sales occurred in 2014.`);

// Here we run an aggregation and open a cursor to the results.
// Use '.toArray()' to exhaust the cursor to return the whole result set.
// You can use '.hasNext()/.next()' to iterate through the cursor page by page.
db.getCollection('sales').aggregate([
  // Find all of the sales that occurred in 2014.
  { $match: { date: { $gte: new Date('2014-01-01'), $lt: new Date('2015-01-01') } } },
  // Group the total sales for each product.
  { $group: { _id: '$item', totalSaleAmount: { $sum: { $multiply: [ '$price', '$quantity' ] } } } }
]);
後半のコードはサンプル的にコレクションの検索や集計を行っていますが、とりあえずこのままとします。
こちらも同様に右上の「▶️」ボタンで実行してみましょう。
実行後、salesコレクションを展開してみると、ドキュメントが8件登録されていることが確認できます。
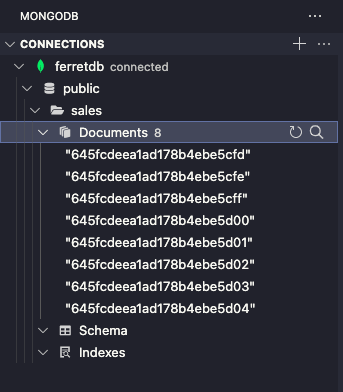
さらに適当なドキュメントをクリックしてみると、内容がjson形式で表示されます。
{
  "_id": {
    "$oid": "645fcdeea1ad178b4ebe5cfd"
  },
  "item": "abc",
  "price": 10,
  "quantity": 2,
  "date": {
    "$date": "2014-03-01T08:00:00Z"
  }
}
postgresql のテーブル確認
さて、いよいよ今回の興味の対象だった postgresql 側のデータを見てみます。
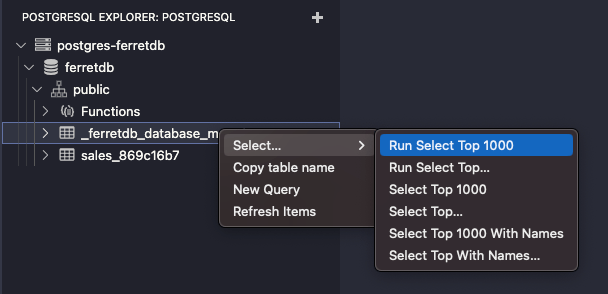
ferretdbのツリーを開いてみると、それっぽいテーブルがいくつか作成されていますので、まずは_ferretdb_database_metadataテーブルを右クリックし、SELECT を発行して中身を見てみます。
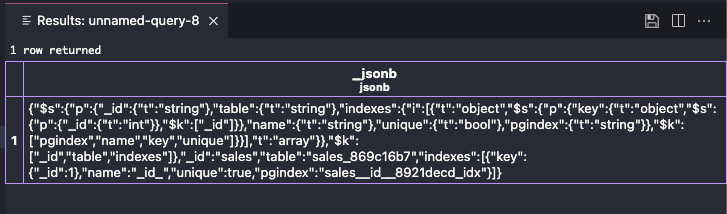
なるほど、ドキュメント形式のjsonデータがそのままjsonb型のカラムに格納されています。
ちょっと見づらいので、右上のフロッピーディスクマーク💾のボタンをクリックしてjson形式で出力してみます。[3]
[
  {
    "_jsonb": {
      "$s": {
        "p": {
          "_id": {
            "t": "string"
          },
          "table": {
            "t": "string"
          },
          "indexes": {
            "i": [
              {
                "t": "object",
                "$s": {
                  "p": {
                    "key": {
                      "t": "object",
                      "$s": {
                        "p": {
                          "_id": {
                            "t": "int"
                          }
                        },
                        "$k": [
                          "_id"
                        ]
                      }
                    },
                    "name": {
                      "t": "string"
                    },
                    "unique": {
                      "t": "bool"
                    },
                    "pgindex": {
                      "t": "string"
                    }
                  },
                  "$k": [
                    "pgindex",
                    "name",
                    "key",
                    "unique"
                  ]
                }
              }
            ],
            "t": "array"
          }
        },
        "$k": [
          "_id",
          "table",
          "indexes"
        ]
      },
      "_id": "sales",
      "table": "sales_869c16b7",
      "indexes": [
        {
          "key": {
            "_id": 1
          },
          "name": "_id_",
          "unique": true,
          "pgindex": "sales__id__8921decd_idx"
        }
      ]
    }
  }
]
なんとなくですが、コレクションの名前、インデックスとなるidの存在と、インデックス自体が定義されている様子が伺えます。
次にデータと思われるsales_869c16b7コレクション [4] の内容も見てみましょう。
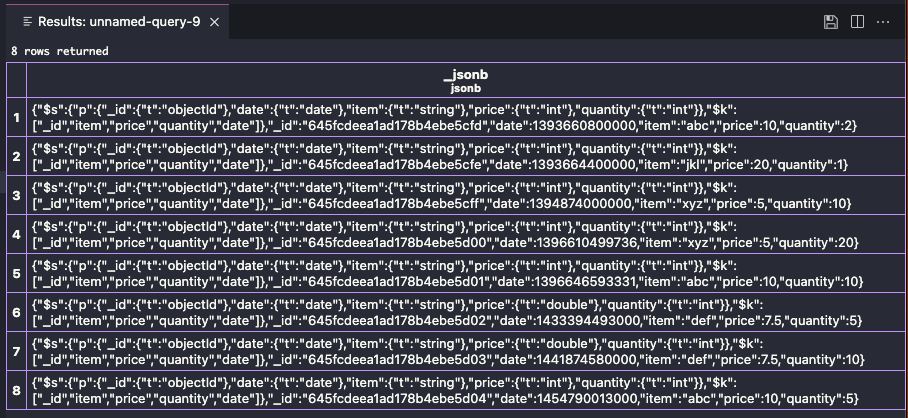
先ほど投入した8件のドキュメントが格納されている様子が見えます。
こちらも同様に💾マークをクリックしてjson形式で見てみます。
[
  {
    "_jsonb": {
      "$s": {
        "p": {
          "_id": {
            "t": "objectId"
          },
          "date": {
            "t": "date"
          },
          "item": {
            "t": "string"
          },
          "price": {
            "t": "int"
          },
          "quantity": {
            "t": "int"
          }
        },
        "$k": [
          "_id",
          "item",
          "price",
          "quantity",
          "date"
        ]
      },
      "_id": "645fcdeea1ad178b4ebe5cfd",
      "date": 1393660800000,
      "item": "abc",
      "price": 10,
      "quantity": 2
    }
  },
  // 後略
]
こちらは明らかにドキュメント自身のスキーマ定義のようなものと、データの内容が格納されている様子が見えます。(dateは13桁なので millisec っぽいですね)
いわゆるRDBとは異なりデータ自身がスキーマ定義を保持しているので、同じコレクションに異なる構造を持ったデータが格納できるという仕組みのようです。
まとめ
以上です。
ドキュメント型データベースはデータと合わせてデータ構造のスキーマを格納することで、不定な構造のデータを取り扱っている様子を確認することができました。
ご参考いただければ幸いです。
ではまた!
Discussion