Wordpress ブロックエディタ用プラグインを作る④ 〜デザイン変更に対応〜
前回はタイトル付きの枠を作成しました。
ブロックとしてはすでに完成していますが、今回は色やデザインの変更対応させます。
別ブロックを作るバリエーション機能もありますが今回は触れません。
前回やったこと
- タイトル付きの枠を作った
- デザインは変更できない
この章のゴール
- 枠線の色、太さ、タイトルの色などデザインの変更に対応する
- 角丸のバリエーションが作れるようにする
設定サイドバーに対応する
編集画面の右側にあるサイドバーにはブロックの設定を置くことができます。
edit.js のブロックの中に InspectorControls を含めることで実装します。
import { useBlockProps, RichText, InspectorControls } from '@wordpress/block-editor';
ブロックの中に <InspectorControls /> を追加します。
    〜略〜
    <section {...useBlockProps()}>
      <InspectorControls />
      <RichText
    〜略〜
この状態で編集画面を開き、右上の歯車ボタンからサイドバーを開いてもまだ何もありません。

カラーパレットを追加する
枠線の色を変更できるように ColorPalette を追加します。
要素が増えたので改行しました。
import {
  useBlockProps,
  RichText,
  InspectorControls,
  ColorPalette
} from '@wordpress/block-editor';
InspectorControls の中に追加します。
色は borderColor というAttributeに保存するのでこの後 block.json にも追加します。
      <InspectorControls>
        <div>
          <ColorPalette onChange={color => setAttributes({borderColor:color})} />
        </div>
      </InspectorControls>
部に色を反映させます。
style={〜} の部分を追加しました。
<section {...useBlockProps()} style={{"--study--border-color": attributes.borderColor}}>
block.json の attributes に borderColor を追加します。
  "attributes": {
    〜略〜
    "borderColor": {
      "type": "string",
      "default": "#000000"
    }
  }
枠線の色を変更できるようになりました。
この画像では用意された色ではなくカスタムカラーを使っています。

線の太さとタイトル色の設定も追加
タイトル色も ColorPalette を使いますが、線の太さはラジオグループにします。
Radio、RadioGroup というのは無いようで __experimentalRadio、__experimentalRadioGroup を別名定義して使います。
import {
  useBlockProps,
  RichText,
  InspectorControls,
  ColorPalette
} from '@wordpress/block-editor';
import {
  __experimentalRadio as Radio,
  __experimentalRadioGroup as RadioGroup
} from '@wordpress/components';
import './editor.scss';
<InspectorControls> の中にそれぞれ追加します。
CSS変数でまとめているので <section> の中で一括指定します。
    <section {...useBlockProps()} style={{
      "--study--border-color": attributes.borderColor,
      "--study--title-color": attributes.titleColor,
      "--study--border-width": attributes.borderWidth,
    }}>
      <InspectorControls>
        <div>
          タイトルの色
          <ColorPalette onChange={color => setAttributes({titleColor:color})} />
          枠の色
          <ColorPalette onChange={color => setAttributes({borderColor:color})} />
          枠の太さ
          <RadioGroup
          checked={attributes.borderWidth}
          onChange={val => setAttributes({borderWidth:val})}>
            <Radio value="1px">1</Radio>
            <Radio value="2px">2</Radio>
            <Radio value="3px">3</Radio>
          </RadioGroup>
        </div>
      </InspectorControls>
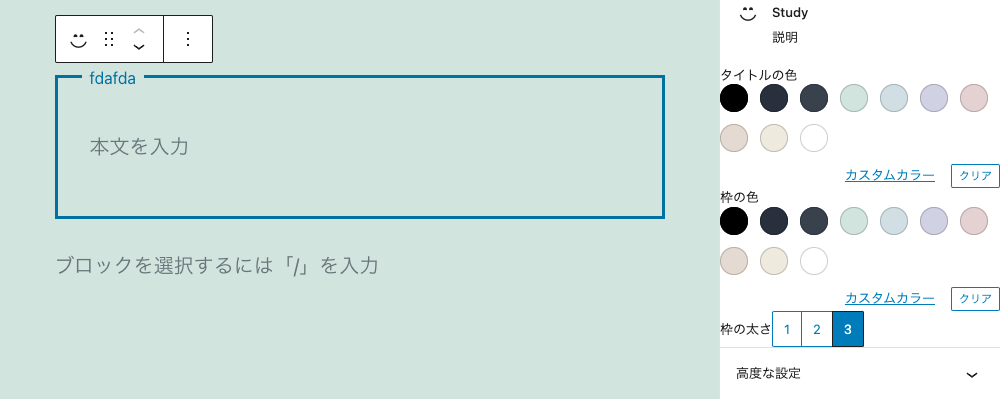
設定が正しく反映されているのを確認します。

設定サイドバーの見た目を整える
設定サイドバーの見た目をすっきりさせるため PanelBody で非表示にできるようにします。
import {
  __experimentalRadio as Radio,
  __experimentalRadioGroup as RadioGroup,
  PanelBody
} from '@wordpress/components';
各設定項目を <PanelBody> で囲みます。
      <InspectorControls>
        <PanelBody title="タイトルの色" initialOpen="false">
          <ColorPalette onChange={color => setAttributes({titleColor:color})} />
        </PanelBody>
        <PanelBody title="枠の色" initialOpen="false">
          <ColorPalette onChange={color => setAttributes({borderColor:color})} />
        </PanelBody>
        <PanelBody title="枠の太さ" initialOpen="false">
          <RadioGroup
          checked={attributes.borderWidth}
          onChange={val => setAttributes({borderWidth:val})}>
            <Radio value="1px">1</Radio>
            <Radio value="2px">2</Radio>
            <Radio value="3px">3</Radio>
          </RadioGroup>
        </PanelBody>
      </InspectorControls>
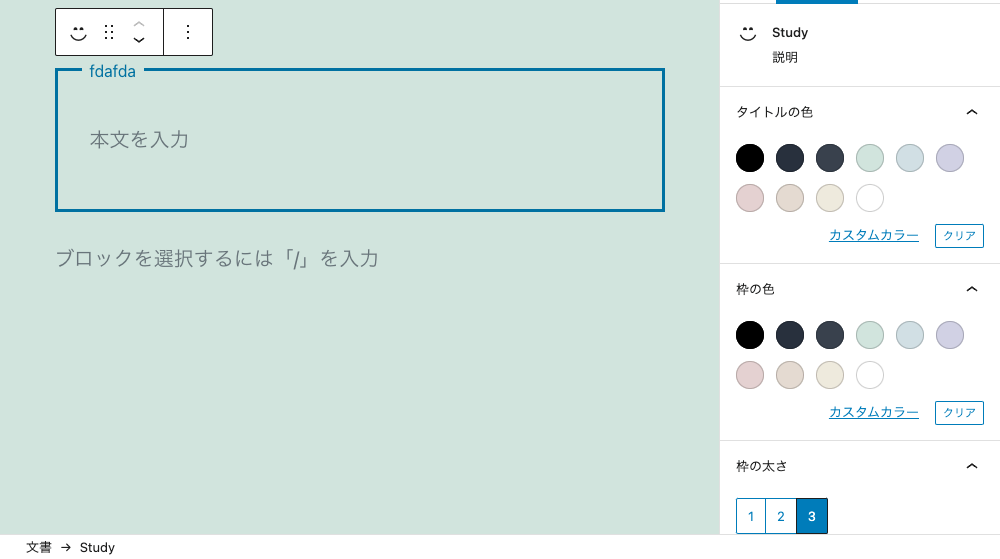
設定項目を開閉できるようになりました。
initialOpen="false" にしていますが、 initialOpen="true" にすると開いた状態が初期設定がになります。

設定が閉じてる

設定を開いた
公開画面に反映する
色々設定値が追加されたので save.js を編集して公開画面に反映させます。
変更前
<section {...useBlockProps.save()}>
変更後
    <section {...useBlockProps.save()} style={{
      "--study--border-color": attributes.borderColor,
      "--study--title-color": attributes.titleColor,
      "--study--border-width": attributes.borderWidth,
    }}>
反映されました!

他のスタイルも選べるようにする
角丸バージョンや、タイトル位置の違うバージョンなどを作りたいですが、ここまでの設定では難しいので他のパターンを作ります。
index.js を編集して registerBlockStyle() で別のスタイルを定義します。
// registerBlockStyle を追加
import { registerBlockType, registerBlockStyle } from '@wordpress/blocks';
import './style.scss';

import Edit from './edit';
import save from './save';

registerBlockType('my-plugin/study', {
  edit: Edit,
  save,
});

// デフォルトスタイルの名前を定義
registerBlockStyle('my-plugin/study', {
  name: 'default',
  label: "デフォルト",
  isDefault: true,
});

// 別スタイルの定義を追加
registerBlockStyle('my-plugin/study', {
  name: 'round',
  label: "角丸"
});
編集画面を見るとスタイルを選択できるようになっています。
今はまだCSSを変更していないのでサムネイルは同じです。

変更によりCSSクラスが付与される
registerBlockStyle() で定義した name 属性値が最後に付与されるようになります。
デフォルトの出力結果
is-style-default が追加されている。
class="block-editor-block-list__block wp-block is-selected wp-block-my-plugin-study is-style-default"
Round Styleの出力結果
is-style-round が追加されている。
class="block-editor-block-list__block wp-block is-selected wp-block-my-plugin-study is-style-round"
style.scss を編集
style.scss に .is-style-round のスタイルを追加します。
.wp-block-my-plugin-study {

  〜略〜

  &.is-style-round{
    --study--border-radius: 20px;
  }
}
編集画面、公開画面ともに反映されました!

編集画面

公開画面
おわり
以上でオリジナルのブロック作成とスタイルの編集ができるようになりました。
スクリプト全文
index.js
import { registerBlockType, registerBlockStyle } from '@wordpress/blocks';
import './style.scss';

import Edit from './edit';
import save from './save';

registerBlockType('my-plugin/study', {
  edit: Edit,
  save,
});

registerBlockStyle('my-plugin/study', {
  name: 'default',
  label: "デフォルト",
  isDefault: true,
});

registerBlockStyle('my-plugin/study', {
  name: 'study--round',
  label: "角丸"
});
edit.js
import {
  useBlockProps,
  RichText,
  InspectorControls,
  ColorPalette
} from '@wordpress/block-editor';
import {
  __experimentalRadio as Radio,
  __experimentalRadioGroup as RadioGroup,
  PanelBody
} from '@wordpress/components';
import './editor.scss';

/**
 * 文字列中の <br> を取り除く
 */
const removeBr = val => {
  return val.split('<br>').join('');
}


export default function Edit({attributes, setAttributes}) {
  return (
    <section {...useBlockProps()} style={{
      "--study--border-color": attributes.borderColor,
      "--study--title-color": attributes.titleColor,
      "--study--border-width": attributes.borderWidth,
    }}>
      {/* 設定サイドバー */}
      <InspectorControls>
        <PanelBody title="タイトルの色" initialOpen="false">
          <ColorPalette onChange={color => setAttributes({titleColor:color})} />
        </PanelBody>
        <PanelBody title="枠の色" initialOpen="false">
          <ColorPalette onChange={color => setAttributes({borderColor:color})} />
        </PanelBody>
        <PanelBody title="枠の太さ" initialOpen="false">
          <RadioGroup
          checked={attributes.borderWidth}
          onChange={val => setAttributes({borderWidth:val})}>
            <Radio value="1px">1</Radio>
            <Radio value="2px">2</Radio>
            <Radio value="3px">3</Radio>
          </RadioGroup>
        </PanelBody>
      </InspectorControls>

      {/* 画面に表示するアイテム */}
      <RichText
        className="title"
        tagName="span"
        allowedFormats={[]}
        placeholder="タイトルを入力"
        onChange={(val)=> setAttributes({title:removeBr(val)})}
        value={attributes.title}
      />
      <RichText
        className="content"
        tagName="p"
        placeholder="本文を入力"
        onChange={(val)=> setAttributes({content:val})}
        value={attributes.content}
      />
    </section>
  );
}
save.js
import { __ } from '@wordpress/i18n';
import { useBlockProps, RichText } from '@wordpress/block-editor';

export default function save({attributes}) {
  return (
    <section {...useBlockProps.save()} style={{
      "--study--border-color": attributes.borderColor,
      "--study--title-color": attributes.titleColor,
      "--study--border-width": attributes.borderWidth,
    }}>
      <RichText.Content
        className="title"
        tagName="span"
        value={attributes.title}
      />
      <RichText.Content
        className="content"
        tagName="p"
        value={attributes.content}
      />
    </section>
  );
}
block.json
{
  "$schema": "https://json.schemastore.org/block.json",
  "apiVersion": 2,
  "name": "my-plugin/study",
  "version": "0.1.15",
  "title": "Study",
  "category": "text",
  "icon": "smiley",
  "description": "説明",
  "supports": {
    "html": false
  },
  "textdomain": "heart",
  "editorScript": "file:./build/index.js",
  "editorStyle": "file:./build/index.css",
  "style": "file:./build/style-index.css",
  "attributes": {
    "title": {
      "type": "string",
      "source": "text",
      "selector": ".title",
      "default": ""
    },
    "content": {
      "type": "array",
      "source": "children",
      "selector": ".content",
      "default": ""
    },
    "borderColor": {
      "type": "string",
      "default": "#000000"
    },
    "titleColor": {
      "type": "string",
      "default": "#000000"
    },
    "borderWidth": {
      "type": "string",
      "default": "1px"
    }
  }
}
Discussion