こんにちは D2Cデータサイエンティストの吉岡です。
D2Cでは社内データサイエンティスト用の開発環境としてJupyterLabを利用しています。私のメイン業務はこの開発環境の開発保守運用なのですが、既存のJupyterLab Extensionでは解決できない課題が発生した時のためにも、JupyterLab Extensionの開発方法を調査いたしました。
自分用の覚え書きの意味も込めて、今回記事にさせていただきます。
JupyterLabとは?
JupyterLabは対話型の開発環境です。
実行環境自体はサーバー上に閉じており、そこにブラウザからアクセスして利用します。
弊社では機械学習モデルの開発やデータの分析など、さまざまな用途で利用しています。
JupyterLab Extensionとは?
JupyterLab ExtensionとはJupyterLabの拡張機能のことです。
Fundamentally, JupyterLab is designed as an extensible environment.
JupyterLab公式ドキュメント
公式でも書かれている通り、そもそもJupyterLabは拡張可能なように設計されています。
かなり自由度が高く、有名どころだとコードフォーマッターやTensorBoardなどが公開されています。
前提
- JupyterLabがcondaのbase環境から建てられている。
開発環境
- JupyterLab 4.0.7
- conda 23.5.2
- python 3.10.12
環境構築
今回はcondaにjupyterlab-extという環境を作って、そこで開発を行なっていきます。
conda create -n jupyterlab-ext --override-channels --strict-channel-priority -c conda-forge -c nodefaults jupyterlab=4.0.7 nodejs=18 git copier=7 jinja2-time
conda activate jupyterlab-ext
次に、JupyterLab Extentionのテンプレートを作ります。
mkdir lab_ext_example
cd lab_ext_example
copier copy https://github.com/jupyterlab/extension-template .
上記のコマンドを実行すると、どのようなextensionを作るか聞かれます。
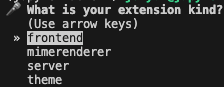
今回はfrontendを選択します。
そのほかにも色々と聞かれますが、今回は以下のようにしました。
🎤 What is your extension kind?
   frontend
🎤 Extension author name
   d2cyoshioka
🎤 Extension author email
   me@test.com
🎤 JavaScript package name
   lab_ext_example
🎤 Python package name
   lab_ext_example
🎤 Extension short description
   A JupyterLab extension example.
🎤 Does the extension have user settings?
   No
🎤 Do you want to set up Binder example?
   Yes
🎤 Do you want to set up tests for the extension?
   No
🎤 Git remote repository URL
   https://github.com/github_username/my-extension
するとテンプレートが生成されます。
ひとまず、このままJupyterLabにインストールしてみましょう。
conda acrivate jupyterlab-ext
jlpm
jlpm build:prod
conda acrivate base
jupyter labextension develop --overwrite .
これは何をやっているのかというと、jupyterlab-extという環境でビルドを行ってから、baseという環境のJupyterLabにインストールしています。
実際にインストールされているかを確認してみましょう。base環境にてJupyterLabを起動して、JupyterLabにアクセスします。既に起動済みであれば、JupyterLabを開いているタブをリロードすればOKです。
この際に、ブラウザの開発者ツールを起動しておきましょう。
するとコンソールに以下のような出力が行われます。
Jupyter Lab extension lab_ext_example is activated!
試しにsrc/index.tsを以下のように編集してみます。
@@ -12,6 +12,7 @@
   autoStart: true,
   activate: (app: JupyterFrontEnd) => {
     console.log('JupyterLab extension lab_ext_example is activated!');
+    console.log('hogehoge');
   }
 };
その後再ビルドを行なってからJupyterLabをリロードすると、コンソールにhogehogeの出力が追加されます。
conda activate jupyterlab-ext
jlpm run build
実践
それでは実際にアプリケーションを作ってみます。今回は非常に簡単なカウンターを作りたいと思います。
src/index.tsを以下のように変更します。
import {
  ILayoutRestorer,
  JupyterFrontEnd,
  JupyterFrontEndPlugin,
} from '@jupyterlab/application';

import {
  ICommandPalette,
  MainAreaWidget,
  WidgetTracker,
} from '@jupyterlab/apputils';

import { ILauncher } from '@jupyterlab/launcher';

import { Widget } from '@lumino/widgets';

class CounterWidget extends Widget {
  constructor(){
    super();

    this.i=0;

    this.number = document.createElement("p");
    this.number.innerText = String(this.i);
    this.node.appendChild(this.number);

    this.add = document.createElement("button");
    this.add.innerText = "+";
    this.add.onclick = (e) => {this.increment()};
    this.node.appendChild(this.add);
  }

  increment(){
    this.i++;
    this.number.innerText = String(this.i);
  }

  number: HTMLParagraphElement;
  readonly add: HTMLButtonElement;
  i: number;
}

function activate(
  app: JupyterFrontEnd,
  palette: ICommandPalette,
  restorer: ILayoutRestorer | null,
  launcher: ILauncher | null,
){
  console.log('JupyterLab extension lab_ext_example is activated!');

  let widget: MainAreaWidget<CounterWidget>;

  const command: string = "counter:open";
  app.commands.addCommand(command, {
    label: "Simple Counter",
    execute: () => {
      if (!widget || widget.isDisposed){
        const content = new CounterWidget();
        widget = new MainAreaWidget({content});
        widget.id = "counter";
        widget.title.label = "Simple Counter";
        widget.title.closable = true;
      }
      if (!tracker.has(widget)){
        tracker.add(widget);
      }
      if (!widget.isAttached){
        app.shell.add(widget, "main");
      }
      app.shell.activateById(widget.id);
    }
  });

  palette.addItem({
    command,
    category: "Tutorial",
  });

  let tracker = new WidgetTracker<MainAreaWidget<CounterWidget>>({
    namespace: "counter",
  })
  if (restorer) {
    restorer.restore(tracker, {
      command,
      name: () => "counter",
    })
  }

  if (launcher) {
    launcher.add({
      command,
      category: "example",
      rank: 1,
    })
  }
}

/**
 * Initialization data for the lab_ext_example extension.
 */
const plugin: JupyterFrontEndPlugin<void> = {
  id: 'lab_ext_example:plugin',
  description: 'A JupyterLab extension example.',
  autoStart: true,
  requires: [ICommandPalette],
  optional: [ILayoutRestorer, ILauncher],
  activate: activate,
};

export default plugin;
ビルドする前に、使用したパッケージを読み込む必要があります。今回は@jupyterlab/apputils、@jupyterlab/launcherと@lumino/widgetsを利用したので、これらを読み込んでおきましょう。
jlpm add @jupyterlab/apputils @jupyterlab/launcher @lumino/widgets
その後ビルドして、JupyterLabをリロードしてLauncherを開くと以下のようなアイコンが増えています。
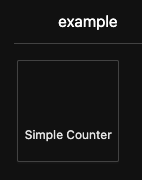
これをクリックすると、数字と+ボタンだけが表示された画面になるかと思います。
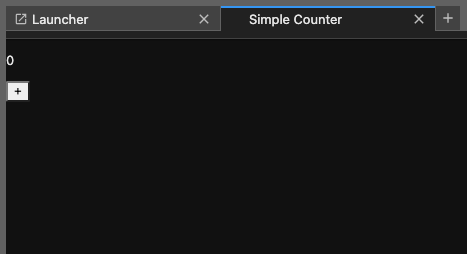
+ボタンを押すと数字が増えていきます。

無事カウンターの実装が完了しました!
少しだけコードの説明をします。
class CounterWidget extends Widget {
  constructor(){
    super();

    this.i=0;

    this.number = document.createElement("p");
    this.number.innerText = String(this.i);
    this.node.appendChild(this.number);

    this.add = document.createElement("button");
    this.add.innerText = "+";
    this.add.onclick = (e) => {this.increment()};
    this.node.appendChild(this.add);
  }

  increment(){
    this.i++;
    this.number.innerText = String(this.i);
  }

  number: HTMLParagraphElement;
  readonly add: HTMLButtonElement;
  i: number;
}
この辺りは、普段フロントエンドに関わっている方なら見覚えがあるかと思います。
やっていることとしては、実際に表示される部分をCounterWidgetとして定義しているだけです。
  const command: string = "counter:open";
  app.commands.addCommand(command, {
    label: "Simple Counter",
    execute: () => {
      if (!widget || widget.isDisposed){
        const content = new CounterWidget();
        widget = new MainAreaWidget({content});
        widget.id = "counter";
        widget.title.label = "Simple Counter";
        widget.title.closable = true;
      }
      if (!tracker.has(widget)){
        tracker.add(widget);
      }
      if (!widget.isAttached){
        app.shell.add(widget, "main");
      }
      app.shell.activateById(widget.id);
    }
  });
ここではJupyterLab Extension起動時の初期化を定義しています。
その後の
  palette.addItem({
    command,
    category: "Tutorial",
  });
ではコマンドパレットへの登録を行なっています。
実際にJupyterLabのコマンドパレットからSimple Counterとコマンドを打てば、カウンターを起動できます。
  let tracker = new WidgetTracker<MainAreaWidget<CounterWidget>>({
    namespace: "counter",
  })
  if (restorer) {
    restorer.restore(tracker, {
      command,
      name: () => "counter",
    })
  }
ここでは、リロード時にカウンターがあった場合は、次もカウンターを起動するようにしています。
ここを外すと、毎回自分で起動する必要が出てきます。
  if (launcher) {
    launcher.add({
      command,
      category: "example",
      rank: 1,
    })
  }
ここでは、ランチャーに起動アイコンの登録を行なっています。
rankは同じcategoryの中で、表示する優先順位のようなものです。
const plugin: JupyterFrontEndPlugin<void> = {
  id: 'lab_ext_example:plugin',
  description: 'A JupyterLab extension example.',
  autoStart: true,
  requires: [ICommandPalette],
  optional: [ILayoutRestorer, ILauncher],
  activate: activate,
};
最後に、拡張機能の登録を行なっています。
requiresは必須の引数、optionalはあればの機能です。カスタマイズされたJupyterLabでもこの拡張機能が動くように、機能にクリティカルでない引数はoptionalにすると良いようです。
終わりに
JupyterLab Extensionの開発の始め方から、簡単な例までをまとめました。
今回はフロントだけで作れる機能で試してみましたが、サーバー側の処理も簡単に書くことができます。
そのほか、公式の拡張機能実装例もかなり細かくまとまっており、調べるのもそこまで難しくなかったです。
本当はサーバー側も含めた記事にしたかったのですが、サーバー側の拡張機能はJupyterLabを再起動しないと読み込めないようでしたので、もう少し時間のある時にやろうと思います。
参考文献

株式会社D2C d2c.co.jp のテックブログです。 D2Cは、NTTドコモと電通などの共同出資により設立されたデジタルマーケティング企業です。 ドコモの膨大なデータを活用した最適化を行える広告配信システムの開発をしています。
Discussion