本記事では、ブラウザ拡張機能開発を加速させる、個人的に注目な3つの拡張機能開発フレームワーク・ツール(WXT、Plasmo、Extension.js)を紹介します。
サンプル拡張機能の実装を通して、それぞれの特徴、セットアップ方法、実際の開発フローを見ていきます。お好みの拡張機能開発ツールが見つかれば嬉しいです。
各フレームワーク・ツールの紹介
WXT
WXTは、Viteベースのブラウザ拡張フレームワークです。次のような特徴を持っています(トップページから抜粋)。
-
クロスブラウザ対応
- Chrome、Firefox、Edge、Safari、その他Chromiumベースのブラウザ
- Manifest V2、V3の両方に対応
- 開発モードでのHMRと、開発用ブラウザの自動起動
- 内部的にChrome Launcher等を使用
- ファイルベースのエントリーポイントでマニフェストを自動生成
- Nuxt風の自動インポート
- 公開プロセスの自動化
- 任意のフロントエンドフレームワークを利用可能
- 複数のExamples、テンプレートを提供
- PlaywrightやVitestを使った自動テストのサンプルも
-
リモートコードのバンドル
- URLからインポートされたリモートコードをダウンロードしてバンドル
Plasmo
Plasmoは、Parcelベースのオールインワンなブラウザ拡張フレームワークです。次のような特徴を持っています(トップページから抜粋)。
- ブラウザ拡張機能開発のための有料の統合プラットフォームの提供
- ファイルを作成し、コンポーネントをエクスポートする宣言的な開発アプローチ
- ソースファイルを元にしたマニフェスト自動生成
- TypeScript、React、Preact、Svelte、Vueのサポート
- 開発モードでのHMR
- ブラウザ拡張用のJavaScript APIをラップしたライブラリの提供
- 公開プロセスの自動化
- Itero TestBedによる即時のベータテスター向けデプロイ
- アクティブな開発者コミュニティ(400人以上)
Plasmoに関しての詳細な説明は、次の記事が参考になります。
Extension.js
Extension.jsは、実用性と迅速なプロトタイピングを念頭に設計された拡張機能開発ツールです。次のような特徴を持っています(トップページから抜粋)。
- プラグアンドプレイ、ビルドコンフィグなしで開発可能
- クロスブラウザ対応 (Chrome, Edge, Firefoxなど)
- MV2とMV3のほぼすべての機能をサポート
- TypeScript、WebAssembly、React、Vue、Preactなどをサポート
- 開発モードでのHMRと、開発用ブラウザの自動起動
- 既存のプロジェクトに組み込み可能
- Chrome拡張機能サンプルやMozilla Add-onサンプルからコマンドで開発可能
-
リモート拡張機能を実行可能
- URLをコマンド引数として実行すると、対象のブラウザーに対して拡張機能ファイルをダウンロードして実行できる
作成する拡張機能
デモ
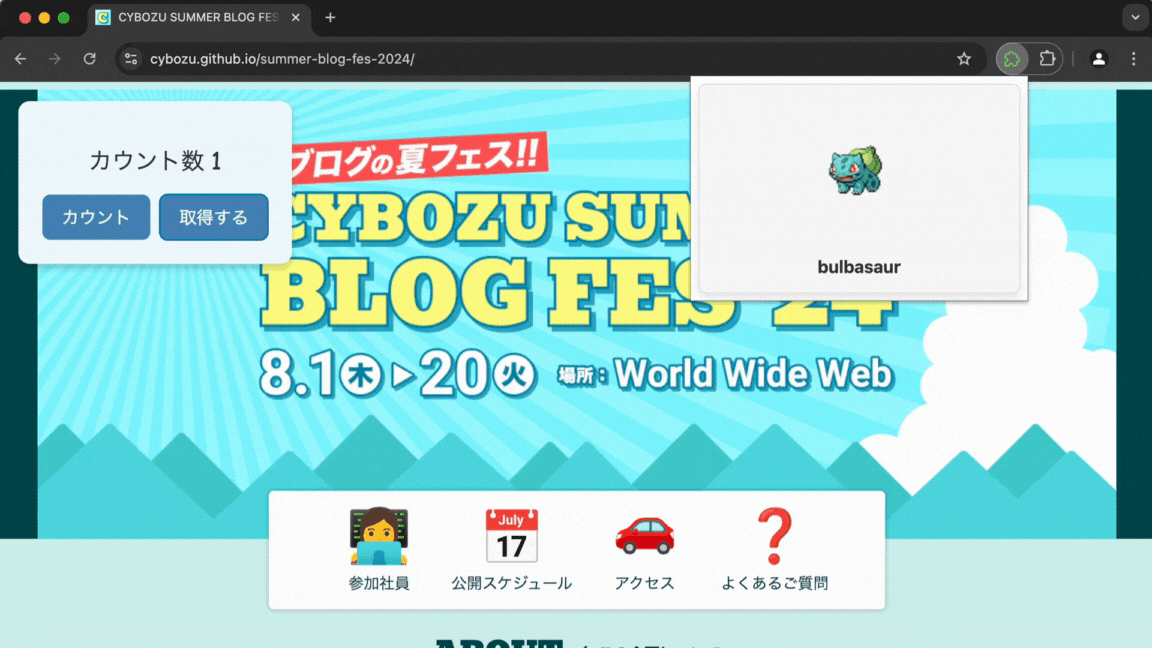
カウンター横の取得するボタンを押すと、現在のカウント数をidに持つポケモンがポップアップに表示されます。カウンターはWebページ上に表示されており、ポップアップは拡張機能のToolbar Buttonを押すと表示されます。
処理の流れ
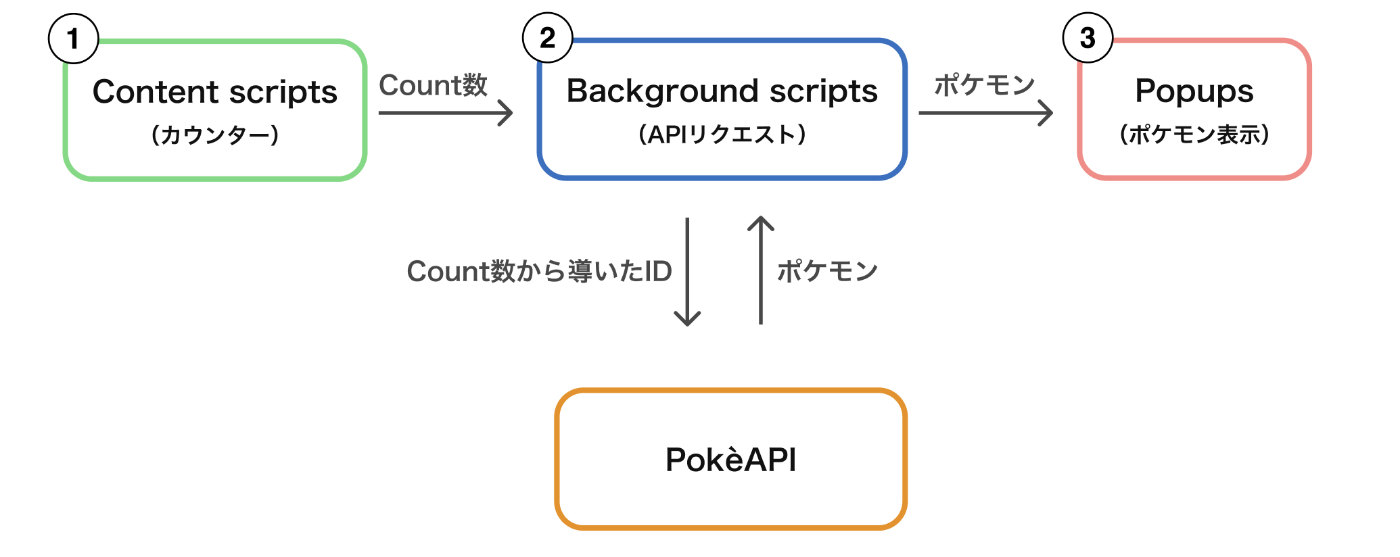
拡張機能のフロー図[1]
- Content scripts:特定のWebページのコンテキストで実行される拡張機能の一部です。ここでWebページ上にカウンターを表示します
- Background scripts:background pageと呼ばれる特別なコンテキストで実行されます。そのため、CORS等の心配は必要なく、任意のオリジンからリソースを取得できます
- Popups:Toolbar ButtonやAddress bar buttonに関連づけられたダイアログです。今回は、Toolbar Buttonをクリックするとダイアログが開き、ポケモンが表示されます
① Content scripts(カウンター)の処理
- Webページの左上にカウンターを表示する
- カウントボタンを押下すると、カウントされる
- 取得するボタンを押下すると、現在のカウント数をBackground scriptsに送信する
② Background scripts(APIリクエスト)の処理
- Content scriptsからカウント数を受信する
- 受け取ったカウント数を元にPokéAPIにリクエストを送り、カウント数をidに持つポケモンを取得する
- 取得したポケモン情報をPopupsに送信する
③ Popups(ポケモンの表示)の処理
- Background scriptsから受け取ったポケモンの画像と名前を表示する
フレームワーク・ツールごとの実装
完成品のコードはこちらです。全部全く同じ挙動をします。
WXTでの実装
セットアップ
対話形式でセットアップします。テンプレートは、vanilla、vue、react、solid、svelte、から選ぶことができます。パッケージマネージャはnpm、pnpm、yarn、bunから選べます。
npx wxt@latest init .

✔ Choose a template › react
✔ Package Manager › npm
ディレクトリ構成
.
├── assets
├── entrypoints
│   ├── background.ts # Background scripts
│   ├── content.ts    # Content scripts
│   └── popup/        # Popups
├── package.json
├── public
└── wxt.config.ts  # 設定ファイル(manifestなど)
WXTでは、entrypointsディレクトリにファイルを追加することでエントリーポイントを作成します。backgroundや、*.content、popup/など、一部のファイル名やパターンは特別で、マニフェストの生成に影響します。詳しくは、Entrypoints Directory guideを参照してください。リストにないファイルはマニフェストには追加されませんが、実行時にアクセスしたり、読み込むことは可能です。
devコマンドで拡張機能込みの開発用ブラウザが起動し、開発を開始できます。
マニフェストの作成
wxt.config.tsのmanifestプロパティに追加で与えたい権限などを記載します。
import { defineConfig } from 'wxt';

export default defineConfig({
  modules: ['@wxt-dev/module-react'],
  manifest: {
    // ここに書く
  }
});
今回は特にありません。
Content scripts(カウンター)の実装
ReactでUIを構築したいので、entrypoints/content.tsをentrypoints/content/index.tsxに変更します。
import ReactDOM from 'react-dom/client';
import App from './App.tsx';

export default defineContentScript({
  matches: ['*://*/*'],
  cssInjectionMode: 'ui', // Content scriptsのCSSがWebページに影響を与えないようにする
  async main(ctx) { // Content scriptsがロードされたタイミングで実行される
    const ui = await createShadowRootUi(ctx, {
      name: 'wxt-react-example',
      position: 'inline',
      anchor: 'body', // Elementを直に指定することも可能
      append: 'first',
      onMount: (container) => { // UIのマウント時に実行されるコールバック
        const wrapper = document.createElement('div');
        container.append(wrapper);

        const root = ReactDOM.createRoot(wrapper);
        root.render(<App />);
        return { root, wrapper };
      },
      onRemove: (elements) => { // UIがWebページから削除される時に実行されるコールバック
        elements?.root.unmount();
        elements?.wrapper.remove();
      },
    });

    ui.mount(); // onMountが実行される
  },
});
defineContentScriptのみをエクスポートします。defineContentScriptには、マニフェストのオプションと、main関数を定義します。main関数は、Content scriptsのロード時に実行されます。
UIの構成には、createShadowRootUiが利用できます。内部的にShadowRootが使われており、記述したCSSはWebページに影響を与えません。UIのmountやunmount等のライフサイクルを自分で書くところが特徴です。
また、defineContentScriptや、createShadowRootUiなどは、Nuxt風の自動インポート機能により明示的にインポートする必要はありません。
<App />の中身(カウンターのReactコンポーネント)
カウンターのReactコンポーネントです。useStateでカウント数を保持し、runtime.sendMessageを使って、Background scriptsにカウント数を送信しています。
import { useState } from 'react';

import './App.css';

const App = () => {
  const [count, setCount] = useState(1);

  return (
    <div>
      <p>カウント数 {count}</p>
      <button type="button" onClick={() => setCount((count) => count + 1)}>
        カウント
      </button>
      <button
        type="button"
        onClick={() => {
          chrome.runtime.sendMessage({
            type: 'count',
            id: count,
          });
        }}
      >
        取得する
      </button>
    </div>
  );
};

export default App;
Background scripts(APIリクエスト)の実装
export default defineBackground({
  async main() {
    handlePokemonRequest()
  }
});
defineBackgroundのみをエクスポートします。defineBackgroundは、defineContentScript同様に、マニフェストのオプションとmain関数を定義します。main関数は、Background scriptsのロード時に実行されます。
handlePokemonRequest()の中身
runtime.onMessageでContent scriptsからのメッセージを受信します。
Content scriptsが送信したメッセージtypeと一致していたら、PokéAPIにリクエストを送信し、レスポンスをruntime.sendMessageでPopupに送ります。
function handlePokemonRequest() {
  chrome.runtime.onMessage.addListener(async (message) => {
    if (message.type === 'count') {
      const url = `https://pokeapi.co/api/v2/pokemon/${message.id}`;

      try {
        const response = await fetch(url);
        const data = await response.json();
        chrome.runtime.sendMessage({
          type: 'poke',
          image: data.sprites.front_default,
          name: data.name,
        });
      } catch (error) {
        console.error('Error fetching poke:', error);
      }
    }
  });
};
Popups(ポケモンの表示)の実装
entrypoints/popup.htmlまたはentrypoints/popup/index.htmlはPopupsとして解釈されます。
<!doctype html>
<html lang="en">
  <head>
    <meta charset="UTF-8" />
    <meta name="viewport" content="width=device-width, initial-scale=1.0" />
    <title>Default Popup Title</title>
    <meta name="manifest.type" content="browser_action" />
  </head>
  <body>
    <div id="root"></div>
    <script type="module" src="./main.tsx"></script>
  </body>
</html>
React要素をレンダリングするためのrootノードを定義し、main.tsxを読み込みます。
main.tsxで、rootノードの中にReact要素をレンダリングします。
import ReactDOM from 'react-dom/client';
import App from './App';

const root = ReactDOM.createRoot(document.getElementById('root')!);
root.render(<App />);
ポケモンを描画する<App />の中身
runtime.onMessageでBackground scriptsからのメッセージを受信し、中身に応じてポケモンを描画しています。
import { useEffect, useState } from 'react';
import './App.css';

interface PokeMessage {
  type: string;
  image: string;
  name: string;
}

const Popup = () => {
  const [pokeData, setPokeData] = useState<{ image: string; name: string }>({
    image: '',
    name: '',
  });

  useEffect(() => {
    const handleMessage = (message: PokeMessage) => {
      if (message.type === 'poke') {
        setPokeData({ image: message.image, name: message.name });
      }
    };

    if (!chrome.runtime.onMessage.hasListener(handleMessage)) {
      chrome.runtime.onMessage.addListener(handleMessage);
    }

    return () => {
      chrome.runtime.onMessage.removeListener(handleMessage);
    };
  }, []);

  return (
    <div className="container">
      <img alt={pokeData.name} src={pokeData.image} className="image" />
      <span className="name">{pokeData.name}</span>
    </div>
  );
};

export default Popup;
感想
- フレームワークそのものの学習コストは低いなと感じました。
entrypointsでエクスポートする関数もインターフェースが揃っていてわかりやすいです - UIの
mountやunmount等のライフサイクルを自分で書くのは個人的には嬉しいと思いました。ユーザのインタラクションに応じてUIを表示するなど、複雑な要件でも直感的に記述できそうです -
devコマンドで拡張機能込みの開発用ブラウザが起動するのはかなり体験が良かったです。コンポーネント作成中のHMRも安定していました - マニフェストのオプション周りをいじっている時はよくエラーで落ちるので、その都度起動し直しているといつの間にかこんな感じになります

Plasmoでの実装
セットアップ
createコマンドで雛形を作成できます。
# srcディレクトリ配下にソースコードを配置する
npm create plasmo --with-src
# Messaging APIを扱うため別途インストールする
npm i @plasmohq/messaging
ディレクトリ構成
.
├── README.md
├── assets
├── src
│   ├── background.ts  # Background scripts
│   ├── contents       # Content scripts
│   │   └── plasmo.ts
│   ├── popup.tsx      # Popups
│   └── style.css
└── package.json
Content scripts、Background scriptsや、PopupsなどのExtension Pagesは、すべて予約されたファイル名で作成する必要があります。詳しくはPlasmo Frameworkの該当する項を参照してください。
devコマンドで開発用サーバーが起動します。生成されたbuild/chrome-mv3-devを、開発用の拡張機能として読み込むことで、開発を開始できます。
マニフェストの作成
package.jsonのmanifestプロパティに追加で与えたい権限などを記載します。
{
  "manifest": {
    // ここに書く
  }
}
今回は特にありません。
Content scripts(カウンター)の実装
contents/もしくは、content.tsxを配置することで、ReactでUIを構築できます。
import styleText from 'data-text:./content.css';
import type { PlasmoCSConfig, PlasmoGetInlineAnchor, PlasmoGetStyle } from 'plasmo';
import { App } from './App';

// マニフェストのオプション
export const config: PlasmoCSConfig = {
  matches: ['*://*/*'],
};

// スタイル
export const getStyle: PlasmoGetStyle = () => {
  const style = document.createElement('style');
  style.textContent = styleText;
  return style;
};

// Content scriptsで描画するUIの位置(アンカー)を指定
export const getInlineAnchor: PlasmoGetInlineAnchor = () => document.body;

// レンダリングするReact要素
const Index = () => <App />;

export default Index;
configにはマニフェストのオプション、getStyleにはスタイル、getXxAnchorにはアンカーをそれぞれ定義し、エクスポートします。基本的にはReact要素をエクスポートするだけでUIを描画できるところが特徴です。その他のオプションやライフサイクルは、Life Cycle of Plasmo CSUIを参照してください。
Plasmoも内部的にShadowRootが使われており、記述したCSSはWebページに影響を与えません。
contents/index.tsxでレンダリングしている<App />では、取得するボタン押下時にPlasmoのMessaging APIである、sendToBackgroundを使用しています。
// 取得ボタン押下時に↓を実行
await sendToBackground({
  name: 'count',
  body: {
    id: count,
  },
});
sendToBackgroundでは、nameとbodyを指定して、Background scriptsにメッセージを送信でき、返り値でレスポンスを受け取ります。詳しいAPIの対応関係はTL;DR | Messaging APIを参照してください
<App />の中身(カウンターのReactコンポーネント)
カウンターのReactコンポーネントです。
今回はPopupsでレスポンスを受け取るため、sendToBackgroundの返り値は受け取りません。
import { sendToBackground } from '@plasmohq/messaging';
import { useState } from 'react';

export const App = () => {
  const [count, setCount] = useState(1);

  return (
    <div>
      <p>カウント数 {count}</p>
      <button type="button" onClick={() => setCount((count) => count + 1)}>
        カウント
      </button>
      <button
        type="button"
        onClick={async () => {
          await sendToBackground({
            name: 'count',
            body: {
              id: count,
            },
          });
        }}
      >
        取得する
      </button>
    </div>
  );
};
Background scripts(APIリクエスト)の実装
PlasmoのMessaging APIを利用すると、runtime.onMessageを使わずにファイルベースでメッセージを受信することができます。
今回は、countというnameでカウント数を受け取るため、background/messages/count.tsという場所にファイルを作ります。
import type { PlasmoMessaging } from '@plasmohq/messaging';

const handler: PlasmoMessaging.MessageHandler<{ id: string }> = async (req, res) => {
  // 受信後の処理を書く
};

export default handler;
req.bodyにリクエストの中身が入っています。送信元にレスポンスを返す場合は、res.send()を使うことができます。req.bodyの型は、MessageHandlerの型引数に明示する必要があります。[2]
Background scriptsの全体
今回は、送信元ではなくPopupsにポケモンの情報を送りたいので、runtime.sendMessageを使用しています。
import type { PlasmoMessaging } from '@plasmohq/messaging';

const handler: PlasmoMessaging.MessageHandler<{ id: string }> = async (req, _res) => {
  const url = `https://pokeapi.co/api/v2/pokemon/${req.body.id}`;

  try {
    const response = await fetch(url);
    const data = await response.json();

    chrome.runtime.sendMessage({
      type: 'poke',
      image: data.sprites.front_default,
      name: data.name,
    });
  } catch (error) {
    console.error('Error fetching poke:', error);
  }
};

export default handler;
```
Popups(ポケモンの表示)の実装
popup.tsxまたはpopup/index.tsxで描画したいコンポーネントをエクスポートするとPopupsとして解釈されます。
import './popup.css';
import { useEffect, useState } from 'react';

// Reactコンポーネントをdefault exportする
function IndexPopup() {
  // ポケモンの描画処理
}

export default IndexPopup;
popup/index.tsxの全体
WXTのAppコンポーネントと全く同じです。PopupsでもPlasmoのMessaging APIが使用可能ですが、Background scriptsでruntime.sendMessageを使用しているため、runtime.onMessageで受信しています。
import { useEffect, useState } from 'react';
import './index.css';

interface PokeMessage {
  type: string;
  image: string;
  name: string;
}

const Popup = () => {
  const [pokeData, setPokeData] = useState<{ image: string; name: string }>({
    image: '',
    name: '',
  });

  useEffect(() => {
    const handleMessage = (message: PokeMessage) => {
      if (message.type === 'poke') {
        setPokeData({ image: message.image, name: message.name });
      }
    };

    if (!chrome.runtime.onMessage.hasListener(handleMessage)) {
      chrome.runtime.onMessage.addListener(handleMessage);
    }

    return () => {
      chrome.runtime.onMessage.removeListener(handleMessage);
    };
  }, []);

  return (
    <div className="container">
      <img alt={pokeData.name} src={pokeData.image} className="image" />
      <span className="name">{pokeData.name}</span>
    </div>
  );
};

export default Popup;
感想
- 基本的にコンポーネントをエクスポートするだけなので、記述量は少なく、考えることも少ないなと感じました。パッと作って試したい時に便利です
- Plasmo特有のお作法を覚える必要があるため、少し学習コストは高いのかなと感じます。メッセージング周りで少しハマりました
- HMRはたまにされないときがありますが、右下にリロードボタンが浮かび上がるため、特に気になりませんでした
Extension.jsでの実装
セットアップ
デフォルトでTailwind CSSで構成されます。
# react-typescriptテンプレートを使用
npx extension create . --template=react-typescript
ディレクトリ構成
.
├── background.ts  # Background scripts
├── content        # Content scripts
│   ├── ContentApp.tsx
│   ├── base.css
│   ├── content.css
│   └── content.tsx
├── extension-env.d.ts
├── manifest.json
├── package.json
└── public
フレームワークではないため、予約されたファイル名等はありません。
devコマンドで拡張機能込みの開発用ブラウザが立ち上がり、開発を開始できます。
マニフェストの作成
manifest.jsonに書きます。
{
  "manifest_version": 3,
  "version": "1.0",
  "name": "extension-js",
  "description": "",
  "background": {
    "service_worker": "./background.ts"
  },
  "action": {
    "default_title": "Default Popup Title",
    "default_popup": "popup/index.html"
  },
  "content_scripts": [
    {
      "matches": ["*://*/*"],
      "js": ["./content/main.tsx"]
    }
  ],
  "host_permissions": ["*://*/*", "http://localhost/*"],
  "icons": {
    "16": "public/icon/icon_16.png",
    "48": "public/icon/icon_48.png"
  }
}
Popups、Background scripts、Content scriptsそれぞれへのビルド前のパスを記載します。
全体の実装
特にフレームワーク特有のルール等はありません。ほとんどこれまでのコードのコピペです。詳細な実装は下記を参照してください。
感想
- 特有のルールを覚えなくて良いため一番早く実装できました
- 単に3個目に作ったので、コピペで済んだからかもしれません
- やっぱり
devコマンドで開発用ブラウザが起動するのはとても体験が良いです - クロスブラウザ対応やビルドの設定はやってくれるけどマニフェストなどの根幹部分は自分で書く間合いはちょうど良く感じました
まとめ
今回は、拡張機能を開発するためのフレームワーク・ツールの紹介と、実際にWXT、Plasmo、Extension.jsで拡張機能を実装しました。
開発者体験は全部良かったです。コンポーネントの実装自体が大きく変わるわけではないので、移行はそんなに大変ではないかなと思いました。(PlasmoのAPIをヘビーに使っている場合は微妙かも)
フレームワークを使用する際は慎重に検討する必要があると思いますが、PoC作成等では気にせずガンガン使って加速させると良さそうです。
最後に、マニフェストを自動生成するフレームワークを使用する際は、ビルド後のマニフェストに目を通しておくと安心です。想定外の権限が付与されていることがあります。例として、Plasmoは@plasmohq/storageを依存関係に追加すると、使用していなくてもstorageの権限が付与されます。
おまけ(その他ツールを簡単に紹介)
CRXJS Vite Plugin
下記の記事が参考になります。
Vite Plugin Web Extension
WXTの開発者である@aklinker1氏が作成した、WXTの前身となるツールです。

Discussion