PlaywrightでStorybookのブラウザ毎キャプチャを撮ってみる


先日、サービスの本番環境にて、検証から漏れていたブラウザでの見た目が崩れていることに気付きました。
「ウッ...デバイス/ブラウザ検証やっとけという話ではあるがしかし...ぶっちゃけめんどくさい!」
ということで、PlaywrightでStorybookのブラウザ毎画面キャプチャを撮ってみる技術検証をやりました。
アイデア
- Playwrightを使えば、画面キャプチャを含む各種主要ブラウザ[1]での操作・検証ができる
- Storybookに各コンポーネントはそこそこ揃えているので、その仕組みに乗っかって網羅的にキャプチャが取れると簡単そう
- Storybookの画面キャプチャをpuppeteerで実現するaddon-storyshots-puppeteerにて、puppeteerの代わりにPlaywrightのブラウザのインスタンスを突っ込んだら動いたと言ってる人がいる
3つ目が本当に動くのであれば、それを実装しつつ検証したいブラウザ・デバイスごとに実行すれば目的の画面キャプチャを得ることができそうです。
そこで本記事では、そのPlaywrightによるキャプチャの動作検証およびブラウザ・デバイス毎に実行するための調整をしていきます。
なお成果物はこちらにあります:
準備1. Storybook/Storyshots環境を用意する
本記事は主にStoryshotsおよびaddon-storyshots-puppeteerの話なので、まずそれらを動かす前提であるStorybookおよび素のStoryshotsの環境を用意します。
ここで必要な技術要素は「StorybookおよびStoryshotsが動くこと」「(Storyshotsが動くために)Jestが動くこと」です。Storybookが対象とするアプリケーションがどのフレームワークでできているかは問いません。
本記事ではnpx create-react-appとnpx sb initで手っ取り早く用意します。加えてStoryshotsも入れるため、下記のようなイメージです。
npx create-react-app hoge --template typescript
cd hoge
npx sb init
npm install -D @storybook/addon-storyshots
またStoryshotsのページを参考にして最低限のテストファイルを用意します。
import initStoryshots from '@storybook/addon-storyshots';

initStoryshots();
最終的に、npm run storybook, npm run build-storybook, npm testが動けばokです。
準備2. Playwrightをセットアップする
次にPlaywrightをセットアップします。といっても、基本的にはnpmパッケージなので下記で済みます。
npm install -D playwright
なお、実行環境によっては[2]npx playwright install-depsによってOSへの依存パッケージインストールが必要になります。実施せずに進んだ場合でも、もし必要であれば非常にわかりやすくエラーメッセージが出るため、それに従って実行すれば良いです。
Playwrightでキャプチャしてみる
準備ができたところで、本命の検証です。
まず、Storyshotsで画像スナップショットテストをするaddon-storyshots-puppeteerを入れます。
npm install -D @storybook/addon-storyshots-puppeteer
addonのドキュメントでは一緒にpuppeteerパッケージを入れていますが、今回はPlaywrightを使うため不要です。
そして例のissueコメントによると、getCustomBrowserオプション関数にplaywrightで起動したブラウザインスタンスを入れれば動くとのことなので、実際に書き下すと下記のようになります。
import initStoryshots from '@storybook/addon-storyshots';
import { imageSnapshot } from '@storybook/addon-storyshots-puppeteer';
import playwright from 'playwright'

initStoryshots({
  test: imageSnapshot({
    // MEMO: puppeteerパッケージが入っているとここで型エラーになる。
    // 違うモノを入れているので当然であるが、意図してやっているので必要なら@ts-ignoreで対処
    getCustomBrowser: () => {
      return playwright.chromium.launch()
    }
  })
});
では実行してみます。addon-storyshots-puppeteerのimageSnapshotでは、デフォルトでは外部起動されたstorybookのdevサーバにアクセスする動作になるので、
npm run storybook
を起動しつつ、別ターミナルにて
npm test
として少々待つと

8 snapshots written.とあり、できてそうな感じです。何やらwarningが出ていますが後で考えるとして
$ ls src/__image_snapshots__/
storyshots-test-ts-storyshots-example-button-large-1-snap.png
storyshots-test-ts-storyshots-example-button-primary-1-snap.png
storyshots-test-ts-storyshots-example-button-secondary-1-snap.png
storyshots-test-ts-storyshots-example-button-small-1-snap.png
storyshots-test-ts-storyshots-example-header-logged-in-1-snap.png
storyshots-test-ts-storyshots-example-header-logged-out-1-snap.png
storyshots-test-ts-storyshots-example-page-logged-in-1-snap.png
storyshots-test-ts-storyshots-example-page-logged-out-1-snap.png
それっぽいファイルが!試しに一番上のbutton-large-1-snap.pngを開くと

それっぽい!ターゲットは右上のちっさいやつなのに画像がデカいのがとてもブラウザキャプチャっぽい!
というわけで、割とすんなりとPlaywrightでStorybookの画面キャプチャができました。ちなみに、コード中のplaywright.chormiumのところをplaywright.firefoxやplaywright.webkitに変えれば、それだけでそれぞれの環境で実行できます。
元ネタのissueコメントを見たときは「そんな強引なw」と思いましたが、その割にはあっさりできました。やったね!
ビルド済のStoryを参照するようにする
Playwrightでキャプチャが撮れることが確認できたので色々カスタムしていきたいところですが、その前にこのテストを実行しやすくします。
実行時に別途Storybookのdevサーバを起動するのは面倒だったりCIを考えると不便な面があるため、ビルド済Storybookを参照するようにします。これはaddonのドキュメントにそのままの例があるので
 import initStoryshots from '@storybook/addon-storyshots';
 import { imageSnapshot } from '@storybook/addon-storyshots-puppeteer';
 import playwright from 'playwright'
+import path from 'path'

 initStoryshots({
   test: imageSnapshot({
+    storybookUrl: `file://${path.resolve(__dirname, '../storybook-static')}`,
     getCustomBrowser: () => {
       return playwright.chromium.launch()
     }
このように設定すれば、npm run build-storybookを事前に実行しておけばその成果物を読んでテスト実行できます。CIの事前ステップで実行したものなどを使っても良いでしょう。
ブラウザをちゃんと閉じる
ところで、前述のテスト実行時にWarningが出ていたのでこれを解決しておきます。
これはgetCustomBrowserで渡したブラウザインスタンスをcloseしておらず、それが終了しないために起こっています。
通常はライブラリ (addon-storyshots-puppeteer) が閉じますが、ここではユーザ側で生成したものを渡しているのでユーザ側で片付けるようにします。
 import path from 'path'

+let browser: playwright.Browser;
+afterAll(() => {
+  return browser.close();
+});
+
 initStoryshots({
   test: imageSnapshot({
     storybookUrl: `file://${path.resolve(__dirname, '../storybook-static')}`,
-    getCustomBrowser: () => {
-      return playwright.chromium.launch()
+    getCustomBrowser: async () => {
+      browser = await playwright.chromium.launch()
+      return browser
     }
   })
 });
これでテスト終了時にブラウザがcloseされます。
デバイス(画面サイズ)を指定する
一通りのStoryshots + Playwrightはいい感じに動くようになったので、ブラウザやデバイス(画面サイズ)を変えてみます。といっても、ブラウザは前述の通りchromiumのところをfirefoxやwebkitに変えるだけなので、デバイスに着目します。
Playwrightでは、ブラウザインスタンスから事前定義されたデバイス情報を使ってContextを作れば良く、
 import initStoryshots from '@storybook/addon-storyshots';
 import { imageSnapshot } from '@storybook/addon-storyshots-puppeteer';
-import playwright from 'playwright'
+import { Browser, chromium, devices } from 'playwright'
 import path from 'path'

-let browser: playwright.Browser;
+
+let browser: Browser;
 afterAll(() => {
   return browser.close();
 });
@@ -13,8 +14,9 @@ initStoryshots({
     storybookUrl: `file://${path.resolve(__dirname, '../storybook-static')}`,
     getCustomBrowser: async () => {
-      browser = await playwright.chromium.launch()
-      return browser
+      browser = await chromium.launch()
+      const context = await browser.newContext(devices['Pixel 5'])
+      return context
     }
   })
 });
と、こんな感じになります。これで実行すると、出力される画像がスマホっぽいサイズになります。
ちなみに、devicesの中身は下記のようになっていました。
> require('playwright').devices['iPhone 13']
{
  userAgent: 'Mozilla/5.0 (iPhone; CPU iPhone OS 15_0 like Mac OS X) AppleWebKit/605.1.15 (KHTML, like Gecko) Version/15.4 Mobile/15E148 Safari/604.1',
  screen: { width: 390, height: 844 },
  viewport: { width: 390, height: 664 },
  deviceScaleFactor: 3,
  isMobile: true,
  hasTouch: true,
  defaultBrowserType: 'webkit'
}
画像ファイル名をいい感じにする
これはStoryshotsやplaywrightではなくjest-image-snapshotの仕様なのですが、デフォルトで出力されるファイル名がこう...しんどい感じです。元がStorybookであり階層っぽい構造があること、また後に環境ごとに別ディレクトリに出力したい思惑もあり、ここでファイル名の調整を試みておきます。
それらしいあたりのコードを読んでみると、getMatchOptionsという関数の戻り値をtoMatchImageSnapshotに渡しているようです。というわけで両者のドキュメントやコードを見つつ
       browser = await chromium.launch()
       const context = await browser.newContext(devices['Pixel 5'])
       return context
-    }
+    },
+    getMatchOptions: (options) => {
+      const { kind, story } = options.context
+
+      const dir = path.resolve(__dirname, '__image_snapshots__', kind)
+      const name = story.replaceAll(/\s/g, '')
+
+      return {
+        customSnapshotsDir: path.resolve(dir),
+        customSnapshotIdentifier: name,
+      };
+    },
   })
 });
とこんな感じに作ります。すると
$ tree src/__image_snapshots__/
src/__image_snapshots__/
└── Example
    ├── Button
    │   ├── Large-snap.png
    │   ├── Primary-snap.png
    │   ├── Secondary-snap.png
    │   └── Small-snap.png
    ├── Header
    │   ├── LoggedIn-snap.png
    │   └── LoggedOut-snap.png
    └── Page
        ├── LoggedIn-snap.png
        └── LoggedOut-snap.png

4 directories, 8 files
となり、Storybookのサイドバーで見慣れた感じになります。わかりやすいですね。
いい感じに複数ブラウザ・デバイスしてみる
ここまでできれば、あとは検証したいブラウザとデバイスを好きなだけ並べればよさそうです。というわけで完成品がこちら。
import initStoryshots from '@storybook/addon-storyshots';
import { imageSnapshot, Context } from '@storybook/addon-storyshots-puppeteer';
import { Browser, BrowserType, chromium, webkit, firefox, devices } from 'playwright'
import path from 'path'

// deviceName: refs https://github.com/microsoft/playwright/blob/v1.19.0/packages/playwright-core/types/types.d.ts#L15739
function initBrowserStoryshots(key: string, deviceName: string, browserType: BrowserType) {
  let browser: Browser;
  afterAll(() => {
    return browser.close();
  });

  // MEMO: puppeteerパッケージを入れているとここで型エラーになる
  const getCustomBrowser = async () => {
    browser = await browserType.launch()
    const context = await browser.newContext(devices[deviceName])
    return context
  }

  const getMatchOptions = (options: {context: Context, url: string}) => {
    const { kind, story } = options.context

    const dir = path.resolve(__dirname, '__image_snapshots__', key, kind)
    const name = story.replaceAll(/\s/g, '')

    return {
      customSnapshotsDir: path.resolve(dir),
      customSnapshotIdentifier: name,
    }
  }

  initStoryshots({
    test: imageSnapshot({
      storybookUrl: `file://${path.resolve(__dirname, '../storybook-static')}`,
      getCustomBrowser,
      getMatchOptions,
    })
  });
}

initBrowserStoryshots('Desktop-firefox', "Desktop Firefox", firefox)
initBrowserStoryshots('Pixel5-chrome', "Pixel 5", chromium)
initBrowserStoryshots('iPhone13-safari', "iPhone 13", webkit)
(全体成果物のリポジトリも再掲しておきます)
前節と変わっているのは
- 全体を関数でまとめ、識別子とデバイス名とブラウザタイプを指定できるようにした
-
getCustomBrowser,getMatchOptionsを変数定義した(インデント浅くした) - デバイスとブラウザをまとめた識別子
keyを用意し、画像ファイル群の親ディレクトリにした
といったところです。ここでは適当に3種類のテストを並べており、実行すると
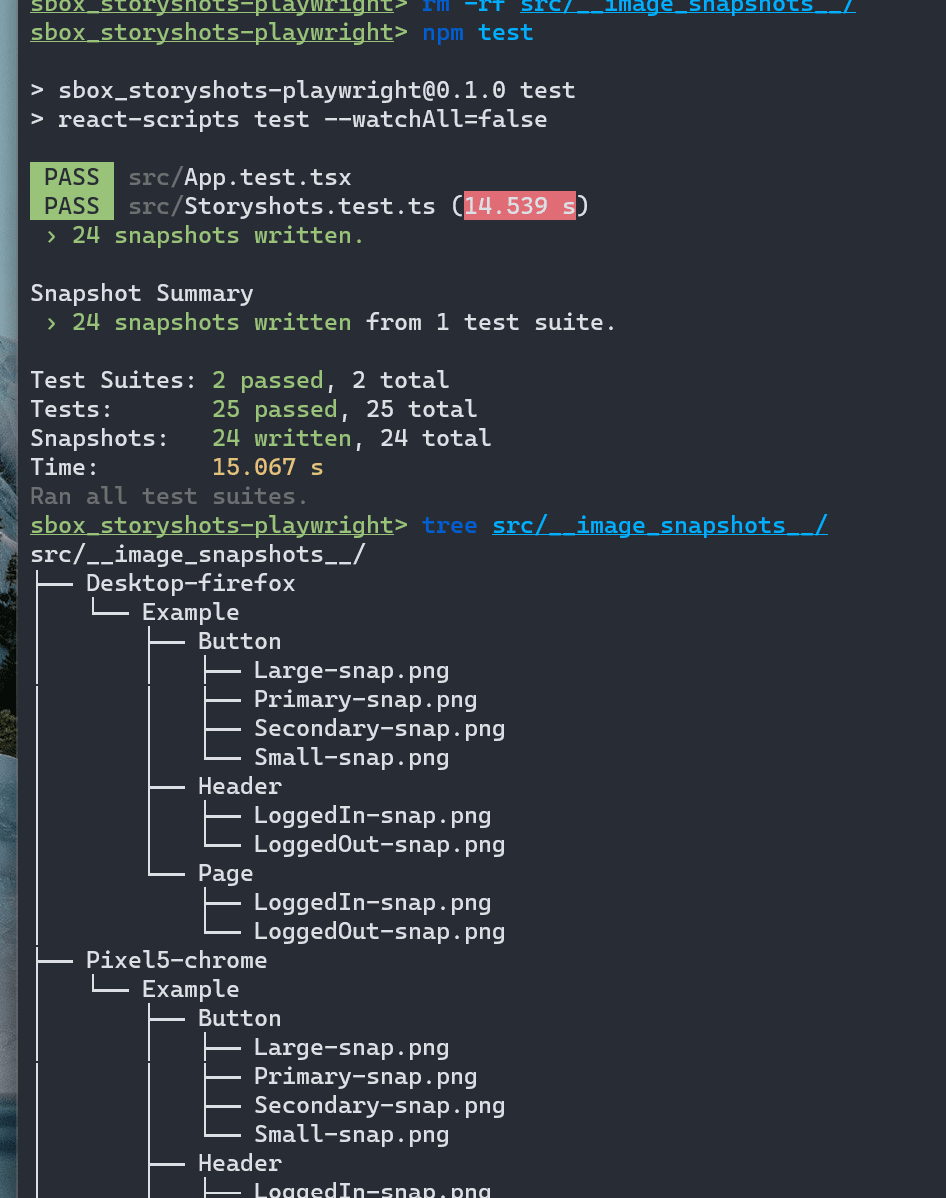
3ケース分のテスト実行とキャプチャが出来上がりました。いい感じですね!
まとめ
あとは好きなようにデバイスとブラウザを並べて実行し、リグレッションテストをするなりホスティング環境にアップしてサッと眺めるなりして便利に使えそうです。
少々公式感が無いこと・Playwrightのnpm installが遅いのがCIなどの観点で懸念ですが、それ以外は追加コードも少なく内容の割には導入しやすい印象です。
このユースケース気になってた方やカジュアルに試してみたい方など、参考になれば。
Discussion