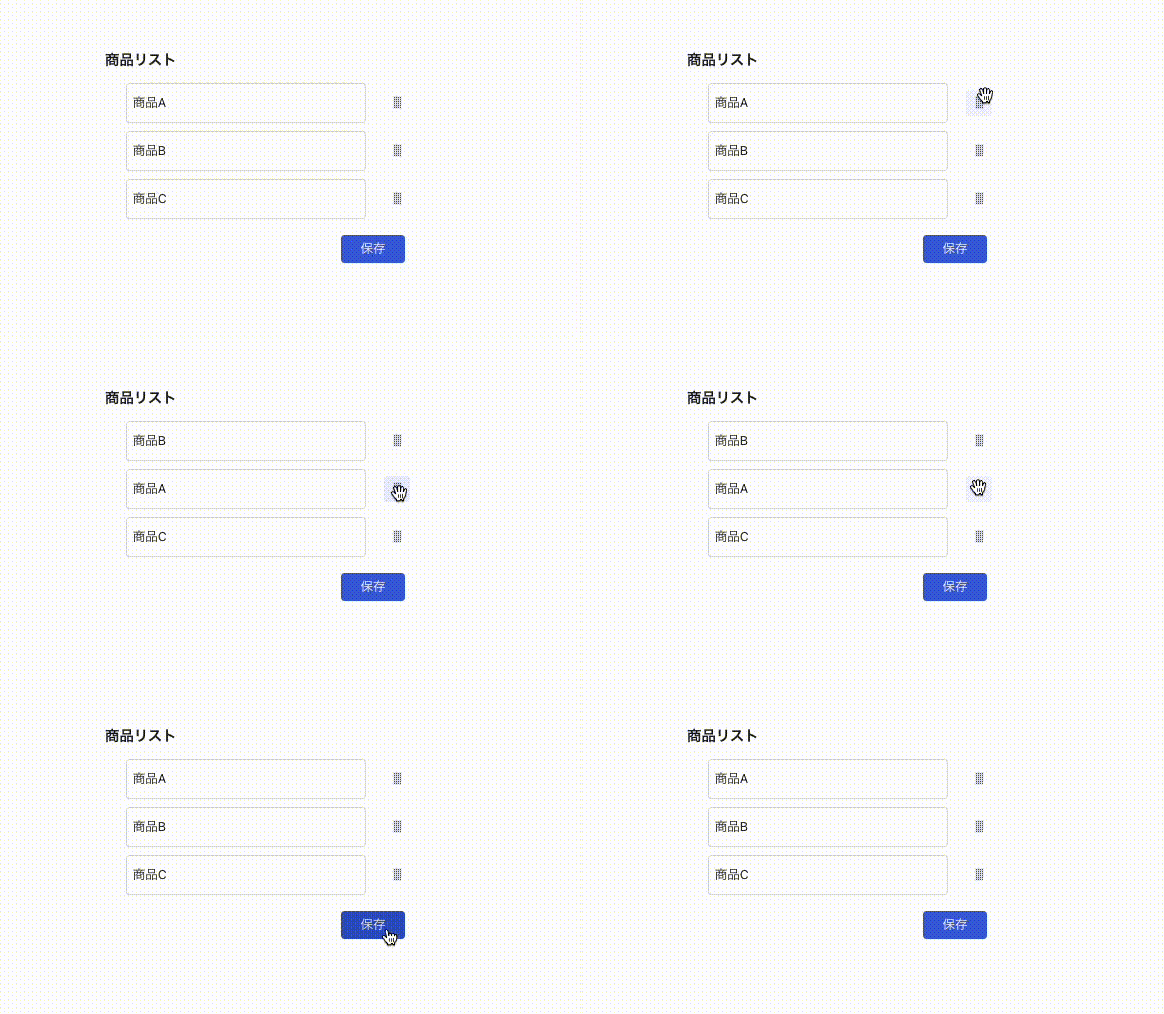
react-hook-form × dnd-kitで並び替えを実装した
はじめに
こんにちは、株式会社COUNTERWORKSで働いている小木曽です。
普段はNext.jsでフロントエンド開発をしております。
今回は、react-hook-formとdnd-kitライブラリを使ってフォーム画面で並び替え機能を作成したので実装を共有したいと思います。
画像のように、フォーム画面で一つの項目に対して複数入力できて、かつ並び替えもできるようにするケースはよくあるかと思います。

並び替えはdnd-kitを使いつつ、react-hook-formを使って並び替えた情報を更新します。
インストール
react-hook-form、dnd-kitをインストールします。
pnpm add react-hook-form @dnd-kit/core @dnd-kit/modifiers @dnd-kit/utilities @dnd-kit/sortable
実装
実装手順を説明していきます。ドラッグ&ドロップに関係しない見た目のスタイルに関しては割愛させていただきます。
1. フォーム画面作成
はじめにフォーム画面を作成します。
react-hook-formのuseFormとdnd-kitのDndContext、SortableContextを定義します。
またドラッグ操作を終了したときに実行するonDragEnd関数を定義します。
export type Product = { id: number; name: string };

export type FormType = {
  products: Product[];
};
import { FC } from 'react';
import { DndContext, DragEndEvent } from '@dnd-kit/core';
import { restrictToVerticalAxis } from '@dnd-kit/modifiers';
import { SortableContext } from '@dnd-kit/sortable';
import { FormProvider, useFieldArray, useForm } from 'react-hook-form';
import { FormType, Product } from '@/interfaces/Product';
import { Item } from './Item';

const products: Product[] = [
  {
    id: 1,
    name: '商品A',
  },
  {
    id: 2,
    name: '商品B',
  },
  {
    id: 3,
    name: '商品C',
  },
];

export const Form: FC = () => {
  // フォームを定義
  const formMethods = useForm<FormType>({ defaultValues: { products } });
  const { control, handleSubmit } = formMethods;
  const { fields, move } = useFieldArray({ control, name: 'products' });
  const modifiers = [restrictToVerticalAxis];

  // ドラッグ操作を終了するときのイベントを定義
  const onDragEnd = (event: DragEndEvent) => {
    // イベント情報からactive(=移動元)、over(=移動先)の情報を取得する
    const { active, over } = event;
    // 移動元と移動先のid(fieldsのid)が変わらない場合は更新処理をしない
    if (!over || active.id === over.id) return;

        // 移動元のインデックスを取得する
    const activeIndex = active.data.current?.sortable?.index;
    // 移動先のインデックスを取得する
    const overIndex = over.data.current?.sortable?.index;
    if (activeIndex !== undefined && overIndex !== undefined) {
    // 2つのインデックスでuseFieldArrayのmoveを使ってfieldsを更新する
      move(activeIndex, overIndex);
    }
  };

  const onSubmit = (data: FormType) => {
    console.log(data);
  };

  return (
    <FormProvider {...formMethods}>
      <form onSubmit={handleSubmit(onSubmit)}>
          // modifiersはドラッグ&ドロップする際の移動を縦か横方向に制限する
	// 今回は縦方向の移動に制限したいので、`restrictToVerticalAxis`を定義
        <DndContext modifiers={modifiers} onDragEnd={onDragEnd}>
	  // itemsにソート対象のアイテムを渡す(fieldsを渡す)
          <SortableContext items={fields}>
            <label className="font-bold text-left">商品リスト</label>
            <div className="flex flex-col gap-y-2 w-full items-center mt-3">
              {fields.map((field, index) => (
                <Item key={field.id} id={field.id} index={index} />
              ))}
            </div>
          </SortableContext>
        </DndContext>
        <button type="subtmit">保存</Button>
      </form>
    </FormProvider>
  );
};
- @dnd-kit/modifiersに関して
modifiersは上記実装中のコメントに書いた通り、移動を制限することができます。
今回はrestrictToVerticalAxisを使って縦方向のみ動きを制限しましたが、横方向に制限したい場合は、restrictToHorizontalAxisを使います。
詳しくは以下をご覧ください。
2. 並び替え対象のコンポーネント作成
次に並び替えするコンポーネントを作成していきます。

ドラッグアイコンでテキストボックスを動かせるようにします。
dnd-kitのuseSortableを利用して、並び替えができるようにします。
import { CSSProperties, FC } from 'react';
import { useSortable } from '@dnd-kit/sortable';
import { CSS } from '@dnd-kit/utilities';
import { useFormContext } from 'react-hook-form';
import { FormType } from '@/interfaces/Product';
import { DragIcon } from './DragIcon';

type Props = {
  id: string;
  index: number;
};

export const DndItem: FC<Props> = ({ id, index }) => {
  const { register } = useFormContext<FormType>();
  const { attributes, listeners, setNodeRef, transform, transition, isDragging } = useSortable({
    id,
  });
  const style: CSSProperties = {
    transform: CSS.Transform.toString(transform),
    transition,
    position: 'relative',
    // ドラッグ中はz-indexプロパティでコンポーネントを浮かせる
    zIndex: isDragging ? 10 : 0,
    display: 'flex',
    alignItems: 'center',
    gap: '0 24px',
  };

  return (
      // setNodeRefは並び替えさせたい箇所に定義
    // attributesは並び替えに必要なデフォルト属性を定義
    <div ref={setNodeRef} style={style} {...attributes}>
      <input {...register(`products.${index}.name`)} />
      // listenersはドラッグ操作(Form.tsxで定義したonDragEnd)を実行したい箇所に定義
      <DragIcon {...listeners} />
    </div>
  );
};
- @dnd-kit/utilitiesのCSSに関して
@dnd-kitではパフォーマンス上の理由でtransformを使用して、要素を移動することを推奨しております。
テンプレートリテラルを使用して以下のようにも書けます。
transform: `translate3d(${transform.x}px, ${transform.y}px, 0)`,
テンプレートリテラルに式を埋め込むのが嫌な場合は@dnd-kit/utilitiesのCSSを使って実装するのが便利です。
transform: CSS.Transform.toString(transform),
1と2で完成です!
おわりに
最後までご覧いただきありがとうございます。
今更かもしれませんが、dnd-kitを使った実装を書いてみました。
今後もReactに関する記事を書いていきたいと思っております。
ポップアップストアや催事イベント向けの商業スペースを簡単に予約できる「SHOPCOUNTER」と商業施設向けリーシングDXシステム「SHOPCOUNTER Enterprise」を運営しています。エンジニア採用強化中ですので、興味ある方はお気軽にご連絡ください! counterworks.co.jp/
Discussion
この記事のおかげで、実装が進められました、ありがとうございます!