Three.jsのシェーダーで歪む画像ギャラリー作ってみた
はじめに
最初にお伝えしておきます。
これは、オリジナルではございません。
思いっきり、かまぼこ様の記事をパクった参考にさせて頂きました。
なので、詳細の解説は以下の記事を参照して下さい。
解説記事あるなら、それでええやんってところなんですが。
この記事を書く理由は後述します。
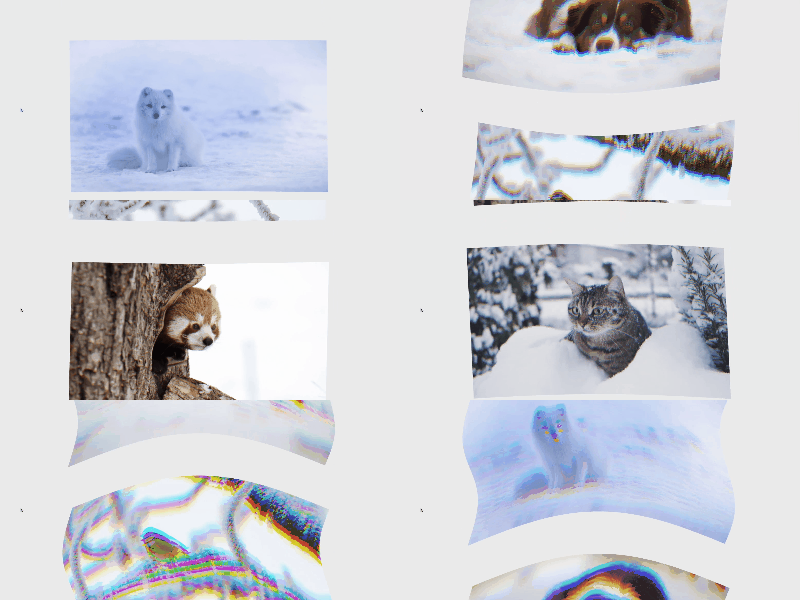
ひとまず完成図
すいません。僕のスキルでは激重いサイトしか無理でした、、
重すぎてしんどい人はgifをどうぞ。

この記事を書くに至った経緯
僕も実際に上記記事を参考にグニョングニョンを作ったのですが
一つ、困ったことがありました。
(断じて、かまぼこ様を否定しているわけではないので、何卒ご容赦を。。)
- DOMの画像を変えても、表示される画像は変わらない。
最初は「???」でしたが、考えてみれば当たり前のことでした。
目に見えている歪む画像はシェーダーで作成されたオブジェクトであって
DOMで表示されているものではありません。
なので、DOMとwebGLのオブジェクトを連動させる必要がありました。
コード全体像
<div class="container">
      <ul class="image-list">
        <li class="image-item">
          <a href="" class="image-wrapper">
            <img class="slide-image" src="texture/fox.jpg" alt="" />
          </a>
        </li>
        <li class="image-item dog">
          <a href="" class="image-wrapper">
            <img class="slide-image" src="texture/dog.jpg" alt="" />
          </a>
        </li>
        <li class="image-item">
          <a href="" class="image-wrapper">
            <img class="slide-image" src="texture/bird.jpg" alt="" />
          </a>
        </li>
        <li class="image-item">
          <a href="" class="image-wrapper">
            <img class="slide-image" src="texture/red-panda.jpg" alt="" />
          </a>
        </li>
        <li class="image-item">
          <a href="" class="image-wrapper">
            <img class="slide-image" src="texture/red-panda.jpg" alt="" />
          </a>
        </li>
      </ul>
    </div>
    <div class="webgl-canvas">
      <canvas id="canvas" class="webgl-canvas__body"></canvas>
    </div>

    <script id="v-shader" type="x-shader/x-vertex">
      varying vec2 vUv;
      uniform float uTime;

      float PI = 3.1415926535897932384626433832795;

      void main(){
        vUv = uv;
        vec3 pos = position;

        // 横方向
        float amp = 0.03; // 振幅(の役割) 大きくすると波が大きくなる
        float freq = 0.01 * uTime; // 振動数(の役割) 大きくすると波が細かくなる

        // 縦方向
        float tension = -0.001 * uTime; // 上下の張り具合

        pos.x = pos.x + sin(pos.y * PI  * freq) * amp;
        pos.y = pos.y + (cos(pos.x * PI) * tension);
        gl_Position = projectionMatrix * modelViewMatrix * vec4(pos, 1.0);
      }
    </script>

    <script id="f-shader" type="x-shader/x-fragment">
      varying vec2 vUv;
      uniform sampler2D uTexture;
      uniform float uImageAspect;
      uniform float uPlaneAspect;
      uniform float uTime;

      void main(){
        // 画像のアスペクトとプレーンのアスペクトを比較し、短い方に合わせる
        vec2 ratio = vec2(
          min(uPlaneAspect / uImageAspect, 1.0),
          min((1.0 / uPlaneAspect) / (1.0 / uImageAspect), 1.0)
        );

        // 計算結果を用いて補正後のuv値を生成
        vec2 fixedUv = vec2(
          (vUv.x - 0.5) * ratio.x + 0.5,
          (vUv.y - 0.5) * ratio.y + 0.5
        );

        //texture2D関数画像とuv座標を指定して座標での色を取り出す
        //rgbシフト有無でコードを分けています。適宜コメントアウトを外してください。

        //rgbシフトありの場合以下を適応(uTimeに乗算する数値でシフト幅を調整)
        vec2 offset = vec2(0.0,uTime * 0.0003);
        float r = texture2D(uTexture,fixedUv + offset).r;
        float g = texture2D(uTexture,fixedUv + offset * 0.5).g;
        float b = texture2D(uTexture,fixedUv).b;
        vec3 texture = vec3(r,g,b);
        gl_FragColor = vec4(texture, 1.0);

        //rgbシフトなしの場合以下
        /*
        vec4 texture = texture2D(uTexture,vUv);
        gl_FragColor = vec4(texture);
        */
      }
    </script>
/* -- リセット系 -- */
* {
  box-sizing: border-box;
  margin: 0;
  padding: 0;
}

ul,
li {
  list-style: none;
}

a {
  text-decoration: none;
}

img {
  width: 100%;
}

/* -- ここまで -- */

.container {
  width: 80vw;
  max-width: 1000px;
  margin: 0 auto;
}

#canvas {
  position: fixed;
  top: 0;
  left: 0;
  width: 100vw;
  height: 100vh;
  z-index: -1;
}

.webgl-canvas__body {
  width: 100%;
  height: 100%;
}

.image-list {
  width:100%;
  margin: 0 auto;
  padding: 180px 0;
}

.image-item {
  width: 100%;
}

.image-item:not(:first-of-type) {
  margin-top: 180px;
}

.image-wrapper {
  display: block;
  width: 100%;
  height: auto;
}

.image-wrapper > img {
  height: 100%;
  object-fit: cover;
  opacity: 0;
}
import * as THREE from "three";
import fox from "./texture/fox.jpg";
import dog from "./texture/dog.jpg";
import bird from "./texture/bird.jpg";
import redPanda from "./texture/red-panda.jpg";
import cat from "./texture/cat.jpg";
//imgを増やしたら、importで読み込む。

let camera, scene, renderer,uniforms,geometry;

//DOMのimg要素を配列で取得
const imageArray = [...document.querySelectorAll('.slide-image')];

//テクスチャの読み込み
//(画像の表示順序は配列に入れる順番で制御、追加で読み込んだら定義して配列に入れる)
const textures = [];
const tex = new THREE.TextureLoader();
const texture = tex.load(fox);
const texture2 = tex.load(dog);
const texture3 = tex.load(bird);
const texture4 = tex.load(redPanda);
const texture5 = tex.load(cat);
textures.push(texture,texture2,texture3, texture4,texture5);

//サイズを定義
const canvas = document.getElementById("canvas");
const sizes = {
  width: innerWidth,
  height: innerHeight,
};

function init() {
  //シーンを定義
  scene = new THREE.Scene();

  //カメラを定義(window座標とwebGL座標を一致させるため調整)
  const fov = 60,
    fovRad = (fov / 2) * (Math.PI / 180), //中心から左右30度ずつの視野角で丁度60度
    aspect = sizes.width / sizes.height,
    dist = sizes.height / 2 / Math.tan(fovRad),
    near = 0.1,
    far = 1000;
  camera = new THREE.PerspectiveCamera(fov, aspect, near, far);
  camera.position.z = dist;
  scene.add(camera);

  //レンダラーを定義
  renderer = new THREE.WebGLRenderer({
    canvas: canvas,
    antialias: true, //アンチエイリアスを適応
  });
  renderer.setSize(sizes.width, sizes.height); //サイズを指定
  renderer.setClearColor(new THREE.Color(0xEEEEEE));//背景色
  renderer.setPixelRatio(window.devicePixelRatio); //アスペクト比を指定

  // リサイズ(負荷軽減のためリサイズが完了してから発火する)
  window.addEventListener('resize', () => {
    if (timeoutId) clearTimeout(timeoutId);
    timeoutId = setTimeout(onWindowResize, 200);
  });
}

//画像をテクスチャにしたPlaneを扱うクラス
class ImagePlane {
  constructor(mesh, img) {
    this.refImage = img;//参照する要素
    this.mesh = mesh;
  }
  setParams() {
    //参照するimg要素から大きさ、位置を取得してセットする
    const rect = this.refImage.getBoundingClientRect();

    this.mesh.scale.x = rect.width;
    this.mesh.scale.y = rect.height;

    //window座標をWebGL座標に変換
    const x = rect.left - sizes.width / 2 + rect.width / 2;
    const y = -rect.top + sizes.height / 2 - rect.height / 2;
    this.mesh.position.set(x, y, this.mesh.position.z);
  }

  update(offset) {
    this.setParams();
    this.mesh.material.uniforms.uTime.value = offset;
  }
}

//Meshを生成する用の関数
const createMesh = (geometry,material) => {
  //メッシュ化
  const mesh = new THREE.Mesh(geometry, material);
  return mesh;
};

//materialを生成する用の関数(uniformsの値を引数によって変更する目的)
const createMaterial = (img,index) =>{
  uniforms = {
    uTexture: { value: textures[index] },
    uImageAspect: { value: img.naturalWidth / img.naturalHeight }, // 元画像のアスペクト比
    uPlaneAspect: { value: img.clientWidth / img.clientHeight }, // 画像描画サイズのアスペクト比
    uTime: { value: 0 },
  };

  //マテリアルを定義
  const material = new THREE.ShaderMaterial({
    uniforms,
    vertexShader: document.getElementById("v-shader").textContent,
    fragmentShader: document.getElementById("f-shader").textContent,
  });
  return material;
}


const imagePlaneArray = [];//テクスチャを適応したPlaneオブジェクトの配列
//アニメーション実行用関数
function animate() {
  updateScroll();
  for (const plane of imagePlaneArray) {
    plane.update(scrollOffset);
  }
  renderer.render(scene, camera);
  requestAnimationFrame(animate);
}

//material,meshを格納する用の配列を定義
const materials = [];
const meshes = [];
const main = () =>{
  window.addEventListener('load', () => {
    //imgタグの数だけループを回して、順番に
    for (let i = 0; i < imageArray.length; i++) {
      geometry = new THREE.PlaneGeometry(1, 1, 100, 100);
      const img = imageArray[i];
      const material = createMaterial(img, i);
      materials.push(material);
      const mesh = createMesh(geometry, materials[i]);
      meshes.push(mesh);
      scene.add(meshes[i]);
      const imagePlane = new ImagePlane(mesh, img);
      imagePlane.setParams();
      imagePlaneArray.push(imagePlane);
    }
    animate();
  })
}

//リサイズ対応関数
function onWindowResize() {
  sizes = {
    width: innerWidth,
    height: innerHeight,
  };
  // カメラの距離を計算し直す
  const fov = 60;
  const fovRad = (fov / 2) * (Math.PI / 180);
  const dist = sizes.width / 2 / Math.tan(fovRad);
  camera.position.z = dist;
  camera.aspect = window.innerWidth / window.innerHeight;
  camera.updateProjectionMatrix();
  renderer.setSize(window.innerWidth, window.innerHeight);
  renderer.setPixelRatio(window.devicePixelRatio);
  main();
  renderer.render(scene, camera);
}

init();
main();

//スクロール量に応じてアニメーションさせる
let targetScrollY = 0; // 本来のスクロール位置
let currentScrollY = 0; // 線形補間を適用した現在のスクロール位置
let scrollOffset = 0; // 上記2つの差分

// 開始と終了をなめらかに補間する関数
const lerp = (start, end, multiplier) => {
  return (1 - multiplier) * start + multiplier * end;
};

const updateScroll = () => {
  // スクロール位置を取得
  targetScrollY = document.documentElement.scrollTop;
  // リープ関数でスクロール位置をなめらかに追従
  currentScrollY = lerp(currentScrollY, targetScrollY, 0.1);
  scrollOffset = targetScrollY - currentScrollY;
};
実現したいこと
まず、目標として以下を試みました。
- imgが増えたら、jsで検知。その分のオブジェクトを生成する
- 増えたimgの画像を自動で読み込み、オブジェクトに反映する。
- それぞれのimgに対応した画像を表示する。
- imgの並び順を変更したら、自動でオブジェクトの表示順を変更する。
結論から言うと、2.4は困難でした。
試したことは以下。
(アホなこと試してますが、目を瞑ってください。)
2.について
- imgのsrc属性を取ってきて、読み込みコード(import文)を変数に格納するまでいけた
- そのコードが実行できなくて詰んだ
- 自動で読み込むのは無理だったので、都度import文を書く必要があります。
4.について
- DOMの順番が変わったらquerySelectorAllで取得した配列の要素順も変わるので
それに対応して、TextureLoader.load()を配列の中で実行しようとした - 配列の中で実行できなくて詰んだ。
- 自動は無理でしたが、textures配列に入れる順番でオブジェクトの表示順は調整可能です。
実現できたこと
- imgが増えたら、jsで検知。その分のオブジェクトを生成する
- それぞれのimgに対応した画像を表示する。
これらは、できたと言えるのか。。
力技のような気もしますが、一応やったこと(変更点)を書きます。
//DOMのimg要素を配列で取得
const imageArray = [...document.querySelectorAll('.slide-image')];

//materialを生成する用の関数(uniformsの値を引数によって変更する目的)
const createMaterial = (img,index) =>{
  uniforms = {
    uTexture: { value: textures[index] },
    uImageAspect: { value: img.naturalWidth / img.naturalHeight }, // 元画像のアスペクト比
    uPlaneAspect: { value: img.clientWidth / img.clientHeight }, // 画像描画サイズのアスペクト比
    uTime: { value: 0 },
  };

  //マテリアルを定義
  const material = new THREE.ShaderMaterial({
    uniforms,
    vertexShader: document.getElementById("v-shader").textContent,
    fragmentShader: document.getElementById("f-shader").textContent,
  });
  return material;
}

//material,meshを格納する用の配列を定義
const materials = [];
const meshes = [];
const main = () =>{
  window.addEventListener('load', () => {
    //imgタグの数だけループを回して、順番に
    for (let i = 0; i < imageArray.length; i++) {
      geometry = new THREE.PlaneGeometry(1, 1, 100, 100);
      const img = imageArray[i];
      const material = createMaterial(img, i);
      materials.push(material);
      const mesh = createMesh(geometry, materials[i]);
      meshes.push(mesh);
      scene.add(meshes[i]);
      const imagePlane = new ImagePlane(mesh, img);
      imagePlane.setParams();
      imagePlaneArray.push(imagePlane);
    }
    animate();
  })
}
上記で、関係箇所を抜粋しています。
imgの数に応じて、オブジェクトを生成するにはつまり
meshをimgタグと同じ数だけ生成する必要があります。
また、mesh毎にmaterialのuniformsのuTextureに格納する画像も変更する必要があるため
materialも、mesh同様imgと同じ個数だけ生成する必要があります。
(厳密には、materialの場合生成ではなくuTextureの値を更新しています。)
これらを実現するために、meshを生成する用の関数(createMesh)と
materialを生成(更新)する用の関数(createMaterial)を別で用意しました。
あとは、それぞれを格納する配列を用意してmain関数の中でループ処理を行い
ループの変数iと配列のインデックスを対応させてsceneにaddしています。
他の流れは全てかまぼこ様の記事と同じなので、そちらを参照して下さい。
終わりに
理想を言えば、imgタグ増やしたら自動でオブジェクト増えて、画像もちゃんと反映されてる。
imgタグは変わらないけどsrcだけ変更されたら、それもちゃんと反映されてる。
なんて、魔法のようなことは僕には無理でした。
極力拡張性、メンテナンス性を考慮してコードを書いてみたつもりではありますが
何せWebGLにわかなので、至らぬ点が多々あるかと思います。
ぜひ、ご指摘をお願い致します。
駄文をここまでお読み頂きありがとうございました。
10/20追記 問題は全て解決しました!
今回理想としていた実装である
「imgタグ場所や数、srcの変更が、オブジェクトにも動的に反映される。」
と言うことが、解決できましたので詳細を記載します。
全ての根源は、フラグメントシェーダーに渡すuTextureの読み込み方にありました。
僕は、JS冒頭でimport文で画像を読み込んだ後に
textureLoaderを用いてWebGLに、テクスチャとして読み込んでいました。
しかし、かまぼこ様のコメントにあるように
const texture = new THREE.TextureLoader().load(img.src);
このようにimgタグのsrc属性を直接読み込むようにすればよかったです。
main関数の中でループ毎にtextureの再読み込みが可能なので
imgに対応したテクスチャが反映されたオブジェクトを生成できるようになります。
そしてなんと、meshを格納する配列も、materialを格納する配列も不要になりました。。
だいぶコードがシンプルになったと思っています。
以下、コード全体像を記載致します。
import * as THREE from "three";

let camera, scene, renderer,uniforms,geometry;

//サイズを定義
const canvas = document.getElementById("canvas");
const sizes = {
  width: innerWidth,
  height: innerHeight,
};

function init() {
  //シーンを定義
  scene = new THREE.Scene();
  //カメラを定義(window座標とwebGL座標を一致させるため調整)
  const fov = 60,
    fovRad = (fov / 2) * (Math.PI / 180), //中心から左右30度ずつの視野角で丁度60度
    aspect = sizes.width / sizes.height,
    dist = sizes.height / 2 / Math.tan(fovRad),
    near = 0.1,
    far = 1000;
  camera = new THREE.PerspectiveCamera(fov, aspect, near, far);
  camera.position.z = dist;
  scene.add(camera);

  //レンダラーを定義
  renderer = new THREE.WebGLRenderer({
    canvas: canvas,
    antialias: true, //アンチエイリアスを適応
  });
  renderer.setSize(sizes.width, sizes.height); //サイズを指定
  renderer.setClearColor(new THREE.Color(0xEEEEEE));//背景色
  renderer.setPixelRatio(window.devicePixelRatio); //アスペクト比を指定

  // リサイズ(負荷軽減のためリサイズが完了してから発火する)
  window.addEventListener('resize', () => {
    if (timeoutId) clearTimeout(timeoutId);
    timeoutId = setTimeout(onWindowResize, 200);
  });
}

//画像をテクスチャにしたPlaneを扱うクラス
class ImagePlane {
  constructor(mesh, img) {
    this.refImage = img;//参照する要素
    this.mesh = mesh;
  }
  setParams() {
    //参照するimg要素から大きさ、位置を取得してセットする
    const rect = this.refImage.getBoundingClientRect();

    this.mesh.scale.x = rect.width;
    this.mesh.scale.y = rect.height;

    //window座標をWebGL座標に変換
    const x = rect.left - sizes.width / 2 + rect.width / 2;
    const y = -rect.top + sizes.height / 2 - rect.height / 2;
    this.mesh.position.set(x, y, this.mesh.position.z);
  }

  update(offset) {
    this.setParams();
    this.mesh.material.uniforms.uTime.value = offset;
  }
}

//Meshを生成する用の関数
const createMesh = (geometry,material) => {
  //メッシュ化
  const mesh = new THREE.Mesh(geometry, material);
  return mesh;
};

//materialを生成する用の関数(uniformsの値を引数によって変更する目的)
const createMaterial = (img, index) => {

  const texture = new THREE.TextureLoader().load(img.src);
  uniforms = {
    uTexture: { value: texture },
    uImageAspect: { value: img.naturalWidth / img.naturalHeight }, // 元画像のアスペクト比
    uPlaneAspect: { value: img.clientWidth / img.clientHeight }, // 画像描画サイズのアスペクト比
    uTime: { value: 0 },
  };

  //マテリアルを定義
  const material = new THREE.ShaderMaterial({
    uniforms,
    vertexShader: document.getElementById("v-shader").textContent,
    fragmentShader: document.getElementById("f-shader").textContent,
  });
  return material;
}

const imagePlaneArray = [];//テクスチャを適応したPlaneオブジェクトの配列
//アニメーション実行用関数
function animate() {
  updateScroll();
  for (const plane of imagePlaneArray) {
    plane.update(scrollOffset);
  }
  renderer.render(scene, camera);
  requestAnimationFrame(animate);
}

//DOMのimg要素を配列で取得
const imageArray = [...document.querySelectorAll('.slide-image')];

const main = () =>{
  window.addEventListener('load', () => {
    //imgタグの数だけループを回して、順番にtextureを読み込みmeshを生成
    for (let i = 0; i < imageArray.length; i++) {
      geometry = new THREE.PlaneGeometry(1, 1, 100, 100);
      const img = imageArray[i];
      const material = createMaterial(img, i);
      const mesh = createMesh(geometry, material);
      scene.add(mesh);
      const imagePlane = new ImagePlane(mesh, img);
      imagePlane.setParams();
      imagePlaneArray.push(imagePlane);
    }
    animate();
  })
}

//リサイズ対応関数
function onWindowResize() {
  sizes = {
    width: innerWidth,
    height: innerHeight,
  };
  // カメラの距離を計算し直す
  const fov = 60;
  const fovRad = (fov / 2) * (Math.PI / 180);
  const dist = sizes.width / 2 / Math.tan(fovRad);
  camera.position.z = dist;
  camera.aspect = window.innerWidth / window.innerHeight;
  camera.updateProjectionMatrix();
  renderer.setSize(window.innerWidth, window.innerHeight);
  renderer.setPixelRatio(window.devicePixelRatio);
  renderer.render(scene, camera);
}

init();
main();

//スクロール量に応じてアニメーションさせる
let targetScrollY = 0; // 本来のスクロール位置
let currentScrollY = 0; // 線形補間を適用した現在のスクロール位置
let scrollOffset = 0; // 上記2つの差分

// 開始と終了をなめらかに補間する関数
const lerp = (start, end, multiplier) => {
  return (1 - multiplier) * start + multiplier * end;
};

const updateScroll = () => {
  // スクロール位置を取得
  targetScrollY = document.documentElement.scrollTop;
  // リープ関数でスクロール位置をなめらかに追従
  currentScrollY = lerp(currentScrollY, targetScrollY, 0.1);
  scrollOffset = targetScrollY - currentScrollY;
};
変更点は
- main関数内でtextureを読み込むようにした
- meshes,materials配列を削除
- textureのimport文を削除。
となっています。


Discussion
こんにちは。
記事を参照いただきありがとうございます。
私のデモではimg要素のsrc属性を参照してテクスチャを取得しているので、src属性の中身を変えればWebGL上の画像も変わりますが、それとは意図が異なりますでしょうか...?
https://codepen.io/bokoko33/pen/VwpOWMR
(取り急ぎ記事内で紹介しているデモで画像を変えてみました)
こちらは画像を動的に追加する(ボタンクリックで画像が増える、など)ようなイメージでしょうか?
確かに私のデモは、Planeの生成が初回の一度きりなので、動的に画像を追加する場合はその度に初期化処理をし直す必要がありますね。(こちらはコードベースでご説明できずすみません)
コメントありがとうございます!!
ここの部分、完全に見落としていました。。
そのような方法でテクスチャを読み込めること自体、無知で知らなかったです!!
ありがとうございます。その方法で読み込めば、meshの生成毎にuTextureを更新して対応できそうです!
イメージとしては、サイトの更新などでHTML側のimgを増やした際に
動的にJSにもオブジェクトの生成をすると言うことを考えておりましたが。。
上記のような方法でテクスチャをloadした場合、オブジェクト生成もループで行っているので
自動で生成できるような気がしてきました。。
ちょっと色々試してみたいと思います!
ありがとうございます!🙇♂️🙇♂️