はじめに
この記事について
VueUse のuseMouseフックについて、実装しながら学べます。
VueUse を使ったことないけれど使ってみたいという方は、ぜひ自分で書いてみて試してください!
そもそも VueUse とは?
VueUse は「Collection of Vue Composition Utilities」と公式に書かれている通り、
Vue.js を使う上で強力な Helper 関数群になります。
詳しくは公式のドキュメントを参照してください。
VueUse の useMouse の紹介
この記事では、VueUse ライブラリの中でも特に useMouse フックに焦点をあてています。
このフックについての公式の説明は
Reactive mouse position(リアクティブなマウスの位置)
です。以下が公式に記載されている Demo になります。
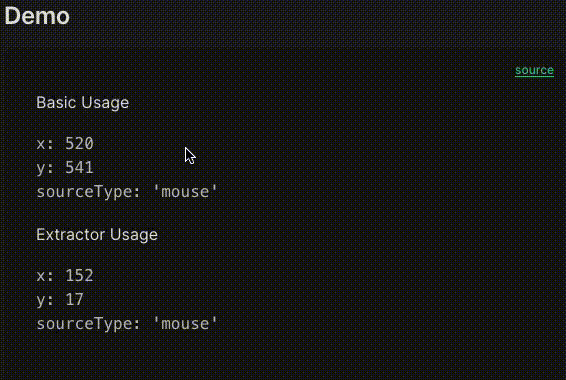
Demo では、Basic Usage側がブラウザ上のマウスの位置座標で、Extractor Usage側が Demo のパネル内の位置座標を取得しています。
Extractor Usageについては、useParentElementという別の VueUse の Utilities を利用して親コンポーネントの要素を取得しています。(なお、今回は利用しないので詳しくは説明しません)
備考
以降の内容では Vue.js の機能(ref, onMounted)の説明は冗長になるため割愛します。
またコードは<script setup>を使用した記述になっています。これらは Vue.js 公式ドキュメントに詳細が載っています!
VueUse を使って実装してみよう
作ってみる機能の概要
マウス操作で Canvas 要素に線を描ける Web アプリです。
クリアボタンで描いた線を削除できます。
実際のアプリは以下のイメージです 👩🎨
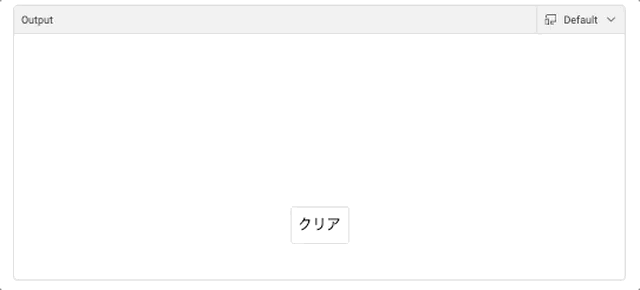
このアプリは VueUse が提供している Playground 上ですぐお試しできます 👌
それでは早速実装してみましょう!
コードの詳細
Template 部分
線を描くために Canvas 要素を設定しています。
Canvas 要素を Script 内で参照するため、ref=canvasRefでテンプレート参照しています。
また、マウスの操作によってイベントを発火させたいので 4 つのイベントハンドラーを登録しています。
それぞれトリガーのタイミングは以下の処理になっています。
- @mousedown:マウスを押下した時
- @mousemove:マウスが動いている時
- @mouseup:マウス押下状態が解除された時
- @mouseleave:マウスが要素外に外れた時
また、クリアボタンの追加と、Tailwind.css を使って若干のスタイリングを施しています。
<template>
  <div class="h-screen flex justify-center items-center">
    <canvas
      ref="canvasRef"
      class="w-full h-full bg-white"
      @mousedown="startDrawing"
      @mousemove="draw"
      @mouseup="stopDrawing"
      @mouseleave="stopDrawing"
    />
    <button
      class="p-2 border rounded absolute bottom-10 text-black"
      @click="clearCanvas"
    >
      クリア
    </button>
  </div>
</template>
Script 部分
1. 基本設定と Canvas の初期化
Vue のrefとonMountedを使用して、Canvas 要素の参照と 2D 描画コンテキストの初期化を行います。
- canvasRef:Canvas 要素の参照
- context:2D 描画用のコンテキスト[1]
onMounted内で Canvas のサイズを設定し、描画用に 2D コンテキストを取得します。[1:1]
// App.vue
<script setup lang="ts">
import { ref, onMounted } from "vue";

const canvasRef = ref<HTMLCanvasElement | null>(null);
let context: CanvasRenderingContext2D | null = null;

onMounted(() => {
  if (canvasRef.value) {
    const rect = canvasRef.value.getBoundingClientRect();
    canvasRef.value.width = rect.width;
    canvasRef.value.height = rect.height;
    context = canvasRef.value.getContext("2d");
  }
});
</script>
なお、以降の解説は<script setup>内のコードだと思ってください。
2. 描画の状態管理とマウス追跡
VueUse を利用して、useMouse からマウスの位置を取得します。
また、描画が進行中かどうかを追跡するための変数isDrawingを追加します。
import { useMouse } from "@vueuse/core";
// .
const { x, y } = useMouse();
let isDrawing = false;
3. 描画関連のイベントハンドラを設定
描画開始、継続、停止を管理するイベントハンドラ関数startDrawing, draw, stopDrawingを定義します。
以下でそれぞれの関数について説明します。
// .

const startDrawing = () => (isDrawing = true);

const draw = () => {
  if (!isDrawing || !context) return;
  context.lineTo(x.value, y.value);
  context.stroke();
};

const stopDrawing = () => {
  isDrawing = false;
  if (context) context.beginPath();
};
① startDrawing
マウス押下をトリガーとして、描画状態を true にするための関数です
② draw
押下状態でマウスを動かした時に描画を行う関数です。
context の lineTo メソッドを利用することで、現在のマウス位置座標に線を引いたのち stroke メソッドで描画を行います。
③ stopDrawing
マウスを放した時、またはキャンバス外に移動した時に描画を停止する関数です。
描画状態を false にして、最後に context の beginPath メソッドにて描画のパスを初期化します。
4. キャンバスのクリア機能の実装
クリアボタン押下時のキャンバスをクリアする機能を追加します。context の clearRect メソッドで対象範囲の描画を削除しています。
// .

const clearCanvas = () => {
  if (context && canvasRef.value) {
    context.clearRect(0, 0, canvasRef.value.width, canvasRef.value.height);
  }
};
実装コード
出来上がったコードはこちらを参照してください。
VueUse を使ったことでシンプルに実装できていますね!!
実装コード全体
<template>
  <div class="h-screen flex justify-center items-center">
    <canvas
      ref="canvasRef"
      class="w-full h-full bg-white"
      @mousedown="startDrawing"
      @mousemove="draw"
      @mouseup="stopDrawing"
      @mouseleave="stopDrawing"
    />
    <button
      class="p-2 border rounded absolute bottom-10 text-black"
      @click="clearCanvas"
    >
      クリア
    </button>
  </div>
</template>

<script setup lang="ts">
import { ref, onMounted } from "vue";
import { useMouse } from "@vueuse/core";

const canvasRef = ref<HTMLCanvasElement | null>(null);
const { x, y } = useMouse();
let context: CanvasRenderingContext2D | null = null;
let isDrawing = false;

const startDrawing = () => (isDrawing = true);

const draw = () => {
  if (!isDrawing || !context) return;
  context.lineTo(x.value, y.value);
  context.stroke();
};

const stopDrawing = () => {
  isDrawing = false;
  if (context) context.beginPath();
};

const clearCanvas = () => {
  if (context && canvasRef.value) {
    context.clearRect(0, 0, canvasRef.value.width, canvasRef.value.height);
  }
};

onMounted(() => {
  if (canvasRef.value) {
    const rect = canvasRef.value.getBoundingClientRect();
    canvasRef.value.width = rect.width;
    canvasRef.value.height = rect.height;
    context = canvasRef.value.getContext("2d");
  }
});
</script>
おわりに
以上でuseMouseの紹介は終わりです。
VueUse でどんなことができるか気になった方は以下もご確認ください!
参考
-
2D コンテキストについては、以下が参考になりました。https://qiita.com/_aaa/items/86c087b937708697acec ↩︎ ↩︎

Discussion