Remix + Conform + shadcn/ui で確認付きフォームを作成する
これはなに?
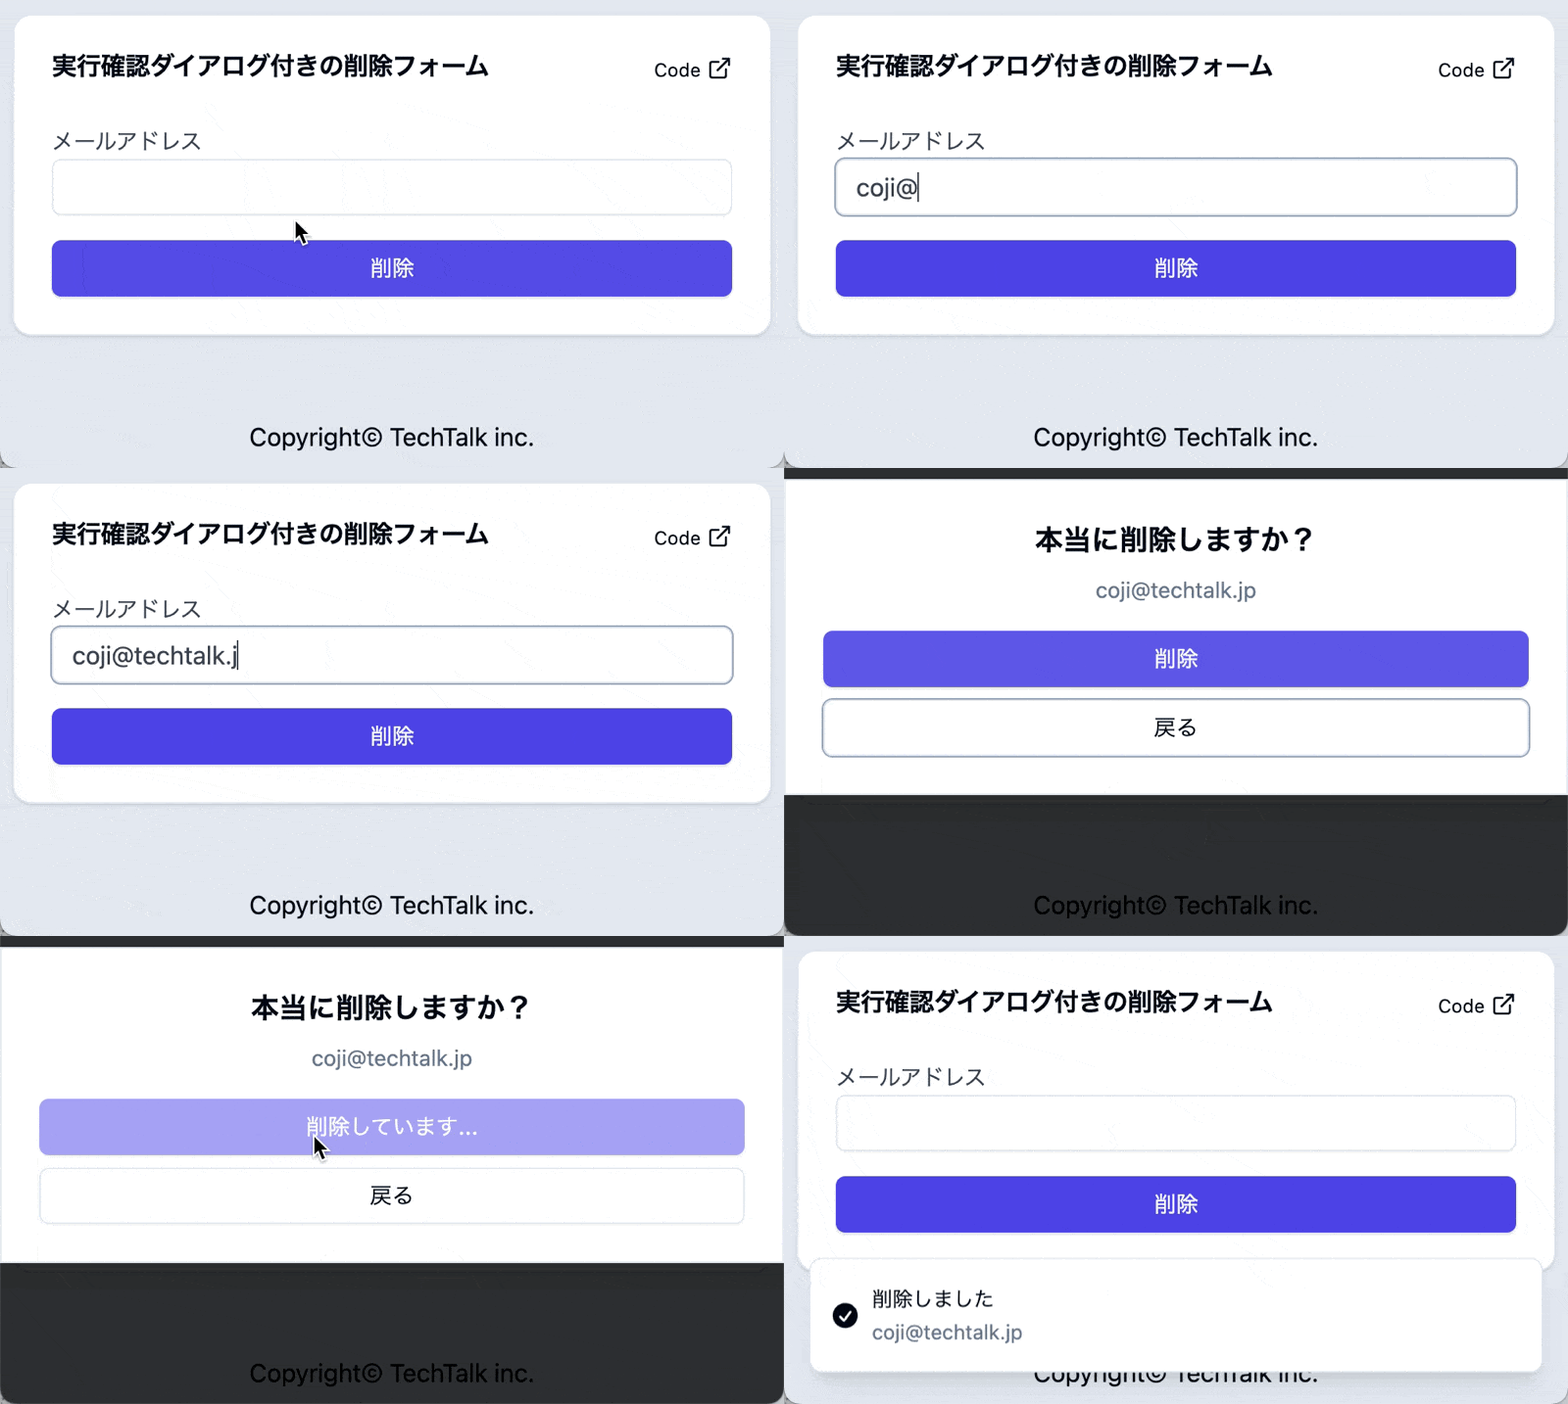
たまに、こういう確認ダイアログ付きのフォームを作るとき、ありますよね。

こういうときに Remix + Conform でどうやって作るときれいに書けるのか、というのを試行錯誤したのでその記録です。確認ダイアログのUIコンポーネントは shadcn/ui を使います。
できあがりのデモ
以下で直接触っていただけます。どうぞご自由に!
処理の流れ
今回のポイントです。確認と実行の2フェーズで実行します。
わざわざ確認フェーズを入れてるのは煩雑に思えるとおもいますが、フォーム検証について一部のケースまで含めて完全にしようとすると、そっちのほうが実はシンプルに書けるから、なのです。
この辺の詳細は後述する試行錯誤でのハマりポイントで説明しますので、まずは2フェーズでの実装コードをみてきましょう。
コードの解説
まずは最終的に上記デモの形にたどり着いたあとのコードを解説してきます。
途中いろいろ試行錯誤したこと(ハマりポイント)については、もっと後ろでご説明します。
zod スキーマ
フォームデータを zod で定義します。
import { z } from 'zod'

const schema = z.object({
  intent: z.enum(['confirm', 'submit']),
  email: z.string().email(),
})
これを以下のブラウザ側フォームと server action 両方でつかいます。
ブラウザ側フォーム
フォームと確認ダイアログ表示の部分を含む route コンポーネントです。
表示も2フェーズに分かれるので、
actionから返ってくる actionData.shouldConfirm の有無で表示を切り替えています。
import {
  Form, useActionData, useNavigation, useRevalidator
} from '@remix-run/react'
import {
  AlertDialog, AlertDialogAction, AlertDialogCancel, AlertDialogContent,
  AlertDialogDescription, AlertDialogFooter, AlertDialogHeader, AlertDialogTitle,
  Button, Input, Label
} from '~/components/ui' // shadcn/ui components

// route コンポーネント
export default function DemoConformAlert() {
  const actionData = useActionData<typeof action>()
  const [form, { email }] = useForm({
    lastResult: actionData?.result,
    constraint: getZodConstraint(schema),
    onValidate: ({ formData }) => parseWithZod(formData, { schema }),
  })
  const navigation = useNavigation()
  const { revalidate } = useRevalidator()

  return (
    <Form
      method="POST"
      className="grid grid-cols-1 gap-4"
      {...getFormProps(form)}
    >
      <div>
        <Label htmlFor={email.id}>メールアドレス</Label>
        <Input {...getInputProps(email, { type: 'email' })} />
        <div className="text-sm text-destructive">{email.errors}</div>
      </div>

      {/* intent=confirm で フォームを検証された状態で確認ダイアログを表示させる */}
      <Button
        type="submit"
        name="intent"
        value="confirm"
        disabled={actionData?.shouldConfirm}
      >
        削除
      </Button>

      {/* 確認ダイアログ */}
      <AlertDialog
        open={actionData?.shouldConfirm}
        onOpenChange={(open) => {
          // キャンセルボタンや ESC キー押下時に閉じられるので、
          // revalidate で再度 loader を実行し、
          // lastResult をリセットして初期状態に戻す。
          // email の値は Input の DOM に保持されているので
          // revalidate しても消えない。
          !open && revalidate()
        }}
      >
        <AlertDialogContent>
          <AlertDialogHeader>
            <AlertDialogTitle>本当に削除しますか?</AlertDialogTitle>
            <AlertDialogDescription>{email.value}</AlertDialogDescription>
          </AlertDialogHeader>
          <AlertDialogFooter>
            <AlertDialogCancel>戻る</AlertDialogCancel>
            {/* intent=submit で submit: 実際に削除 */}
            <AlertDialogAction
              type="submit"
              name="intent"
              value="submit"
              disabled={navigation.state === 'submitting'}
              form={form.id}
            >
              {navigation.state === 'submitting' ? '削除しています...' : '削除'}
            </AlertDialogAction>
          </AlertDialogFooter>
        </AlertDialogContent>
      </AlertDialog>
    </Form>
  )
}
2つの type="submit" のボタン
フォーム内にtype="submit" name="intent" の button が2つあるのがポイントで、この値(value)で後述する action でのフェーズを識別させるようになっています。
intent というのはは日本語で「意図」の意味ですね。Remix のサンプルなどではよくある名前付けの習慣です。これは conform が提供する Intent Button とはまた別のものなのでご注意ください。
どちらのボタンも submit になるので、どちらのボタンをクリックしても conform が onSubmit でフォームの内容を検証してくれます。また、フィールド内で enter をクリックことでも onSubmit が発動するので、フォーム検証を実行してくれます。
確認ダイアログの表示とキャンセル時の挙動
確認ダイアログは shadcn/ui の Alert Dialogです。
open 属性がある場合に確認ダイアログを表示するので Server Action からの戻り値で shouldConfirm がある場合に表示、それ以外はダイアログを表示しないようにします。
また、shadcn/ui の AlertDialog は表示中に AlertDialogCancel をクリックされたり、 ESC キー が押されたときに閉じるようになっています。それを onOpenChange ハンドラで識別して、閉じられたときは revalidate (loader からやりなおし)をしています。
revalidate は remix の useReinvalidator フックで使えるようになる関数で、この route コンポーネントを改めて loader の実行からやり直してくれるものです。
Remix のドキュメントにあるこの図でいう、Loaders からやりなおす、ということですね。
これを実行することで actionData がリセットされて、AlertDialog の open 属性が undefined になることでダイアログも閉じられる、という挙動になります。
Server action の処理
フォームがサーバに送信されたときに処理する action はこちらです。やはり2フェーズあります。
import { json, type ActionFunctionArgs } from '@vercel/remix'
import { jsonWithSuccess } from 'remix-toast'

export const action = async ({ request }: ActionFunctionArgs) => {
  const submission = parseWithZod(await request.formData(), { schema })
  if (submission.status !== 'success') {
    return json({ result: submission.reply(), shouldConfirm: false })
  }

  // intent=confirm で submit された場合は確認ダイアログを表示させるように戻す
  if (submission.value.intent === 'confirm') {
    return json({ result: submission.reply(), shouldConfirm: true })
  }

  // intent=submit で submit された場合は実際に削除
  await setTimeout(1000) // simulate server delay

  // 成功: resetForm: true でフォームをリセットさせる
  return jsonWithSuccess(
    { result: submission.reply({ resetForm: true }), shouldConfirm: false },
    { message: '削除しました', description: submission.value.email }, // toast 表示
  )
}
ここはだいたいコメントのとおりですね。json で戻す shouldConfirm がキモで、intent=confirm の場合にだけ true にしています。
ちなみに conform v1 から使えるようになった submisson.reply は本当に便利で、これをフォーム側の useForm に lastReply として渡すことでいろんなことをやってくれます。
今回は削除を完了したときにフォームをクリアしたかったので resetForm: true を渡しています。
最後の jsonWithSuccess は処理完了のメッセージを toast で出したかったので使った remix-toastの便利関数です。
ハマったポイントと解決策
当初のコード
最初にこんなかんじかな〜と書いたときは、こういうコードでした。
export default function DemoConformAlert() {
  const [isAlertOpen, setIsAlertOpen] = useState(false)
  const lastResult = useActionData<typeof action>()
  const [form, { email }] = useForm({
    lastResult,
    constraint: getZodConstraint(schema),
    onValidate: ({ formData }) => parseWithZod(formData, { schema }),
    onSubmit: (event, { formData }) => {
      const intent = formData.get('intent')
      if (intent === 'alert') {
        event.preventDefault()
        setIsAlertOpen(true)
      }
    },
    shouldValidate: 'onBlur',
  })
  const navigation = useNavigation()

  return (
    <Form method="POST" className="grid grid-cols-1 gap-4" {...getFormProps(form)}>
      <div>
        <Label htmlFor={email.id}>メールアドレス</Label>
        <Input {...getInputProps(email, { type: 'email' })} />
        <div className="text-sm text-destructive">{email.errors}</div>
      </div>

      <Button type="submit" name="intent" value="alert" disabled={navigation.state === 'submitting'}>
        {navigation.state === 'submitting' ? '削除しています...' : '削除'}
      </Button>

      <AlertDialog open={isAlertOpen} onOpenChange={(open) => setIsAlertOpen(open)}>
        <AlertDialogContent>
          <AlertDialogHeader>
            <AlertDialogTitle>このメールアドレスを削除します</AlertDialogTitle>
            <AlertDialogDescription>{email.value}</AlertDialogDescription>
          </AlertDialogHeader>
          <AlertDialogFooter>
            <AlertDialogCancel>戻る</AlertDialogCancel>
            <AlertDialogAction type="submit" name="intent" value="submit" form={form.id}>
              削除する
            </AlertDialogAction>
          </AlertDialogFooter>
        </AlertDialogContent>
      </AlertDialog>
    </Form>
  )
}
SPA 時代に React で UI 作ってた経験から、「確認ダイアログはクライアントサイドで出すもの」という先入観があったのだとおもいます。
useForm に渡す onSubmit ハンドラで、送信されようとしているフォームの intent が alert だったときに ダイアログを出す State を true にしつつ event.preventDefault() することで送信処理を止める、という形です。intent が 'submit' のときはそのまま送信。
conform の Intent Button についてのドキュメントにある以下のコードを参考にして書きました。
import { useForm } from '@conform-to/react';

function Product() {
  const [form] = useForm({
    onSubmit(event, { formData }) {
      event.preventDefault();

      switch (formData.get('intent')) {
        case 'add-to-cart':
          // Add to cart
          break;
        case 'buy-now':
          // Buy now
          break;
      }
    },
  });

  return (
    <form id={form.id}>
      <input type="hidden" name="productId" value="rf23g43" />
      <button type="submit" name="intent" value="add-to-cart">
        Add to Cart
      </button>
      <button type="submit" name="intent" value="buy-now">
        Buy now
      </button>
    </form>
  );
}
一部の問題: コーナーケースだけど。。
これで、ほとんどだいたいいい感じで動きはしたんです。ただ、1点だけ問題があるケースがあったのです。
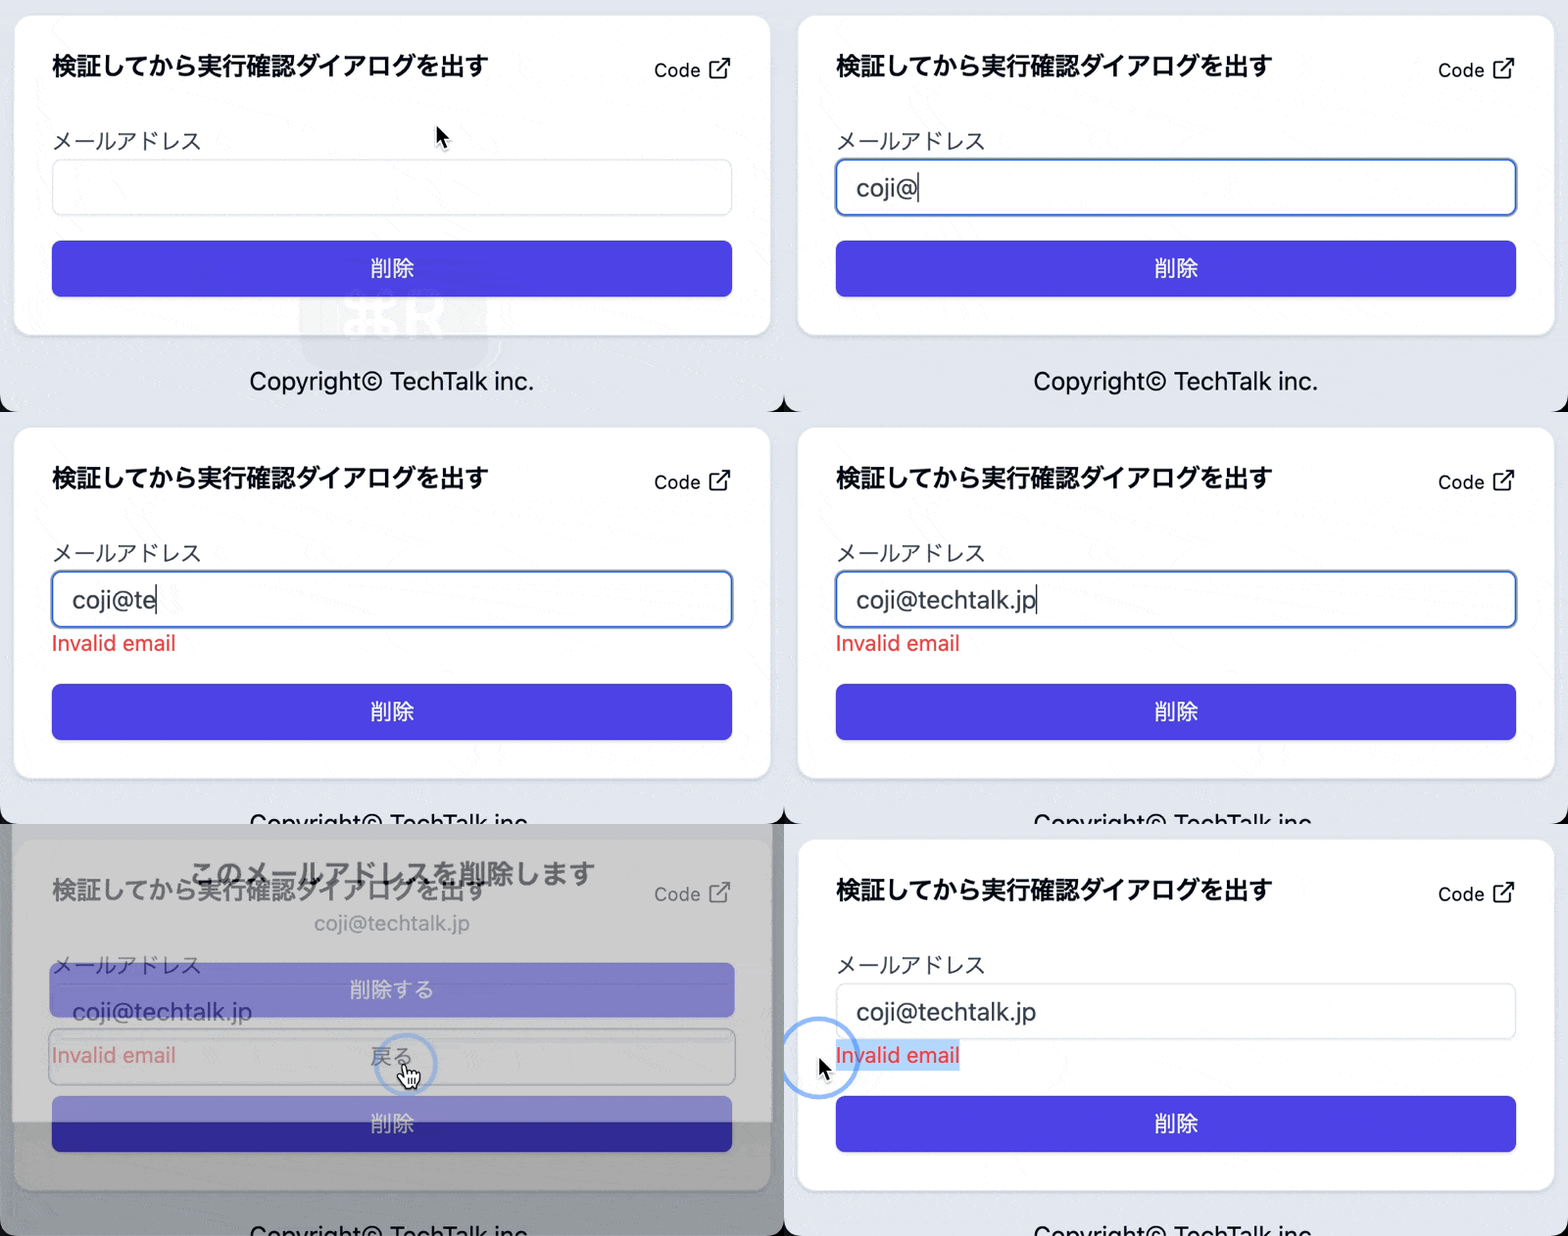
それが以下のような操作シーケンスのときです。
- メールアドレスがおかしな状態で登録ボタンをクリック (検証エラーで進まない)
- この状態でメールアドレスを修正して正しいものに直して フィールド内でエンターキーを押す (検証されない!)
- 確認ダイアログが出るので、ここでキャンセルをする
- メールアドレスが正しいのにエラーメッセージが出たままになっている (なんだこれ!)
そのときのキャプチャがこちら。

まあ、これは正直コーナーケースで、ユーザの操作も阻害しないから、これでもいいかなあ、とは思ったんですが、やっぱり、どうせならちゃんとしたいじゃないですか。どうしたものかなあと思ったんですね。
対策: 解決策を conform 作者さんが示唆してくれました。
上記をちゃんとしたくて、コードを push して X でこんなかんじでボヤいたところ:
ポストをご覧になった conform 作者の Edmund さんが、いろいろと教えて下さったのです。
It's because field validation and form submission handle errors differently and pressing enter in the field skipped field validation (that clears the error automatically instead of waiting for the server).
This is not an issue usually because the action will return the result eventually and clear the error. But in your case, you prevented the form submission as well so it never receives an update from the server.
There maybe something Conform can do better with the way you handled it. But I can suggest you another approach that will work before JS: https://github.com/techtalkjp/techtalk.jp/pull/20/files
日本語訳
フィールド検証とフォーム送信ではエラーの扱いが異なり、フィールドでEnterを押すとフィールド検証がスキップされる(サーバーを待つ代わりにエラーが自動的にクリアされる)からだ。
アクションは最終的に結果を返し、エラーをクリアするので、通常はこれは問題ではありません。しかし、あなたの場合、フォームの投稿も阻止したので、サーバーからの更新を受け取ることはありません。
Conformは、あなたのやり方でもっとうまくやれることがあるかもしれない。でも、JSの前にうまくいく別の方法を提案するよ: https://github.com/techtalkjp/techtalk.jp/pull/20/files
理由をご説明いただいたうえに、解決策のプルリクまで送ってくださいました。マジか!
さっそくいただいたプルリクを手元で動かしたところ、残念ながらちょっとよくわからない挙動になってたので、その旨をお伝えしました。
Thanks for taking the time to create a pull request. I hadn't considered processing each submission with actions. Click operations work as expected, but the dialog disappears immediately when using the enter key. Can't figure out why...
日本語訳
プルリクエストの作成に時間を割いてくれてありがとう。各投稿をアクションで処理することは考えていませんでした。クリック操作は期待通りに動きますが、エンターキーを使うとダイアログがすぐに消えてしまいます。なぜでしょうか?
すると今度は、Stack Blitz のリンクまでついた解決策の提示をいただきます。うわああ
Sorry for a half-baked solution. Handling it with Remix is probably a better choice: https://t.co/R9hX9SOCIU
日本語訳
中途半端な解決策で申し訳ない。Remixで処理するのがベターな選択でしょう: https://t.co/R9hX9SOCIU
というわけで、そのコードを参考にして、最終的には2フェーズでの実装となったのでした。
Wow, I'm thrilled! And indeed, it's much cleaner with the two-step action! Thanks to your code, I've also managed to add support for canceling confirmation with the ESC key. Thank you so much!
日本語訳
わあ、感激!そして確かに、2ステップアクションの方がずっとすっきりしている!あなたのコードのおかげで、ESCキーで確認をキャンセルできるようになりました。本当にありがとう!
ちょっと、Edmund さん、すごすぎでしょう。すっごくうれしい!
というわけで:
conform はいいぞ
今回フォローいただいたことで、完全に Conform 推しになりました。Conform はとても便利だし、作者さんも素敵な方です。みんな Conform はいいぞ!
Remix だけでなく Nextjs App Router でも使えますよ!

Discussion
remixの流儀といえば当然かもしれないですが、ダイアログの状態をactionで処理するというのは、どこか新鮮な感じがしました!