VuePress v2 + Vite でブログを作成し Vercel で運用開始するまでの流れ
ながらく記事を書いていない kohji.blog というドメインのブログを Vercel に移行しようと思いたちました。
せっかくなので環境構築を記事にしておいて記録に残そうと思います。
VitePress か VuePress v2 + Vite か
Vite を使ったブログに VitePress というものもあります。
すでに VuePress はベータ版ながら vuepress-next の開発が進んでいて Vite 対応もされています。
どちらを使えばよいか迷いますが、何も手をかけずブログを立ち上げたいという場合は、テーマやプラグイン等の周辺の環境の整っている VuePress のほうが合っているかなと思いました。
より軽いものでという場合は、機能制限の内容をみて問題なければ VitePress でよいのかと思います。
VuePress インストール
以下 VuePress と表記した場合は v2 を指しています。
準備
いつも使ってるユーザーフォルダ直下にある gitrepos フォルダに blog フォルダをつくりました。
そこにドメイン名でもある kohji.blog フォルダをつくり Git リポジトリとして運用します。
mkdir -p ~/gitrepos/blog/kohji.blog
cd ~/gitrepos/blog/kohji.blog
git init
VuePress + Vite
公式ドキュメントの通りだと webpack となってしまうので次の手順で Vite で稼働する VuePress をインストールします。
yarn init
yarn add -D vuepress-vite@next
起動スクリプトを記述する
yarn docs:dev で開発環境を立ち上げられるようにします(もちろん HMR により、リロード不要で保存した内容が反映されます)
また yarn docs:build で本番環境用のビルドが行われるようにします。
次のように scripts を追加します。
{
  "name": "kohji.blog",
  "version": "1.0.0",
  "author": "TANAKA Kohji",
  "scripts": {
    "docs:dev": "vuepress dev docs",
    "docs:build": "vuepress build docs"
  },
  "devDependencies": {
    "vuepress-vite": "^2.0.0-beta.27"
  }
}
Hello, kohji.blog!
docs フォルダを作成し、そのなかにフロントページとなる README.md を作成します。
# Hello kohji.blog
開発サーバーを起動し無事インストールできていることを確認しましょう。
さきほど設定したスクリプトを使用します。
yarn docs:dev
http://localhost:8080/ をブラウザで開き表示されていたらインストール完了です。🎉
Git Commit
ここまでを一旦コミットします。
その前に .gitignore を用意します。
node_modules
.temp
.cache
git add .
git commit
GitHub リポジトリを作成
GitHub CLIを使用し GitHub リポジトリを作成します。
gh repo create
忘れずに Push しておきましょう。
git push -u origin main
Vercel に公開する
Vercel CLI をインストール
これまで Vercel はお試し利用した程度で、まだ CLI での利用がありませんでした。
そこでまず Vercel CLI をインストールします。
npm i -g vercel
Vercel にプロジェクトを作成
vercel
基本的に質問に答えていけば良いのですが、最後のほうの ? Which settings would you like to overwrite (select multiple)? については上書きが必要です。
Vercel CLI 23.1.2
? Set up and deploy “~/gitrepos/docs/blog/kohji.blog”? [Y/n] y
? Which scope do you want to deploy to? monsat
? Link to existing project? [y/N] n
? What’s your project’s name? kohji-blog
? In which directory is your code located? ./
No framework detected. Default Project Settings:
- Build Command: `npm run vercel-build` or `npm run build`
- Output Directory: `public` if it exists, or `.`
- Development Command: None
? Want to override the settings? [y/N] y
? Which settings would you like to overwrite (select multiple)?
  ▪︎ Build Command
› ▪︎ Output Directory
  ▫︎ Development Command
? What's your Build Command? npm run docs:build
? What's your Output Directory? docs/.vuepress/dist
Build Command と Output Directory の2項目を上書き
? What's your Build Command? には npm run docs:build と回答し
? What's your Output Directory? には docs/.vuepress/dist と回答します。
vercel コマンドで Preview デプロイ
とくに問題がなければプレビューできるURLが発行されるはずです。
URLにアクセスし、無事デプロイできていることを確認しましょう。🎉
GitHub リポジトリと紐付け
コマンドラインからの紐付け方法が分からなかったので Project Settings の Connected Git Repository より紐付けました。
これで main ブランチへの Push で自動的に本番環境へのデプロイが行われます。
コマンドラインから直接本番環境へのデプロイは次のコマンドで可能です。
vercel --prod
VuePress の基本設定
config.ts
VuePress は docs/.vuepress フォルダを使用します。
config.ts を作成します。
import { defineUserConfig } from 'vuepress-vite'
import type { DefaultThemeOptions } from 'vuepress-vite'

export default defineUserConfig<DefaultThemeOptions>({
  lang: 'ja',
  title: 'kohji.blog',
  description: '田中弘治のブログ',
})
メインの画像
docs/.vuepress/public 以下がWebルートになっているようですので images フォルダを用意します。
mkdir -p docs/.vuepress/public/images
画像を入れて config.ts を書き換えます。
import { defineUserConfig } from 'vuepress-vite'
import type { DefaultThemeOptions } from 'vuepress-vite'

export default defineUserConfig<DefaultThemeOptions>({
  lang: 'ja',
  title: 'kohji.blog',
  description: '田中弘治のブログ',
  // 追記
  themeConfig: {
    logo: '/images/kohji_vector_white.png',
  },
})
記事を作成する
記事ファイル用のフォルダを作成し、そのなかに .md ファイルを入れていきます。
mkdir docs/articles
ファイル名は slug として利用されます。
URL(パーマリンク)を /2021/12/10/my-first-article のようにするには次のように Frontmatter を記述します。
Frontmatter とは markdown の先頭に記述するメタデータです。
---
title: 最初の記事です
description: VuePress でブログをつくりました。
date: 2021-12-10
permalinkPattern: /:year/:month/:day/:slug
---
# 最初の記事です

[[toc]]

## はじめに

ブログをリニューアルしました。
[[toc]] は記事内の目次を挿入するための記法です。
## や ### より自動的に作成されます。
Vue Component を使う
.md ファイル(記事)内で Vue Component を使用するには次のように設定します。
yarn add -D @vuepress/plugin-register-components@next
import { defineUserConfig } from 'vuepress-vite'
import type { DefaultThemeOptions } from 'vuepress-vite'
import { path } from '@vuepress/utils'

export default defineUserConfig<DefaultThemeOptions>({
  lang: 'ja',
  title: 'kohji.blog',
  description: '田中弘治のブログ',
  // 追加
  plugins: [
    ['@vuepress/register-components', {
      componentsDir: path.resolve(__dirname, './components'),
    }],
  ],
})
docs/.vuepress/components フォルダを作成します。
mkdir docs/.vuepress/components
Component を作成し .md で読み込む
<script lang="ts">
import { defineComponent, ref } from 'vue'

export default defineComponent({
  setup() {
    const count = ref(0)
    return { count }
  },
})
</script>

<template>
  <div>
    {{ count }}<br>
    <button @click="count++">カウントアップ</button>
  </div>
</template>
---
title: 最初の記事です
description: VuePress でブログをつくりました。
date: 2021-12-10
permalinkPattern: /:year/:month/:day/:slug
---
# 最初の記事です

[[toc]]

## はじめに

ブログをリニューアルしました。

## Component を使用する

<TheCounter/>
Theme を拡張する
テーマの一部を変更するにあたり、テーマの拡張を行います。
WordPress でいう子テーマの作成です。
まず docs/.vuepress/theme フォルダと docs/.vuepress/theme/layouts フォルダを作成します。
mkdir -p docs/.vuepress/theme/layouts
テーマファイルを作成します。
import type { ThemeObject } from '@vuepress/core'
import { path } from '@vuepress/utils'

const childDefaultTheme: ThemeObject = {
  name: 'vuepress-theme-default-child',
  extends: '@vuepress/theme-default',
  layouts: {
    Layout: path.resolve(__dirname, 'layouts/Layout.vue'),
  },
}

export default childDefaultTheme
theme-default のレイアウトファイルは、名前付き slot を使って拡張できるようになっています。
<script lang="ts">
import { defineComponent } from 'vue'
import Layout from '@vuepress/theme-default/lib/client/layouts/Layout.vue'

export default defineComponent({
  components: { Layout },
})
</script>

<template>
  <Layout>
    <template #sidebar-top>
      <div class="sidebar-header">サイドバー</div>
    </template>
  </Layout>
</template>

<style>
.sidebar-header {
  padding: 1.5rem 1.5rem 0;
  font-size: 1.1em;
  font-weight: bold;
}
</style>
設定ファイルでテーマを指定すれば反映されるでしょう。
import { defineUserConfig } from 'vuepress-vite'
import type { DefaultThemeOptions } from 'vuepress-vite'
import { path } from '@vuepress/utils'

export default defineUserConfig<DefaultThemeOptions>({
  lang: 'ja',
  title: 'kohji.blog',
  description: '田中弘治のブログ',
  plugins: [
    ['@vuepress/register-components', {
      componentsDir: path.resolve(__dirname, './components'),
    }],
  ],
  // 追加
  theme: path.resolve(__dirname, './theme'),
})
うまく反映されればサイドバーの先頭に「サイドバー」と書かれていることが確認できます。🎉
記事一覧
記事の一覧を取得しようと思ったのですが VuePress 1.x で利用できていた this.$site.pages というのが見当たりませんでした。
ソースコードを pages で検索したところ usePagesData というのが見つかります。
次のようにして取得できるものの、最初からオブジェクトの配列であれば、記事一覧を書き出すときに便利そうです。
<script lang="ts">
import { defineComponent } from 'vue'
import { usePagesData } from '@vuepress/client'

export default defineComponent({
  setup() {
    const pagesData = usePagesData()
    Object.keys(pagesData.value).map(async (key) => {
      console.log(await pagesData.value[key]())
    })
  },
})
</script>
もしかしたら存在するのかもしれませんが、再実装になることも覚悟して、使いやすいものを作ってみたいと思います。
記事一覧オブジェクト
VuePress のライフサイクルを確認すると Load Pages した後に onInitialized というフックが呼ばれるようです。
試しに設定ファイルに書いてみたところ、ページデータが残っていました。
  onInitialized: (app) => {
    console.log(app.pages.map(p => p.data.path))
  },
あとはこれを Component で利用できるようにします。
app.provide() することができずに困っていたら app.writeTemp() で temp ファイル作成 ができそうなことがわかりました。
docs/.vuepress/.cache/.tempフォルダに作成されます。
  onInitialized: (app) => {
    const pages = app.pages.filter(p => p.data.path.startsWith('/articles/')).map(p => p.data)
    const content = `export const usePages = () => ${JSON.stringify(pages)}`
    app.writeTemp('pages.js', content)
  },
と設定ファイルで書き出してあげれば、無事次のように記事ページで取得できます。
もちろん Component や Composition Function でも読み出せるでしょう。
<script lang="ts">
import { defineComponent } from 'vue'
import { usePages } from '@temp/pages'

export default defineComponent({
  setup() {
    const pages = usePages()
    console.log(pages)
  },
})
</script>
記事一覧プラグインを作成する
上記の記事一覧を利用し navbar 等に書き出す Component を用意すれば便利に使えます。
せっかくなので勉強も兼ねて Plugin にしておきたいと思います。
あまり仕様を複雑にしても仕方がないので、次のようなカスタマイズを可能にします。
- ページをフィルタリングするために
startsWith: stringとfilter: (page) => booleanのふたつを指定できるようにする - 記事の順番を任意に変更できるようにする
- 最大何件キャッシュするかを
limit: number | falseで指定できるようにする - キャッシュファイルのファイル名を任意に変更できるようにする
次のように利用する想定です。
  plugins: [
    ['vuepress-plugin-use-pages', {
      startsWith: '/articles/',                   // fetch only matched paths
      filter: (page) => page.data.lang === 'ja',  // fetch only filtered pages
      sort: (a, b) => b.data.git.updatedTime - a.data.git.updatedTime
      limit: 30,                                  // maximum cached size
      file: 'articles.js',                        // temp file name
    }],
  ],
<script>
import { defineComponent } from 'vue'
import { usePages } from '@temp/pages'  // pages.js is default filename

export default defineComponent({
  setup() {
    const pages = usePages()
    console.log(pages)
    return { pages }
  },
})
</script>

<template>
  <ul>
    <li
      v-for="page in pages"
      :key="page.key"
    >
      <RouterLink :to="page.path">{{ page.title }}</RouterLink>
      <span v-if="page.frontmatter.date">
        [ {{ (new Date(page.frontmatter.date)).toLocaleString() }} ]
      </span>
    </li>
  </ul>
</template>
プラグイン用のフォルダを用意する
まったくはじめてなのでどこからどうやって進めたら良いかも分からないのですが、何とかなるだろうということですすめていきます。
docs/.vuepress/plugin フォルダを用意し vuepress-plugin-use-pages というフォルダを作成します。
先頭に vuepress-plugin- とつけるのがベストプラクティスのようです。
まずはドキュメントどおりに書いて読み込まれることを確認したいと思います。
mkdir -p docs/.vuepress/plugin/vuepress-plugin-use-pages/lib
import type { Plugin, PluginObject } from '@vuepress/core'
import { path } from '@vuepress/utils'

const usePagesPlugin: Plugin = (options, app): PluginObject => {
  const name = 'vuepress-plugin-use-pages'
  const multiple = true
  console.log('読み込まれました')
  console.log(options)

  return {
    name,
    multiple,
  }
}

export default usePagesPlugin
docs/.vuepress/plugin/vuepress-plugin-use-pages 内で npm init し package.json を作成します。
(必要なところだけ抜粋しました。 "main" は一旦 "index.ts" にしています)
cd docs/.vuepress/plugin/vuepress-plugin-use-pages
npm init
{
  "name": "vuepress-plugin-use-pages",
  "version": "0.0.1",
  "description": "Vue Press 2 plugin - use pages",
  "main": "lib/index.ts",
  "directories": {
    "lib": "lib"
  }
}
設定ファイルで読み込みます。
  plugins: [
    [path.resolve(__dirname, './plugin/vuepress-plugin-use-pages'), {
      foo: 'bar',
    }],
  ],
yarn docs:dev すると
$ vuepress dev docs
読み込まれました
{ foo: 'bar' }
info Initializing VuePress and preparing data...
のように表示されれば成功です。🎉
さきほどと同じ内容で一旦プラグインを作成する
設定ファイルから onInitialized を削除し、プラグインのファイルに記述します。
import type { Plugin, PluginObject } from '@vuepress/core'
import { path } from '@vuepress/utils'

const usePagesPlugin: Plugin = (options, app): PluginObject => {
  const name = 'vuepress-plugin-use-pages'
  const multiple = true

  const onInitialized = () => {
    const pages = app.pages.filter(p => p.data.path.startsWith('/articles/')).map(p => p.data)
    const content = `export const usePages = () => ${JSON.stringify(pages)}`
    app.writeTemp('pages.js', content)
  }

  return {
    name,
    multiple,
    onInitialized,
  }
}

export default usePagesPlugin
キャッシュファイルを削除して yarn docs:dev するため --clean-temp --clean-cache をつけて起動します。
yarn docs:dev --clean-temp --clean-cache
これまでと同様にブラウザのコンソールに記事一覧のオブジェクトが書き出されれば、プラグイン移行の足場が固まりました。🎉
オプションを実装する
オプションの型を作成し onInitialized 内で実装します。
import type { Plugin, PluginObject, Page } from '@vuepress/core'

export interface UsePagesPluginOptions {
  startsWith?: string
  filter?: (page: Page) => boolean
  sort?: (a: Page, b: Page) => number
  limit?: number | false
  file?: string
}

const usePagesPlugin: Plugin = (options, app): PluginObject => {
  const name = 'vuepress-plugin-use-pages'
  const multiple = true

  const onInitialized = () => {
    const defaultSort = (a: Page, b: Page) => {
      if (!a.data.frontmatter.date || !b.data.frontmatter.date) {
        return 0
      }
      return (new Date(b.data.frontmatter.date).getTime()) - (new Date(a.data.frontmatter.date).getTime())
    }
    const {
      startsWith = '/articles/',
      filter,
      sort = defaultSort,
      limit = false,
      file = 'pages.js',
    }: UsePagesPluginOptions = options || {}

    const docs = app.pages.filter(p => p.data.path.startsWith(startsWith))
    const filtered = filter ? docs.filter(filter) : docs
    filtered.sort(sort)   // Sorted in place
    const limited = limit ? filtered.slice(0, limit) : filtered
    const pageData = limited.map(p => p.data)
    const content = `export const usePages = () => ${JSON.stringify(pageData)}`
    app.writeTemp(file, content)
  }

  return {
    name,
    multiple,
    onInitialized,
  }
}

export default usePagesPlugin
デフォルトでは、全ページを frontmatter.date の新しい順に配列に入れています。
設定ファイルにオプションを加えると、設定どおりに書き出されることが確認できます。🎉
プラグインを整理する
公式が提供しているプラグインを見ると src フォルダ内に node と client というフォルダがあります。
それらをビルドし lib に入れるようです。
(今回はクライアント側はとくに記述しませんので使用しません)
mkdir -p src/client
mv lib src/node
lib フォルダはもう不要ですので mv で構いません。
npm パッケージとしてビルドして書き出す
いよいよ npm パッケージにします。
はじめてで手順が分からないのでこちらの記事を参考に進めることにしました(感謝)
さきほど package.json で lib/index.ts にしていた箇所を lib/node/index.js にします。
"main": "lib/node/index.js",
docs/.vuepress/plugin/vuepress-plugin-use-pages 内で npx tsc --init し tsconfig.json を作成します。
公式プラグインを参考にすすめていきます。
{
  "compilerOptions": {
    "composite": true,
    "target": "ES2018",
    "lib": ["DOM", "ES2020"],
    "module": "commonjs",
    "rootDir": "./src",
    "moduleResolution": "node",
    "resolveJsonModule": true,
    "declaration": true,
    "declarationMap": false,
    "sourceMap": true,
    "outDir": "./lib",
    "noEmitOnError": true,
    "esModuleInterop": true,
    "forceConsistentCasingInFileNames": true,
    "strict": true,
    "noImplicitAny": true,
    "strictNullChecks": true,
    "skipLibCheck": true
  },
  "include": ["./src"]
}
つづいて package.json も修正します。
{
  "name": "vuepress-plugin-use-pages",
  "version": "0.0.1",
  "description": "Vue Press 2 plugin - use pages",
  "main": "lib/node/index.js",
  "types": "lib/node/index.d.ts",
  "files": [
    "lib"
  ],
  "scripts": {
    "build": "tsc",
    "prepare": "npm run build"
  },
  "dependencies": {
    "@vuepress/core": "2.0.0-beta.27"
  },
  "devDependencies": {
    "typescript": "^4.4.4"
  },
  "repository": {
    "type": "git",
    "url": "git+https://github.com/monsat/vuepress-plugin-use-pages.git"
  },
  "keywords": [
    "vuepress-plugin",
    "vuepress"
  ],
  "author": "monsat",
  "license": "MIT",
  "bugs": {
    "url": "https://github.com/monsat/vuepress-plugin-use-pages/issues"
  },
  "homepage": "https://github.com/monsat/vuepress-plugin-use-pages#readme"
}
プラグインのフォルダ内で git init します。
git init
echo 'lib' >> .gitignore
echo 'node_modules' >> .gitignore
echo 'tsconfig.tsbuildinfo' >> .gitignore
git add .
git commit
GitHub CLI でリポジトリを作成し Push します。
gh repo create
git push -u origin main
うまくできていれば devDependencies に加えて node_modules にインストールされるはずです。
  "devDependencies": {
    "@vuepress/plugin-register-components": "^2.0.0-beta.27",
    "vuepress-plugin-use-pages": "git+ssh://git@github.com:monsat/vuepress-plugin-use-pages.git",
    "vuepress-vite": "^2.0.0-beta.27"
  }
パッケージの公開前のため git+ssh:// を Git リポジトリの Clone する際の SSH URL につけて指定します。
cd -      # プロジェクトのルートに戻る
yarn      # インストール
ビルドに成功すればいつものように ✨ Done in 38.60s. のように表示されるでしょう。🎉
node_modules 内にプラグインが存在することも確認できます。
設定ファイルを修正する
設定ファイルの第1引数を晴れてプラグイン名だけのシンプルな記述にできるようになりました。
  plugins: [
    ['vuepress-plugin-use-pages', {
      file: 'articles.js',
    }],
  ],
いちどキャッシュファイルを消してみて yarn docs:dev して動作することを確認できますね。🎉
README と npm version
忘れずに README.md を記載しバージョンを 1.0.0 にあげたいと思います。
変更したら docs/.vuepress/plugin/vuepress-plugin-use-pages 内で再度 git commit します。
cd -
git add README.md
git commit
np というのを使うと npm publish が便利に行えるとのこと。
npx np --no-tests
これでバージョンを選択すれば晴れて公開されるはずです。
初めての npm パッケージを無事公開できました。🎉
npm パッケージを公開のものと入れ替える
一旦 GitHub から読み込んでいるパッケージを削除し、通常の手順でパッケージを読み込みます。
yarn remove vuepress-plugin-use-pages
yarn add -D vuepress-plugin-use-pages
同じように動作していることが確認できます。🎉
サイドバーに記事一覧を表示
少し遠回りしましたが、これで無事サイドバーに最新の記事一覧を表示できるようになりました。
数が少ないうちはすべての記事を読み込んでよいでしょう。
<script setup lang="ts">
import { usePages } from '@temp/pages'

const pages = usePages()
</script>

<template>
  <div class="sidebar-content-box">
    <h2>記事一覧</h2>
    <ul>
      <li v-for="page in pages" :key="page.key">
        <RouterLink :to="page.path">{{ page.title }}</RouterLink>
        <span v-if="page.frontmatter.date">
          ({{ (new Date(page.frontmatter.date)).toLocaleDateString() }})
        </span>
      </li>
    </ul>
  </div>
</template>
これをレイアウトファイルで読み込みます。
(ソースコードはレイアウトファイルの <template> のみ)
<template>
  <Layout>
    <template #sidebar-bottom>
      <ArticleList/>
    </template>
  </Layout>
</template>
記事ページの場合、記事内の見出しがサイドバーに書かれています。
その下に記事一覧が表示されることが確認できます。🎉
検索窓を追加
デフォルトテーマに記事タイトルの検索機能をつけたいときはプラグインの追加だけで可能です。
yarn add -D @vuepress/plugin-search@next
  plugins: [
    ['@vuepress/plugin-search'],  // 追加
  ],
Windi CSS (Tailwind CSS) を利用する
コンポーネント内では CSS を記述することも増えます。
Tailwind CSS を使用することで統一的な記述が可能です。
また Windi CSS を使用すると開発時のコンパイルも速く、またより効率的な記述などが可能になります。
Tailwind CSS のすべての記述は、Windi CSS でも可能です。
VS Code の拡張機能もありますので、まだ利用したことのない方はぜひインストールしておきましょう。
Windi CSS のインストール
Windi CSS と Vite 用のプラグインをインストールします。
yarn add -D vite-plugin-windicss windicss
VuePress の設定ファイルにおける Vite の設定
VuePress の設定ファイルの記述について簡単に説明します。
通常 vite.config.js に記述する内容は docs/.vuepress/config.ts の bundlerConfig.viteOptions で設定します。
通常 windi.config.ts で記述する内容は、本来は vite.config.js の plugins に記述します。
つまり bundlerConfig.viteOptions.plugins に windi.config.ts の設定を記述すればよいことになります。
参考までに VuePress を使用せずに Vite と Windi CSS を利用する場合 の vite.config.js は次のようになります。
import { defineConfig } from 'vite'
import vue from '@vitejs/plugin-vue'
import WindiCSS from "vite-plugin-windicss"

export default defineConfig({
  plugins: [
    vue(),      // このオプションの内容を bundlerConfig.vuePluginOptions に
    WindiCSS(), // このオプションの内容を bundlerConfig.viteOptions.plugins に
  ]
})
bundlerConfig.vuePluginOptionsにはvite.config.jsにてplugins: [vue()]で設定するオプションを記述する箇所になるので、今回は使用しません
Windi CSS の設定
VuePress にて使用する場合、最低限つぎの設定を行います。
-
preflight: falseを設定し、テーマのCSSをリセットされないようにする -
.vueファイルなどを読み込むフォルダを、デフォルトのsrcから変更する
windi.config.ts や tailwind.config.ts の内容は config に記述します。
設定ファイルはこのようになります。
(下記のコードでは該当するもののみ記述しています)
import { defineUserConfig } from 'vuepress-vite'
import type { DefaultThemeOptions } from 'vuepress-vite'
import type { ViteBundlerOptions } from '@vuepress/bundler-vite'
import WindiCSS from 'vite-plugin-windicss'

export default defineUserConfig<DefaultThemeOptions, ViteBundlerOptions>({
  bundlerConfig: {
    viteOptions: {
      plugins: [
        WindiCSS({
          preflight: false,
          scan: {
            include: [path.resolve(__dirname, './**/*.{vue,html,md}')],
          },
          config: {
            // Windi CSS, TailwindCSS のオプションを記述する
          },
        }),
      ],
    },
  },
})
これで m-4 や bg-sky-300 のような記述が可能になりました。
コンポーネント内の class に指定すると反映されます。🎉
Vercel で公開
以上で最低限のブログの作成ができました。
ここまでの内容で公開したいと思います。
main ブランチを GitHub に Push すると Vercel に公開されます。
もしくは別のブランチを Pull Request で main ブランチに merge しても同様です。
以下 GitHub CLI で Pull Request を作成し merge をする流れです。
(article ブランチで記事を作成しコミットしているとします)
gh pr create                  # article ブランチで PR を作成

gh pr merge                   # プレビューデプロイを確認後 PR をマージ

git fetch origin
git fetch . origin/main:main  # GitHub の main ブランチの内容をローカルリポジトリに反映
📰 VuePress を活用していきましょう
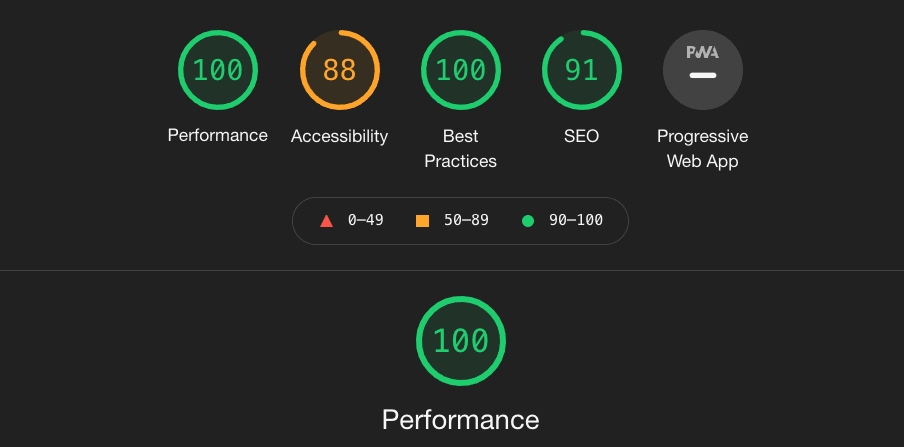
スタティックなページを事前に書き出すため、アクセスした際もストレスなく描画してくれます。
実際に Lighthouse でパフォーマンスを測定したところ100点でした。
(kohji.blog を2021年11月15日に計測)
この記事ではデザインの大きな変更までは触れていませんが、トップページを作成する機能もデフォルトテーマに用意されています。
Tailwind CSS を使えばデザイン性の高いサイトも、より効率的に開発していけるでしょう。
またプラグインやテーマを作成し、それらを公開していくことで、ほかの利用者が活用してくれることにもなります。
そのようにして VuePress のエコシステムが発展していけば、より開発しやすい環境になっていくことは間違いありません。
ぜひ一緒に VuePress を活用していきましょう。
記事内に修正箇所を見つけたら
記事内に修正箇所を見つけましたら、正確な内容を伝えていきたいと思っていますので、ぜひコメントでお知らせください。
どうぞよろしくお願いいたします。
Discussion
config.ts ファイルでWindi CSS の設定を記述する手順、とても参考になりました。
どうもありがとうございます。
もし可能であれば、Client API Helpers にある defineClientAppEnhance の使い方などについても今後追加していただけるとありがたいです。
コメントありがとうございますー
この記事のプラグインはサーバーサイドだけだったので使ってないのですが、別記事のほうではかんたんに使っています。 お役に立てればよいのですが🙂