Headless Chrome with Java
What is a headless browser?
A headless browser is a term for browser simulation programs that don't have a graphical user interface (GUI). These programs work in the same way as a regular browser, but they don't show any user interface.
Why is it useful?
A headless browser is ideal for automated testing and server environments where a visible UI shell is not needed. You may want to run some tests on a real web page, make a PDF of it, or just look at how the browser makes a URL. It is also used when you want to run your tests on a headless system like Linux without Graphical User Interface (GUI). It is also useful when you want to stimulate multiple browser behavior on a single machine. It is the best option when we want to use as minimal resources as possible. Also, if you just want to create some bulk data sets, you can use it as it runs in the background.
Cases where Headless Browsers should not be used:-
- When we want to visualize our tests on a browser, we cannot use headless browsers.
- Also, since everything is working at the backend, headless browsers cannot be used in cases where customer feedback is of great value to us. We cannot get any information about what the speed of page loading is and so on. In a real-world scenario, page loading time is of great concern as it directly impacts our customer’s experience on the website.
- Sometimes, headless browsers throw exceptions that might not occur in a real working browser.
Examples of Headless Browsers:-
- PhantomJS
- SlimerJS
- Zombie.js
- trifleJS
Headless Chrome:
Headless Chrome was launched with Chrome 59. It's a method of running Chrome in a headless environment. In other words, it is like running Chrome without Chrome! It brings all of Chromium's and the Blink rendering engine's modern web platform functionality to the command line.
Earlier, HtmlUnit and PhantomJS were two popular tools to perform web scraping with Java. Now, when it comes to browser automation and coping with Javascript-heavy websites, Chrome headless is becoming the first choice to go with, since it is faster and more stable than the other two.
HtmlUnit, PhantomJS, and the other headless browsers are excellent tools; however, they are not as robust as Chrome, and you can find Javascript errors that would not have occurred if you were using them Chrome.
An Example to demonstrate Headless Chrome:-
We will demonstrate Headless Chrome by running a Selenium Script written in Java using Chrome in a headless environment. We will basically login into a website named “zero.webappsecurity.com”and after logging in, we will take a screenshot and save it in the screenshot folder of our Selenium project. All of these tasks will be automated and will be running in a headless environment, that is, we would not be able to see the series of events taking place in the browser window.
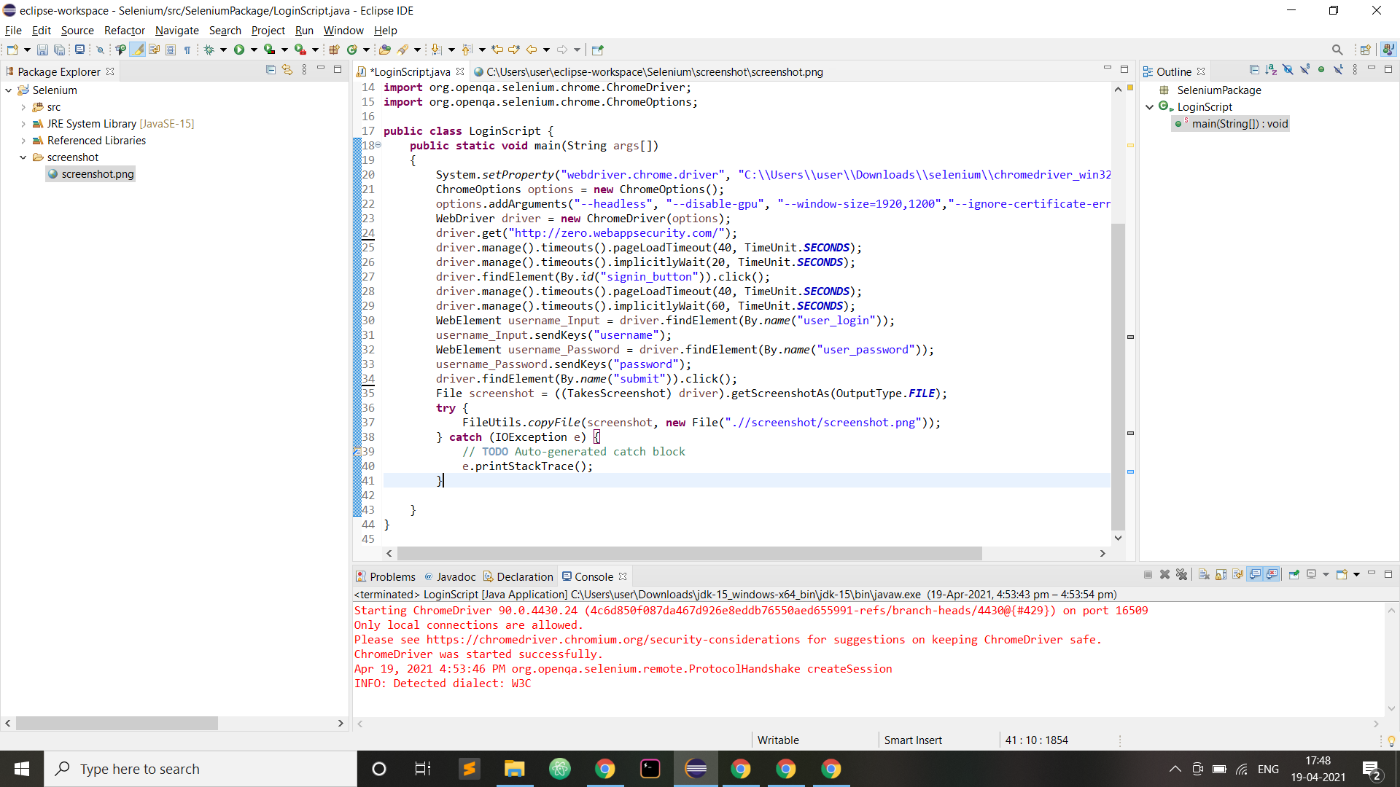
First of all, we create a new Project in our eclipse IDE and name it Selenium. This can be done by going to File => New => Java Project. Then, under our newly created project, we create a new package named SeleniumPackage. This can be done by right-clicking on our project name and clicking on New => Package. Then under our newly created package, we create a new class named LoginScript. This will be the entry point for our script. Next, we right-click on the JRE System Library under Package Explorer and click on Build Path => Configure Build Path. Next, we head over to the Classpath and click on Add External Jars... We browse through our system and add our downloaded and unzipped Selenium Standalone Server Jar file to it.
Now, we write our code snippet in the class file. First of all, we need to define the path to the chrome executable that we had downloaded earlier. We do it with the following line of code :-
System.setProperty("webdriver.chrome.driver", {Path to the executable file} );
Next, we will initialise an instance of the ChromeOptions class so that we can add arguments to it and run Chrome in a headless environment. After having done so, we add all the required options in the options object using the addArguments() function. Next, we create an instance of the ChromeDriver. This is done with the following line of code :-
ChromeOptions options = new ChromeOptions();
options.addArguments("--headless","--disable-gpu","--window-size=1920,1200","--ignore-certificate-errors", "--silent");
WebDriver driver = new ChromeDriver(options);
We need to import the following code for using ChromeOptions and ChromeDriver :-
import org.openqa.selenium.chrome.ChromeOptions;
import org.openqa.selenium.chrome.ChromeDriver;
Next, we use the get( ) method of the driver object so as to open our required web page. This can be done with the following code:-
driver.get("http://zero.webappsecurity.com/");
We write code to set a timeout for loading the web page. If the web page does not get loaded in this time frame, an exception will be thrown. The following code is used:-
driver.manage().timeouts().pageLoadTimeout(40, TimeUnit.SECONDS);
Now we write code to implicitly wait for twenty seconds. If the element is not found within 20 seconds, an exception will be thrown. This can be done by the following code:-
driver.manage().timeouts().implicitlyWait(20, TimeUnit.SECONDS);
For this to work, we need to import the following:-
import java.util.concurrent.TimeUnit;
Now, we write code so that the sign-in button is clicked. The automation of clicking sign in button is done by the following code :-
driver.findElement(By.id("signin_button")).click();
We again write code to set a timeout for loading the web page. If the web page does not get loaded in this time frame, an exception will be thrown. The following code is used:-
driver.manage().timeouts().pageLoadTimeout(40, TimeUnit.SECONDS);
Now we write code to implicitly wait for twenty seconds. If the element is not found within 20 seconds, an exception will be thrown. This can be done by the following code:-
driver.manage().timeouts().implicitlyWait(20, TimeUnit.SECONDS);
We write code to find elements for the login input and then fill in the details. From the site, we can infer that the correct login credentials are username: username and password: password.
We can fill in the login credentials using the following code :-
WebElement username_Input = driver.findElement(By.name("user_login"));
username_Input.sendKeys("username");
WebElement username_Password = driver.findElement(By.name("user_password"));
username_Password.sendKeys("password");
We need to import the following to run the above code:-
import org.openqa.selenium.WebElement;
The code for automating the clicking of Sign in button is :-
driver.findElement(By.name("submit")).click();
Now, we take a screenshot of the web page using the following line of code:-
File screenshot = ((TakesScreenshot) driver).getScreenshotAs(OutputType.FILE);
Now, we need to store this screenshot taken. For this we use the FileUtils.copyFile( src, dest) method. But for using this, we need to download and unzip Commons IO as it is defined under this package. We can download it from this link. After having done so, we need to add the jar file to our Classpath of the project. Having done so we can store the screenshot using the following lines of code:-
FileUtils.copyFile(screenshot, new File(".//screenshot/screenshot.png"));
We have named our taken screenshot as “screenshot.png”.
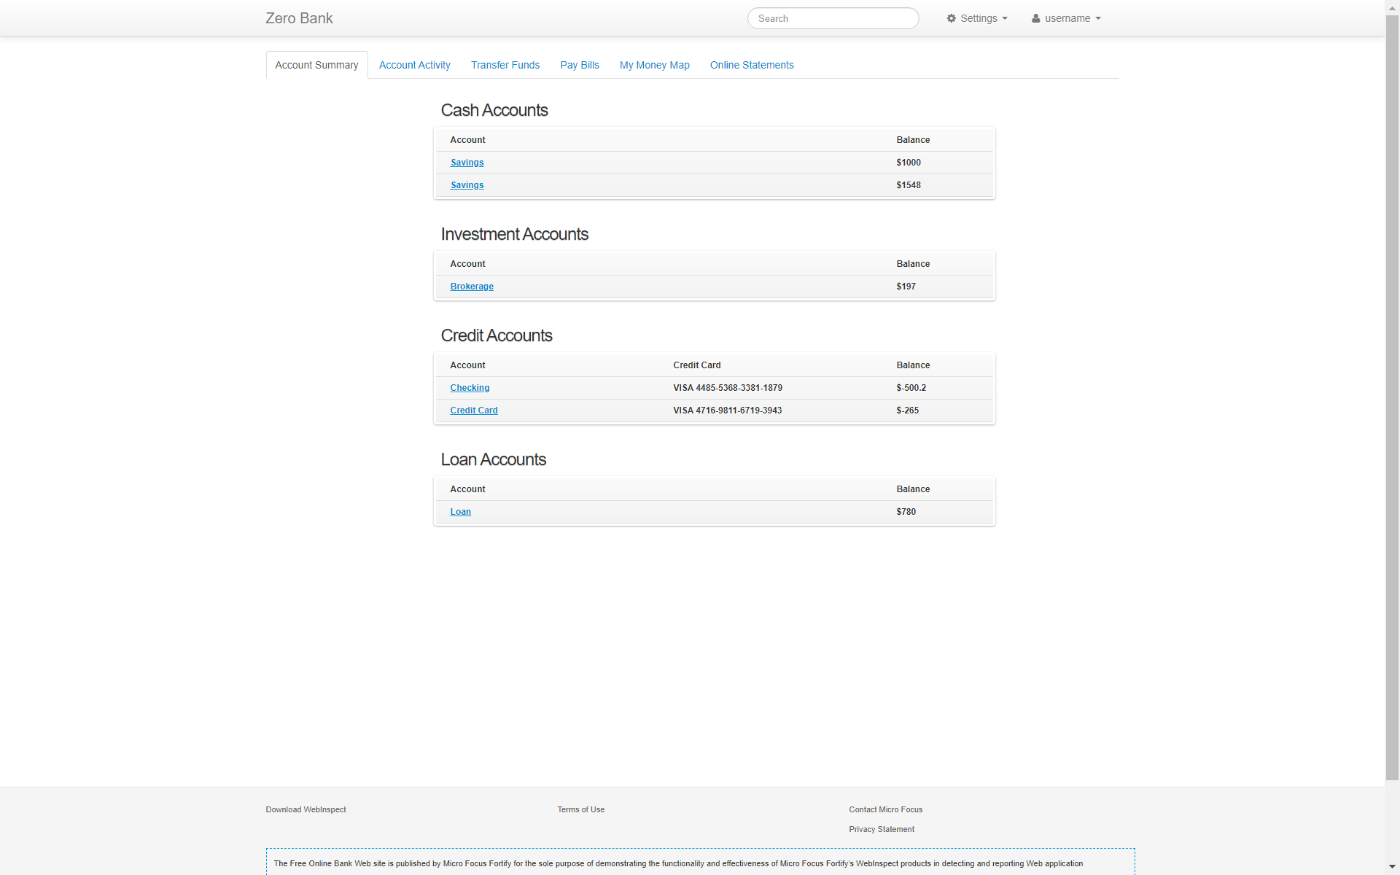
Now, we run our script. We observe that a new folder has been created under our project Selenium with the name screenshot. Under this folder, we have an image named screenshot.png.
We open the screenshot.png file to check the image.

So, we have been successful in logging into a website and taking a screenshot without actually opening the website in an actual browser. All of these have been done in the background and the series of events that took place is not visible to us. Thus, we have run Chrome in a headless environment.
The code of our script:-
package SeleniumPackage;

import java.io.File;
import java.io.IOException;
import java.util.concurrent.TimeUnit;
import java.util.logging.FileHandler;

import org.apache.commons.io.FileUtils;
import org.openqa.selenium.By;
import org.openqa.selenium.OutputType;
import org.openqa.selenium.TakesScreenshot;
import org.openqa.selenium.WebDriver;
import org.openqa.selenium.WebElement;
import org.openqa.selenium.chrome.ChromeDriver;
import org.openqa.selenium.chrome.ChromeOptions;

public class LoginScript {
	public static void main(String args[])
	{
		System.setProperty("webdriver.chrome.driver", "C:\\Users\\user\\Downloads\\selenium\\chromedriver_win32\\chromedriver.exe");
		ChromeOptions options = new ChromeOptions();
	    options.addArguments("--headless", "--disable-gpu", "--window-size=1920,1200","--ignore-certificate-errors", "--silent");
		WebDriver driver = new ChromeDriver(options);//Creating an instance of the WebDriver class
		driver.get("http://zero.webappsecurity.com/");
		driver.manage().timeouts().pageLoadTimeout(40, TimeUnit.SECONDS);
		driver.manage().timeouts().implicitlyWait(20, TimeUnit.SECONDS);
		driver.findElement(By.id("signin_button")).click();//Clicking on Sign in to open the Sign in web page
		driver.manage().timeouts().pageLoadTimeout(40, TimeUnit.SECONDS);
		driver.manage().timeouts().implicitlyWait(60, TimeUnit.SECONDS);
		WebElement username_Input = driver.findElement(By.name("user_login"));
		username_Input.sendKeys("username");//Entering the details for the username field
		WebElement username_Password = driver.findElement(By.name("user_password"));
		username_Password.sendKeys("password");//Entering the details for the password field
		driver.findElement(By.name("submit")).click();//Clicking the Sign in button
		File screenshot = ((TakesScreenshot) driver).getScreenshotAs(OutputType.FILE);
		try {
			FileUtils.copyFile(screenshot, new File(".//screenshot/screenshot.png"));
		} catch (IOException e) {
			// TODO Auto-generated catch block
			e.printStackTrace();
		}

	}
}
The Screenshot image:-
Conclusion:-
One of the advantages of using Headless Chrome (rather than testing in Node) is that your JavaScript tests will run in the same environment as your site's users. Without the memory overhead of running a complete version of Chrome, headless Chrome gives you a real browser background. Running automated tests in the background is a crucial part of many projects and one can have great future prospects if he/she knows and understands automation properly.
Java is a very popular Object Oriented Programming Language and is used in almost every field of development and testing. So, you must have a firm understanding of this programming language. Java Basics is the foundation to a strong command in Java Development and you must be crystal clear with the basics. Java is an important and popular topic in interviews as well. So, you can expect to have an advantage over other candidates if you have a good command of Java. To go through some of the most frequently asked interview questions on Java, you can visit this link
In this article, we explained what a headless browser is and how it works. We explained the scenarios where a headless browser is preferable and the scenarios where it is not. We also explained with an example how Google Chrome can be made to run in a headless environment using Selenium for running the automated scripts written in Java.
Discussion