GitHub Actions と Workload Identity 連携による Google Cloud リソース管理のハンズオン
はじめに
こんにちは、クラウドエース SRE 部所属の大槻です。クラウドエースでは、Terraform による Google Cloud リソース管理を実践する機会が多くあります。
そこで今回は、Google Cloud での CI/CD 手法を 1 つ紹介したいと思います。GitHub Actions のワークフローを使用して、Open ID Connect (以下、OIDC) による認証を行い、 Terraform で Google Cloud リソースを管理する方法をハンズオン形式で紹介していきます。
Workload Identity 連携
GitHub Actions から、Google Cloud リソースへのアクセスのため、Workload Identity 連携を使用して、サービス アカウントの権限を借用します。Workload Identity 連携を使用することで、サービス アカウント キーの代わりにフェデレーション ID を使用して、Google Cloud リソースへのアクセス権を付与できます。
GitHub Actions では OIDC をサポートしており、有効期限が短いトークンを利用して Google Cloud へのアクセスを制御することができます。
もう一つの接続方法として、サービス アカウント キーを利用する方法がありますが、セキュリティ上のリスクとなるため推奨されておりません。
Workload Identity 連携の詳しい図などは、こちらの記事の図を参考にしていただけると幸いです。
設定手順
早速ですが、以下に具体的な設定手順例を記載していきます。
1. Workload Identity 連携の設定
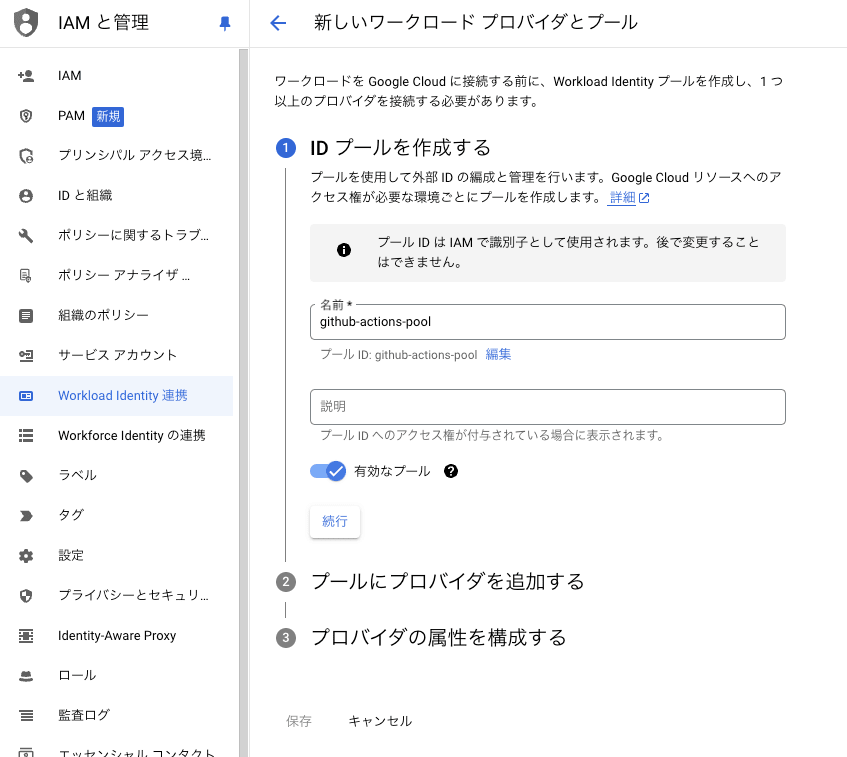
コンソールから「IAM と管理」、「Workload Identity 連携」を選択し、「プールを作成」をクリックします。
「名前」を入力し、「続行」をクリックします。(ここでは、github-actions-pool とします。)
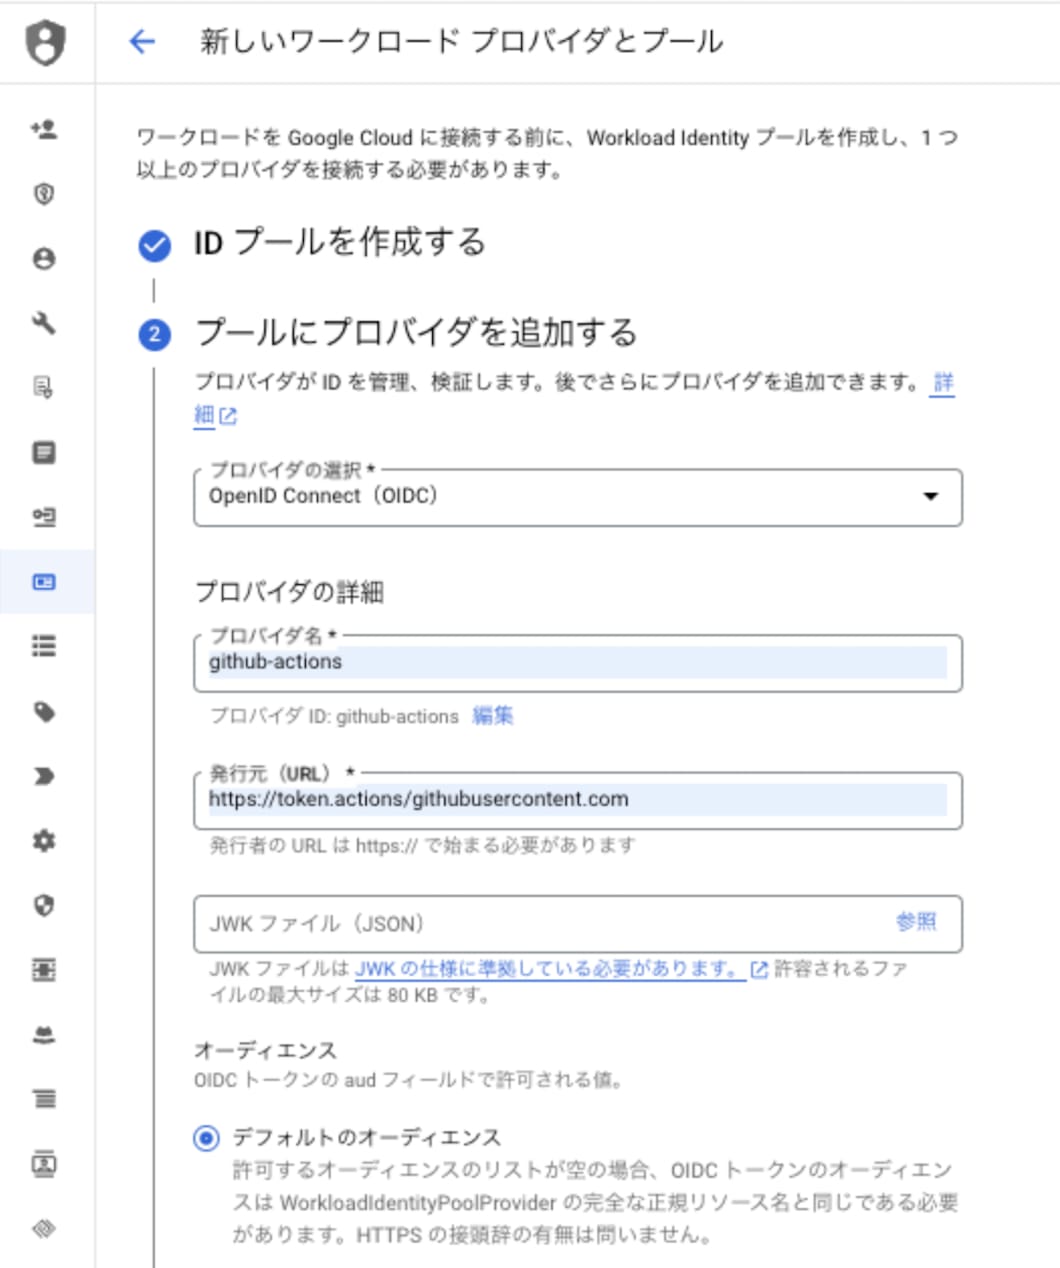
「プロバイダの選択」で「OpenID Connect(OIDC)」を選択します。
「プロバイダ名」を入力し、「発行元(URL)」に https://token.actions.githubusercontent.com を入力し、「続行」をクリックします。(ここではプロバイダ名をgithub-actions とします。)
「プロバイダの属性を構成する」で、下表の値を設定し、「保存」をクリックします。
| 項目名 | 設定値 |
|---|---|
| google1 | google.subject |
| OIDC1 | assertion.sub |
| google2 | attribute.repository |
| OIDC2 | assertion.repository |
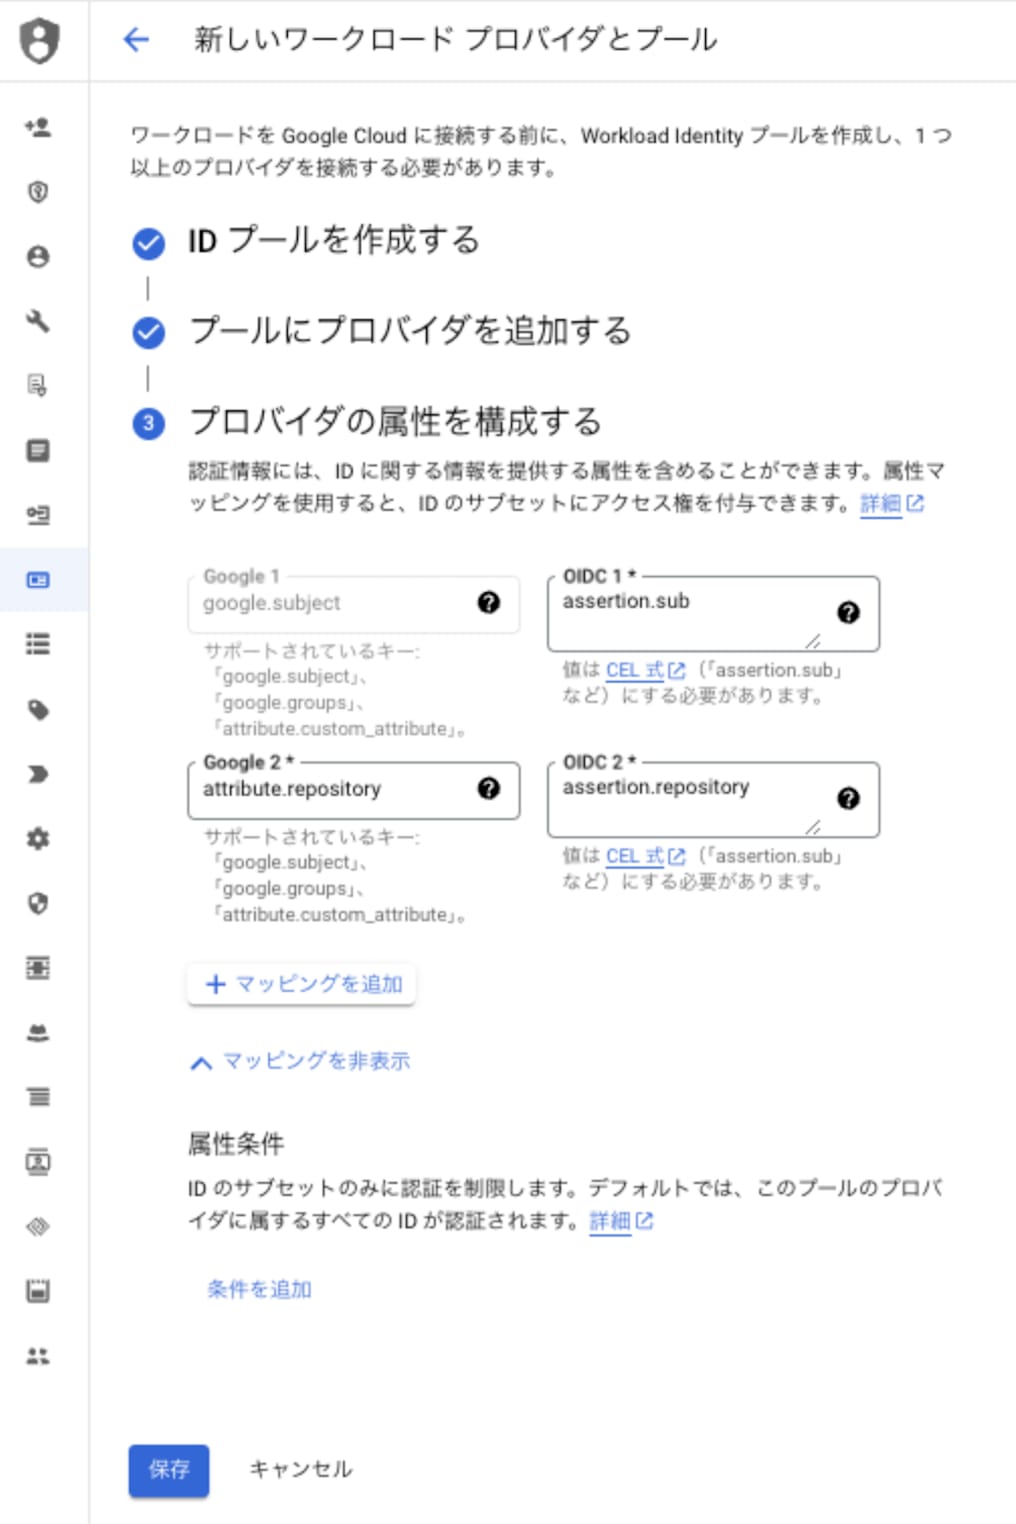
表の項目名と 設定値の詳細については、リンクを参照ください。
2. サービス アカウントの設定
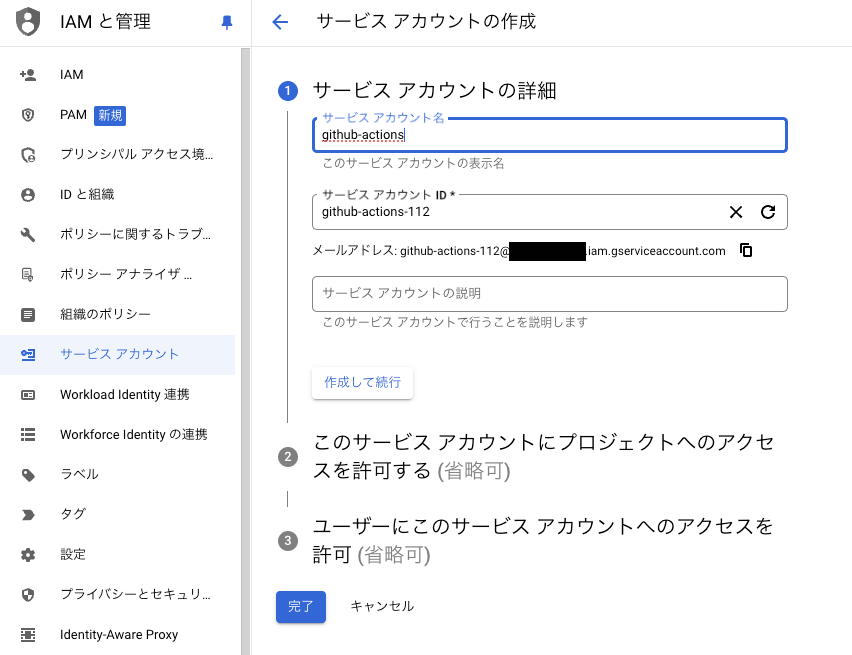
コンソールから、「IAM と管理」、「サービス アカウント」を選択し、「サービス アカウントを作成」をクリックします。
サービス アカウント名を入力して、「作成して続行」をクリックします。(ここでは、github-actions とします。)
「ロールを選択」から権限を付与し、「完了」をクリックします。(ここでは、編集者 権限を付与することとします。)

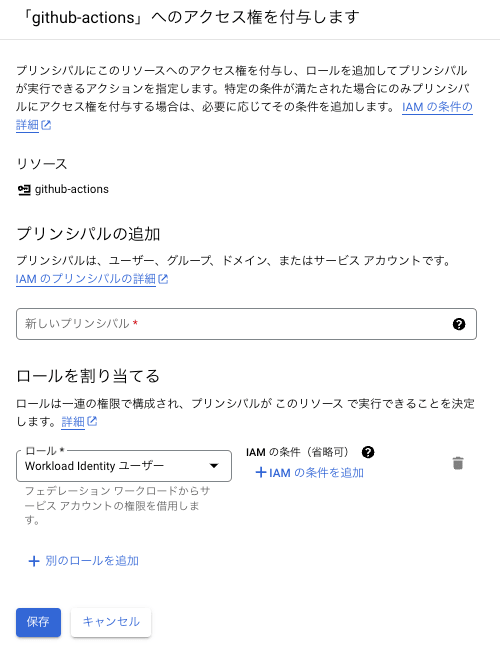
作成したサービス アカウントをクリックして、「権限」タブを開きます。
「アクセス権を付与」をクリックして、下表の値を設定し、「保存」をクリックします。
| 項目名 | 設定値 |
|---|---|
| 新しいプリンシパル | principalSet://iam.googleapis.com/projects/[PROJECT_NUMBER]/locations/global/workloadIdentityPools/github-actions-pool/attribute.repository/[PROJECT_ID]/github-actions |
| ロール | Workload Identity ユーザー |
3. GitHub Actions の設定
.github/workflows/ 配下に yaml ファイルを作成することで、GitHub Actions の設定を行うことができます。
今回は以下の 3 つの yaml ファイルを作成します。
- auth-test.yaml
Workload Identity 連携によるサービス アカウントの権限借用を検証するもので、GitHub Actions を手動で実行します。 - terraform-plan.yaml
terraform planを実行するもので、main ブランチへの PR 作成時に実行されます。 - terraform-apply.yaml
terraform applyを実行するもので、main ブランチへのv*のタグ付与時に実行されます。
以下の 3 つのファイルを .github/workflows/ 配下に作成します。
ファイル作成後、main ブランチに push します。
# auth-test.yaml
name: Auth test
run-name: Auth test by @${{ github.actor }}

on:
  workflow_dispatch: # Manually run

permissions:
  contents: read
  id-token: write

env:
  PROJECT_ID: [PROJECT_ID]
  PROJECT_NUMBER: [PROJECT_NUMBER]

jobs:
  auth_test:
    runs-on: ubuntu-latest
    steps:
    - name: Checkout
      uses: actions/checkout@v4

    - name: Auth
      uses: google-github-actions/auth@v2
      with:
        project_id: ${{ env.PROJECT_ID }}
        workload_identity_provider: projects/${{ env.PROJECT_NUMBER }}/locations/global/workloadIdentityPools/github-actions-pool/providers/github-actions
        service_account: github-actions@${{ env.PROJECT_ID }}.iam.gserviceaccount.com

    - name: Set up Cloud SDK
      uses: google-github-actions/setup-gcloud@v2

    - name: Use Cloud SDK
      run: gcloud config list
# terraform-plan.yaml
name: Terraform Plan
run-name: Terraform Plan by @${{ github.actor }}

on:
  pull_request:
    branches:
      - main

permissions:
  contents: read
  id-token: write
  pull-requests: write

env:
  PROJECT_ID: [PROJECT_ID]
  PROJECT_NUMBER: [PROJECT_NUMBER]
  TERRAFORM_VERSION: 1.8.5

jobs:
  terraform-plan:
    runs-on: ubuntu-latest
    steps:
    - uses: actions/checkout@v4
    - uses: hashicorp/setup-terraform@v3
      with:
        terraform_version: ${{ env.TERRAFORM_VERSION }}

    - uses: google-github-actions/auth@v2
      with:
        project_id: ${{ env.PROJECT_ID }}
        workload_identity_provider: projects/${{ env.PROJECT_NUMBER }}/locations/global/workloadIdentityPools/github-actions-pool/providers/github-actions
        service_account: github-actions@${{ env.PROJECT_ID }}.iam.gserviceaccount.com

    - name: Terraform fmt
      id: fmt
      run: terraform fmt -check
      continue-on-error: true

    - name: Terraform Init
      id: init
      run: terraform init

    - name: Terraform Validate
      id: validate
      run: terraform validate -no-color

    - name: Terraform Plan
      id: plan
      run: terraform plan -no-color
      continue-on-error: true

    - uses: actions/github-script@v7
      if: github.event_name == 'pull_request'
      env:
        PLAN: "terraform\n${{ steps.plan.outputs.stdout }}"
      with:
        github-token: ${{ secrets.GITHUB_TOKEN }}
        script: |
          // 1. Retrieve existing bot comments for the PR
          const { data: comments } = await github.rest.issues.listComments({
            owner: context.repo.owner,
            repo: context.repo.repo,
            issue_number: context.issue.number,
          })
          const botComment = comments.find(comment => {
            return comment.user.type === 'Bot' && comment.body.includes('Terraform Format and Style')
          })

          // 2. Prepare format of the comment
          const output = `#### Terraform Format and Style 🖌\`${{ steps.fmt.outcome }}\`
          #### Terraform Initialization ⚙️\`${{ steps.init.outcome }}\`
          #### Terraform Validation 🤖\`${{ steps.validate.outcome }}\`
          <details><summary>Validation Output</summary>

          \`\`\`\n
          ${{ steps.validate.outputs.stdout }}
          \`\`\`

          </details>

          #### Terraform Plan 📖\`${{ steps.plan.outcome }}\`

          <details><summary>Show Plan</summary>

          \`\`\`\n
          ${process.env.PLAN}
          \`\`\`

          </details>

          *Pusher: @${{ github.actor }}, Action: \`${{ github.event_name }}\`, Working Directory: \`${{ env.tf_actions_working_dir }}\`, Workflow: \`${{ github.workflow }}\`*`;

          // 3. If we have a comment, update it, otherwise create a new one
          if (botComment) {
            github.rest.issues.updateComment({
              owner: context.repo.owner,
              repo: context.repo.repo,
              comment_id: botComment.id,
              body: output
            })
          } else {
            github.rest.issues.createComment({
              issue_number: context.issue.number,
              owner: context.repo.owner,
              repo: context.repo.repo,
              body: output
            })
          }
# terraform-apply.yaml
name: Terraform Apply
run-name: Terraform Apply by @${{ github.actor }}

on:
  workflow_dispatch: # Manually run
  push:
    tags:
      - v*

permissions:
  contents: read
  id-token: write

env:
  PROJECT_ID: [PROJECT_ID]
  PROJECT_NUMBER: [PROJECT_NUMBER]
  TERRAFORM_VERSION: 1.8.5

jobs:
  terraform-apply:
    runs-on: ubuntu-latest
    steps:
    - uses: actions/checkout@v4
    - uses: hashicorp/setup-terraform@v3
      with:
        terraform_version: ${{ env.TERRAFORM_VERSION }}

    - uses: google-github-actions/auth@v2
      with:
        project_id: ${{ env.PROJECT_ID }}
        workload_identity_provider: projects/${{ env.PROJECT_NUMBER }}/locations/global/workloadIdentityPools/github-actions-pool/providers/github-actions
        service_account: github-actions@${{ env.PROJECT_ID }}.iam.gserviceaccount.com

    - name: Terraform fmt
      id: fmt
      run: terraform fmt -check
      continue-on-error: true

    - name: Terraform Init
      id: init
      run: terraform init

    - name: Terraform Validate
      id: validate
      run: terraform validate -no-color

    - name: Terraform Plan
      id: plan
      run: terraform plan -no-color
      continue-on-error: true

    - name: Terraform apply
      id: apply
      run: terraform apply -auto-approve -no-color
4. Terraform の設定
ブランチを切り替え、以下のファイルをルートフォルダに作成します。
ファイル作成後、動作確認のため main ブランチへの PR を作成します。
resource "google_storage_bucket" "main" {
  name          = "[PROJECT_ID]_static_website_bucket"
  location      = "asia-northeast1"
  storage_class = "STANDARD"
  website {
    main_page_suffix = "index.html"
  }
}

resource "google_storage_bucket_object" "main" {
  name         = "index.html"
  content      = "<html><body>Hello World!</body></html>"
  content_type = "text/html"
  bucket       = google_storage_bucket.main.id
}

terraform {
  required_providers {
    google = {
      source  = "hashicorp/google"
      version = ">=5.33.0"
    }
  }
  required_version = "1.8.5"
}
動作確認
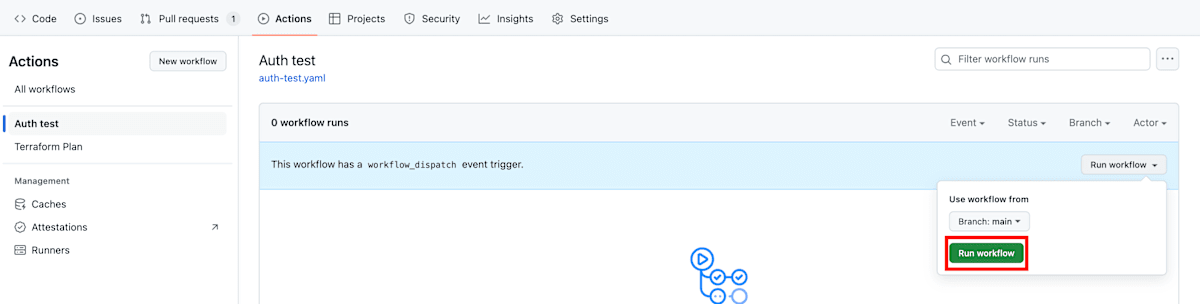
1. Workload Identity 連携
GitHub の Actions タブから、「Auth test」を選択し、「Run workflow」をクリックして、「Run workflow」をクリックします。
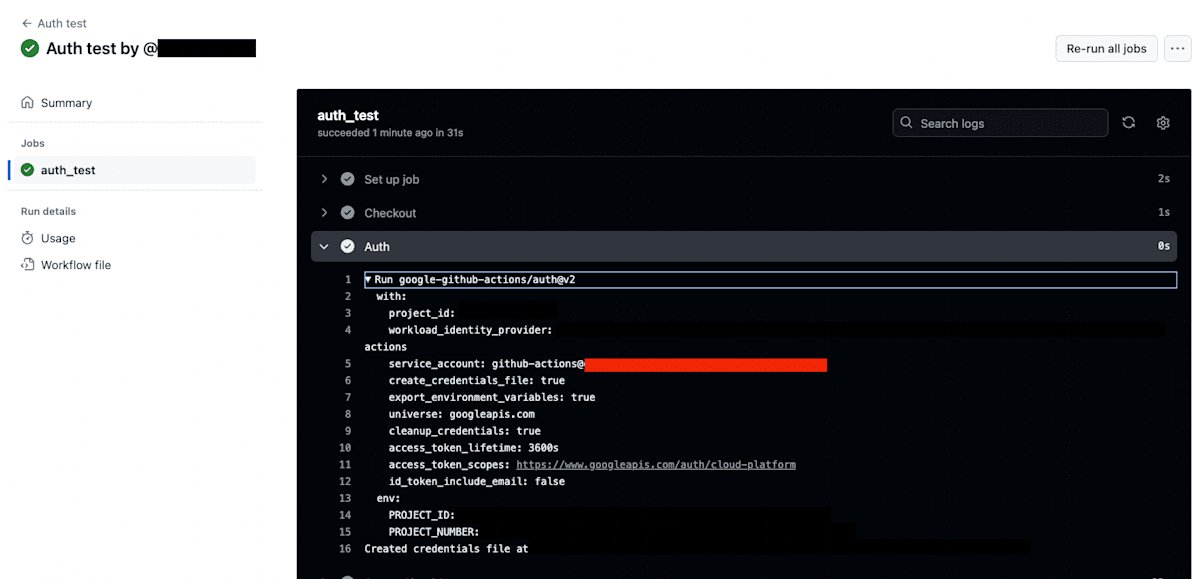
実行結果を確認し、「service account」が「github-actions@[PROJECT_ID].iam.gserviceaccount.com」と表示されていれば OK です。
2. Terraform plan
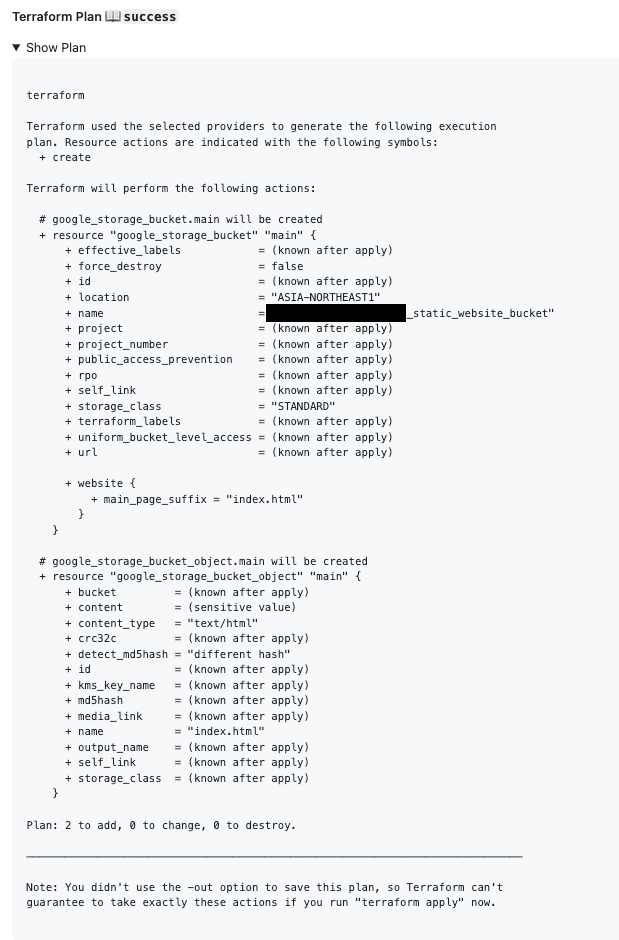
「Pull requests」画面を表示し、「Terraform Plan」が成功していることを確認します。
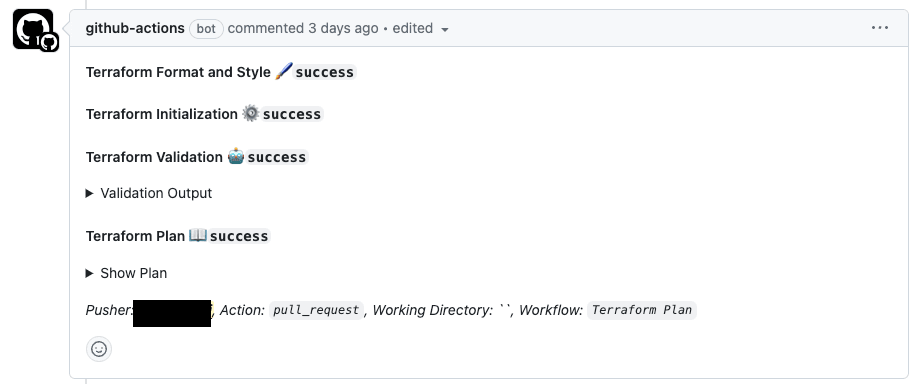
「Show Plan」の内容もしっかり確認しましょう。
ここでは Google Cloud Storage(以下、GCS)バケットを作成し、GCS バケット内に index.html オブジェクトを作成する内容が表示されていれば OK です。
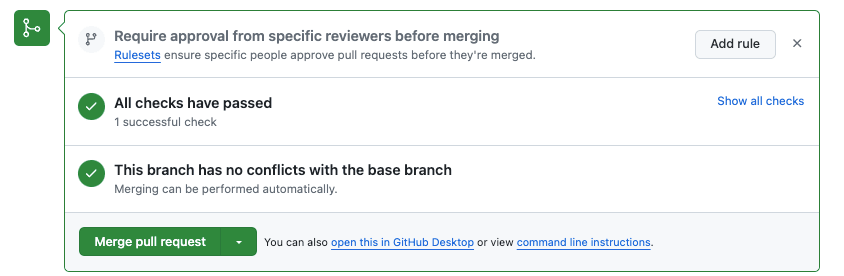
上記が問題なければ、「Merge pull request」をクリックし、main ブランチへマージします。
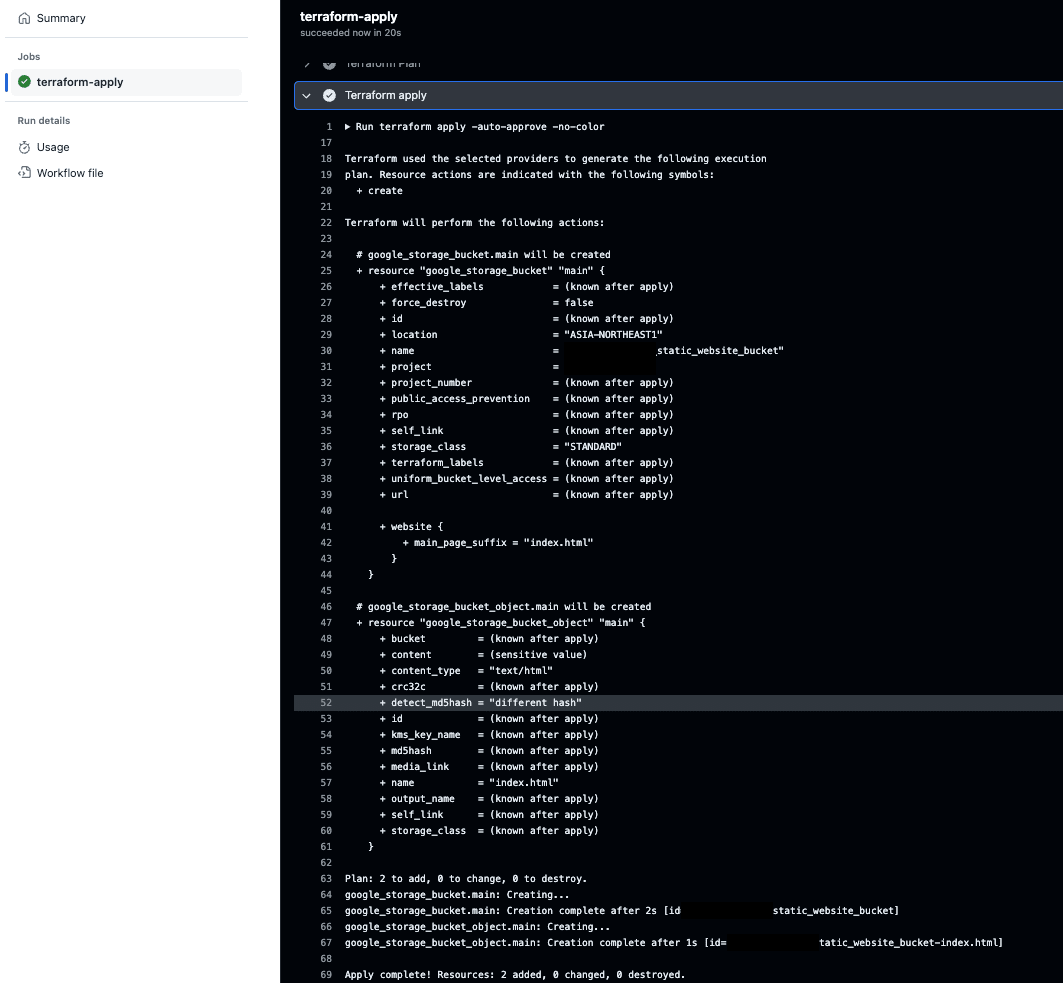
3. Terraform apply
main ブランチにタグ付与し、「Actions」画面から実行結果を確認します。
「Terraform apply」 が成功していれば OK です。
コンソールから「Cloud Storage」、「バケット」を選択し、作成した GCS バケット名をクリックします。
「index.html」を選択し、「認証済み URL」を開きます。
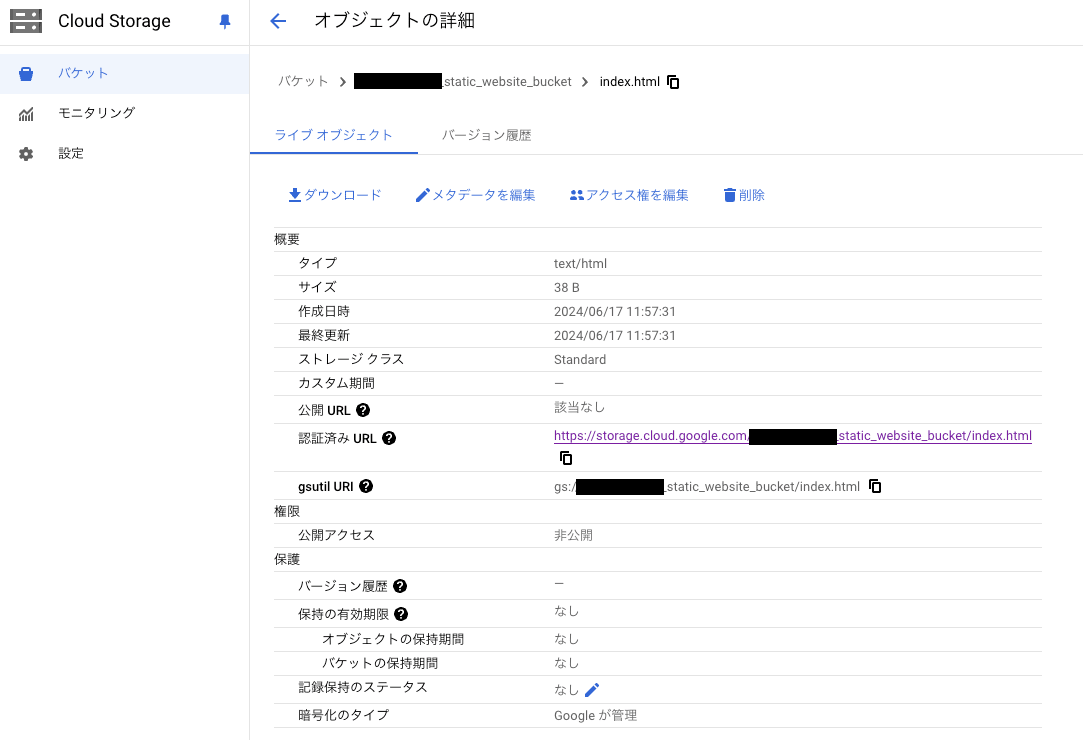
ブラウザに「Hello World!」と表示されていれば OK です。
おわりに
今回は Workload Identity 連携を利用して、GitHub Actions から Terraform 実行するところまで、手順を紹介しました。参考資料が Google Cloud、GitHub、Terraform と分散しており理解に苦労しましたが、実装自体は案外簡単にできました。
是非、お手元の環境で実践してみてください。
最後まで読んでいただきありがとうございました。
Discussion