Cloud Run ジョブにオーバーライド機能が追加されました
はじめに
こんにちは!クラウドエース データML ディビジョン所属の佐塚と申します。
データML ディビジョンとはクラウドエースのITエンジニアリングを担うシステム開発部の中で、特にデータ基盤構築・分析基盤構築からデータ分析までを含む一貫したデータ課題の解決を専門としております。
データML ディビジョンでは活動の一環として、毎週Google Cloud の新規リリースを調査・発表し、データ領域のプロダクトのキャッチアップをしています。その中でも重要と考えるリリースを本ページ含め記事として公開しています。
今回紹介するリリースは「Cloud Run ジョブにオーバーライド機能が追加」についてです。
オーバーライド機能とは
ジョブのオーバーライド機能は、新しいジョブの実行を開始するときに、以下のパラメータを変更することができる機能です。
- ジョブに構成された引数
- 環境変数
- タスクの数
- タスクのタイムアウト構成
ここでCloud Run ジョブとは、コンテナイメージを使用して、単一もしくは複数のタスクを構成し並列で実行する機能です。全てのタスクが完了すると成功を返します。
タスクとは、ジョブ内で行う実行の単位です。1つのタスクが1つのコンテナインスタンスを使用します。
ジョブのオーバーライド機能によって、同じジョブ定義を異なるパラメータで実行することが可能になり、パラメータの変更のたびにジョブを再デプロイする必要がなくなります。
また基盤となるジョブ定義は変更されず、変更したパラメータはそのジョブのみに反映されます。
そのため次に実行するジョブは、基盤となるパラメータを使って実行か、パラメータを再度変更して実行か選択することができます。
この機能を使用するには run.jobs.runWithOverrides の権限が必要です。
Cloud Run 管理者ロールと Cloud Run 開発者ロールにはこの権限が含まれています。
この機能を使うと、以下のようなユースケースで役立つと思います。
- BigQueryの日付ごとに分けられたテーブルに向けてジョブを実行する際、参照するテーブルをジョブによって変更させたい場合
- データ処理の規模に応じて、タスク数を変更させたい場合
参考:特定の実行のジョブ構成をオーバーライドする
試してみた
基盤となるジョブのデプロイ
今回の記事では公式のCloud Run ジョブ クイックスタートに記載されているコードを参考にしてジョブオーバーライドを試してみたいと思います。
検証のゴールとしては、ジョブのオーバーライド機能を使って、パラメータが上書きできたことを確認します。
今回はパラメータの上書きが確認できればいいので、タスクはSLEEP_MS の時間sleep を実行する内容になっています。
基盤となるパラメータの値は以下の表の通りです。
| 基盤 | オーバライド1 | オーバーライド2 | |
|---|---|---|---|
| tasks | 50 | 100 | 25 |
| SLEEP_MS | 10000 | 20000 | 5000 |
import json
import os
import sys
import time

# Retrieve Job-defined env vars
TASK_INDEX = os.getenv("CLOUD_RUN_TASK_INDEX", 0)
TASK_ATTEMPT = os.getenv("CLOUD_RUN_TASK_ATTEMPT", 0)
# Retrieve User-defined env vars
SLEEP_MS = os.getenv("SLEEP_MS", 0)

# Define main script
def main(sleep_ms=0):
    """Program that simulates work using the sleep method.

    Args:
        sleep_ms: number of milliseconds to sleep
    """
    print(f"Starting Task #{TASK_INDEX}, Attempt #{TASK_ATTEMPT}...")
    # Simulate work by waiting for a specific amount of time
    time.sleep(float(sleep_ms) / 1000)  # Convert to seconds

    print(f"Completed Task #{TASK_INDEX}.")

# Start script
if __name__ == "__main__":
    main(SLEEP_MS)
Procfile を作成し、以下の内容を追加します。
このファイルは、web タイプのジョブをpython で起動させるという宣言をしています。
web: python3 main.py
以下のコマンドで、コンテナをビルドして Artifact Registry にアップロードし、ジョブを Cloud Run にデプロイするソースからのデプロイを使用します。
参考:ジョブコンテナをビルドして Artifact Registry に送信し、Cloud Run にデプロイする
gcloud run jobs deploy test \
--source . \
--tasks 50 \
--set-env-vars SLEEP_MS=10000 \
--max-retries 5 \
--region  asia-northeast1 \
--project project-id
デプロイを成功すると以下の出力が得られます。
This command is equivalent to running `gcloud builds submit --pack image=[IMAGE] .` and `gcloud run jobs deploy test --image [IMAGE]`

Building using Buildpacks and deploying container to Cloud Run job [test] in project [project-id] region [asia-northeast1]
✓ Building and creating job... Done.
  ✓ Uploading sources...
  ✓ Building Container... Logs are available at [https://console.cloud.google.com/cloud-build/builds/52adbf7f-0efa-403b-a829-7431c3
  87139a?project=xxxxxxxx].
Done.
Job [test] has successfully been deployed.

To execute this job, use:
gcloud run jobs execute test
ジョブの実行
先ほどデプロイしたジョブを以下のコマンドで実行します。
gcloud run jobs execute test --region asia-northeast1
ジョブを開始すると以下の出力が得られます。
✓ Creating execution... Done.
✓ Provisioning resources...
Done.
Execution [test-gxrpc] has successfully started running.

View details about this execution by running:
gcloud run jobs executions describe test-gxrpc

Or visit https://console.cloud.google.com/run/jobs/executions/details/asia-northeast1/test-gxrpc/tasks?project=xxxxxxxx
ジョブの結果を取得したい場合、以下のコマンドを入力します。
gcloud run jobs executions describe test-gxrpc
ジョブの結果として以下の出力が得られます。
✔ Execution test-gxrpc in region asia-northeast1
50 tasks completed successfully
Elapsed time: 30 seconds

Log URI: https://console.cloud.google.com/logs/viewer?project=project-id&advancedFilter=resource.type%3D%22cloud_run_job%22%0Aresource.labels.job_name%3D%22test%22%0Aresource.labels.location%3D%22asia-northeast1%22%0Alabels.%22run.googleapis.com/execution_name%22%3D%22test-gxrpc%22

Image:           asia-northeast1-docker.pkg.dev//cloud-run-source-deploy/test@sha256:d10f8f76af1cb14bc6e8d4ce942eb8e92f8947213081fd7638404d026f54aeee
Tasks:           50
Memory:          512Mi
CPU:             1000m
Task Timeout:    600s
Max Retries:     5
Parallelism:     50
Service account: xxxxxxx-compute@developer.gserviceaccount.com
Env vars:
SLEEP_MS       10000
2行目に50 tasks completed successfully と出力され 50個のタスクが成功しジョブが成功したことが確認できます。
また7~16行目では、Image や Tasks のようにジョブの実行で使用した基盤となるパラメータが確認できます。
コマンドラインでのオーバーライド
基盤となるジョブは設定したので、次にオーバーライドを試してみたいと思います。
ジョブを実行するコマンドの引数に、先ほどの表にあるオーバーライド1の値task = 100, SLEEP_MS = 20000 を設定します。
gcloud run jobs execute test \
--region asia-northeast1 \
--update-env-vars SLEEP_MS=20000 \
--tasks 100 \

--出力--
✓ Creating execution... Done.
✓ Provisioning resources...
Done.
Execution [test-7prs4] has successfully started running.

View details about this execution by running:
gcloud run jobs executions describe test-7prs4

Or visit https://console.cloud.google.com/run/jobs/executions/details/asia-northeast1/test-7prs4/tasks?project=xxxxxxxx
以下のコマンドで結果を出力させます。
gcloud run jobs executions describe test-7prs4

--出力--
✔ Execution test-7prs4 in region asia-northeast1
100 tasks completed successfully
Elapsed time: 2 minutes and 6 seconds

Log URI: https://console.cloud.google.com/logs/viewer?project=project-id&advancedFilter=resource.type%3D%22cloud_run_job%22%0Aresource.labels.job_name%3D%22test%22%0Aresource.labels.location%3D%22asia-northeast1%22%0Alabels.%22run.googleapis.com/execution_name%22%3D%22test-7prs4%22

Image:           asia-northeast1-docker.pkg.dev/project-id/cloud-run-source-deploy/test@sha256:d10f8f76af1cb14bc6e8d4ce942eb8e92f8947213081fd7638404d026f54aeee
Tasks:           100
Memory:          512Mi
CPU:             1000m
Task Timeout:    10m
Max Retries:     5
Parallelism:     100
Service account: xxxxxxxx-compute@developer.gserviceaccount.com
Env vars:
SLEEP_MS       20000
Tasks,SLEEP_MS の行で、オーバーライドで設定した値task = 100, SLEEP_MS = 20000 が確認できます。
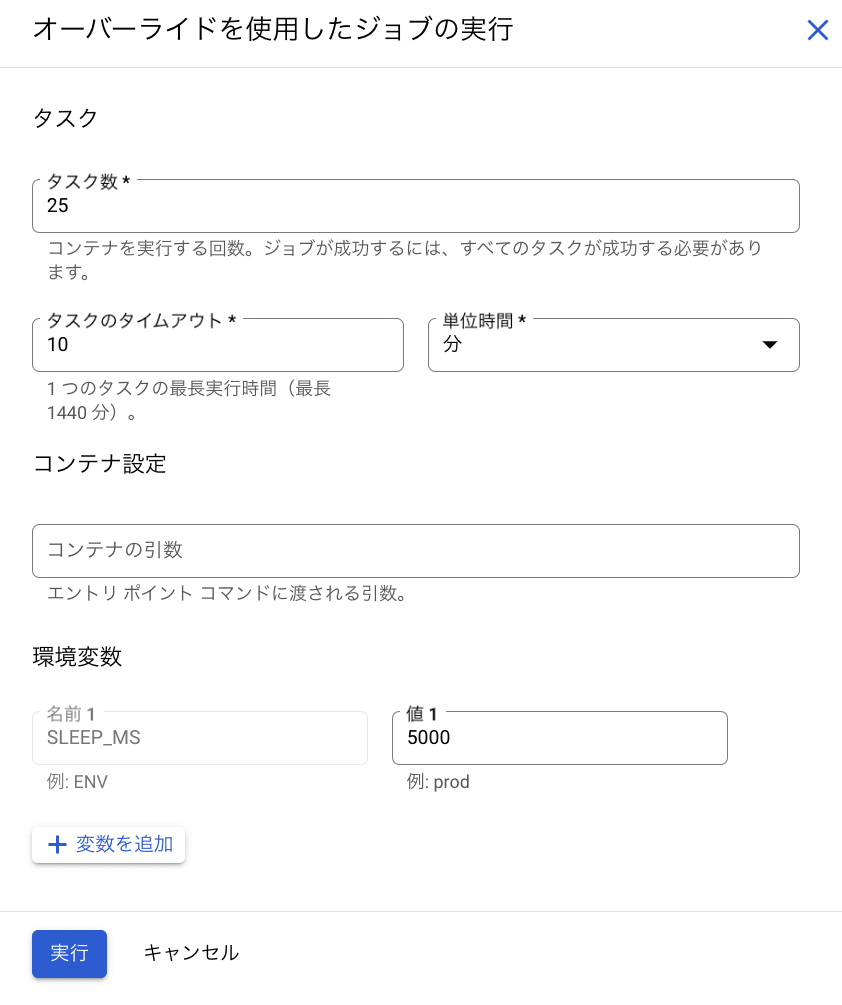
コンソールでのオーバーライド
オーバーライドはコンソールからでも設定することが可能です。
Cloud Run ジョブのコンソール上から[実行]の右を選択し、オーバーライドを使用して実行を選択します。

パラメータを入力するページが表示されるので、先ほどの表にあるオーバーライド2の値task = 25, SLEEP_MS = 5000 に設定し実行ボタンを選択します。
では結果を確認します。
ジョブの実行結果はコンソール上でも確認ができます。
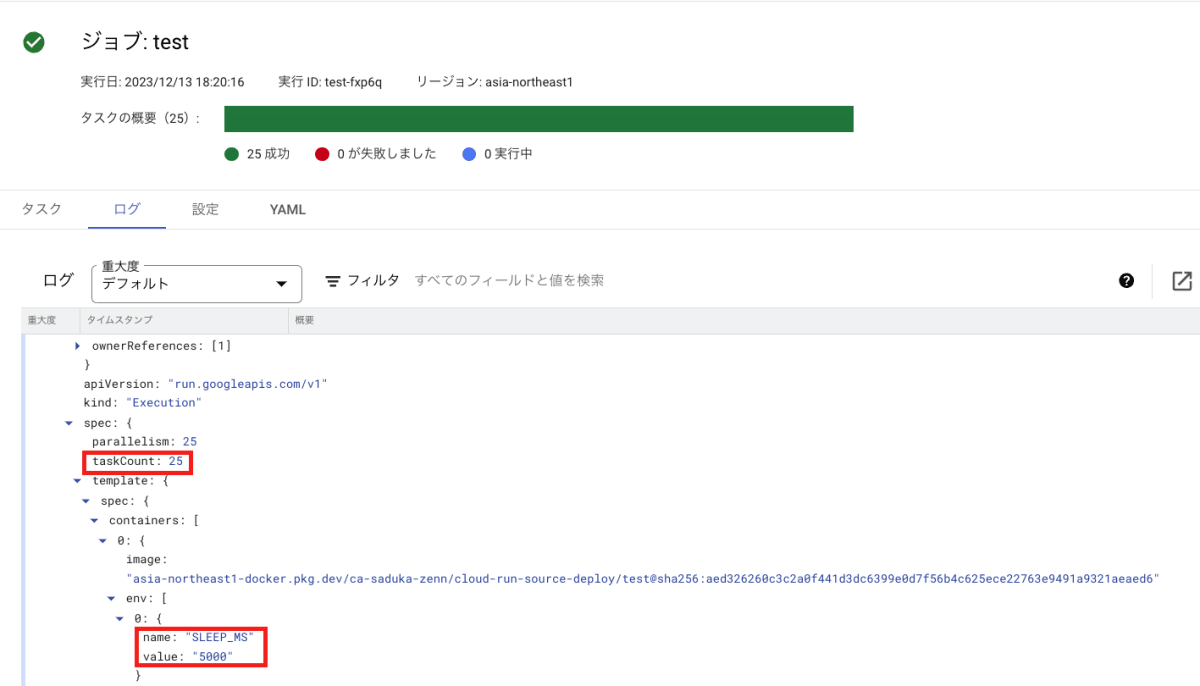
Tasks,SLEEP_MS の行で、オーバーライドで設定した値task = 25, SLEEP_MS = 5000 が確認できます。
まとめ
今回は Cloud Run ジョブのオーバーライド機能についてまとめました。
最後まで読んでいただきありがとうございます。
Discussion