Tensorflowでなんか適当に作るまでの道筋
備忘録そして検索の邪魔になる記事になりそうな予感
※宗教上の理由でとりあえずColabやjupyterは使用せず、Pure pythonからスタートします
ある程度基礎がつかめたらColabなりで進めれるようにしていきたい
anyenvからのpyenvでとりあえずpythonの最新版を落とす。anacondaでもいいけどピュアな方にしておく
pyenv install 3.10.2
(何か前に入れたときとりあえず新しいのぶっこんだらTensorflow動かなかった気もしたけど、とりあえず入れるか~)
pipで色々ぶっこむので、pyenv-virtualenvを使って環境を汚さないようにしておく
git clone https://github.com/pyenv/pyenv-virtualenv.git $(pyenv root)/plugins/pyenv-virtualenv
echo 'eval "$(pyenv virtualenv-init -)"' >> ~/.bashrc
exec $SHELL -l
pyenv virtualenv 3.10.2 tf-3.10
cd tensorflow_test
pyenv local tf-3.10
ここでとりあえずpythonの設定はOK。
次は入れるライブラリです。
pip install --upgrade pip
pip install tensorflow
pip install numpy scipy pandas matplotlib scikit-learn opencv-python
とりあえずコンソールでライブラリが入ったか確認
$ python
Python 3.10.2 (main, Jan 27 2022, 21:05:51) [GCC 7.5.0] on linux
>>> import numpy as np
>>> import tensorflow as tf
2022-01-27 23:54:09.997697: W tensorflow/stream_executor/platform/default/dso_loader.cc:64] Could not load dynamic library 'libcudart.so.11.0'; dlerror: libcudart.so.11.0: cannot open shared object file: No such file or directory
2022-01-27 23:54:09.998181: I tensorflow/stream_executor/cuda/cudart_stub.cc:29] Ignore above cudart dlerror if you do not have a GPU set up on your machine.
>>> tf
<module 'tensorflow' from '/mnt/m/home/.anyenv/envs/pyenv/versions/tf-3.10/lib/python3.10/site-packages/tensorflow/__init__.py'>
>>> import cv2
>>> import matplotlib.pyplot as plt
tensorflowのインポート時になんか怒られているが、Tf自体は通っているのでOK(^o^)
お前のPCからNDIVIAのGPU見つからんぞオラみたいな警告だった気がする(RADEON使ってるので・・・)
MNISTでなんかやる。
サクっとtensorflow.keras.datasets.mnist.load_data()でもいいけど、原始的にファイルを落とすことにした。
mkdir -d mnist/download
cd mnist/download
curl http://yann.lecun.com/exdb/mnist/train-images-idx3-ubyte.gz --output train-images.gz
curl http://yann.lecun.com/exdb/mnist/train-labels-idx1-ubyte.gz --output train-labels.gz
curl http://yann.lecun.com/exdb/mnist/t10k-images-idx3-ubyte.gz --output test-images.gz
curl http://yann.lecun.com/exdb/mnist/t10k-labels-idx1-ubyte.gz --output test-labels.gz
gzip -d *.gz
データのフォーマットは以下参照
とりあえず画像はデータ数x28x28の3次元配列にして、matplotlibで描写をしたい
import math
import struct
import warnings

import matplotlib.pyplot as plt
import numpy as np


def load_data(name: str) -> tuple[np.ndarray, np.ndarray]:
    """downloadフォルダに保存されたMNISTの画像とラベルデータを取得する
    Args:
        name(str): ImageとLabelのファイル名にあるプレフィックス train or test
    Returns:
        tuple[ndarray, ndarray]: (画像データ(3次元配列), ラベルデータ(1次元配列))
    """
    f_images = open(f"./download/{name}-images", "rb")
    f_labels = open(f"./download/{name}-labels", "rb")
    (_, img_count) = struct.unpack(">II", f_images.read(8))
    (_, lbl_count) = struct.unpack(">II", f_labels.read(8))
    (row, col) = struct.unpack(">II", f_images.read(8))

    # データをndarray配列に処理し、reshapeをすることで
    # データ数x28x28の画像ファイル配列と、ラベル数のラベル配列を作る
    img_body = np.frombuffer(f_images.read(), "B")
    lbl_body = np.frombuffer(f_labels.read(), "B")
    data = img_body.reshape(img_count, row, col)
    data = data/256
    label = lbl_body.reshape(lbl_count)
    f_images.close()
    f_labels.close()
    return (data, label)


def plot_images(images: np.ndarray, labels: np.ndarray) -> None:
    """画像イメージ複数を並べてプロットする
    Args:
        images (np.ndarray): 画像イメージ配列
        labels (np.ndarray): ラベル配列
    """
    if len(images) != len(labels):
        warnings.warn(f"データ数が一致しません\n画像数:{len(images)} ラベル数:{len(labels)}")
        return

    # 100 => 10x10のように正方形に均す処理
    image_count = len(images)
    col = math.ceil(math.sqrt(image_count))
    row = col - 1 if col * (col - 1) > image_count else col

    plt.figure(figsize=(row, col))
    for i in range(image_count):
        plt.subplot(row, col, i+1)
        plt.xticks([])
        plt.yticks([])
        plt.grid(False)
        plt.imshow(images[i], cmap=plt.cm.binary)
        plt.xlabel(labels[i])
    plt.tight_layout()
    plt.show()


def main():
    (train_images, train_labels) = load_data("train")

    count = 16
    plot_images(train_images[0:count], train_labels[0:count])


if __name__ == "__main__":
    main()

まぁ当然ながら出ました
さてこれを使って早速TensorflowでCNN……
をせずに、sklearnのSVMで肩慣らしをする(なんで??)
ちなみにSVMは過去に勉強した機械学習で唯一なじみがある手法です。SVMも俺の事が一番仲いいと思ってくれているはずだ。
モデル作成関数を作る。パラメータは全部デフォルトにする。本当に仲がいいのか?
あと作ったモデルはとりあえずpickleで保存する。
def create_model(images: np.ndarray, labels: np.ndarray, save_name: str) -> svm.SVC | None:
    """予測モデルを作成する(SVM)
    モデルは名前を付けて保存される

    Returns:
        SVMモデルを返す
    """
    if len(images) != len(labels):
        warnings.warn(
            f"The number of data does not match\nimage: {len(images)} / label: {len(labels)}")
        return
    # svm.SVC(kernel="rbf", C=1, gamma=0.5, random_state=0)
    print("SVM training has begun")
    clf = svm.SVC()
    clf.fit(images, labels)

    print(f"This model has been created under the name \"{save_name}\"!")
    with open(save_name, 'wb') as f:
        pickle.dump(clf, f, protocol=2)

    return clf
先ほどのmain関数を置き換える。
testデータを使用してもいいけど、とりあえずデータ2000個分を1500個を500個に分け、それぞれ訓練データとテストデータに分ける
def main():
    # count = 12
    # plot_images(train_images[0:count], train_labels[0:count])
    DATA_MAX = 2000
    m = 1500
    (train_images, train_labels) = load_data("train")
    train_images = train_images[0:DATA_MAX]
    train_labels = train_labels[0:DATA_MAX]

    flatten_images = np.array(list(map(lambda l: l.flatten(), train_images)))

    predict_images_flatten = flatten_images[m:DATA_MAX]
    train_images_flatten = flatten_images[0:m]
    predict_labels = train_labels[m:DATA_MAX]
    train_labels = train_labels[0:m]

    clf = create_model(train_images_flatten, train_labels, "svm_model.pickle")

    print("SVM predictions has started")
    predict = clf.predict(predict_images_flatten)

    print("-- Result")
    score = metrics.accuracy_score(predict_labels, predict)
    report = metrics.classification_report(predict_labels, predict)
    print("Accuracy: ", score)
    print(report)
結果は94%
何にも考えてない機械学習でも結構いけてますね。
$ python tutorial.py
SVM training has begun
This model has been created under the name "svm_model.pickle"!
SVM predictions has started
-- Result
Accuracy:  0.94
              precision    recall  f1-score   support

           0       0.98      0.92      0.95        51
           1       1.00      1.00      1.00        48
           2       0.98      0.89      0.93        54
           3       0.98      0.98      0.98        49
           4       0.84      0.87      0.85        54
           5       0.93      1.00      0.97        43
           6       0.94      0.98      0.96        59
           7       0.90      0.96      0.93        47
           8       0.97      0.95      0.96        38
           9       0.91      0.88      0.89        57

    accuracy                           0.94       500
   macro avg       0.94      0.94      0.94       500
weighted avg       0.94      0.94      0.94       500
ここまではよくあるチュートリアルで、今までこういう書写ばっかりだったのでイメージがいまいちつきにくかった。何かおまじないが動いているだけでプログラムを書いてる感じしなかったしね。
というわけでさっき作ったモデルを使い、自分で書いた数字を認識させる。
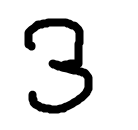
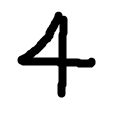
sample1.png
sample2.png
def get_data_by_file(file_name: str) -> np.ndarray:
    """画像データを読み込み、28x28の白黒画像に変換したのち、
    大きさが0~1のndarrayにして返す

    Args:
        file_name (str): 画像データ
    Returns:
        np.ndarray: 画像の二次元配列
    """
    data = cv2.imread(file_name, cv2.IMREAD_GRAYSCALE)
    data = cv2.resize(data, (28, 28))
    data = cv2.bitwise_not(data)
    data = data/256
    return data

def main2():
    data1 = get_data_by_file("sample1.png")
    data2 = get_data_by_file("sample2.png")
    test = np.array([data1.flatten(), data2.flatten()])

    with open("svm_model.pickle", "rb") as f:
        clf = pickle.load(f)
        res = clf.predict(test)

    plot_images(np.array([data1, data2]), res)
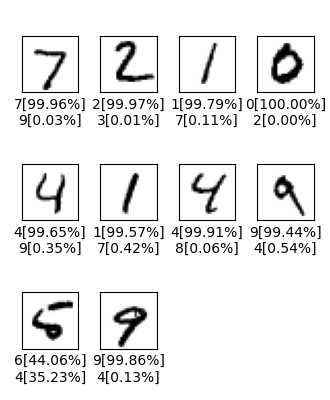
結果はこうなりました

いけましたね!ナイス!
ちなみに訓練数を500個にしたら、4と9を間違えていました。分からなくもない。
Tensorflowを使う。
チュートリアルを参考にCNNでない、普通のDNNを行った。
結局公式サイトのチュートリアルが一番勉強になるな
import numpy as np
import tensorflow as tf
from tensorflow import keras

from tutorial import get_data_by_file, load_data, plot_images


def create_model():
    """Tensorflow Modelを作成する

    Returns:
        作成したモデル
    """
    model = keras.Sequential([
        keras.layers.Flatten(input_shape=(28, 28)),
        keras.layers.Dense(128, activation="relu"),
        keras.layers.Dense(10, activation="softmax")
    ])
    model.compile(optimizer="adam",
                  loss="sparse_categorical_crossentropy",
                  metrics=["accuracy"])
    return model


def main():
    print("Loading data...")
    (train_images, train_labels) = load_data("train")
    (test_images, test_labels) = load_data("test")

    # モデルを作成する
    print("TF Training has begun")
    model = create_model()
    model.fit(train_images, train_labels, epochs=5)

    # モデルの評価をする
    test_loss, test_acc = model.evaluate(test_images, test_labels, verbose=2)
    print('\nTest accuracy:', test_acc)
    print('\nTest loss', test_loss)

    # 予測結果
    predictions = model.predict(test_images)
    result_labels = []

    d = 10
    # ラベルを作る(上位2つ)
    for i in range(d):
        pred = predictions[i]
        # 確率の高い順にインデックスを格納する
        pred_arg_index = np.flip(np.argsort(pred))
        result_labels.append(
            f"{pred_arg_index[0]}[{pred[pred_arg_index[0]]*100:.2f}%]\n"
            f"{pred_arg_index[1]}[{pred[pred_arg_index[1]]*100:.2f}%]"
        )

    plot_images(test_images[0:d], result_labels)


if __name__ == "__main__":
    main()
Epoch 1/5
1875/1875 [==============================] - 3s 1ms/step - loss: 0.2566 - accuracy: 0.9256
Epoch 2/5
1875/1875 [==============================] - 2s 1ms/step - loss: 0.1116 - accuracy: 0.9673
Epoch 3/5
1875/1875 [==============================] - 2s 1ms/step - loss: 0.0764 - accuracy: 0.9768
Epoch 4/5
1875/1875 [==============================] - 2s 1ms/step - loss: 0.0579 - accuracy: 0.9818
Epoch 5/5
1875/1875 [==============================] - 2s 1ms/step - loss: 0.0437 - accuracy: 0.9869
313/313 - 0s - loss: 0.0788 - accuracy: 0.9770 - 331ms/epoch - 1ms/step

Test accuracy: 0.9769999980926514
Test loss 0.07879623770713806
正解率は97.7%くらい。いい感じ。
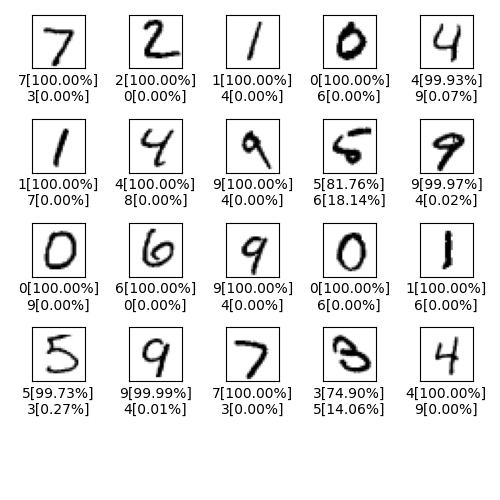
あと結果は以下のようになった
右下のなんやこれ。ξかよ
CNNをしました。GPU使わないと一回の実行がかなり時間がかかる
def create_model_cnn():
    """Tensorflow CNN Modelを作成する

    Returns:
        作成したモデル
    """
    model = keras.Sequential([
        keras.layers.Conv2D(32, (3, 3), activation="relu", input_shape=(28, 28, 1)),
        keras.layers.MaxPooling2D((2, 2)),
        keras.layers.Conv2D(64, (3, 3), activation="relu"),
        keras.layers.MaxPooling2D((2, 2)),
        keras.layers.Conv2D(64, (3, 3), activation="relu"),
        keras.layers.Flatten(),
        keras.layers.Dense(64, activation="relu"),
        keras.layers.Dense(10, activation="softmax")
    ])
    model.compile(optimizer="adam",
                  loss="sparse_categorical_crossentropy",
                  metrics=["accuracy"])
    return model
本当ならモデルはちゃんと考えないといけないんだけど、
基本的に以下の点がポイントかな?
- 活性化関数は大概の場合reluが有効
- 今回みたいな多クラス分類は出力層だけsoftmaxにする(結果を確率にして返せるから)
- 最適化関数は大概はAdamで解決する
結果はこんな感じでした