UnityのSpineアニメーション遷移をAnimation Controllerでやる
はじめに
Unityにはもう何かデフォルトで2Dボーンアニメーションが出来るモノが入っているっぽいですが、何だかんだ流用性とかもあるし私の中ではまだまだSpineが現役です。使いやすいしね!(折角買ったのに勿体なく感じている訳ではない)
さて、UnityでSpineのアニメーション遷移にAnimation Controllerを使うと便利です。
そういった記事は他にもいくつかあるのですが、自分の備忘録として纏めたものを置いておきます。
今回使用するモデルはアークナイツのショウちゃんです。消火器噴射します!

Spine導入
UnityにSpineを導入する記事はもう1000個くらいネットに転がっています。
この辺とかを参考にすればいいと思います。
注意点はAtlasの拡張子をatlas.txtに変えるくらいで他に難しいことはない。
Animator Controllerを作成する
遷移の作成
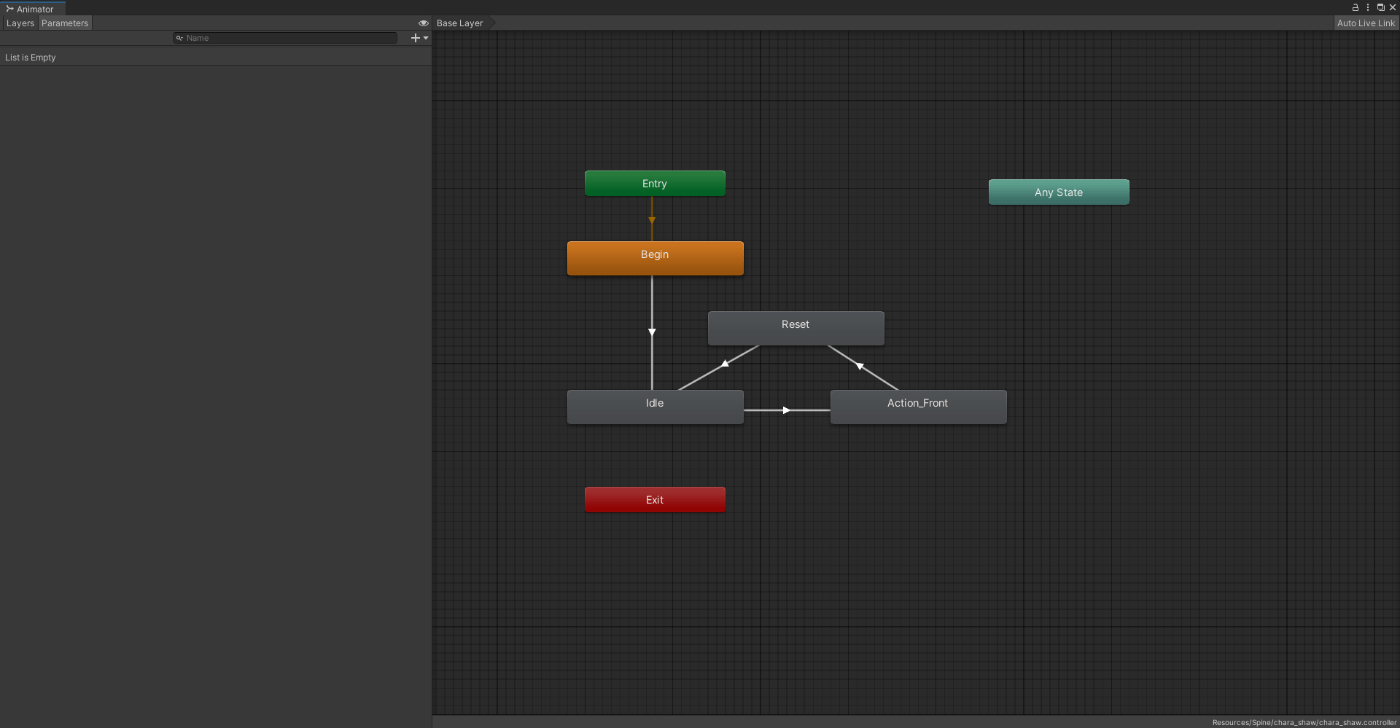
UnityのProjectウィンドウで右クリック⇒Create⇒Animation Controllerより、Animatorを作成しましょう。
今回はBegin(配置)⇒Idle⇒Action_Front(アクション)の簡単な三遷移で行います。
ついでにIdle状態に戻る時はResetのステータスをかまします(特に意味はないかも?)。
Spine用のStateMachineBehaviourの作成
Spineのアニメーションによって遷移を行うためのスクリプトを作成します。
using System.Collections;
using System.Collections.Generic;
using UnityEngine;
using Spine.Unity;

/// <summary>
/// キャラクターのモーション遷移を管理(Spine)
/// </summary>
public class CharactorMotionState : StateMachineBehaviour {
    public string _animationName;
    public bool _loop = false;
    public float _timeScale = 1f;
    SkeletonAnimation _spineAnim;
    Animator _animator;
    bool _instate = false;
    bool _init = false;


    /// <summary>
    /// アニメーション遷移開始とともに、初期設定を行う
    /// </summary>
    public override void OnStateEnter(Animator animator, AnimatorStateInfo stateInfo, int layerIndex) {
        _instate = true;
        if (!_init) {
            _spineAnim = animator.GetComponent<SkeletonAnimation>();
            _animator = animator;
            _spineAnim.state.Complete += OnComplete;

            _init = true;
        }
        _spineAnim.timeScale = _timeScale;
        _spineAnim.state.SetAnimation(0, _animationName, _loop);
    }
    public override void OnStateExit(Animator animator, AnimatorStateInfo stateInfo, int layerIndex) {
        _instate = false;
    }

    /// <summary>
    /// Spineの動作が終了したときの設定
    /// </summary>
    void OnComplete(Spine.TrackEntry entry) {
        if (_instate) {
            // Spineアニメーションが終了したとき、Animator Controllerのトリガーをセットする
            if (_loop == false) {
                _animator.SetTrigger("AnimationEnd");
            }
            else {
                _animator.ResetTrigger("AnimationEnd");
            }
        }
    }
}
アニメーション開始後、OnCompleteでアニメーションの終了を検知し、終了時にはAnimation ControllerのAnimationEndトリガーを付けます。
Animator上でのアニメーション終了検知にAnimationEndを使用します。
Animation Controllerにスクリプトをアタッチ
Animator画面より、StateのAdd Behaviourより先ほど作成したCharactor Motion Stateを追加します。そして、Animation Name(Spineで決めたアニメ名)をインスペクタで入力します。
また、Parametersより、AnimationEndのTriggerと、Action_Frontに遷移する条件の為のFrontActのTriggerを作成しましょう。

Animatorには以下の設定を行っていきます。
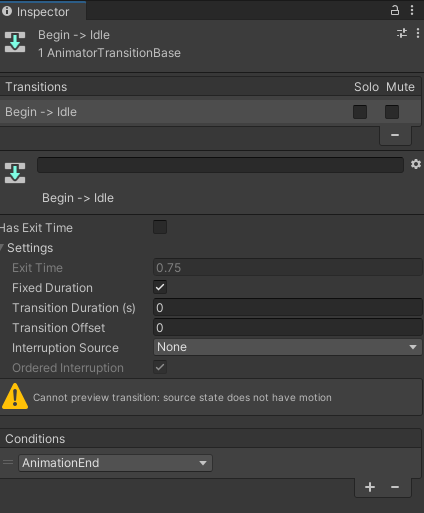
- BeginとAction_Front(ループしないアニメーション)からの遷移条件(Conditions)に、AnimationEndを付ける
- Idleの遷移条件にFrontActを付ける
- Begin、Idle、Action_Frontからの遷移のHas Exit Timeのチェックをオフにする(Spineアニメーションを基準にするため)
- ResetのStateはSpeedをめっちゃ早くし、遷移のExit Timeを0にする
- お好みでTransit Durationも0にする
例として、Begin⇒Idleの遷移はこんな感じになります。
じゃあ動かすか……
シーンに配置したSpineキャラクターに、先ほど作成したAnimation Controllerを接続します。
Add Component⇒Animatorより、Animatorを作成し、Controllerに先ほど設置したAnimation Controllerを設定。
実際にプレイすると……
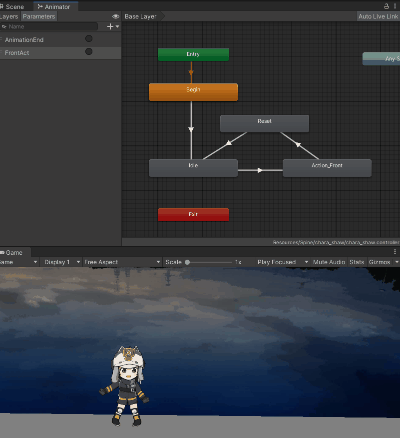
かわいいね!
FrontActionのTriggerをクリックすることで、綺麗にAction_Frontへと遷移してくれました。
あとはUpdate関数に適当に書いたスクリプトでもアタッチすればOKでしょう。
public class Player : MonoBehaviour {
    private SkeletonAnimation _spine;
    private Animator _animator;

    void Start() {
        _spine = GetComponent<SkeletonAnimation>();
        _animator = GetComponent<Animator>();
    }

    // Update is called once per frame
    void Update() {
        if (_animator.GetCurrentAnimatorStateInfo(0).IsName("Idle") && Input.GetKeyDown(KeyCode.Space) == true) {
            _animator.SetTrigger("FrontAct");
            Debug.Log("SHOT!");
        }
    }
}
スペースを押せばアクションをします。
おわりに
遷移のトリガー条件を増やせば、歩行やジャンプ動作のアニメーション遷移もらくちんになります。
ショウちゃん動かしたゲーム何かできるといいな!
Discussion