[SwiftUI][TCA] Navigation
概要
この記事ではTCA初心者の筆者が理解を深めていくために、
pointfreeco公式のサンプルアプリを基に理解しやすく整理していきます。
今回から3章として03-Navigationの内容を整理していきます。
前回2章のEffectについての記事はこちら
今回扱うファイル
今回は公式サンプルの以下のファイルです。
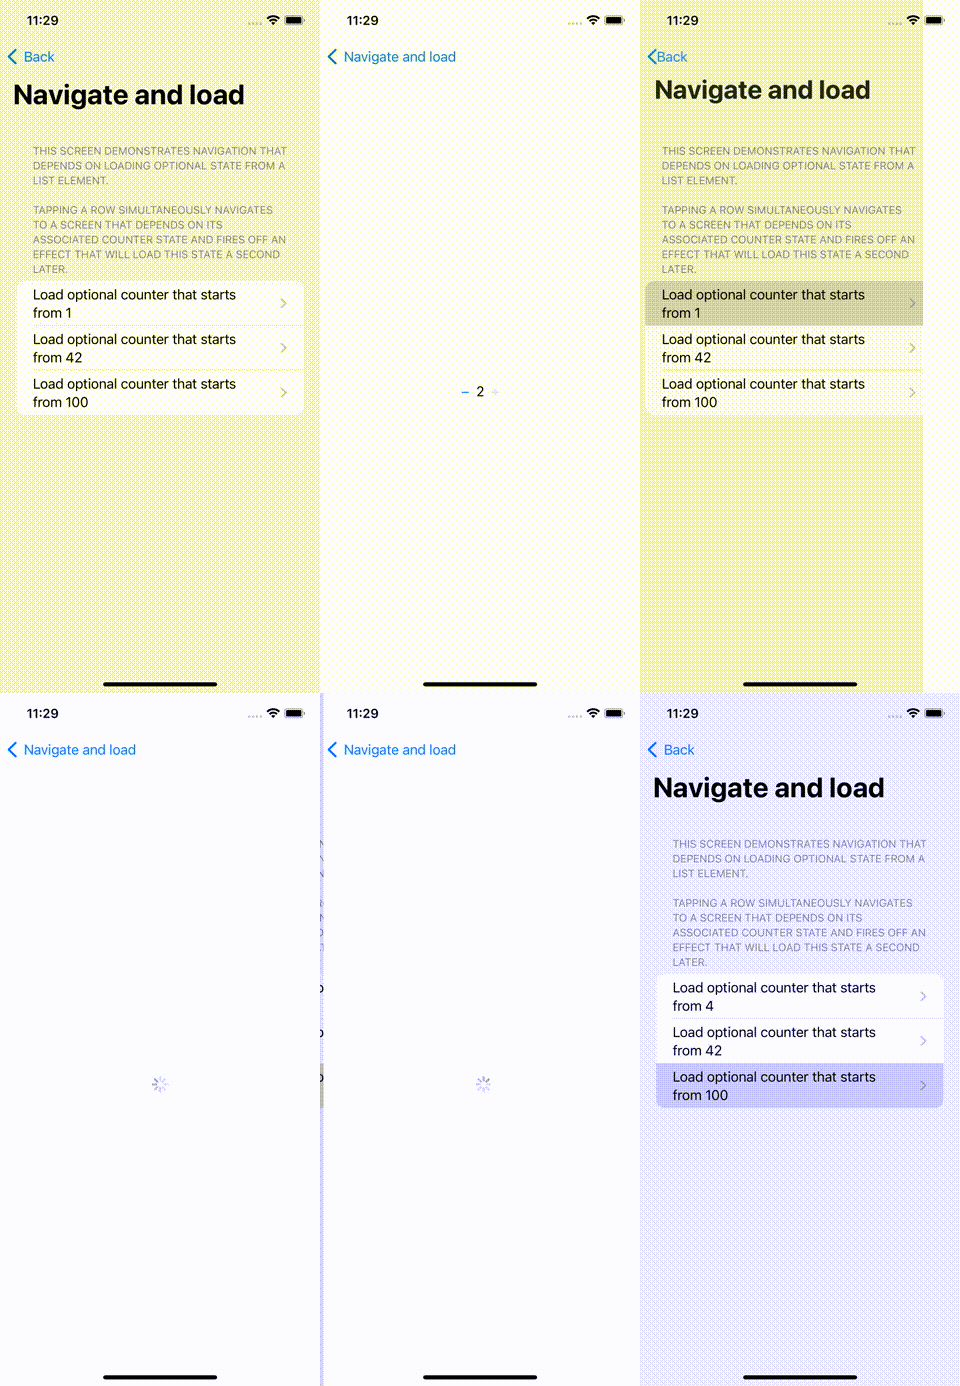
NavigateAndLoadList
3つのListに書かれている1,42,100という数字を、
遷移先のCounterViewに渡しており、
また遷移先のCounterViewで値を増減させると、
戻ってきた際にも値が反映されているという機能です。

State,Action
ここでのポイントは変数selectionの生成です。
IdentifiedというのはIDとValueを持つ構造体です。
今回はそのValueにCounterStateを保持しています。
struct NavigateAndLoadListState: Equatable {
  var rows: IdentifiedArrayOf<Row> = [
    .init(count: 1, id: UUID()),
    .init(count: 42, id: UUID()),
    .init(count: 100, id: UUID()),
  ]
  var selection: Identified<Row.ID, CounterState?>?

  struct Row: Equatable, Identifiable {
    var count: Int
    let id: UUID
  }
}

enum NavigateAndLoadListAction: Equatable {
  case counter(CounterAction)
  case setNavigation(selection: UUID?)
  case setNavigationSelectionDelayCompleted
}
Environment
今回EnvironmentではSchedulerのみの定義なので割愛します。
Reducer
まずReducerの作り方から少し難しく見えますので整理します。
counterReducerというのは元々以下の定義なので、
let counterReducer = Reducer<CounterState, CounterAction, CounterEnvironment>
まずそれをoptionalメソッドでoptional化し、
pullbackメソッドでIdentified.value(CounterState?)のReducerを作ります。
ただまだ問題があり、
変数selectionの型はIdentifiedのOptional型です。
よってこれもOptionalを許容するReducerに変換する必要があります。
なので再度optionalメソッドでoptional化・pullbackメソッドで今回使用したいReducerを作ります。
let navigateAndLoadListReducer =
  counterReducer
  .optional()
  .pullback(state: \Identified.value, action: .self, environment: { $0 })
  .optional()
  .pullback(
    state: \NavigateAndLoadListState.selection,
    action: /NavigateAndLoadListAction.counter,
    environment: { _ in CounterEnvironment() }
  )
続いて各Action内の実装を見ていきます。
ポイントはsetNavigationと、
その後Effect(value:)で呼ばれるsetNavigationSelectionDelayCompletedです。
setNavigation
Action時の定義は以下でした。
case setNavigation(selection: UUID?)
引数にユニークなID(UUID)が存在する(Optional)かどうかで処理も分けられています。
- 引数のUUIDが存在する場合
- selectionにIdentifiedのValueをnil、idに持ってきた引数のIDを入れています。
state.selection = Identified(nil, id: id) - 1秒後にsetNavigationSelectionDelayCompletedを呼び出します。
case let .setNavigation(selection: .some(id)):
        state.selection = Identified(nil, id: id)

        return Effect(value: .setNavigationSelectionDelayCompleted)
          .delay(for: 1, scheduler: environment.mainQueue)
          .eraseToEffect()
          .cancellable(id: CancelId())
- 引数のUUIDがnilの場合
stateのselectionをアンラップ、
stateのselectionのvalue?.count(CounterStateのcountの値)もアンラップし、
stateのrows(初期化時1・42・100のcount)に値を入れています。
整理すると今回Navigation遷移先のCounterViewのCounterStateのcountの値が、
rowsのcountに入ります。(state.rows[id: selection.id]?.count)
この処理でViewで表示されるNavigationLinkのセルの数字がBindされてます。
case .setNavigation(selection: .none):
        if let selection = state.selection, let count = selection.value?.count {
          state.rows[id: selection.id]?.count = count
        }
        state.selection = nil
        return .cancel(id: CancelId())
setNavigationSelectionDelayCompleted
まずstate.selection?.idに値があることを確認し、
続いてstate.selection?.valueにCounterStateを入れます。
その代入するCounterStateのパラメータが、
state.rows[id: id]?.count
先ほどのsetNavigationのアクション内で値を入れてた箇所となります。
これまでの流れを整理するため値の流れについてはViewの部分で記載します。
case .setNavigationSelectionDelayCompleted:
        guard let id = state.selection?.id else { return .none }
        state.selection?.value = CounterState(count: state.rows[id: id]?.count ?? 0)
        return .none
View,Store
ここで見るべきポイントとしてNavigationLink内に絞って流れを整理します。
-
viewStore.rowsに1・42・100のcountが入ったIdentifiedArrayOfがあります。 - 各Rowの値を反映したNavigationLinkを作成します。
- 例として42のRowのNavigationLinkを押下するとします。
- まずdestinationでStateではstate: .selection?.valueを見ています。(.selection?.valueとはCounterState?のこと。)
- CounterState?はOptionalなので値が確認出来たらthen:がコールされます。
-
CounterView.init(store:)ここの引数store:にはself.store.scopeが入ります。(CounterStateが\.selection?.valueでCounterActionはNavigateAndLoadListAction.counter) - ここまででdestinationで表示したいCounterViewを生成出来ました。
- あとはtag:でユニークな数字を、selection:でBindingをします。
- Bindingではまず
\.selection?.idからユニークな数字をgetします。参照元はRow.IDです。 - 次にsendでsetNavigationアクションを送ります。引数は
\.selection?.idの値です。 - ですのでまず上記3番のイベントの際は、必ず何かしらのIDがあるはずなので、
.setNavigation(selection: .some(id))が呼ばれます。 - そうすると最終的にsetNavigationSelectionDelayCompletedアクションが呼ばれるので、その際に
- 逆に遷移先のCounterViewから戻る際は、IDが無いので
.setNavigation(selection: .none)が呼ばれます。(ここら辺はよくあるisActiveやisPresentedの使い方と似てますね。)
struct NavigateAndLoadListView: View {
  let store: Store<NavigateAndLoadListState, NavigateAndLoadListAction>

  var body: some View {
    WithViewStore(self.store) { viewStore in
      Form {
        Section(header: Text(readMe)) {
          ForEach(viewStore.rows) { row in
            NavigationLink(
              destination: IfLetStore(
                self.store.scope(
                  state: \.selection?.value,
                  action: NavigateAndLoadListAction.counter
                ),
                then: CounterView.init(store:),
                else: ProgressView.init
              ),
              tag: row.id,
              selection: viewStore.binding(
                get: \.selection?.id,
                send: NavigateAndLoadListAction.setNavigation(selection:)
              )
            ) {
              Text("Load optional counter that starts from \(row.count)")
            }
          }
        }
      }
    }
    .navigationBarTitle("Navigate and load")
  }
}
Discussion