[SwiftUI][TCA] OptionalState、Stateの共有
概要
この記事ではTCA初心者の筆者が理解を深めていくために、
pointfreeco公式のサンプルアプリを基に理解しやすく整理していきます。
今回はbindingの使用例を整理して理解していきます。
今回扱うファイル
今回は公式サンプルの以下の2つのファイルです。
OptionalState
SharedState
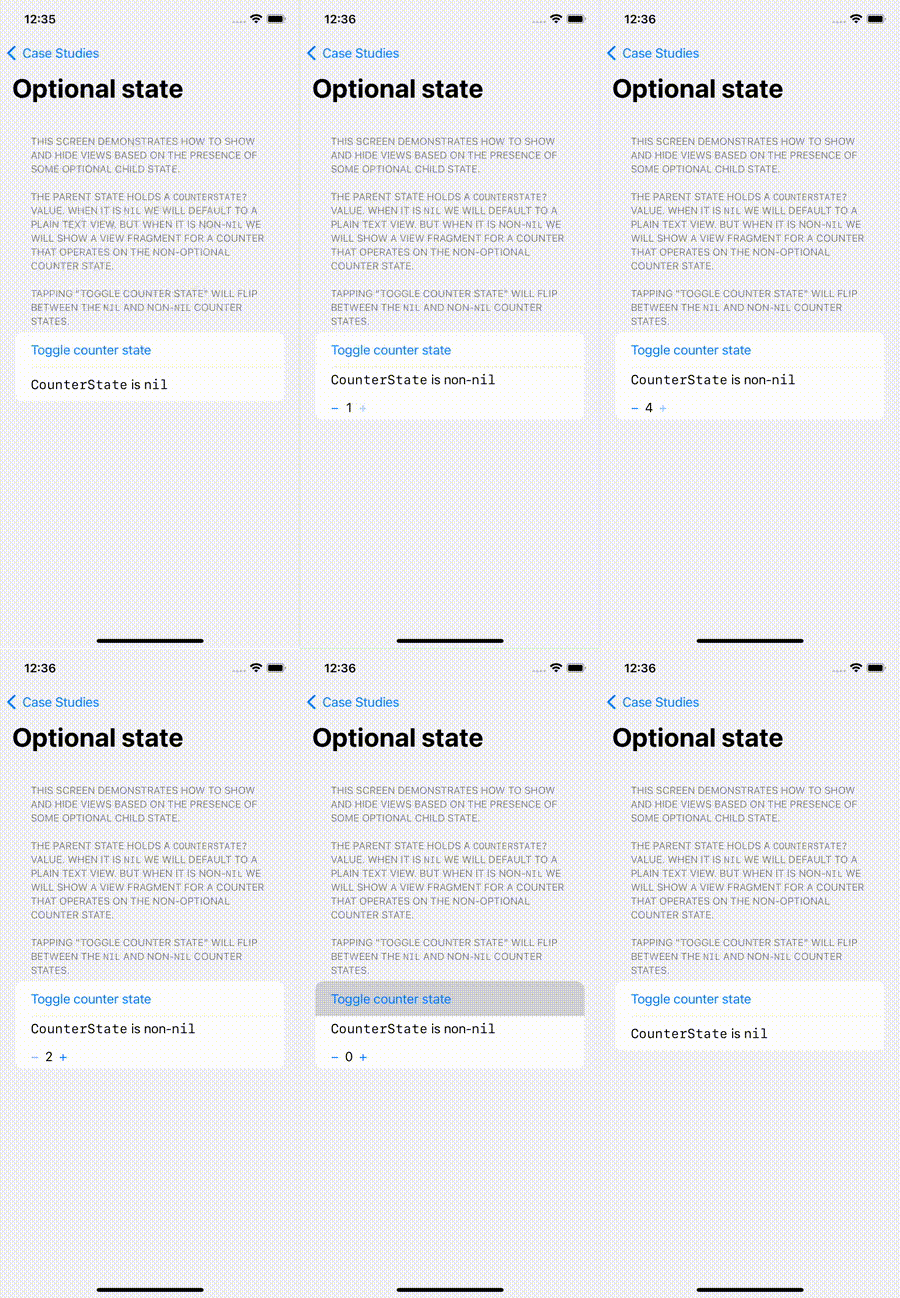
OptionalState

State,Action
今回の場合StateのoptionalCounterが、
optional型であるが1つポイントとなります。
そのoptional型Stateの扱い方をここでは整理していきます。
struct OptionalBasicsState: Equatable {
  var optionalCounter: CounterState? // optional型
}

enum OptionalBasicsAction: Equatable {
  case optionalCounter(CounterAction)
  case toggleCounterButtonTapped
}
Reducer
toggleCounterButtonTappedのActionがコールされた際に、
Stateの更新の部分でoptionalの場合を考慮していて、
nilの場合はCounterStateを入れ、non-nilの場合はnilを入れています。
let optionalBasicsReducer =
  counterReducer
  .optional() // ポイント
  .pullback(
    state: \.optionalCounter,
    action: /OptionalBasicsAction.optionalCounter,
    environment: { _ in CounterEnvironment() }
  )
   // ポイント
  .combined(
    with: Reducer<
      OptionalBasicsState, OptionalBasicsAction, OptionalBasicsEnvironment
    > { state, action, environment in
      switch action {
      case .toggleCounterButtonTapped:
      // optionalの場合を考慮
        state.optionalCounter =
          state.optionalCounter == nil
          ? CounterState()
          : nil
        return .none
      case .optionalCounter:
        return .none
      }
    }
  )
そしてここでのポイントである、
optional()とcombined(with:)について整理します。
optional
optional()についての公式ドキュメントです。
ドキュメントには以下の説明記載がされています。
非オプションの状態に対して動作するリデューサを、 オプションでない状態に対して動作するリデューサに変換し、 state が non-nil のときだけ非オプションのリデューサを実行します。
pullback(state:action:environment:) と一緒に使うと、非オプショナルな子ドメインのリデューサを、 オプショナルな子ドメインを含む親ドメインのリデューサと結合できるリデューサに変換できることがよくある。
combined(with:)
combined(with:)についての公式ドキュメントです。
親の前に子が結合されるcombineに対して、
combined(with:)は親の前に子が実行されます。
View,Store
ここでのポイントはIfLetStoreを使用し、
Stateのnil判定を行なっている部分となります。
  var body: some View {
    WithViewStore(self.store) { viewStore in
      Form {
        Section(header: Text(template: readMe, .caption)) {
          Button("Toggle counter state") {
            viewStore.send(.toggleCounterButtonTapped)
          }
                    // ポイント
          IfLetStore(
            self.store.scope(
              state: \.optionalCounter,
              action: OptionalBasicsAction.optionalCounter
            ),
            then: { store in
              VStack(alignment: .leading, spacing: 16) {
                Text(template: "`CounterState` is non-`nil`", .body)
                CounterView(store: store)
                  .buttonStyle(.borderless)
              }
            },
            else: {
              Text(template: "`CounterState` is `nil`", .body)
            }
          )
        }
      }
    }
    .navigationBarTitle("Optional state")
  }
ポイントである、IfLetStoreについて整理します。
IfLetStore
Stateのnil判定でnon-nilの場合thenクロージャが実行され、
そうでない場合はelseクロージャが実行されます。
使い道としてはStateの状態によって、表示する2つのViewを決定するのに便利です。
今回のケースで言うと、
non-nilのthenクロージャ内ではCounterViewを表示し、
nilのelseクロージャ内ではTextを表示するように制御されています。
SharedState
これまでより少し複雑なので簡単に今回の仕様を整理しておきます。
まず画面上部のセグメントタブで2つの画面を出し分けています。
初期表示のSharedStateCounterViewでは、
これまでのようなCounter機能と、
Counterの数字が素数かどうか判定するボタンがあります。
もう一つのSharedStateProfileViewでは、
Counterの現在の数字と、
表示した数字の最大・最小の数字を表示と、
インクリメント、デクリメントボタンを押した総回数を表示し、
Counterの状態をinitするリセットボタンがあります。

State,Action
まずSharedStateが今回の共通のStateで、
その子としてCounterStateとProfileStateを2つ定義しています。
ポイントとしてはProfileStateで1つcountという値を例に挙げると、
self.counter.count
このようにCounterStateから参照していることで、
CounterStateの値が更新されることで、
ProfileStateのcountなどの値も更新されるようになっています。
struct SharedState: Equatable {
  var counter = CounterState()
  var currentTab = Tab.counter

  enum Tab { case counter, profile }

  struct CounterState: Equatable {
    var alert: AlertState<SharedStateAction.CounterAction>?
    var count = 0
    var maxCount = 0
    var minCount = 0
    var numberOfCounts = 0
  }

  // The ProfileState can be derived from the CounterState by getting and setting the parts it cares
  // about. This allows the profile feature to operate on a subset of app state instead of the whole
  // thing.
  var profile: ProfileState {
    get {
      ProfileState(
        currentTab: self.currentTab,
        count: self.counter.count,// ポイント
        maxCount: self.counter.maxCount,
        minCount: self.counter.minCount,
        numberOfCounts: self.counter.numberOfCounts
      )
    }
    set {
      self.currentTab = newValue.currentTab
      self.counter.count = newValue.count
      self.counter.maxCount = newValue.maxCount
      self.counter.minCount = newValue.minCount
      self.counter.numberOfCounts = newValue.numberOfCounts
    }
  }

  struct ProfileState: Equatable {
    private(set) var currentTab: Tab
    private(set) var count = 0
    private(set) var maxCount: Int
    private(set) var minCount: Int
    private(set) var numberOfCounts: Int

    fileprivate mutating func resetCount() {
      self.currentTab = .counter
      self.count = 0
      self.maxCount = 0
      self.minCount = 0
      self.numberOfCounts = 0
    }
  }
}

enum SharedStateAction: Equatable {
  case counter(CounterAction)
  case profile(ProfileAction)
  case selectTab(SharedState.Tab)

  enum CounterAction: Equatable {
    case alertDismissed
    case decrementButtonTapped
    case incrementButtonTapped
    case isPrimeButtonTapped
  }

  enum ProfileAction: Equatable {
    case resetCounterButtonTapped
  }
}
Reducer
上記Stateの説明で記載したように、
ProfileStateはCounterStateの値を参照しています。
まずはCounter画面のReducerです。
ここではこれまでのCounter機能と同じように、
インクリメント、デクリメントボタンのアクションと、
素数を求めるPrimeButtonのアクションから、
CounterStateの値を更新しています。
let sharedStateCounterReducer = Reducer<
  SharedState.CounterState, SharedStateAction.CounterAction, Void
> { state, action, _ in
  switch action {
  case .alertDismissed:
    state.alert = nil
    return .none

  case .decrementButtonTapped:
    state.count -= 1
    state.numberOfCounts += 1
    state.minCount = min(state.minCount, state.count)
    return .none

  case .incrementButtonTapped:
    state.count += 1
    state.numberOfCounts += 1
    state.maxCount = max(state.maxCount, state.count)
    return .none

  case .isPrimeButtonTapped:
    state.alert = .init(
      title: isPrime(state.count)
        ? .init("👍 The number \(state.count) is prime!")
        : .init("👎 The number \(state.count) is not prime :(")
    )
    return .none
  }
}
次にProfile画面のReducerです。
resetCounterButtonのアクションから、
ProfileStateのresetCount()をコールし、
初期状態にStateの値を戻すだけとなっています。
ProfileStateの他のStateに関しては、
CounterStateの値を参照してるので、
特にProfile画面でのアクションには必要がありません。
let sharedStateProfileReducer = Reducer<
  SharedState.ProfileState, SharedStateAction.ProfileAction, Void
> { state, action, _ in
  switch action {
  case .resetCounterButtonTapped:
    state.resetCount()
    return .none
  }
}
最後に今回の共通部分のReducerです。
前の2つのReducerをcombineし、
セグメントタブ切り替えのアクションのみStateの更新を行います。
let sharedStateReducer = Reducer<SharedState, SharedStateAction, Void>.combine(
  sharedStateCounterReducer.pullback(
    state: \SharedState.counter,
    action: /SharedStateAction.counter,
    environment: { _ in () }
  ),
  sharedStateProfileReducer.pullback(
    state: \SharedState.profile,
    action: /SharedStateAction.profile,
    environment: { _ in () }
  ),
  Reducer { state, action, _ in
    switch action {
    case .counter, .profile:
      return .none
    case let .selectTab(tab):
      state.currentTab = tab
      return .none
    }
  }
)
View,Store
SharedStateViewでは、
今回の親Viewとして、
セグメントタブと2つのViewをStateで判定し表示しています。
struct SharedStateView: View {
  let store: Store<SharedState, SharedStateAction>

  var body: some View {
    WithViewStore(self.store.scope(state: \.currentTab)) { viewStore in
      VStack {
        Picker(
          "Tab",
          selection: viewStore.binding(send: SharedStateAction.selectTab)
        ) {
          Text("Counter")
            .tag(SharedState.Tab.counter)

          Text("Profile")
            .tag(SharedState.Tab.profile)
        }
        .pickerStyle(.segmented)

        if viewStore.state == .counter {
          SharedStateCounterView(
            store: self.store.scope(state: \.counter, action: SharedStateAction.counter))
        }

        if viewStore.state == .profile {
          SharedStateProfileView(
            store: self.store.scope(state: \.profile, action: SharedStateAction.profile))
        }

        Spacer()
      }
    }
    .padding()
  }
}
SharedStateCounterViewは、
主にCounter機能の各種アクションを送っています。
ここではCounterStateの値のみで状態管理が完結しています。
struct SharedStateCounterView: View {
  let store: Store<SharedState.CounterState, SharedStateAction.CounterAction>

  var body: some View {
    WithViewStore(self.store) { viewStore in
      VStack(spacing: 64) {
        Text(template: readMe, .caption)

        VStack(spacing: 16) {
          HStack {
            Button("−") { viewStore.send(.decrementButtonTapped) }

            Text("\(viewStore.count)")
              .font(.body.monospacedDigit())

            Button("+") { viewStore.send(.incrementButtonTapped) }
          }

          Button("Is this prime?") { viewStore.send(.isPrimeButtonTapped) }
        }
      }
      .padding(16)
      .frame(minWidth: 0, maxWidth: .infinity, minHeight: 0, maxHeight: .infinity, alignment: .top)
      .navigationBarTitle("Shared State Demo")
      .alert(self.store.scope(state: \.alert), dismiss: .alertDismissed)
    }
  }
}
SharedStateProfileViewでは、
CounterStateの値を参照するStateから表示する値を取得しており、
ProfileStateの値のみで状態管理をしているコンポーネントがありません。
CounterStateの値を参照することで今回の目的である、
共通のStateを利用することが出来る様になっています。
struct SharedStateProfileView: View {
  let store: Store<SharedState.ProfileState, SharedStateAction.ProfileAction>

  var body: some View {
    WithViewStore(self.store) { viewStore in
      VStack(spacing: 64) {
        Text(
          template: """
            This tab shows state from the previous tab, and it is capable of reseting all of the \
            state back to 0.

            This shows that it is possible for each screen to model its state in the way that makes \
            the most sense for it, while still allowing the state and mutations to be shared \
            across independent screens.
            """,
          .caption
        )

        VStack(spacing: 16) {
          Text("Current count: \(viewStore.count)")
          Text("Max count: \(viewStore.maxCount)")
          Text("Min count: \(viewStore.minCount)")
          Text("Total number of count events: \(viewStore.numberOfCounts)")
          Button("Reset") { viewStore.send(.resetCounterButtonTapped) }
        }
      }
      .padding(16)
      .frame(minWidth: 0, maxWidth: .infinity, minHeight: 0, maxHeight: .infinity, alignment: .top)
      .navigationBarTitle("Profile")
    }
  }
}
Stateの共有
今回のサンプルの場合ProfileStateはCounterStateの値を参照しているので、
共通のStateを使用しているというと少し自分の思っていた形とは違っていました。
今回の実装で言えばSharedStateで共通のStateを保持し、
SharedStateだけで各画面の状態管理が出来れば、
同じStateを各画面から参照・更新するというStateの共有と言う本来の目的に沿うかなと感じました。
次回
次回はAlertとDialogについて理解していきます。
記事はこちら
Discussion