C# - ComboBox - 右詰め 3桁カンマ区切り
はじめに
ComboBox、数値の場合には右詰め表示としたいですよね。
本記事では、3桁カンマ区切り数値で右詰めとする手法を記載します。
テスト環境
ここに記載した情報/ソースコードは、Visual Studio Community 2022 を利用した下記プロジェクトで生成したモジュールを Windows 11 24H2 で動作確認しています。
- Windows Forms - .NET Framework 4.8
- Windows Forms - .NET 8
- WPF - .NET Framework 4.8
- WPF - .NET 8
Windows Forms
ComboBox.DropDownStyle で DropDownList と DropDown の切り替えます。
DropDownList
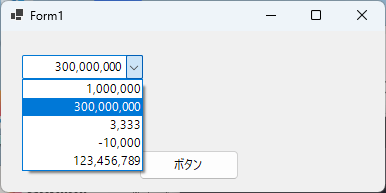
Windows Forms の場合、ComboBox.DrawMode = DrawMode.OwnerDrawFixed として、DrawItem イベントハンドラで、StringFormat を用いて右詰め描画する必要があります。
public partial class Form1 : Form
{
  public Form1()
  {
    InitializeComponent();

    // デザイナで ComboBox comboBox1 を配置
    comboBox1.DrawMode = DrawMode.OwnerDrawFixed; // カスタム描画モード
    comboBox1.DropDownStyle = ComboBoxStyle.DropDownList;
    comboBox1.Items.AddRange(new object[]
    {
      1000000, 300000000, 3333, -10000, 123456789
    });
    // comboBox1.FormatString = "N0";  // DrawMode.OwnerDrawFixed 時は無効
    comboBox1.DrawItem += comboBox_DrawItem;
  }
  // .NET Framework 時 object? の ? 不要
  private void comboBox_DrawItem(object? sender, DrawItemEventArgs e)
  {
    if (sender is ComboBox cbox)
    {
      if (e.Font != null && e.Index >= 0)
      {
        // 背景描画
        e.DrawBackground();
        // 数値の場合 3桁カンマ区切り反映
        string text;
        var obj = cbox.Items[e.Index];
        if (obj is int number)
        {
          text = number.ToString("N0");
        }
        else
        {
          text = obj?.ToString() ?? string.Empty;
        }
        // テキスト描画
        using (Brush textBrush = new SolidBrush(e.ForeColor))
        using (var textFormat = new StringFormat())
        {
          textFormat.Alignment = StringAlignment.Far;        // 水平方向:右寄せ
          textFormat.LineAlignment = StringAlignment.Center; // 垂直方向:中央寄せ
          e.Graphics.DrawString(text, e.Font, textBrush, e.Bounds, textFormat);
        }
        // フォーカス矩形描画
        e.DrawFocusRectangle();
      }
    }
  }
}
DropDown
ComboBox.RightToLeft = RightToLeft.Yes で右詰め、Leaveイベントで 3桁カンマ区切りとすることができますが、一覧表示リスト展開ボタンが左配置となってしまいます。

public Form1()
{
  InitializeComponent();

  // デザイナで ComboBox comboBox1 を配置
  comboBox1.DrawMode = DrawMode.OwnerDrawFixed;     // カスタム描画モード
  comboBox1.DropDownStyle = ComboBoxStyle.DropDown; // TODO:DropDownに変更
  comboBox1.Items.AddRange(new object[]
  {
    1000000, 300000000, 3333, -10000, 123456789
  });
  // comboBox1.FormatString = "N0";  // DrawMode.OwnerDrawFixed 時は無効
  comboBox1.DrawItem += comboBox_DrawItem;

  // TODO:下記処理を追加
  comboBox1.RightToLeft = RightToLeft.Yes;
  comboBox1.Leave += ComboBox_Leave;
}
<中略>
// .NET Framework 時 object? の ? 不要
private void ComboBox_Leave(object? sender, EventArgs e)
{
  if (sender is ComboBox cbox && !string.IsNullOrEmpty(cbox.Text)
   && Int64.TryParse(cbox.Text.Trim().Replace(",", ""), out Int64 value))
  {
    cbox.Text = value.ToString("N0");
  }
}
一覧表示リスト展開ボタン左配置は、不自然ですよね、、、
右配置のまま、編集、もしくは、選択した値を右詰めとするには、ComboBox 編集領域(TextBox)に対する操作が必要となります。
Leave、HandleCreated などのイベントで、ComboBox.Controls[] としてアクセス可能かを確認しましたが、期待通りの動作は得られませんでした。
下記情報通りに、カスタムコントール化が必要ということですね。(コード提示は割愛します)
WPF
Windows Forms の ComboBox では、ComboBox.DropDownStyle で DropDownList と DropDown を切り替えていましたが、WPF では IsEditable を False(DropDownList)True(DropDown)で切り替えます。
DropDownList
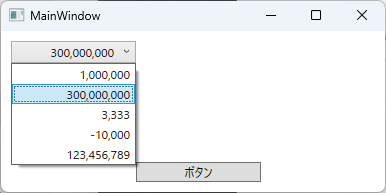
右寄せは、ComboBox.HorizontalContentAlignment(選択した値)と <ComboBox.ItemTemplate>(選択値) で行います。
MVVM モデルは割愛して、単純にコードビハインドでデータを指定する方法を記載します。
<Window x:Class="WpfApp1.MainWindow"
    xmlns="http://schemas.microsoft.com/winfx/2006/xaml/presentation"
    xmlns:x="http://schemas.microsoft.com/winfx/2006/xaml"
    xmlns:d="http://schemas.microsoft.com/expression/blend/2008"
    xmlns:mc="http://schemas.openxmlformats.org/markup-compatibility/2006"
    xmlns:local="clr-namespace:WpfApp1"
    mc:Ignorable="d"
    Title="MainWindow" Height="200" Width="400">
  <Grid Margin="10" >
    <Grid.RowDefinitions>
      <RowDefinition Height="*" />
      <RowDefinition Height="Auto" />
    </Grid.RowDefinitions>
    <!-- SelectedItem に対する指定:HorizontalContentAlignment -->
    <ComboBox x:Name="comboBox1" Grid.Row="0" Width="125"
              IsEditable="False" IsReadOnly="False"
              HorizontalAlignment="Left" VerticalAlignment="Top"
              HorizontalContentAlignment="Right"
              Loaded="comboBox_Loaded">
      <ComboBox.ItemTemplate>
        <DataTemplate>
          <TextBlock Text="{Binding StringFormat={}{0:N0}}" HorizontalAlignment="Right"/>
        </DataTemplate>
      </ComboBox.ItemTemplate>
    </ComboBox>
    <!-- ComboBox の LostFocus 挙動確認用にコントール配置 -->
    <Button x:Name="button1" Grid.Row="1"
            Width="125" Height="20" Content="ボタン"
            HorizontalAlignment="Center" VerticalAlignment="Bottom"/>
  </Grid>
</Window>
// .NET Framework 時は object? の ? 不要
private void comboBox_Loaded(object? sender, RoutedEventArgs e)
{
  if (sender is ComboBox cbox)
  {
    cbox.ItemsSource = new List<int> { 1000000, 300000000, 3333, -10000, 123456789 };
  }
}
DropDown
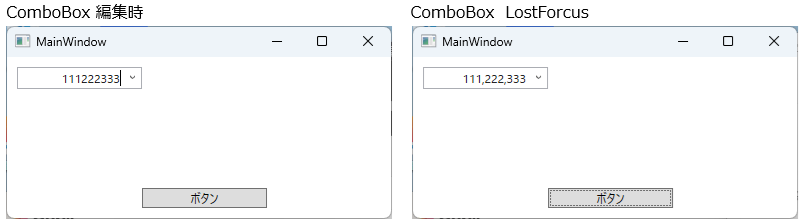
DropDown の場合、前述コードに対して LostFocus で 3桁カンマ区切り整形の処理を追加します。
<Window x:Class="WpfApp1.MainWindow"
    xmlns="http://schemas.microsoft.com/winfx/2006/xaml/presentation"
    xmlns:x="http://schemas.microsoft.com/winfx/2006/xaml"
    xmlns:d="http://schemas.microsoft.com/expression/blend/2008"
    xmlns:mc="http://schemas.openxmlformats.org/markup-compatibility/2006"
    xmlns:local="clr-namespace:WpfApp1"
    mc:Ignorable="d"
    Title="MainWindow" Height="200" Width="400">
  <Grid Margin="10" >
    <Grid.RowDefinitions>
      <RowDefinition Height="*" />
      <RowDefinition Height="Auto" />
    </Grid.RowDefinitions>
    <!-- SelectedItem に対する指定:HorizontalContentAlignment -->
    <ComboBox x:Name="comboBox1" Grid.Row="0" Width="125"
              IsEditable="False" IsReadOnly="False"
              HorizontalAlignment="Left" VerticalAlignment="Top"
              HorizontalContentAlignment="Right"
              Loaded="comboBox_Loaded" LostFocus="comboBox_LostFocus">
      <ComboBox.ItemTemplate>
        <DataTemplate>
          <TextBlock Text="{Binding StringFormat={}{0:N0}}" HorizontalAlignment="Right"/>
        </DataTemplate>
      </ComboBox.ItemTemplate>
    </ComboBox>
    <!-- ComboBox の LostFocus 挙動確認用にコントール配置 -->
    <Button x:Name="button1" Grid.Row="1"
            Width="125" Height="20" Content="ボタン"
            HorizontalAlignment="Center" VerticalAlignment="Bottom"/>
  </Grid>
</Window>
// .NET Framework 時は object? の ? 不要
private void comboBox_Loaded(object? sender, RoutedEventArgs e)
{
  if (sender is ComboBox cbox)
  {
    cbox.ItemsSource = new List<int> { 1000000, 300000000, 3333, -10000, 123456789 };
  }
}
// .NET Framework 時は object? の ? 不要
private void comboBox_LostFocus(object? sender, RoutedEventArgs e)
{
  if (sender is ComboBox cbox && !string.IsNullOrEmpty(cbox.Text)
   && Int64.TryParse(cbox.Text.Trim().Replace(",", ""), out Int64 value))
  {
    cbox.Text = value.ToString("N0"); // 3桁カンマ区切り
  }
}
出典
本記事は、2025/07/01 Qiita 投稿記事の転載です。
Discussion