Flutter v1.22.0からv2.2.0に上げた時の修正メモ
Flutter v1.22.0のプロジェクトをv2.2.0にするとnull-safetyを中心に大量のbreaking changeによってコンパイルエラーやwarningが出る。このメモはそれらをどのように修正したか記録するメモ。
基本的には以下の手順に従って移行しています。
以下のコマンドによって依存している全てのパッケージがnull-safetyに対応したバージョンをリリースしていることを確認する。
$ .fvm/flutter_sdk/bin/dart pub outedated --null-safety
次に、pubspec.yamlに書かれているパッケージをnull-safetyに対応したバージョンに上げる。
$ .fvm/flutter_sdk/bin/dart pub upgrade --null-safety
公式によると dart migrate によるマイグレートが推奨されているので試してみる。
$ .fvm/flutter_sdk/bin/dart migrate

See https://dart.dev/go/null-safety-migration for a migration guide.

Analyzing project...

Bad state: Error: package has unmigrated dependencies.

Before migrating your package, we recommend ensuring that every library it
imports (either directly or indirectly) has been migrated to null safety, so
that you will be able to run your unit tests in sound null checking mode.  You
are currently importing the following non-null-safe libraries:

  package:sputnik/config/app_config.dart
  ...
  package:sputnik/utils/string_to_base64.dart

Please upgrade the packages containing these libraries to null safe versions
before continuing.  To see what null safe package versions are available, run
the following command: `dart pub outdated --mode=null-safety`.

To skip this check and try to migrate anyway, re-run with the flag
`--skip-import-check`.
自分でファイル分割してimportしているファイルがnull-safeでない判定を受けてしまってmigrateが実行されなかった。これらのファイルはまぁ一旦無視していいので--skip-import-checkで再実行する。
$ .fvm/flutter_sdk/bin/dart migrate --skip-import-check`

...
error • The argument type 'String' can't be assigned to the parameter type 'Request' at test/repositories/kitty_repository_test.dart:364:60 • (argument_type_not_assignable)

The migration tool didn't start, due to analysis errors.

The following steps might fix your problem:
1. Run `dart pub get`.
2. Try running `dart migrate` again.
...analysis errorのせいでマイグレーションが始まらない。それをやるのが君の仕事じゃないのか。
migrateコマンドのヘルプを覗いてみる。(以下抜粋)
$  .fvm/flutter_sdk/bin/dart migrate --help
Perform a null safety migration on a project or package.

Usage: dart migrate [arguments] [project or directory]
-h, --help                       Print this usage information.
-v, --verbose                    Show additional command output.
    --apply-changes              Apply the proposed null safety changes to the files on disk.
    --ignore-errors              Attempt to perform null safety analysis even if the package has analysis errors.
    --skip-import-check          Go ahead with migration even if some imported files have not yet been migrated.
--ignore-errors Attempt to perform null safety analysis even if the package has analysis errors.
--ignore-errorsで良さそうなのでrerunする。
$ .fvm/flutter_sdk/bin/dart migrate --skip-import-check --ignore-errors
ちょっと長くなってきたので詳細なログは載せないが、UnimplementedErrorでコケた。自分でファイル分割してimportしているファイルでこの例外が上がっている。
To attempt to perform migration anyway, you may re-run with --ignore-exceptions.
とヘルプにあるので、一旦--ignore-exceptionsオプションを付けてrerunする。
$  .fvm/flutter_sdk/bin/dart migrate --skip-import-check --ignore-errors --ignore-exceptions
...
Compiling instrumentation information...
[--------------------------------------------------------------------------------------------------------------------------------------------------------------------------------------------]

Your pubspec has been updated.  Please run `dart pub get`.
View the migration suggestions by visiting:

  http://127.0.0.1:62067/home/sputnik?authToken=hoge

Use this interactive web view to review, improve, or apply the results.
When finished with the preview, hit ctrl-c to terminate this process.

If you make edits outside of the web view (in your IDE), use the 'Rerun from
sources' action.
無事マイグレーションツールが起動した。
表示されたURLを開くと以下のような画面が表示される。
とりあえず1ファイルだけapplyしてみるか...と左のチェックマークを1つ以外外して右上のApply changeを押したら、チェックされてないファイル全部に// @dart=2.9のアノテーションが追加された。
これはnull-safetyに移行できないimportを含むファイルに付けるアノテーションで、要はこのファイルはdart2.9のルールでanalysisしますよ、という意味の以降までの救済措置。
全ファイルに// @dart=2.9が付いてたら意味が無いので全部削除してmigrateを再実行した。
その上で一旦全ファイルにサジェストされた変更を適用し、細かい修正は全部ローカルのファイルに目を通して確認/修正することにした。
そうするとほぼ全ファイルが変更される訳だけれど、ここでどういうわけかディスク上のファイルがコンフリクトしてしまって保存できない。
差分を確認すると@requiredの記述が+になっていることから、本来変更前になっているはずの内容(dart v2.12以前のコード)が新しく書き込まれようとしているらしい。
とりあえずツールバーからrevertのボタンを押すことで正しくmigrateされたファイルが保存されたがこれを全ファイルやるのは辛いのでなんとかしたい...
結局200件程度だったのでひたすら連打してコンフリクトを解消させてしまった。
変更点をざっくり見ていく。
required
class Hoge {
  Hoge({
-   @required foo
+   required foo
  })
}
記法が変わっただけではなく、コンストラクタのnon-nullableな型定義の変数(e.g. foo String)にrequiredが付いていないとコンパイルエラーが上がるようになった。
requiredが付いた変数はnon-nullableが保証されるので、コンストラクタのbodyに書いていたassertは不要になりanalyzerがwarningを出してくれるようになった。
freezedなどを使った自動生成ファイルを再生成する。
$ fvm flutter pub run build_runner build --delete-conflicting-outputs

Failed to precompile build_runner:build_runner:
../../.pub-cache/hosted/pub.dartlang.org/analyzer-1.6.0/lib/src/error/best_practices_verifier.dart:1600:40: Error: Getter not found: 'topLevelVariable'.
      return kinds.contains(TargetKind.topLevelVariable);
                                       ^^^^^^^^^^^^^^^^
ググってみるとどうやらanalyzerのv1.6.0がまずいらしい。dev_dependenciesに1.7.1を指定する。
dev_dependencies:
  analyzer: ^1.7.1
dart, freezedの仕様変更によってまだ生成できないファイルがいくつかあるので修正する。
late
dart v2.12.0から変数の初期化を遅延してくれるlateキーワードが使えるようになった。
freezedでは先に似た文法でlateを取り入れていたが、dartのバージョンアップに伴って古い文法が廃止されたので置き換える。
class Todos with _$Todos {
// Required for adding a custom field.
Todos._();
factory Todos(List<Todo> todos) = _Todos;
-
- List<Todo> get completed => todos.where((t) => t.completed).toList();
+ late final List<Todo> completed = todos.where((t) => t.completed).toList();
}
// freezedのドキュメントより抜粋・編集
abstract
不要になった。以上。
- abstract class Todos with _$Todos {
+ class Todos with _$Todos {
  ...
}
Map型のvalueの型定義
これはfreezedに限らないが、fromJsonなどで受け取るMap型もvalueがnullableなのか書く必要があるので以下のような変更を行う必要がある。
- factory Todo.fromJson(Map<String, Object> json) { ...
+ factory Todo.fromJson(Map<String, Object?> json) { ...
で、これに伴ってvalueがnullableであることをケアする必要があるので以下のようなコードに修正する必要がある。
factory Todo.fromJson(Map<String, Object?> json) {
  title: json['title'] ?? 'no title'
}

// もしくは以下のような..

factory Todo.fromJson(Map<String, Object?> json) {
  title: json['title'] == null ? 'no title' : json['title']
}
なお、nullableなvalueでもas Tで無理矢理キャストすることが出来ることに注意したい。具体的には以下のようなコードもコンパイラのチェック自体は通るということ。
factory Todo.fromJson(Map<String, Object?> json) {
  title: json['title'] as String
}
ちょっとまだ動かしてないので分からないけど多分nullが入ってくると実行時エラーになるはず。
なのでAPIのスキーマなどでnullが存在しないことが確実ならこのキャストでもよいが、なるべくnullのチェックはしておきたい。
動かしてみると案の定jsonのパースがコケた。
flutter: Caught error type '_InternalLinkedHashMap<String, dynamic>' is not a subtype of type 'Map<String, Object>'
要はMap<String, dynamic>はMap<String, Object?>ではないのでパースできない。というわけでアプリ内のjsonにまつわる型を全部Object?からdynamicに変える。
余談ですがjson_serializableのexampleにはしっかりとdynamicとして書かれてた。ちゃんと読もう..
iOSビルド編
順番が多少前後したのだけれど、iOSのビルドに関して詰まった点をメモっておく。
deployment target
$ pod install
...
Specs satisfying the `firebase_analytics (from `.symlinks/plugins/firebase_analytics/ios`)` dependency were found, but they required a higher minimum deployment target.
deployment targetがios9になっていたのだが、iosのfirebase_analyticsのアップデートに伴って最小のtargetが10になったらしいのでPodfileを修正する。
- platform :ios, '9.0'
+ platform :ios, '10.0'
pod repo update
$ pod install
...
None of your spec sources contain a spec satisfying the dependency: `Firebase/CoreOnly (= 8.0.0)`.
You have either:
 * out-of-date source repos which you can update with `pod repo update` or with `pod install --repo-update`.
 * mistyped the name or version.
 * not added the source repo that hosts the Podspec to your Podfile.
podのrepositoryが古くなっていて、Flutterで指定したバージョンのiOS sdkが見つからなかったらしい。
pod repo updateで更新する。
$ pod repo update
...
Updating spec repo `trunk`.
$ pod install
...
Pod installation complete! There are 19 dependencies from the Podfile and 34 total pods installed.
無事installできた。
このままビルドコマンドを叩けばビルドが成功した。めでたしめでたし。Androidは何も考えずにビルドボタンを押したらビルドが完了した。
(厳密に言うと自分の環境ではfreezedの文法が微妙に間違っていてビルドに失敗したりしたのだけれどしょうもなすぎるので割愛する)
Flutter v2以降でのボタンのUIの作り方
もうあっちこっちで自分よりもいい記事を書いてる方々がいるし公式のガイドがよく書かれてるので必要か怪しいのだけれどやったこととして備忘録的に書いておく。
公式のガイド: Migrating to the New Material Buttons and their Themes - Google Docs
Flutterのv2から(多分厳密に言うと1.1x.xの後半ぐらいだったと思う)Button系のWidgetとThemeが破壊的に変わり、古い方のButtonはdeprecatedになった。目的としては過去のButtonのスタイルのIFが統一されていなかったためにメンテナンスしにくくなっていたので整理したかったよう。
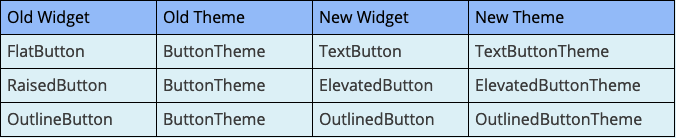
今まですべてのButtonをButtonThemeで制御していたのをそれぞれのThemeで設定できるようになったでかなり簡便に書けるようになったっぽい。yay!
例:FlatButtonの場合
例えば、こういうFlatButtonを書いていたとして、
FlatButton(
  shape: RoundedRectangleBorder(borderRadius: BorderRadius.circular(30)),
  color: Colors.red,
  child: ...
)
v2からは以下のように書き換える。
TextButton(
  style: TextButton.styleFrom(
    shape: RoundedRectangleBorder(borderRadius: BorderRadius.circular(30)),
    backgroundColor: Colors.red,
  ),
  child: ...
)
v2では~ButtonのUIは全部ButtonStyleクラスを使って定義することになる。
~Button.styleFromは簡単にそのButtonクラスに対してスタイルを設定するためのfactory。
v2で設定できる色のプロパティは以下の5つとなる(説明は非常にざっくりの理解なので詳細はAPIドキュメントを読むこと)。
-
foregroundColor- テキストとアイコンの色
-
backgroundColor- ボタン自体の色
-
shadowColor- 影の色
-
overlayColor- hover, pressedの時の色
-
onSurface- disabled時のforegroundColor。(opacity0.38で表示される)
tips: disabled時のbackgroundColorを変更したい時
上で書いたように、onSurfaceが制御しているのはdisabled時のforegroundColor、つまりボタンの上に乗ったアイコンやテキストだけで、backgroundColorつまりボタン自体の色はonSurfaceでは変更できない。
こういう時にどういった指定をすれば良いかだが、結論から言ってしまうとMaterialStateProperty<Color>を使えばよい。
MaterialStateProperty<T> class - api.flutter.dev
例えば先程の例に従って、disabled時にボタンの色をグレーにしたい時は以下のように書く。
TextButton(
  style: ButtonStyle(
    backgroundColor:MaterialStateProperty.resolveWith<Color>(
      (Set<MaterialState> states) {
        if (states.contains(MaterialState.disabled)) {
          return SputnikColors.lightGrey;
        }
        return null; // disabled以外のケースだとTextButtonのデフォルトの値が返る
      }),
    )
  )
  child: ...
)
MaterialStateはwidgetのstateを表すenumで、disable hovered pressedなどの値を持つ。
MaterialStateProperty.resolveWith()はSet<MaterialState>の値によって任意の値を返すコールバックの関数を登録することが出来る。つまり、disabledの時はグレーで、pressedの時は青色...といった制御が可能になる。
ちなみにどの状態でも同じ値を返す時のためにMaterialStateProperty.all()というショートハンドが用意されている。また、MaterialStatePropertyはジェネリクス型なのでBorderSide Color MouseCursor OutlinedBorder などでも同様の制御ができる。