DOMDOMタイムス#17: Blinkはテキストやそのデコレーション、カゲをどうやってペイントしているの?
久しぶりのDOMDOMタイムスです!!
Chromium(Blink)のbug fixを通じてテキストのPaintingまわりの実装について知ったので、自分用にまとめてみます👀
なんかもうDOMとかじゃないんですけど、これもまたDOMDOMタイムスなのです。
いきさつ
どんなバグだったのよ
めちゃ一言で言うと「テキストをverticalにしたときに、それにあわせて回転する文字が入っていると、text-shadowの位置が仕様と異なっちゃう」というバグのbug fixをやってみています。
こういうことです。

右が正しい実装だと考えている方もいるのではないかと思ったり。
要するにshadowのoffsetは回転に影響を受けない、絶対的なものだよというわけです。この仕様はCSS Writing Modes Level 4にて"Purely Physical Mappings"という概念として定義されています。
Purely Physical Mappings
The following values are purely physical in their definitions and do not respond to changes in writing mode:
- the rect() notation of the clip property
- the background properties
- the border-image properties
- the offsets of the box-shadow and text-shadow properties
実際のバグの報告へのリンクも貼っておきますね👶
text-shadow is incorrectly rendered on Latin font texts that are displayed vertically via writing-mode
直すぞ!!…………あれ?
まずは現状を確認します。
writing-modeがverticalではなければ、つまり文字が水平に描かれている場合は下記のように正しく表示されます。

もう一度、バグの状態を見てみます。
ここで、下記のような仮説が生まれます。
- shadowをつけたうえで全体を回転しているように見える。内部的にはshadow➝回転という順序になっているのだろう
- shadowのoffsetについてstyleの情報から決定している場所があるはず
- だったらshadowのoffsetを決定している場所で、テキストが回転しているかどうかを見て、offsetを変換すればいいのでは!?!?💡
というわけでtext-shadowのoffsetが決定されている場所を見つけて、そこに回転を考慮した変換を仕込んでみます。
テキストが回転するかどうかはwriting-modeおよびそれと併せて使用されるtext-orientationを見ればいいはずです!
(writing-modeがvertical-XXでも、text-orientationがuprightだったら文字は正立するから両方見ないといけない)
sk_sp<SkDrawLooper> CreateDrawLooper(
    const ShadowList* shadow_list,
+   // `horizontal` is calculated in the upper layer
+   // it's equal to `style.IsHorizontalWritingMode() || style.GetTextOrientation() == ETextOrientation::kUpright`
+   bool horizontal
    DrawLooperBuilder::ShadowAlphaMode alpha_mode,
    const Color& current_color,
    mojom::blink::ColorScheme color_scheme,
    TextPainter::ShadowMode shadow_mode) {
  DrawLooperBuilder draw_looper_builder;

  // ShadowList nullptr means there are no shadows.
  if (shadow_mode != TextPainter::kTextProperOnly && shadow_list) {
    for (wtf_size_t i = shadow_list->Shadows().size(); i--;) {
      const ShadowData& shadow = shadow_list->Shadows()[i];
+     float shadow_x = horizontal ? shadow.X() : shadow.Y();
+     float shadow_y = horizontal ? shadow.Y() : -shadow.X();
      draw_looper_builder.AddShadow(
-         shadow.Offset(), // it's equal to (shadow.X(), shadow.Y())
+         gfx::Vector2dF(shadow_x, shadow_y),
          shadow.Blur(),
          shadow.GetColor().Resolve(current_color, color_scheme),
          DrawLooperBuilder::kShadowRespectsTransforms, alpha_mode);
    }
  }
  if (shadow_mode != TextPainter::kShadowsOnly) {
    draw_looper_builder.AddUnmodifiedContent();
  }
  return draw_looper_builder.DetachDrawLooper();
}
いっちょあがりです!!!おしまい!!!
……
……あれ!?

おいおいおいおい!?落ち着いて、修正の前後を見比べてみましょう。

……これは大変そうです。
回転するもの、しないもの
ひらがなの場合にshadowのoffsetが間違ってしまうのは、この実装が「writing-mode: vertical-XX;かつtext-orientationの値がない、という場合に回転しない文字」を考慮できていないからです。

UDN: https://udn.realityripple.com/docs/Web/CSS/writing-mode
面白いですね。sideways-lrとsideways-rlとで回転の向きが異なる字もあるようです。
回転についてもう少し正確に理解してみましょう。
そもそもCSSではテキストを垂直方向に並べる際の文字回転処理をbi-orientational transformと呼んでいます。
To lay out vertical text, the UA needs to transform the text from its horizontal orientation. This transformation is the bi-orientational transform, and there are two types:
rotate Rotate the glyph from horizontal to vertical
translate Translate the glyph from horizontal to vertical
https://drafts.csswg.org/css-writing-modes-4/#intro-text-layout
このbi-orientational transformとしてtranslateが適用されるなら回転はしないということになります。
rotateかtranslateかはどう決定されるのでしょうか??続きにはこうあります。
Scripts with a native vertical orientation have an intrinsic bi-orientational transform, which orients them correctly in vertical text: most CJK (Chinese/Japanese/Korean) characters translate, that is, they are always upright. Characters from other scripts, such as Mongolian, rotate.
Scripts without a native vertical orientation can be either rotated (set sideways) or translated (set upright): the transform used is a stylistic preference depending on the text’s usage, rather than a matter of correctness. The text-orientation property’s mixed and upright values are provided to specify rotation vs. translation of horizontal-only text.
要するに下記のようです。
- ネイティブで垂直方向に書くことがないscripts 👉
sidewaysやmixedで回転する。uprightでそのまま。 - ネイティブで垂直方向に書くことがあるscripts 👉 intrinsicにする
いまは後者が気になります。intrinsicが何を指すかはAppendix Aを見ると分かるようです。

めちゃくちゃ面白いですね!?👀 縦書きにしたときの挙動について、下記のようなバリエーションがあるわけです。
- 文字の方向はそのまま、上から下に読む
- 文字の方向は時計回りに90度回転、上から下に読む
- 文字の方向は反時計回りに90度回転、上から下に読む
- 文字の方向は反時計回りに90度回転、下から上に読む
Oghamという体系は反時計回りに90度回転、下から上に読むようです。ぜひ"Omniglot: Writing Systems & Language of the World"の"Ogham alphabet"で実際の文字の様子を見てみてください。

Omniglot: Writing Systems & Language of the World; Ogham alphabetより
標準化団体の仕様を見ていると、ブラウザやウェブが果たす(べき)社会的役割を考えさせられることがあります。
例えば今回の話も、「これこれの表記体系はうまく出ないんですよ」となったら、その表記体系をネイティブで使用する人たちはウェブから排除されてしまうわけです。翻訳技術があるとはいえ、表記体系自体がメディアから排除されることのインパクトは大きいはずです。ウェブのアクセシビリティは徐々に話題に上がるようになってきていますが、ウェブをアクセシブルにするうえで文字もまた大きな論点であると今回気づくことが出来ました。
さて、話を戻しましょう。とにかく、文字が回転するかどうかは上の表を参照すればいい、つまりその文字が属するscriptをもとに判定できるようです(ダッシュ文字などを考えはじめると例外があるようですが)。
Blink内部では、この細かなハンドリングがRunSegmenter内でなされています。これは、ひとかたまりのtextを、文字のshape(文字を、フォントやobliqueなどを考慮した「実際の形」に落とし込むこと)に必要な条件のまとまりで切り分けるモジュールです。どうやら、ここで最終的な文字の方向が決定されていそうです。
The segments indicated by the segementation results showing the script, orientation information and font fallback preference (text, emoji presentation) of the individual segment.
https://chromium.googlesource.com/chromium/src/+/main/third_party/blink/renderer/platform/fonts/README.md#text-shaping

ただ、RunSegmenterが走るのは先ほど自分が手を入れた部分よりももっと奥です。自分が先ほど手を入れた場所にその情報を持ってくることはできない(すべきでない)ように思えました。
困りました😭
修正方針の決定
というわけで、今回の修正のレビュワーにこのことを相談したところ、下記のことが分かりました。
-
いまの変更は色々直っていないどころか、regressionも起こしている
- たしかに、アルファベットをはじめとした一部のscriptは、verticalでのshadowを正しく描画できるようになった
- しかし、CJKのようなscriptについては直っていない
- また、
text-decorationのshadowは直っていない - なんなら、
text-emphasisのshadowは新たに壊れてしまっている
正直なところ、text-decorationやtext-emphasisのことまで考えることができていませんでした。実際に試してみるとregressionが起きています。
そして、新たな修正方針として下記のようになりました。
- テキストのshadow: shadowのoffsetを回転によって変化させないようにする(i.e. purely physical mappingsに従うようにする)
- デコレーションのshadow: テキストのshadowと同じ仕組みにリファクタリングしたうえで、同じ方法を採る
- (現在はデコレーションのshadowが後述のようにテキストのshadowと異なる仕組みで描かれている)
こうして、たまたまですが他部分のリファクタリングにも関わることができました!
下記では、この作業を通じて、デコレーションまで含めテキストがどうペイントされるかについて学んだことをまとめてみます😉
Blink内部でのテキストとshadowの描画の流れ
ここからの話の目標は画像のようなテキストの一連のセットがどういう順番でどう描かれているのかを理解することです。

さきに結論を載せておくとこのようになります。

では下記の通り、順番に見ていきましょう!
- そもそもどうやってテキストが描画されているのか
- shadowの描画はどう実施されているのか
1. テキストのPaintの流れ
まずは1点目を見ていきます。
- そもそもどうやってテキストが描画されているのか 👈
- shadowの描画はどう実施されているのか
LayoutからPaintの流れ
そもそもPaintフェーズはLayoutフェーズから何を受け取って、何を吐き出すのでしょうか??
先ほど紹介した一連のレンダリングの流れはLocalFrameView::UpdateLifecyclePhasesInternal、つまりLocalFrameのライフサイクルをまわしている場所で見れます。
(この関数はResizeObserverやIntersectionObserverをレイアウト後に作動させている様子など、色々と面白い要素が多いです)
一番最後にRunPaintLifecyclePhase(PaintBenchmarkMode::kNormal);とありますね。
そこがPaint処理の入口です!ここから下記のようにしてTextFragmentのPaintが行われます。
LocalFrameView::RunPaintLifecyclePhaseLocalFrameView::PaintTreePaintLayerPainter::PaintPaintLayerPainter::PaintWithPhasePaintLayerPainter::PaintFragmentWithPhase- (
PhysicalFragmentを扱う場合は……) BoxFragmentPainter::PaintBoxFragmentPainter::PaintInternalBoxFragmentPainter::PaintObjectBoxFragmentPainter::PaintInlineItemsBoxFragmentPainter::PaintTextItemTextFragmentPainter::Paint
要するに下記のようになっています。
- Layoutフェーズで
LayoutObjectから成るLayout Treeというものができあがる - 各
LayoutObjectはFragmentDataを持っており、ここには主に位置と大きさの情報が入っている- 例えば
TextFragmentであれば、改行など考慮して分割までされた形で、テキストの位置情報や大きさが入っている
- 例えば
- 各
FragmentDataをPaintLayerPainter::PaintFragmentWithPhaseにいれると、Fragmentの種類に併せたFragmentPainterがやってきてそれをSkiaのオペレーションに落とし込んでくれる

実際のコードをみてみると、PaintLayerPainter::PaintWithPhaseではLayoutObjectからFragmentDataをループしてPaintFragmentWithPhaseに渡していることが分かります。
for (const FragmentData& fragment :
    FragmentDataIterator(paint_layer_.GetLayoutObject())) {
    const PhysicalBoxFragment* physical_fragment = nullptr;
    if (layout_box_with_fragments) {
        physical_fragment =
            layout_box_with_fragments->GetPhysicalFragment(fragment_idx);
        DCHECK(physical_fragment);
    }

    std::optional<ScopedDisplayItemFragment> scoped_display_item_fragment;
    if (fragment_idx)
        scoped_display_item_fragment.emplace(context, fragment_idx);

    PaintFragmentWithPhase(phase, fragment, fragment_idx, physical_fragment,
                            context, paint_flags);

    // [omit by me]
}
また、余談ですがカリング処理を実施している場所もありますね👀
カリングとは、レンダリング処理の一般的な用語で、要するに「いま描画しないといけない対象・部分だけ描画しよう」ということです。
FragmentDataには位置の他にも、カリング情報も入っているのですね。
CullRect cull_rect = fragment_data.GetCullRect();
if (cull_rect.Rect().IsEmpty())
    return;
いろいろ書きましたが、要するにPaintフェーズとは「Layoutフェーズから吐き出されたFragmentデータ(位置など)をもとにグラフィックライブラリ(ここではSkia)のオペレーションを構築するフェーズ」です!
SkiaとGraphicsContext
「グラフィックライブラリ(ここではSkia)のオペレーション」と言いましたが、具体的にはどういうものなのでしょうか。
SkiaはGoogle製の2Dグラフィックライブラリ(OSS)であり、下記が実際のSkiaのコードと結果です。
void draw(SkCanvas* canvas) {
    canvas->drawColor(SK_ColorWHITE);

    SkPaint paint;
    paint.setStyle(SkPaint::kFill_Style);
    paint.setStrokeWidth(4);
    paint.setColor(0xff4285F4);

    SkRect rect = SkRect::MakeXYWH(10, 10, 100, 160);
    canvas->drawRect(rect, paint);

    SkRRect oval;
    oval.setOval(rect);
    oval.offset(40, 80);
    paint.setColor(0xffDB4437);
    canvas->drawRRect(oval, paint);
}
結果はこうなります。

公式ドキュメントによれば、基本的な対象物("the primitive being drawn")と、その描き方("color/style attributes": SkPaint)を用意して、SkCanvas経由で両方をオペレーションに入れれば描けるようです👶テキストもいけるとのこと。
Skia is organized around the SkCanvas object. It is the host for the “draw” calls: drawRect, drawPath, drawText, etc. Each of these has two components: the primitive being drawn (SkRect, SkPath, etc.) and color/style attributes (SkPaint).
https://skia.org/docs/user/api/
canvas->drawRect(rect, paint);
わかりやすいですね👀
ちなみに、SkPaintに入れられるスタイル情報は多岐にわたります。Shade, ColorFilter, BlendModeなどなど。どれも私たちがCSSで指定することがあるものばかりですね!?
一方で座標変換用の行列やクリッピングの領域はSkCanvas自体にもたせます。アフィン変換、つまり図形をずらしたり歪ませたりするための情報はSkCanvasに入れておくのです。
The canvas holds relatively little state. It points to the actual pixels being drawn, and it maintains a stack of matrices and clips. Thus in the above call, the canvas' current matrix may transform the coordinates of the rectangle (translation, rotation, skewing, perspective), and the canvas' current clip may restrict where on the canvas the rectangle will be drawn, but all other stylistic attributes of the drawing are controlled by the paint.
https://skia.org/docs/user/api/
なお、Skiaに興味がある方はplayground(fiddle)があるので飽くなき探求してみてね。
さて、Blink内部に戻ると、さすがにこのSkiaがむき出しになっているわけではありません。
基本的にwebページの描画においてはGraphicsContextなるクラスがSkCanvas的な役割を担うようです。私たちは例えば下記のような操作をGraphicsContextを通じて実施することができます。
void DrawLine(const gfx::Point&,
            const gfx::Point&,
            const StyledStrokeData&,
            const AutoDarkMode& auto_dark_mode,
            bool is_text_line = false,
            const cc::PaintFlags* flags = nullptr);
void DrawText(const Font&,
            const TextFragmentPaintInfo&,
            const gfx::PointF&,
            DOMNodeId,
            const AutoDarkMode& auto_dark_mode);

void ClipRect(const SkRect&,
            AntiAliasingMode = kNotAntiAliased,
            SkClipOp = SkClipOp::kIntersect);

void Scale(float x, float y);
void Rotate(float angle_in_radians);
void Translate(float x, float y);
GraphicsContext自体はSkCanvasの抽象化であるPaintCanvasというクラスを持っています。そして、GraphicsContextを使った描画オペレーションは、最終的にSkCanvasのオペレーションに変換されてSkBitmapに描き込まれていきます。なお、この最終的に描き込まれる部分をbacking storeと呼ぶことがあります。
このあたりの話は"Graphics and Skia"や、やや古いですがWebKit for Developersにも少しだけ詳しいことが書かれています👀
いずれにせよ私たちがwebページの描画をするために触るのはGraphicsContextです。このような抽象化はBlinkがまだWebKitだった頃からあるようで、だからこそ色々なブラウザがみんなでWebKitを使っていた頃も、使用されるグラフィックライブラリがSkiaだったりCoreGraphicsだったりしたようです👶

WebKit for Developersより、少し古い画像
TextFragmentPainterによるtextとemphasis-markのPaint
さて、どうやって描画オペレーションが作られているのかを見ていきましょう!
エントリーポイントはTextFragmentPainter::Paintです。色々と場合分けが詳細ですが、すべてスキップしてPaintのコアとなる処理に注目しましょう。
void TextFragmentPainter::Paint(const PaintInfo& paint_info,
                                const PhysicalOffset& paint_offset) {
  // [omit by me]

  switch (highlight_case) {
    case HighlightPainter::kNoHighlights:
      // Fast path: just paint the text, including its decorations.
      decoration_painter.Begin(text_item, TextDecorationPainter::kOriginating);
      decoration_painter.PaintExceptLineThrough(fragment_paint_info);
      text_painter.Paint(fragment_paint_info, text_style, node_id,
                         auto_dark_mode);
      decoration_painter.PaintOnlyLineThrough();
      break;

  // [omit by me]
}
テキストとそのデコレーションは下記のように描き込まれていることが分かります。なお、この順番が実は重要なのであとで再掲します。
-
TextDecorationPainter::PaintExceptLineThroughによってlinethrough以外のデコレーションが描かれる -
TextPainter::Paintによってテキストが描かれる -
TextDecorationPainter::PaintOnlyLineThroughによってlinethroughが描かれる
せっかくなので、TextPainter::Paintだけもう少し見てみましょう。
void TextPainter::Paint(const TextFragmentPaintInfo& fragment_paint_info,
                        const TextPaintStyle& text_style,
                        DOMNodeId node_id,
                        const AutoDarkMode& auto_dark_mode,
                        ShadowMode shadow_mode) {
  // [omit by me]

  UpdateGraphicsContext(graphics_context_, text_style, state_saver,
                        shadow_mode);

  if (svg_text_paint_state_.has_value()) {
    // [omit by me]
  } else {
    graphics_context_.DrawText(font_, fragment_paint_info,
                               gfx::PointF(text_origin_), node_id,
                               auto_dark_mode);
  }

  if (!emphasis_mark_.empty()) {
    if (text_style.emphasis_mark_color != text_style.fill_color)
      graphics_context_.SetFillColor(text_style.emphasis_mark_color);
    graphics_context_.DrawEmphasisMarks(
        font_, fragment_paint_info, emphasis_mark_,
        gfx::PointF(text_origin_) + gfx::Vector2dF(0, emphasis_mark_offset_),
        auto_dark_mode);
  }

  // [omit by me]
}
先ほどと同様に今回あまり関わらない部分は省略しました。ここでは大きく3つのことを次の順で行っています。
-
UpdateGraphicsContextでtext-shadowの設定をしている(後述) -
GraphicsContext::DrawTextを使ってテキストを描いている。これはSkCanvasのdrawTextBlobを内部で実行する -
GraphicsContext::DrawEmphasisMarksを使って強調マークを描いている。これも内部的にはSkCanvasのdrawTextBlobが実行される
テキストとその強調マークはともにSkCanvasのdrawTextBlobで描画されています。つまり、強調マークはBlink内部ではテキストと同じものとして扱われているわけです。
実際、内部ではComputedStyle::GetTextEmphasisMarkで強調マークを取得し、それをShapeResultBuffer::EmphasisMarkGlyphDataでGlyphDataにします。つまり、強調マークは通常のテキストの文字と同じようにHarfBuzzによってglyphとしてshapeされているわけです。
そして特にdotやsesameは常にuprightのglyphとして内部で扱われています!つまりあのドットや点は内部的には"bi-orientational transform"に対してひらがなと同じように振る舞うのです。ずっと向きが変わりません。だから私の変更はひらがなのshadowといっしょに、強調マークのshadowも同時に壊してしまったのですね。

一応コードも載せておいてみます。
TextEmphasisMark ComputedStyle::GetTextEmphasisMark() const {
  TextEmphasisMark mark = TextEmphasisMarkInternal();
  if (mark != TextEmphasisMark::kAuto) {
    return mark;
  }
  if (IsHorizontalWritingMode()) {
    return TextEmphasisMark::kDot;
  }
  return TextEmphasisMark::kSesame;
}

//////

GlyphData ShapeResultBuffer::EmphasisMarkGlyphData(
    const FontDescription& font_description) const {
  for (const auto& result : results_) {
    for (const auto& run : result->runs_) {
      DCHECK(run->font_data_);
      if (run->glyph_data_.IsEmpty())
        continue;
      return GlyphData(run->glyph_data_[0].glyph,
                       run->font_data_->EmphasisMarkFontData(font_description),
                       run->CanvasRotation());
    }
  }
  return GlyphData();
}
もしかしたらお気づきの方もいるかもしれませんが、ここではglyph_data_[0].glyphとされています。これはtext-emphasisでstring値を入れたときに最初の1文字目しか採用されないという仕様に対応しているわけです!!面白いですねえ👶
TextDecorationPainterによるdecorationのPaint
テキストと強調マークの描画は分かったので、次はデコレーションです。
こちらはDecorationLinePainter::Paintがメインの部分です。
void DecorationLinePainter::Paint(const Color& color,
                                  const cc::PaintFlags* flags) {
  // [omit by me]

  switch (decoration_info_.DecorationStyle()) {
    case ETextDecorationStyle::kWavy:
      PaintWavyTextDecoration(auto_dark_mode);
      break;
    case ETextDecorationStyle::kDotted:
    case ETextDecorationStyle::kDashed:
      context_.SetShouldAntialias(decoration_info_.ShouldAntialias());
      [[fallthrough]];
    default:
      DrawLineForText(context_, decoration_info_.StartPoint(),
                      decoration_info_.Width(), styled_stroke, auto_dark_mode,
                      flags);

      if (decoration_info_.DecorationStyle() == ETextDecorationStyle::kDouble) {
        DrawLineForText(context_,
                        decoration_info_.StartPoint() +
                            gfx::Vector2dF(0, decoration_info_.DoubleOffset()),
                        decoration_info_.Width(), styled_stroke, auto_dark_mode,
                        flags);
      }
  }
}
Wavyのケースは特殊な対応がされていますが、ほかはすべてDrawLineForTextが処理するようです。Wavyはベジエ曲線の計算とそれをSkiaにわたすためのパターンに落とし込む計算が(特に、使用する座標系も)複雑なので、別に切り出されています。
また、Doubleの場合は開始位置をズラシたうえで二本目の線を引いていることがわかります。本当に絵を描くようにして実現されていることがわかります。
なお、DrawLineForTextは線のひき始め(pt)と線の幅(width)を受け取ったうえで、下記のように処理をわけています。
- solid, doubleの場合:
GraphicsContext::DrawRectで指定されたthicknessを高さとしたrectを描く - wavy, dot, dashの場合:
GraphicsContext::DrawLineで線を引く
こうしてすべての道はGraphicsContextに通ずるわけです。
2. shadowのPaint
さて、テキストの描画のされ方が分かったところで、shadowの描画を見ていきましょう。
- そもそもどうやってテキストが描画されているのか
- shadowの描画はどう実施されているのか 👈
textとemphasis-markのshadow
先ほどTextPainter::Paintで出てきたUpdateGraphicsContextの実行がカギです。
この関数はSkiaが提供しているDrawLooperという仕組みを設定してshadowを実現します。DrawLooperはその名の通り、描画作業をループします。
そうです、つまりテキスト(と強調マーク)の描画をループして2回行う、かつ1回目はズラシて色もちょっと変えて行うことでshadowがつくられています!ちょっと面白いですよね。
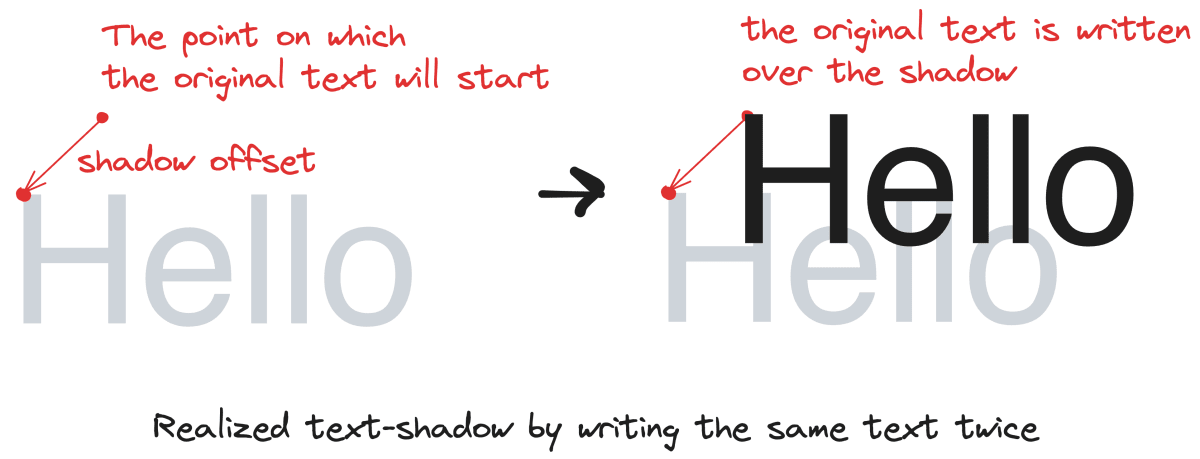
そして、これは強調マークも同じです、全く同じように2回描かれて実現されています。それをふまえて先ほどの図を見てみましょう。さっきよりも少し味わい深いですね👶
興味のある人はDrawLooperBuilder::AddShadowのコードを見ると内容がわかるかと思います。
decorationのshadow
さて、decorationのshadowはどう実現されているのでしょうか。
underlineもoverlineもline-throughもすべて同じ仕組みなので、ここではunderlineのコードを見てみます。
PaintWithTextShadow(
    [&](TextShadowPaintPhase phase) {
        for (wtf_size_t i = 0; i < decoration_info.AppliedDecorationCount(); i++) {
            decoration_info.SetDecorationIndex(i);

           // [omit by me: the same thing as underline is done for `SpellingOrGrammerError`]

            if (decoration_info.HasUnderline() && decoration_info.FontData() &&
                EnumHasFlags(lines_to_paint, TextDecorationLine::kUnderline)) {

                decoration_info.SetUnderlineLineData(decoration_offset);
                decoration_info.SetSkipInkIntercepts(text_painter_,
                                                        &fragment_paint_info);
                text_painter_.PaintDecorationLine(
                    decoration_info, LineColorForPhase(decoration_info, phase),
                    text_style);
            }

            // [omit by me: the same thing as underline is done for `SpellingOrGrammerError`]
        }
    },
paint_info_.context, text_style);
なにやらPaintWithTextShadowという関数がありますね。これは下記のことをやっています。
- デコレーションの線を描画するラムダ式を受け取る
-
text-shadowの指定がない場合は、そのラムダ式を実行しておしまい -
text-shadowの指定がある場合は、SkiaのDropShadowフィルターを適用したレイヤーを作り、そのレイヤーでデコレーションの線を黒色で描画。それが済んだら、通常のレイヤーを作り、そのレイヤーでデコレーションの線をtext-shadowで指定された色で描画する

上で図解したように、SkiaのDropShadowは元となるbitmapにshadowをつけたうえで、元のbitmapも含んだデータを返すはずです。そのため、DropShadowフィルターを使用しているのに2回実行している理由は分かっていません(ただ、おそらくこのCLが関係はしていそうです)。
ただ、いずれにせよ、ここで大事なのはテキストおよび強調マークが2回描くことでshadowを実現しているのに対して、デコレーションはフィルターを使っているという点です。
そして私のCLによって両方ともに「2回描く方式」に変わると考えています。
3. テキストとshadowの描画の流れのまとめ
さて、ここまでの話をまとめると下記の順番になっていることがわかります。
-
TextDecorationPainter::PaintExceptLineThroughによってlinethrough以外のデコレーションが描かれる- 順番は underline of spelling and grammar error => underline decoration => overline decoration の順
-
TextPainter::Paintによってテキストが描かれる -
TextDecorationPainter::PaintOnlyLineThroughによってlinethroughが描かれる - ただし、これらはいずれもshadowを描いてから本体を描く
ということで下記のようになるわけです。
一方、この実装で仕様に沿った動きが実現できているのかというと実は難しいところです。
"CSS Text Decoration Module Level 4"の"5.1. Painting Order of Text Decorations"によれば、text-shadowが最も下層に描画されなければならないと定められています。
下記に2024年4月2日時点でのChromeとFirefoxの比較をしてみます。例えばlinethroughのshadowがテキストの下にあるか、テキストのshadowがunderlineの下にあるかといった点で違いが見られます。
おそらくFirefoxの挙動が正しいと思います。きっとFirefoxの内部では異なる順番での描画をしているのではないかと推測しています。
<style>div {
  font-size: 6rem;
  text-shadow: 10px 10px 0 blue;
  text-emphasis: 'x';
  text-decoration: line-through overline underline red;
}</style>
<div style="">若youngい</div>

回転
さて、回転の話もありました。回転は2段階に分かれています。
まず、テキストや強調マーク、そしてデコレーションを一括で回転させる段階。そして、glyphごとに回転させる段階。この二段階構成が私のパッチがうまくいかない原因でした。
前者はTextFragmentPainter::Paintの内部で、GraphicsContext::ConcatCTMにwriting-modeに対応したアフィン変換行列を渡すことで実現されています。
void TextFragmentPainter::Paint(const PaintInfo& paint_info,
                                const PhysicalOffset& paint_offset) {
    // [omit by me]

    std::optional<AffineTransform> rotation;
    const WritingMode writing_mode = style.GetWritingMode();
    const bool is_horizontal = IsHorizontalWritingMode(writing_mode);
    const LineRelativeRect rotated_box =
        LineRelativeRect::CreateFromLineBox(physical_box, is_horizontal);
    if (!is_horizontal) {
    rotation.emplace(
        rotated_box.ComputeRelativeToPhysicalTransform(writing_mode));
    }

    // [omit by me]

    if (rotation) {
        state_saver.SaveIfNeeded();
        context.ConcatCTM(*rotation);
        if (TextPainter::SvgTextPaintState* state = text_painter.GetSvgState()) {
        DCHECK(rotation->IsInvertible());
        state->EnsureShaderTransform().PostConcat(rotation->Inverse());
        }
    }

    // [omit by me]
}

//////

void GraphicsContext::ConcatCTM(const AffineTransform& affine) {
  Concat(AffineTransformToSkM44(affine));
}

//////

// Returns the transformation that would rotate the canvas in the appropriate
// direction for a vertical writing mode, while keeping the physical top-left
// corner of the given line box in the same place (changing the coordinate
// while keeping the box in the same place on the page).
AffineTransform ComputeRelativeToPhysicalTransform(WritingMode writing_mode) const
後者は、テキストとその強調マークの描画で利用されるDrawBlobsでハンドリングされています。これはfont.cc内の処理です。
// DrawBlobsより一部抜粋
for (const auto& blob_info : blobs) {
    // [omit by me]
    switch (blob_info.rotation) {
      case CanvasRotationInVertical::kRegular:
        break;
      case CanvasRotationInVertical::kRotateCanvasUpright: {
        canvas->save();

        SkMatrix m;
        m.setSinCos(-1, 0, point.x(), point.y());
        canvas->concat(SkM44(m));
        break;
      }
    // [omit by me]
    }
// [omit by me]
}
blobsをループさせて1文字ずつ処理しています。各文字について計算されたrotationによって、ここでもまた回転がかけられていることが分かります。
修正の仕方
なんだかとても長くなってしまいました。たぶんここを読んでいる人はいないと思います。
もともとのバグは「テキストをverticalにしたときに、それにあわせて回転する文字が入っていると、text-shadowの位置が仕様と異なってしまう」というバグでした。
ここまで見てきた内容をふまえて、CLの内容をまとめると下記のようになります。
- 現状
- glyphがbi-orientational transformでtranslateではなくrotateされた場合に、そのshadow offsetが"purely physical mappings"に則らない
- 同じことがtext-decorationに起きている
- 原因
- textのshadowを描く
DrawLooperやdecorationのshadowをつくるfilterが回転の影響を受けている("purely physical mappings"ではない)
- textのshadowを描く
- 解決策
- まずはdecorationのshadowを
DrawLooperでやるようにする -
DrawLooperに渡されているフラグを変えて、offsetが回転の影響を受けないようにする("purely physical mappings"にする)
- まずはdecorationのshadowを
実際のCLはこちらです👶(2024年4月2日現在まだマージされていません!)
さて、この記事はここで終わりにしようとしていたのですが、最後に自分がドツボにはまったskip-inkとクリッピングについて書いてみます。
text-decoration-skip-inkとクリッピング
text-decoration-skip-inkとは下記のように、文字がある部分は線を途切れさせることができる仕様です。

今回、デコレーションのshadowの実現方法をフィルターからDrawLooperに移行するにあたり、このskip-inkの実装がとても印象に残ったのでメモしておいてみます。
現状、underlineを引くにあたり、skip-inkはcanvasのクリッピングで実現されています。具体的にはTextPainter::PaintDecorationLineの中でClipDecorationStripeがクリッピングを行っています。
ClipDecorationStripeは、Font::GetTextInterceptsからGlyphによって線が引けない領域をx座標の組(つまりVector<{float begin_, end_}>)として受け取って、それに従ってcanvasをクリッピングします。
void TextPainter::ClipDecorationsStripe( /* [omit by me] */) {
  // [omit by me]
  Vector<Font::TextIntercept> text_intercepts;
  font_.GetTextIntercepts(fragment_paint_info, graphics_context_.FillFlags(),
                          std::make_tuple(upper, upper + stripe_width),
                          text_intercepts);
  for (auto intercept : text_intercepts) {
    gfx::PointF clip_origin(text_origin_);
    gfx::RectF clip_rect(
        clip_origin + gfx::Vector2dF(intercept.begin_, upper),
        gfx::SizeF(intercept.end_ - intercept.begin_, stripe_width));
    // [omit by me]
    graphics_context_.ClipOut(clip_rect);
  }
}
クリッピングされたcanvasに描かれる線はちょうど文字が存在する場所で途切れることになります。そして、この結果にfilterがかかってshadowも途切れるわけです!

自分は最初、クリッピングの領域を変えないまま、とりあえずDrawLooperを採用してしまいました。そうするとどうなるかというと下記のようになってしまいます。

underlineのshadowが途切れていません。これはDrawLooperがshadowを描く領域にはクリッピングがされていないので当然の結果なのです。

ではDrawLooperのためにクリッピング領域を増やせばいいのかというと違います。下記はクリッピング領域を追加した実装で起きたことです。要するにblurがうまくいかないのです。

最終的にはクリップではなくて、描画する線そのものを分割することにしました。

奥が深いんですねえ〜!面白いです。
さいごに
何度も書いているように、自分のCLは2024年4月2日現在まだマージされていません!!
ただ、基本的な実装は終わっているためそろそろマージされるだろうこと、また記事に書いた内容自体はCLのマージに影響されない話なので記事は出してもいいのかなと思っています👶
自分はブラウザが好きですが、特にDOMだったりペイントだったり「データが目に見える形で表示される」ということに面白みを覚えます。なんだか不思議ですごいことが起きている気がするからです。
というわけで、今日はここまでです!またね〜👋
Discussion
ぼんやりな理解ですが一通り読めました!
「CL」って何の略なんですか?
お読み下さりありがとうございます😊
CLはchange listの略です👶
GitHubでいうPRみたいなものだと思っていますが、その認識で自分は不都合あったことないです!