Cognito IDPoolをTerraformで作って、JSでアクセス制御の動作確認
最近Congitoの凄さの一端に触れ、いくつかTerraformでハンズオンをしながら機能を試しています。
今回は ID Pool(フェデレーティッド ID)とユーザープールと連携させて、AWSのサービスに認証済みのユーザーだけがアクセスできるように設定し、実際にJavaScriptでコードを書きながら動作確認しました。
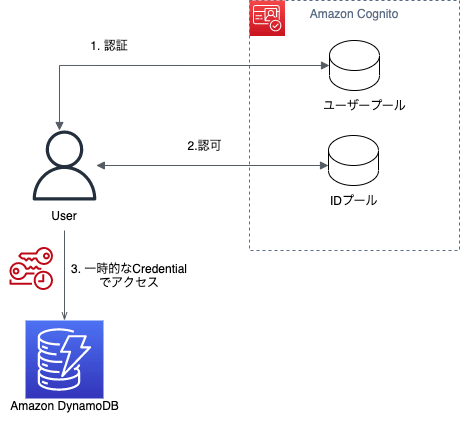
構成としては以下のような形で、Cognitoのユーザープールで認証の機能を実現し、IDPoolで認証済みのユーザーに一時的なAWSサービスへのアクセス権限を与えるイメージです。

なお、認証と認可の違いについては、安定のクラスメソッド様の記事があるので自信がない方はぜひご一読ください。
実装内容
ポイントとなる部分を以下記載していきますが、コード全文が気になる方は以下リポジトリをご参照ください。
Terraformコード
Cognito周りの設定
今回大きくCognito関連のモジュールとDynamoDB関連のモジュールに分けています。
locals {
  default_prefix = "${var.tags.Project}-${var.tags.Environment}"
}

module "auth" {
  source = "./modules/auth/"

  prefix    = local.default_prefix
  table_arn = module.dynamodb.table_arn

  tags = var.tags
}

module "dynamodb" {
  source = "./modules/dynamodb/"

  prefix = local.default_prefix
}
resource "aws_cognito_user_pool" "main" {
  name = "${var.prefix}-auth"

  mfa_configuration = "OFF"
  account_recovery_setting {
    recovery_mechanism {
      name     = "verified_phone_number"
      priority = 1
    }
  }

  admin_create_user_config {
    allow_admin_create_user_only = true
    invite_message_template {
      email_message = "{username}さん、あなたの初期パスワードは {####} です。初回ログインの後パスワード変更が必要です。"
      email_subject = "${var.tags.Project}(開発環境)への招待"
      sms_message   = "{username}さん、あなたの初期パスワードは {####} です。初回ログインの後パスワード変更が必要です。"
    }
  }

  # ユーザー名の他にemailでの認証を許可
  alias_attributes = ["email"]
}

resource "aws_cognito_user_pool_domain" "main" {
  domain       = "${var.prefix}-client"
  user_pool_id = aws_cognito_user_pool.main.id
}

resource "aws_cognito_user_pool_client" "main" {
  name            = "${var.prefix}-client"
  user_pool_id    = aws_cognito_user_pool.main.id
  generate_secret = false
  callback_urls = [
    "http://localhost:8080/"
  ]
  allowed_oauth_flows = ["code"]
  explicit_auth_flows = [
    "ALLOW_REFRESH_TOKEN_AUTH",
    "ALLOW_USER_SRP_AUTH",
    "ALLOW_ADMIN_USER_PASSWORD_AUTH"
  ]
  supported_identity_providers = [
    "COGNITO"
  ]
  allowed_oauth_scopes                 = ["openid"]
  allowed_oauth_flows_user_pool_client = true
}

# IDPool
resource "aws_cognito_identity_pool" "main" {
  identity_pool_name               = "${var.prefix}-id-pool"
  allow_unauthenticated_identities = false
  allow_classic_flow               = false

  cognito_identity_providers {
    client_id               = aws_cognito_user_pool_client.main.id
    provider_name           = aws_cognito_user_pool.main.endpoint
    server_side_token_check = false
  }

}
認証済みユーザーの場合、DynamoDBへのアクセスができるように権限を付与します。
resource "aws_iam_role" "authenticated" {
  name = "${var.prefix}-cognito-authenticated"

  assume_role_policy = templatefile("${path.module}/iam/assume_policy.json", {
    IDPOOL_NAME = aws_cognito_identity_pool.main.id
  })
}

resource "aws_iam_role_policy" "authenticated" {
  name = "authenticated_policy"
  role = aws_iam_role.authenticated.id

  policy = templatefile("${path.module}/iam/authenticated_policy.json", {
    DYNAMO_TABLE_ARN = var.table_arn
  })
}

resource "aws_iam_role" "unauthenticated" {
  name = "${var.prefix}-cognito-unauthenticated"

  assume_role_policy = templatefile("${path.module}/iam/assume_policy_unauth.json", {
    IDPOOL_NAME = aws_cognito_identity_pool.main.id
  })
}

resource "aws_iam_role_policy" "unauthenticated" {
  name = "authenticated_policy"
  role = aws_iam_role.unauthenticated.id

  policy = templatefile("${path.module}/iam/unauthenticated_policy.json", {})
}

resource "aws_cognito_identity_pool_roles_attachment" "main" {
  identity_pool_id = aws_cognito_identity_pool.main.id

  roles = {
    "authenticated"   = aws_iam_role.authenticated.arn
    "unauthenticated" = aws_iam_role.unauthenticated.arn
  }
}
ポリシーは以下のような形になります。
(${DYNAMO_TABLE_ARN}が作成されるDynamoDBのテーブルのARNに置き換わります)
{
  "Version": "2012-10-17",
  "Statement": [
    {
      "Effect": "Allow",
      "Action": [
        "dynamodb:BatchGetItem",
        "dynamodb:GetItem",
        "dynamodb:Query",
        "dynamodb:Scan",
        "dynamodb:PutItem"
      ],
      "Resource": ["${DYNAMO_TABLE_ARN}"]
    }
  ]
}
DynamoDBの作成
テーブルに加えてテスト用のデータも登録しておきます。
resource "aws_dynamodb_table" "main" {
  name           = "${var.prefix}-Score"
  billing_mode   = "PROVISIONED"
  read_capacity  = 1
  write_capacity = 1
  hash_key       = "UserId"

  attribute {
    name = "UserId"
    type = "S"
  }

}

resource "aws_dynamodb_table_item" "main" {
  table_name = aws_dynamodb_table.main.name
  hash_key   = aws_dynamodb_table.main.hash_key

  item = <<ITEM
{
  "UserId": {"S": "123"},
  "Score": {"N": "100"}
}
ITEM
}
次にTerraformの適用をします。
terraform init
terraform plan
terraform apply
テスト用ユーザーの作成・初期パスワードの変更
AWSマネジメントコンソールからテスト用のユーザーを作成します。
公式の以下手順をご参照ください。
次にホストされたUIで初回ログイン・初回パスワード変更まで済ませます。
こちらの手順でホストされたUIを起動して、パスワード変更まで対応しておきます。
JavaScriptでDynamoDBへのアクセスを検証
今回は NodeJS, yarnを使って、以下手順でDynamoDBにアクセスできるか確かめます。
- CognitoUserPoolへのログイン
- UserPoolから取得したIDTokenを使って、IDPoolから一時的なクレデンシャル情報を取得
- 取得した一時的なクレデンシャル情報でDynamoDBにアクセスして、テーブル内容を取得する
import AWS from 'aws-sdk';
import AmazonCognitoIdentity from 'amazon-cognito-identity-js';
import dotenv from 'dotenv';
import { DynamoDBClient, ScanCommand } from '@aws-sdk/client-dynamodb';
dotenv.config();

AWS.config.region = 'ap-northeast-1';

class Auth {
  /**
   * @param  {string} userPoolId
   * @param  {string} clientId
   */
  constructor(userPoolId, clientId) {
    // UserPoolの設定
    const userPool = new AmazonCognitoIdentity.CognitoUserPool({
      UserPoolId: userPoolId,
      ClientId: clientId,
    });
    this.userPool = userPool;
  }

  /**
   * ユーザープールへのログイン処理
   * @param  {string} userName
   * @param  {string} password
   */
  async login(userName, password) {
    const authData = {
      Username: userName,
      Password: password,
    };
    const authenticationDetails =
      new AmazonCognitoIdentity.AuthenticationDetails(authData);
    const userData = {
      Username: userName,
      Pool: this.userPool,
    };
    var cognitoUser = new AmazonCognitoIdentity.CognitoUser(userData);
    return new Promise((resolve, reject) => {
      cognitoUser.authenticateUser(authenticationDetails, {
        onSuccess: async (result) => {
          resolve(result);
        },
        onFailure: async (err) => {
          reject(err);
        },
      });
    });
  }

  /**
   * ユーザープールから取得したIDTokenのJwtを取得する
   * @param  {AmazonCognitoIdentity.CognitoUserSession} userPoolSession
   */
  getIdToken(userPoolSession) {
    const token = userPoolSession.getIdToken().getJwtToken();
    return token;
  }

  /**
   * getIdTokenで取得したToken情報からjwtTokenを取得
   * @param  {string} idTokenJwt
   */
  async getTempCredintials(idTokenJwt) {
    const idPoolEndpoint = `cognito-idp.ap-northeast-1.amazonaws.com/${process.env.USER_POOL_ID}`;
    const credentials = new AWS.CognitoIdentityCredentials({
      IdentityPoolId: process.env.ID_POOL_ID,
      Logins: {
        [idPoolEndpoint]: idTokenJwt,
      },
    });
    await credentials.getPromise();
    const credentialInfo = {};
    credentialInfo.AccessKeyID = credentials.accessKeyId;
    credentialInfo.SecretAccessKey = credentials.secretAccessKey;
    credentialInfo.SessionToken = credentials.sessionToken;
    return credentialInfo;
  }
}

class Dynamo {
  /**
   * @param  {object} tempCredentials
   */
  constructor(tempCredentials) {
    const client = new DynamoDBClient({
      accessKeyId: tempCredentials.AccessKeyID,
      secretAccessKey: tempCredentials.SecretAccessKey,
      region: 'ap-northeast-1',
    });
    this.client = client;
    this.tableName = process.env.DYNAMO_TABLE;
  }
  /**
   * DynamoDBのテーブルをScanする
   */
  async scan() {
    const params = {
      TableName: this.tableName,
    };
    try {
      const result = await this.client.send(new ScanCommand(params));
      return result;
    } catch (e) {
      console.log(e);
    }
  }
}

async function getTempCredintials() {
  const auth = new Auth(process.env.USER_POOL_ID, process.env.CLIENT_ID);
  const authResult = await auth.login(process.env.USER_NAME, process.env.PASS);
  const idToken = auth.getIdToken(authResult);
  const credentials = await auth.getTempCredintials(idToken);
  return credentials;
}

async function scanDynamo(tempCredentials) {
  const dynamo = new Dynamo(tempCredentials);
  const result = await dynamo.scan();
  return result.Items;
}

const credentials = await getTempCredintials();
const scanResult = await scanDynamo(credentials);
console.log(scanResult);
動作確認
上記のサンプルコードを以下のように実行して、レコードの内容が表示されれば成功です。
node client.js
[ { Score: { N: '100' }, UserId: { S: '123' } } ]
なお、以下サンプルコードを動作させるのに必要な手順の詳細は、githubリポジトリのREADMEに記載しております。
正直コードは綺麗ではないですが、一旦動作確認できたということでリファクタはおいおい考えます!
(しないやつ)
Discussion