Androidのカスタムキーボード作成
経緯
Duolingo をやっているとき、度重なる QWERTY キーボードの入力ミスが目立っているため、新しいキーボードを開発することにしました。
Android のカスタムキーボード (Input Method; IM) の開発を調べてみたところ、初心者向けの記事があまりなかったためまとめてみようと思います。
前提
以下の YouTube で実装してくれてる人がいました。動画内ではあまり解説がなかったので、自分が実装した際に躓いた点も含めて手順を記事にすることにしました。
Kotlin 歴 3 日ほどで知識が浅いため、説明内容が不十分だと思います。内容に誤り等あればご指摘頂ければ幸いです。
開発
セットアップ
Android Studio で新しいプロジェクトを作成します。Empty Views Activity を選択します。
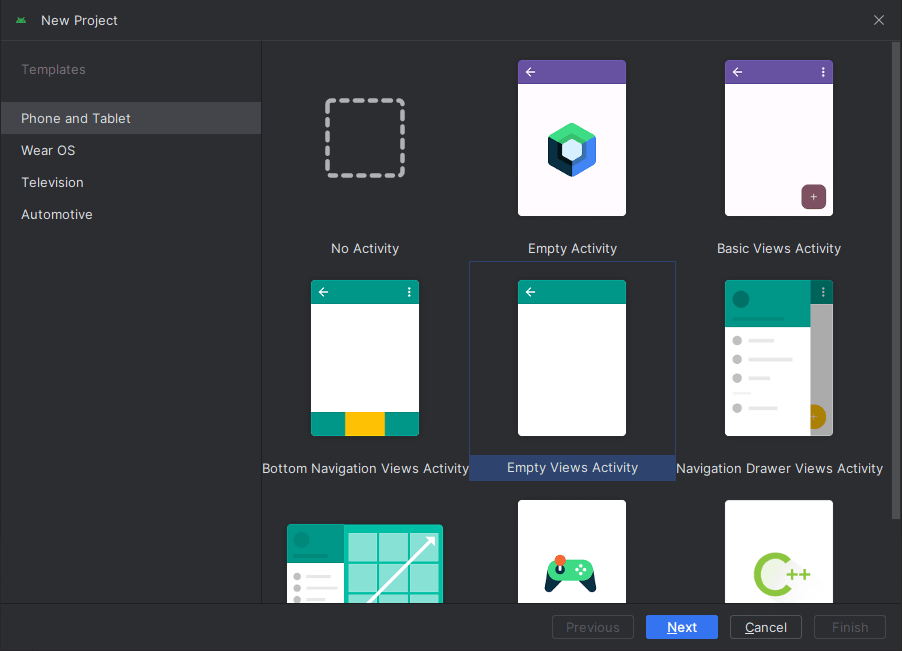
プロジェクト名や保存先などは任意で選んでください。
今回は以下の項目で進めます。
| 設定項目 | 値 |
|---|---|
| Name | MyKeyboard |
| Minimum SDK | API 30 ("R"; Android 11.0) |
| Build configuration language | Kotlin DSL (build.grade.kts) |

しばらく待つとプロジェクトが出来上がります。

💾 ここでコミット。
キーボードレイアウト
build.grade.kts (:app) の以下の箇所に buildFeatures > viewBinding の項目を追加します。
android {
    ...
    buildFeatures {
        viewBinding = true
    }
Gradle ファイルを書き換えた後、以下のようなメッセージが表示されるので、Sync Now を選択します。
これで、DataBinding が有効化されるようです。

res > drawable に btn_ripple.xml を作成します。
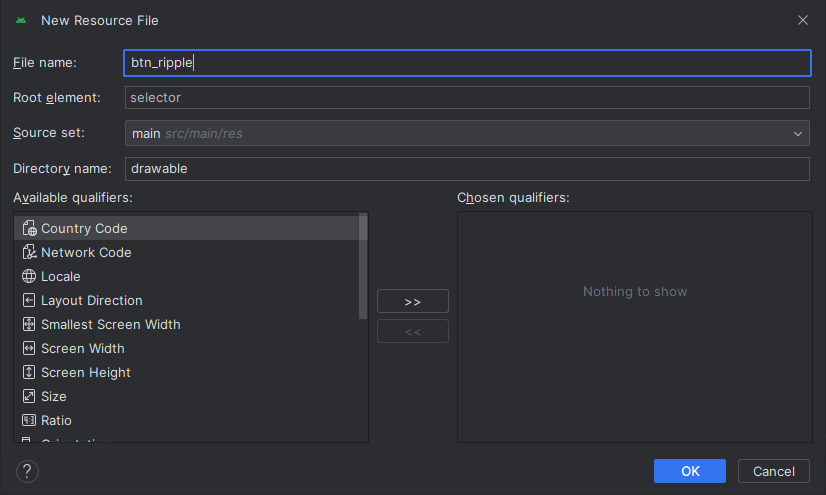
btn_ripple.xml を以下のように修正します。
<?xml version="1.0" encoding="utf-8"?>
<ripple xmlns:android="http://schemas.android.com/apk/res/android"
    android:color="@color/white">
    <item>
        <shape>
            <solid android:color="#03D0F4" />
            <corners android:radius="60dp" />
        </shape>
    </item>
</ripple>
同様に res > drawable に btn_white_ripple.xml を作成して以下のように修正します。
<?xml version="1.0" encoding="utf-8"?>
<ripple android:color="@color/white" xmlns:android="http://schemas.android.com/apk/res/android">
    <item>
        <shape>
            <solid android:color="#D6D6D6"/>
            <corners android:radius="12dp"/>
        </shape>
    </item>
</ripple>
app > res > values > themes の themes.xml を以下のように修正します。
<resources xmlns:tools="http://schemas.android.com/tools">
    <!-- Base application theme. -->
    <style name="Base.Theme.MyKeyboard" parent="Theme.Material3.DayNight.NoActionBar">
        <!-- Customize your light theme here. -->
        <!-- <item name="colorPrimary">@color/my_light_primary</item> -->

        <item name="android:windowLightStatusBar">true</item>
        <item name="android:statusBarColor">#E3EBF9</item>
    </style>

    <style name="Theme.MyKeyboard" parent="Base.Theme.MyKeyboard" />

    <style name="btnLightTheme" parent="Widget.AppCompat.Button">
        <item name="android:layout_margin">2dp</item>
        <item name="android:background">@drawable/btn_white_ripple</item>
        <item name="android:layout_width">0dp</item>
        <item name="android:layout_height">wrap_content</item>
        <item name="android:textAllCaps">false</item>
    </style>

    <style name="btnDarkTheme" parent="Widget.AppCompat.Button">
        <item name="android:layout_margin">2dp</item>
        <item name="android:background">@drawable/btn_ripple</item>
        <item name="android:layout_width">0dp</item>
        <item name="android:layout_height">wrap_content</item>
        <item name="android:textAllCaps">true</item>
    </style>
</resources>
app > res > layout に keyboard_layout.xml を作成します。


keyboard_layout.xml を以下のように修正します。
長いので省略してます。(それでも長いですが...) 全文は GitHub[2] で確認してください。
<?xml version="1.0" encoding="utf-8"?>
<LinearLayout xmlns:android="http://schemas.android.com/apk/res/android"
    android:layout_width="match_parent"
    android:layout_height="wrap_content"
    android:orientation="vertical"
    android:background="@color/white">

    <LinearLayout
        android:layout_width="match_parent"
        android:layout_height="wrap_content"
        android:layout_gravity="center"
        android:gravity="center"
        android:layout_marginHorizontal="5dp"
        android:orientation="horizontal"
        android:weightSum="10">

      <Button
          android:id="@+id/btn1"
          style="@style/btnLightTheme"
          android:layout_weight="1"
          android:text="1"/>

      <Button
          android:id="@+id/btn2"
          style="@style/btnLightTheme"
          android:layout_weight="1"
          android:text="2"/>

      <Button
          android:id="@+id/btn3"
          style="@style/btnLightTheme"
          android:layout_weight="1"
          android:text="3"/>
      ...
      <Button
          android:id="@+id/btn0"
          style="@style/btnLightTheme"
          android:layout_weight="1"
          android:text="0"/>
    </LinearLayout>

    <LinearLayout
        android:layout_width="match_parent"
        android:layout_height="wrap_content"
        android:layout_gravity="center"
        android:gravity="center"
        android:layout_marginHorizontal="5dp"
        android:orientation="horizontal"
        android:weightSum="10">

      <Button
          android:id="@+id/btnQ"
          style="@style/btnLightTheme"
          android:layout_weight="1"
          android:text="q"/>

      <Button
          android:id="@+id/btnW"
          style="@style/btnLightTheme"
          android:layout_weight="1"
          android:text="w"/>
      ...
      <Button
          android:id="@+id/btnP"
          style="@style/btnLightTheme"
          android:layout_weight="1"
          android:text="p"/>
    </LinearLayout>

    <LinearLayout
        android:layout_width="match_parent"
        android:layout_height="wrap_content"
        android:layout_gravity="center"
        android:gravity="center"
        android:layout_marginHorizontal="5dp"
        android:orientation="horizontal"
        android:weightSum="10">

      <Button
          android:id="@+id/btnA"
          style="@style/btnLightTheme"
          android:layout_weight="1"
          android:text="a"/>
      ...
      <Button
          android:id="@+id/btnL"
          style="@style/btnLightTheme"
          android:layout_weight="1"
          android:text="l"/>
    </LinearLayout>

    <LinearLayout
        android:layout_width="match_parent"
        android:layout_height="wrap_content"
        android:layout_gravity="center"
        android:gravity="center"
        android:layout_marginHorizontal="5dp"
        android:orientation="horizontal"
        android:weightSum="10">

      <Button
          android:id="@+id/btnZ"
          style="@style/btnLightTheme"
          android:layout_weight="1"
          android:text="z"/>
      ...
      <Button
          android:id="@+id/btnBackSpace"
          style="@style/btnDarkTheme"
          android:layout_weight="3"
          android:text="Back"/>
   </LinearLayout>

    <LinearLayout
        android:layout_width="match_parent"
        android:layout_height="wrap_content"
        android:layout_gravity="center"
        android:gravity="center"
        android:layout_marginHorizontal="5dp"
        android:orientation="horizontal"
        android:weightSum="10">

      <Button
          android:id="@+id/btnComma"
          style="@style/btnLightTheme"
          android:layout_weight="1"
          android:text=","/>

      <Button
          android:id="@+id/btnSpace"
          style="@style/btnDarkTheme"
          android:layout_weight="5"
          android:text="Space"/>

      <Button
          android:id="@+id/btnDot"
          style="@style/btnLightTheme"
          android:layout_weight="1"
          android:text="."/>

      <Button
          android:id="@+id/btnEnter"
          style="@style/btnDarkTheme"
          android:layout_weight="3"
          android:text="Enter"/>
    </LinearLayout>
</LinearLayout>
💾 ここでコミット。
アプリ画面
activity_main.xml を下記のように修正します。
後半の MaterialButton はそれぞれスクリーンキーボードの設定画面に遷移すること Input Method を選択する UI を表示することを実行するためのボタンとなります。
<?xml version="1.0" encoding="utf-8"?>
<LinearLayout xmlns:android="http://schemas.android.com/apk/res/android"
    xmlns:app="http://schemas.android.com/apk/res-auto"
    xmlns:tools="http://schemas.android.com/tools"
    android:layout_width="match_parent"
    android:layout_height="match_parent"
    android:orientation="vertical"
    android:background="#E3EBF9"
    android:padding="20dp"
    tools:context=".MainActivity">

    <TextView
        android:layout_width="match_parent"
        android:layout_height="wrap_content"
        android:text="@string/app_name"
        android:textColor="@color/black"
        android:textSize="20sp" />

    <TextView
        android:layout_width="wrap_content"
        android:layout_height="wrap_content"
        android:text="@string/create_your_first_custom_keyboard_application"
        android:textColor="@color/black"
        android:layout_marginTop="10dp"
        android:textSize="13sp" />

    <LinearLayout
        android:layout_width="match_parent"
        android:layout_height="match_parent"
        android:layout_gravity="center"
        android:gravity="center"
        android:orientation="vertical">

        <com.google.android.material.button.MaterialButton
            android:id="@+id/btnEnableKeyboard"
            android:layout_width="match_parent"
            android:layout_height="55dp"
            android:layout_marginTop="20dp"
            android:backgroundTint="#F69A4D"
            android:fontFamily="@font/montserrat_medium"
            android:text="@string/enable_keyboard"
            android:textAllCaps="false"
            app:cornerRadius="14dp" />

        <com.google.android.material.button.MaterialButton
            android:id="@+id/btnChooseKeyboard"
            android:layout_width="match_parent"
            android:layout_height="55dp"
            android:layout_marginTop="20dp"
            android:backgroundTint="#F69A4D"
            android:fontFamily="@font/montserrat_medium"
            android:text="@string/choose_keyboard"
            android:textAllCaps="false"
            app:cornerRadius="14dp" />
    </LinearLayout>
</LinearLayout>
私の環境には、チュートリアルにあるフォントが入っていなかったので、フォントをダウンロードします。
まずは、プレビューの Text View を選択して Attributes を開きます。
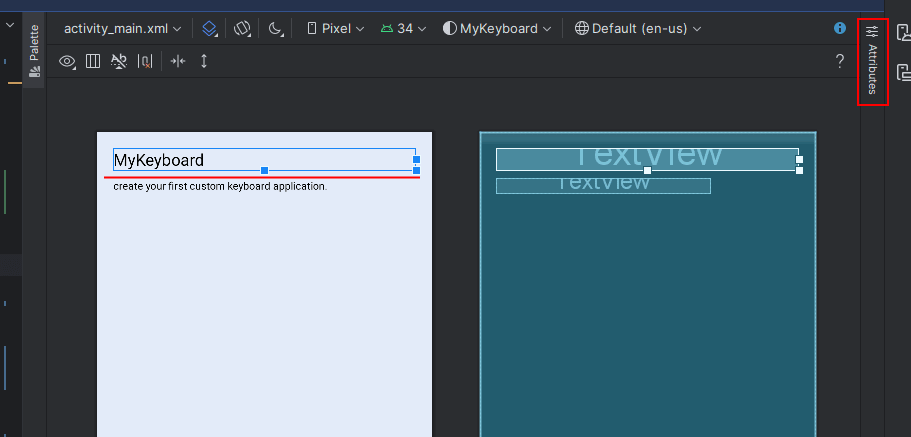
検索窓で font と検索すると、fontFamily という項目が見つかります。
ドロップダウンを開くと、その最下部に More Fonts... とある項目を選択します。

検索窓でフォントを検索し、Preview でスタイルを選択できます。
今回は、チュートリアルに沿ってフォントは montserrat を選択し、Preview はタイトルの TextView には Bold、詳細の TextView には Medium を選択しました。

TextView に android:fontFamily が以下のように追加されていることを確認してください。Android Studio が自動で追加してくれます。
<TextView
    android:layout_width="match_parent"
    android:layout_height="wrap_content"
    android:fontFamily="@font/montserrat_black"
    android:text="@string/app_name"
    android:textColor="@color/black"
    android:textSize="20sp" />
💾 ここまででコミット。
Input Method Service
Input Method Service[3] を構築します。
app > kotlin+java > com.example.mykeyboard に Kotlin のファイルを作成します。
今回は、MyInputMethodService.kt という名前で作成しました。

MyInputMethodService.kt を以下の内容に編集します。
押されるボタン毎に入力に内容を伝えるものを紐づけます。
package com.example.mykeyboard

import android.inputmethodservice.InputMethodService
import android.view.KeyEvent
import android.view.View
import android.widget.Button
import com.example.mykeyboard.databinding.KeyboardLayoutBinding

class MyInputMethodService : InputMethodService() {
    override fun onCreateInputView(): View {
        val keyboardBinding = KeyboardLayoutBinding.inflate(layoutInflater)

        // List of button IDs in your layout
        val buttonIds = arrayOf(
            R.id.btn1, R.id.btn2, R.id.btn3, R.id.btn4, R.id.btn5, R.id.btn6, R.id.btn7, R.id.btn8, R.id.btn9, R.id.btn0,
            R.id.btnQ, R.id.btnW, R.id.btnE, R.id.btnR, R.id.btnT, R.id.btnY, R.id.btnU, R.id.btnU, R.id.btnO, R.id.btnP,
            R.id.btnA, R.id.btnS, R.id.btnD, R.id.btnF, R.id.btnG, R.id.btnH, R.id.btnJ, R.id.btnK, R.id.btnL,
            R.id.btnZ, R.id.btnX, R.id.btnC, R.id.btnV, R.id.btnB, R.id.btnN, R.id.btnM,
            R.id.btnDot, R.id.btnComma
        )
        for(buttonId in buttonIds) {
            val button = keyboardBinding.root.findViewById<Button>(buttonId)
            button.setOnClickListener {
                val inputConnection = currentInputConnection
                inputConnection?.commitText(button.text.toString(), 1)
            }
        }
        keyboardBinding.btnBackSpace.setOnClickListener {
            val inputConnection = currentInputConnection
            inputConnection?.sendKeyEvent(KeyEvent(KeyEvent.ACTION_DOWN, KeyEvent.KEYCODE_DEL))
            return@setOnClickListener
        }
        keyboardBinding.btnEnter.setOnClickListener {
            val inputConnection = currentInputConnection
            inputConnection?.sendKeyEvent(KeyEvent(KeyEvent.ACTION_DOWN, KeyEvent.KEYCODE_ENTER))
            return@setOnClickListener
        }
        keyboardBinding.btnSpace.setOnClickListener {
            val inputConnection = currentInputConnection
            inputConnection?.sendKeyEvent(KeyEvent(KeyEvent.ACTION_DOWN, KeyEvent.KEYCODE_SPACE))
            return@setOnClickListener
        }

        return keyboardBinding.root
    }
}
💾 ここでコミット。
MainActivity の処理
activity_main.xml (View) のバックグラウンドの処理を記述します。
ViewBinding という手法で View とコードをバインドしているようです。
スクリーンキーボードの設定画面に遷移する機能と Input Method を選択する UI を表示する機能をそれぞれリスナーに登録します。
package com.example.mykeyboard

import android.content.Context
import android.content.Intent
import android.os.Bundle
import android.provider.Settings
import android.view.inputmethod.InputMethodManager
import android.widget.Toast
import androidx.appcompat.app.AppCompatActivity
import com.example.mykeyboard.databinding.ActivityMainBinding

class MainActivity : AppCompatActivity() {
    private lateinit var binding: ActivityMainBinding
    private fun isKeyboardEnabled(): Boolean {
        val inputMethodManager =
            getSystemService(Context.INPUT_METHOD_SERVICE) as InputMethodManager
        val enabledInputMethodIds = inputMethodManager.enabledInputMethodList.map { it.id }
        return enabledInputMethodIds.contains("com.example.mykeyboard/.MyInputMethodService")
    }

    private fun openKeyboardChooserSettings() {
        val im = getSystemService(INPUT_METHOD_SERVICE) as InputMethodManager
        im.showInputMethodPicker()
    }

    override fun onCreate(savedInstanceState: Bundle?) {
        super.onCreate(savedInstanceState)
        binding = ActivityMainBinding.inflate(layoutInflater)
        setContentView(binding.root)
        binding.apply {
            // check keyboard status
            if (isKeyboardEnabled())
                btnEnableKeyboard.isEnabled = false
            btnEnableKeyboard.setOnClickListener {
                if (!isKeyboardEnabled())
                    openKeyboardSettings()
            }
            btnChooseKeyboard.setOnClickListener {
                if (isKeyboardEnabled())
                    openKeyboardChooserSettings()
                else Toast.makeText(
                    this@MainActivity,
                    "Choose the keyboard activation button",
                    Toast.LENGTH_SHORT
                ).show()
            }
        }
    }

    private fun openKeyboardSettings() {
        val intent = Intent(Settings.ACTION_INPUT_METHOD_SETTINGS)
        startActivity(intent)
    }
}
💾 ここでコミット。
Input Method の登録
先に app > res > xml に method.xml を作成します。
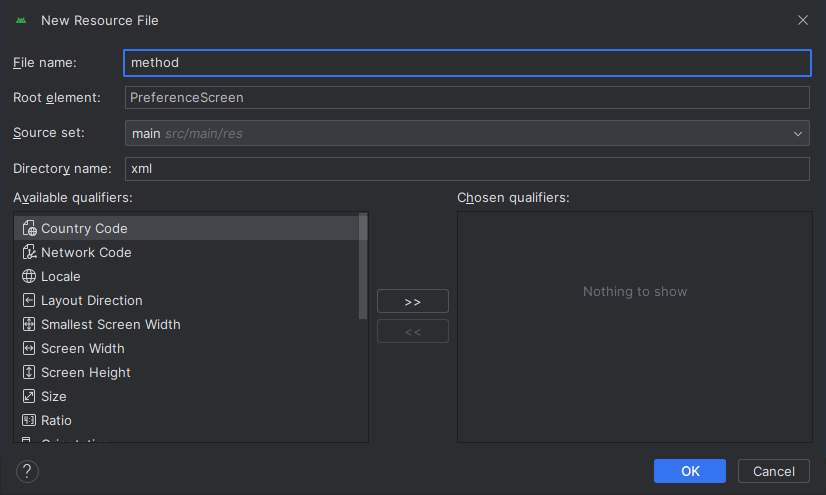
Input Method の選択時に必要なメタデータを記述します。
<?xml version="1.0" encoding="utf-8"?>
<input-method xmlns:android="http://schemas.android.com/apk/res/android">
    <subtype
        android:imeSubtypeLocale="en_US"
        android:imeSubtypeMode="keyboard"
        android:imeSubtypeExtraValue="MyKeyboard" />
</input-method>
app > manifests の AndroidManifest.xml に Input Method Service を登録します。
<?xml version="1.0" encoding="utf-8"?>
<manifest xmlns:android="http://schemas.android.com/apk/res/android"
    xmlns:tools="http://schemas.android.com/tools">

    <application
        ...
        tools:targetApi="31">
        ...

        <service
            android:name=".MyInputMethodService"
            android:exported="true"
            android:label="My Keyboard"
            android:permission="android.permission.BIND_INPUT_METHOD">
            <intent-filter>
                <action android:name="android.view.InputMethod" />
            </intent-filter>
            <meta-data
                android:name="android.view.im"
                android:resource="@xml/method" />
        </service>
    </application>
</manifest>
💾 最後にコミット。
動作確認
動きを確認してみます。想定通りの動作をしてそうですね、一安心。
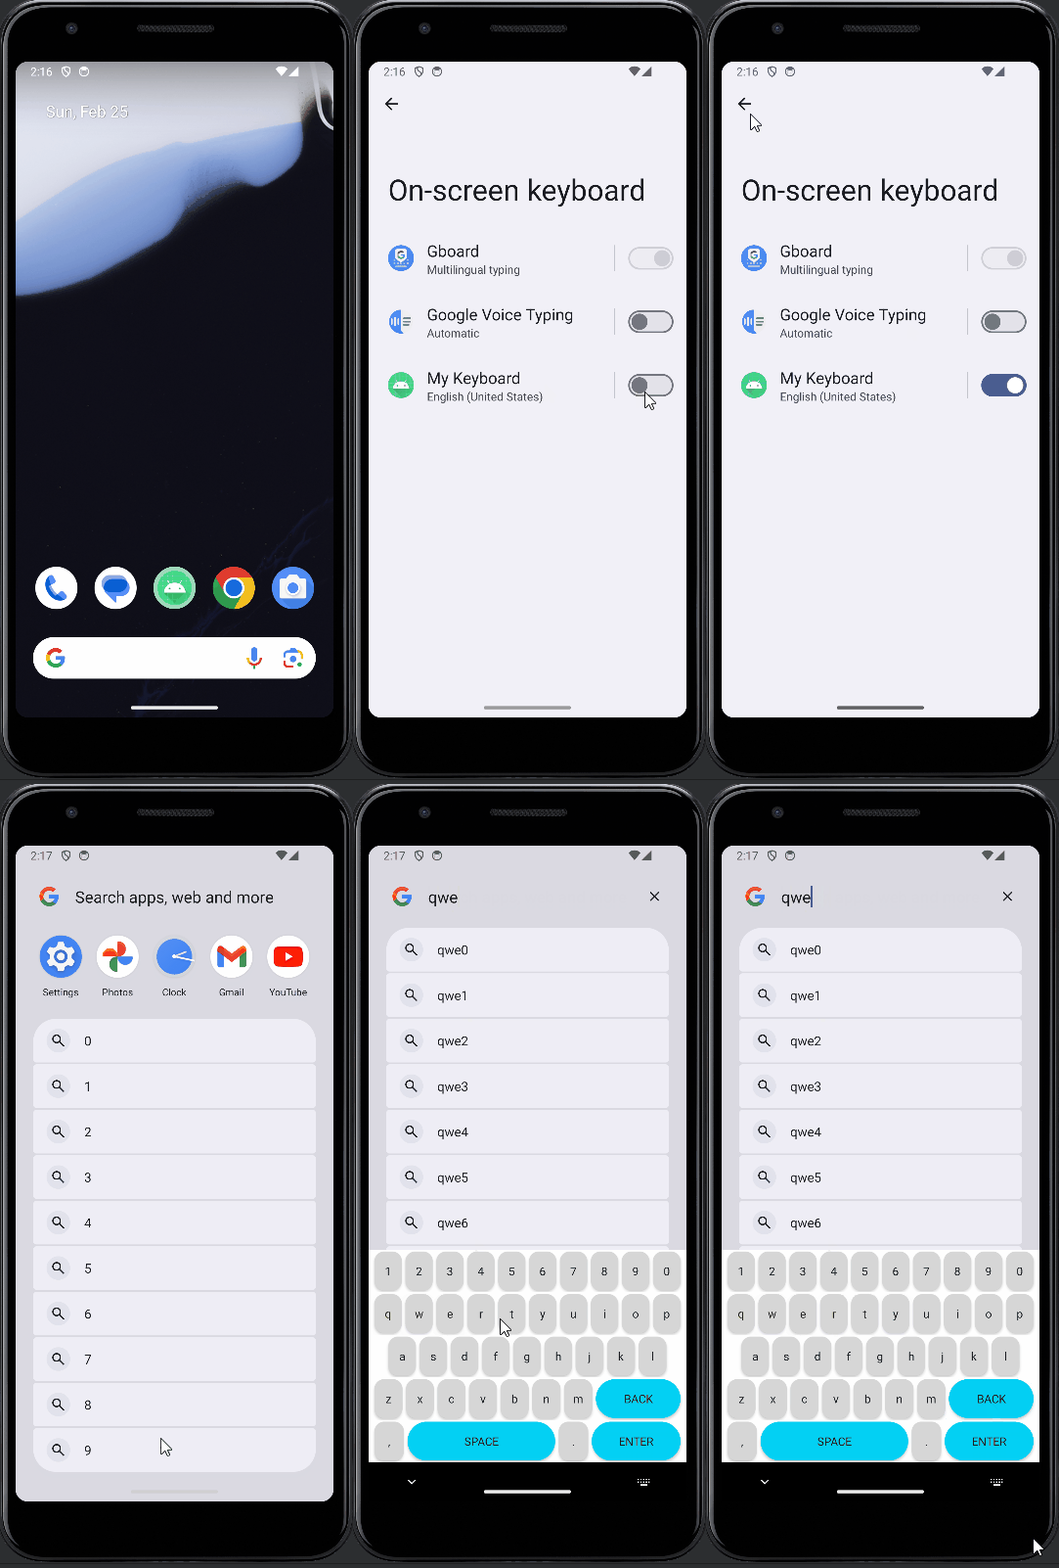
ここまでのコードは以下に置いておきます。(といっても、ほぼ写経しただけですが。)
所感
チュートリアルを作ってくれた人に感謝です。
シンプルな機能のみの実装なので、これから拡張し甲斐がありそうです。
Kotlin の文法にはほとんど慣れていないので、まずはここまでで出てきたコードに対する理解を深めていきます。
その後、自分なりに理想のキーボードに近づけていけたらと思います。
最後に、記事を書くって大変ですね。これまで良質な記事にたくさん出会ってきましたが、ありがたみを感じました。
リファレンス
Discussion