VSCodeでRustの開発環境を構築する
the book を読み進めていくために Rust をインストールするところから始めます。
1. 事始め まで完了したら VSCode で開発するための環境を構築します。
ローカルの環境は次の通りです。
$ sw_vers
ProductName:	macOS
ProductVersion:	12.0.1
BuildVersion:	21A559
1. 事始め
1.1 インストール
the book - 1. 事始め - 1.1 インストールの手順に沿って、Rust をローカルの環境にインストールします。
付録 D - 便利な開発ツールも一緒にインストールしたいので 1 を選択します。
$ curl --proto '=https' --tlsv1.2 https://sh.rustup.rs -sSf | sh

~

1) Proceed with installation (default)
2) Customize installation
3) Cancel installation
>1

info: profile set to 'default'
info: default host triple is x86_64-apple-darwin
info: syncing channel updates for 'stable-x86_64-apple-darwin'
info: latest update on 2022-12-15, rust version 1.66.0 (69f9c33d7 2022-12-12)
info: downloading component 'cargo'
info: downloading component 'clippy'
info: downloading component 'rust-docs'
 19.0 MiB /  19.0 MiB (100 %)  11.7 MiB/s in  1s ETA:  0s
info: downloading component 'rust-std'
 28.4 MiB /  28.4 MiB (100 %)  11.9 MiB/s in  2s ETA:  0s
info: downloading component 'rustc'
 55.9 MiB /  55.9 MiB (100 %)  11.3 MiB/s in  4s ETA:  0s
info: downloading component 'rustfmt'
info: installing component 'cargo'
info: installing component 'clippy'
info: installing component 'rust-docs'
 19.0 MiB /  19.0 MiB (100 %)   4.7 MiB/s in  2s ETA:  0s
info: installing component 'rust-std'
 28.4 MiB /  28.4 MiB (100 %)  14.2 MiB/s in  2s ETA:  0s
info: installing component 'rustc'
 55.9 MiB /  55.9 MiB (100 %)  13.8 MiB/s in  4s ETA:  0s
info: installing component 'rustfmt'
info: default toolchain set to 'stable-x86_64-apple-darwin'

  stable-x86_64-apple-darwin installed - rustc 1.66.0 (69f9c33d7 2022-12-12)


Rust is installed now. Great!
Rust が正常にインストールされていることを確認します。
$ rustc --version
rustc 1.66.0 (69f9c33d7 2022-12-12)
1.2 Hello World!
Hello, World!プロジェクトのディレクトリを作成します。
$ mkdir hello_world
$ cd hello_world
$ touch main.rs
ファイル名に 2 単語以上使う場合は、アンダースコアで区切るのがしきたりのようです。
例えば、 helloworld.rs ではなく hello_world.rs とする。
fn main() {
    println!("Hello, world!");
}
ファイルをコンパイルして実行します。
$ rustc main.rs
$ ./main
Hello, World!
1.3 Hello, Cargo!
Cargo は Rust のビルドシステム兼パッケージマネージャです。
the book では、Hello, Cargo!プロジェクトを新たに作成していますが、同じリポジトリ内で進めたいので cargo init を使います。
$ cargo init
    Created binary (application) package
Cargo.toml や src/main.rs が作られます。
1.2 で作成したプログラムと一緒に src ディレクトリ内に配置します。
$ tree ./src
./src
├── hello_cargo
│   └── main.rs
└── hello_world
    └── main.rs

2 directories, 2 files
プロジェクト別に実行バイナリを作成したいので、 Cargo.toml に [[bin]] セクションを追加します。
[package]
name = "rust-the-book"
version = "0.1.0"
edition = "2021"

# See more keys and their definitions at https://doc.rust-lang.org/cargo/reference/manifest.html

[[bin]]
name = "hello_world"
path = "src/hello_world/main.rs"

[[bin]]
name = "hello_cargo"
path = "src/hello_cargo/main.rs"

[dependencies]
Cargo プロジェクトをコンパイルして、実行します。
$ cargo build
   Compiling rust-the-book v0.1.0 (***)
    Finished dev [unoptimized + debuginfo] target(s) in 0.62s

$ ./target/debug/hello_world
Hello, world!

$ ./target/debug/hello_cargo
Hello, Cargo!
cargo run はコードのコンパイルから、できた実行ファイルの実行までを一つのコマンドで行えます。
[[bin]] セクションが複数あるので、 --bin の指定が必要です。
$ cargo run
error: `cargo run` could not determine which binary to run. Use the `--bin` option to specify a binary, or the `default-run` manifest key.

$ cargo run --bin hello_world
    Finished dev [unoptimized + debuginfo] target(s) in 0.00s
     Running `target/debug/hello_world`
Hello, World!

$ cargo run --bin hello_cargo
    Finished dev [unoptimized + debuginfo] target(s) in 0.00s
     Running `target/debug/hello_cargo`
Hello, Cargo!
VSCode で開発環境を構築
便利な開発ツールを開発中に使う
rust-analyzer という拡張機能をインストールします。
Cargo.toml ファイルが存在しないと、 rust-analyzer failed to discover workspace というエラーが出て拡張機能が動作しないので注意すること。
Clippy による静的解析と保存時に rustfmt による自動フォーマットが走るように設定を変更します。
{
  "rust-analyzer.checkOnSave.command": "clippy",
  "editor.formatOnSave": true
}
VS Code Server 上で開発する
Dev Containers という拡張機能をインストールします。
ウィンドウ左下の Open a Remote Window マークをクリックし、表示されたコマンドパレットから Reopen in Container を選択する。
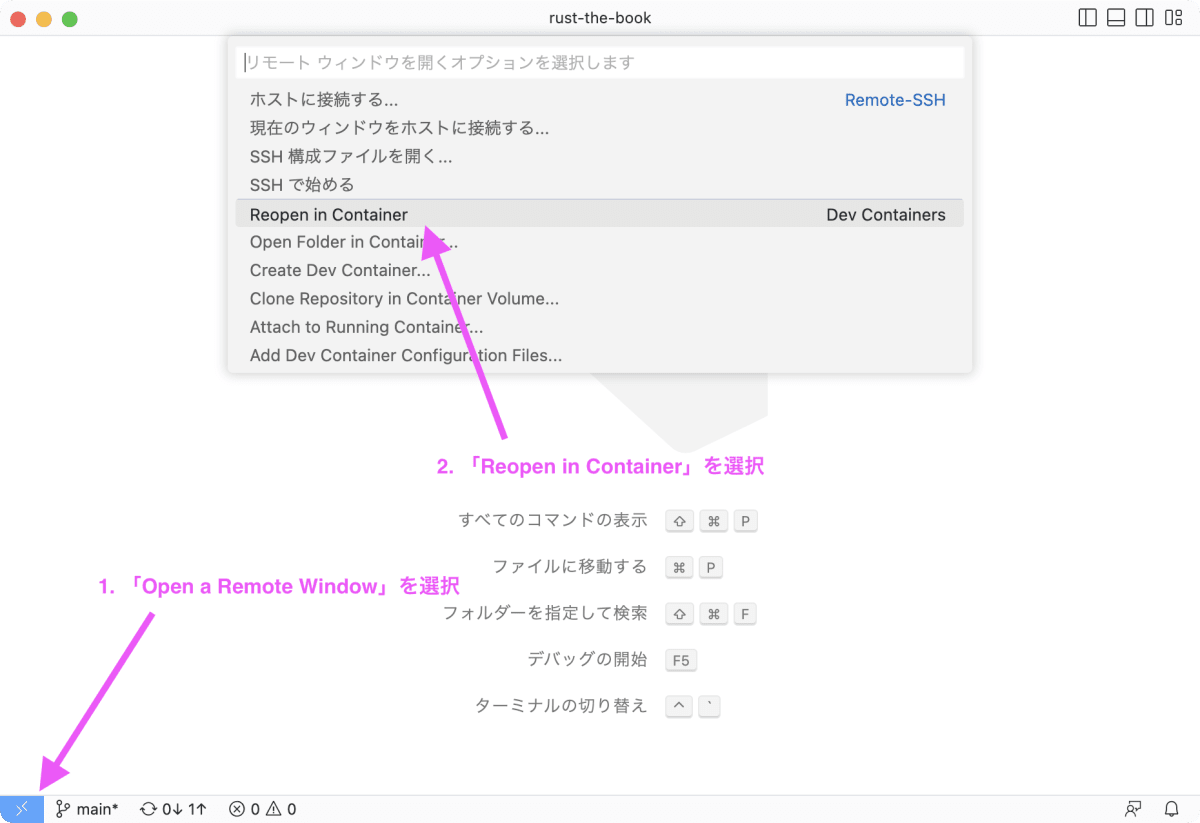
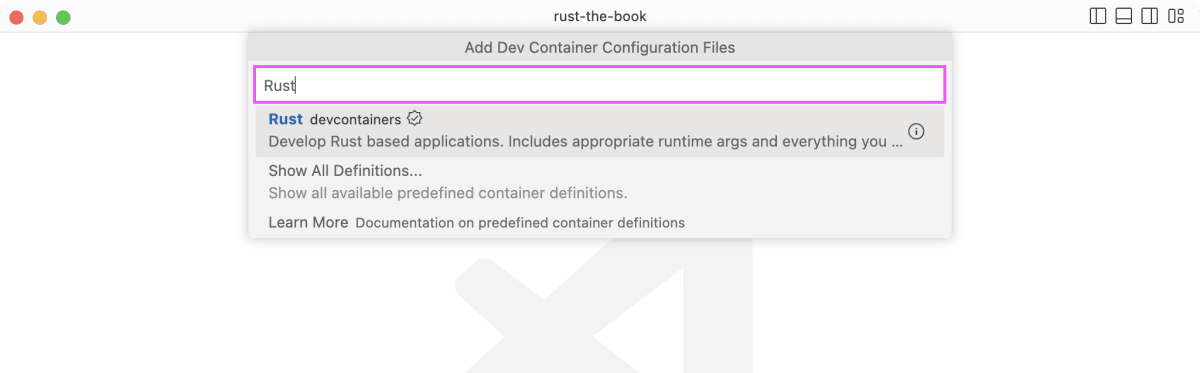
コンテナーは VSCode 用の Rust イメージを選択し、Container の OS は buster を選択、追加でインストールするものは指定しない。
この環境で the book を読み進めていこうと思います。
ここまでの成果物はこのタグでまとめています。
Discussion