【Dev】Blockchainをjsで実装してみる(その6:ノードの同期編)
まずは雑談から
先日、今までずっと距離をとってきたDeFiを始めてみました。なんでトークンをペアにして預けるんだとか、その辺は少しずつ勉強しながら(ある程度今は理解できたように思います)適当に約数千円程度の資産を預けてみて、これはこれでやっぱり面白いのですが、その面白さの感覚はSTEPNに似た感覚であったことにびっくりしました。GameFiもDeFiもどちらもファイナンス・サービスであるのでそりゃまぁ似てる訳ですね。そう考えると、確かに毎日歩いて少しずつ資産が増えていく感覚はDeFiに資産を寝かせて少しずつ増えていく感覚と本質は同じなのかもしれません。毎日歩きたくない人はSTEPNなんてやらずにDeFiをやればいいんですね。私はと言うと、毎日犬の散歩をしているのでしばらくSTEPN続けようと思っています。
ではここから本題。
前回の補足
前回のBlogではノードを複数立ち上げて各ノードを同期させる仕組みを解説したのですが、実際に同期を取るとどのようになるのか説明するのを忘れていました。(結構書き上げるのに時間がかかってしまい早く公開したかったのです...)前回のBlogからのコピペですが、シングルノードを立ち上げた直後はこうなります。
{
  "chain": [
    {
      "index": 1,
      "timestamp": 1660462380627,
      "transactions": [

      ],
      "nonce": 100,
      "hash": "0",
      "previousBlockHash": "0"
    }
  ],
  "pendingTransactions": [

  ],
  "currentNodeUrl": "http://localhost:3001",
  "networkNodes": [

  ]
}
起動直後のノードについて押さえておきたいポイントは以下の通り。
- GenesisBlock(一番最初のBlock)として、ひとつ適当なBlockが生成済みである。
- pendingTransactionsには何もない
- networkNodesにも何もない(まだ各ノード同士が同期していない)
この状態で、まずは一つノードを追加してみましょう。

networkNodesにノードが追加されました。
{
  "chain": [
    {
      "index": 1,
      "timestamp": 1661244618799,
      "transactions": [

      ],
      "nonce": 100,
      "hash": "0",
      "previousBlockHash": "0"
    }
  ],
  "pendingTransactions": [

  ],
  "currentNodeUrl": "http://localhost:3001",
  "networkNodes": [
    "http://localhost:3002"
  ]
}
localhost:3002の方もみてみましょう。
{
  "chain": [
    {
      "index": 1,
      "timestamp": 1661243730356,
      "transactions": [

      ],
      "nonce": 100,
      "hash": "0",
      "previousBlockHash": "0"
    }
  ],
  "pendingTransactions": [

  ],
  "currentNodeUrl": "http://localhost:3002",
  "networkNodes": [
    "http://localhost:3001"
  ]
}
こちらにもノードが追加されています。では、もう一つノードを追加してみます。

{
  "chain": [
    {
      "index": 1,
      "timestamp": 1661244618799,
      "transactions": [

      ],
      "nonce": 100,
      "hash": "0",
      "previousBlockHash": "0"
    }
  ],
  "pendingTransactions": [

  ],
  "currentNodeUrl": "http://localhost:3001",
  "networkNodes": [
    "http://localhost:3002",
    "http://localhost:3003"
  ]
}
{
  "chain": [
    {
      "index": 1,
      "timestamp": 1661243730356,
      "transactions": [

      ],
      "nonce": 100,
      "hash": "0",
      "previousBlockHash": "0"
    }
  ],
  "pendingTransactions": [

  ],
  "currentNodeUrl": "http://localhost:3002",
  "networkNodes": [
    "http://localhost:3001",
    "http://localhost:3003"
  ]
}
{
  "chain": [
    {
      "index": 1,
      "timestamp": 1661243742671,
      "transactions": [

      ],
      "nonce": 100,
      "hash": "0",
      "previousBlockHash": "0"
    }
  ],
  "pendingTransactions": [

  ],
  "currentNodeUrl": "http://localhost:3003",
  "networkNodes": [
    "http://localhost:3002",
    "http://localhost:3001"
  ]
}
いい感じにお互いのノードのことを認識し合っていますね。想定通りです。データ上同一ネットワークのノードを登録することができたので、ここからデータを同期させる処理を作ってみます。
ノードを同期させる(Transaction)
同期が必要なデータは2種類あります。Blockに書き込まれる前のTransactionと、マイニングでつくられるBlockです。どちらの場合も、自ノードにおいて行なった処理と同じ処理を他ノードのRestAPIで行うようになります。
ここにきてただただコードを貼り付けるだけになってしまいますが、まずTransactionの同期処理です。/transaction/broadcast というAPIでまず自ノードのPendingTransactionに追加をしています。その後、全く同じ処理をPromise.all()によりすべてのノードで実行しています。
app.post('/transaction', function (req, res) {
    const newTransaction = req.body;
    const blockIndex = bitcoin.addTransactionToPendingTransactions(newTransaction);
    res.json({ note: `Transaction will be added in block ${blockIndex}.` });
});

app.post('/transaction/broadcast', function (req, res) {
    console.log(req.body.amount + ","
        + req.body.sender + ","
        + req.body.recipient)
    const newTransaction = bitcoin.createNewTransancion(
        req.body.amount, req.body.sender, req.body.recipient
    );
    bitcoin.addTransactionToPendingTransactions(newTransaction);

    const requestPromises = [];
    bitcoin.networkNodes.forEach(networkNodeUrl => {
        const requestOptions = {
            uri: networkNodeUrl + '/transaction',
            method: 'POST',
            body: newTransaction,
            json: true
        };

        requestPromises.push(rp(requestOptions));
    });

    Promise.all(requestPromises)
        .then(data => {
            res.json({ note: 'Transaction created and broadcast successfully.' });
        });
});
マイニングされたBlockの同期も同様です。まず自ノードにおいてbitcoin.createNewBlock()でブロックを生成します。その後、/receive-new-blockをリクエストして他のノードでも同様にブロックを生成します。
app.get('/mine', function (req, res) {
    const lastBlock = bitcoin.getLastBlock();
    const previousBlockHash = lastBlock['hash'];
    const currentBlockData = {
        transactions: bitcoin.pendingTransactions,
        index: lastBlock['index'] + 1
    };
    const nonce = bitcoin.proofOfWork(previousBlockHash, currentBlockData);
    const blockHash = bitcoin.hashBlock(previousBlockHash, currentBlockData, nonce);
    const newBlock = bitcoin.createNewBlock(nonce, previousBlockHash, blockHash);

    const requestPromises = [];
    bitcoin.networkNodes.forEach(networkNodeUrl => {
        const requestOptions = {
            uri: networkNodeUrl + '/receive-new-block',
            method: 'POST',
            body: { newBlock: newBlock },
            json: true
        };

        requestPromises.push(rp(requestOptions));
    });

    Promise.all(requestPromises)
        .then(data => {
            const requestOptions = {
                uri: bitcoin.currentNodeUrl + '/transaction/broadcast',
                method: 'POST',
                body: {
                    amount: 12.5,
                    sender: "00",
                    recipient: nodeAddress
                },
                json: true
            };

            return rp(requestOptions);
        })
        .then(data => {
            res.json({
                note: "New block mined & broadcast successfully.",
                block: newBlock
            });
        });
});

app.post('/receive-new-block', function (req, res) {
    const newBlock = req.body.newBlock;
    const lastBlock = bitcoin.getLastBlock();
    const correctHash = lastBlock.hash === newBlock.previousBlockHash;
    const correctIndex = lastBlock['index'] + 1 === newBlock['index'];

    if (correctHash && correctIndex) {
        bitcoin.chain.push(newBlock);
        bitcoin.pendingTransactions = [];
        res.json({
            note: 'New block received and accepted.',
            newBlock: newBlock
        });
    } else {
        res.json({
            note: 'New block rejected.',
            newBlock: newBlock
        });
    }
});
あら、なんて簡単なんでしょう。何が簡単かというと、コーディングが簡単なのではなく(コードのコピペがメインなので)Blogを書くのが簡単なんです!
実際にトランザクションを作ってマイニングしてみる
では検証してみましょう。トランザクションを一つ作成してみます。

見てみます。
{
  "chain": [
    {
      "index": 1,
      "timestamp": 1662183795756,
      "transactions": [

      ],
      "nonce": 100,
      "hash": "0",
      "previousBlockHash": "0"
    }
  ],
  "pendingTransactions": [
    {
      "amount": 10,
      "sender": "03q4fh80fqghy",
      "recipient": "q3w0f8uvfqry8g0",
      "transactionId": "17a4e4802b6f11edb69f615fa80fb353"
    }
  ],
  "currentNodeUrl": "http://localhost:3001",
  "networkNodes": [
    "http://localhost:3002",
    "http://localhost:3003",
    "http://localhost:3004",
    "http://localhost:3005"
  ]
}
別のノードも見てみます。
{
  "chain": [
    {
      "index": 1,
      "timestamp": 1662183808852,
      "transactions": [

      ],
      "nonce": 100,
      "hash": "0",
      "previousBlockHash": "0"
    }
  ],
  "pendingTransactions": [
    {
      "amount": 10,
      "sender": "03q4fh80fqghy",
      "recipient": "q3w0f8uvfqry8g0",
      "transactionId": "17a4e4802b6f11edb69f615fa80fb353"
    }
  ],
  "currentNodeUrl": "http://localhost:3002",
  "networkNodes": [
    "http://localhost:3001",
    "http://localhost:3003",
    "http://localhost:3004",
    "http://localhost:3005"
  ]
}
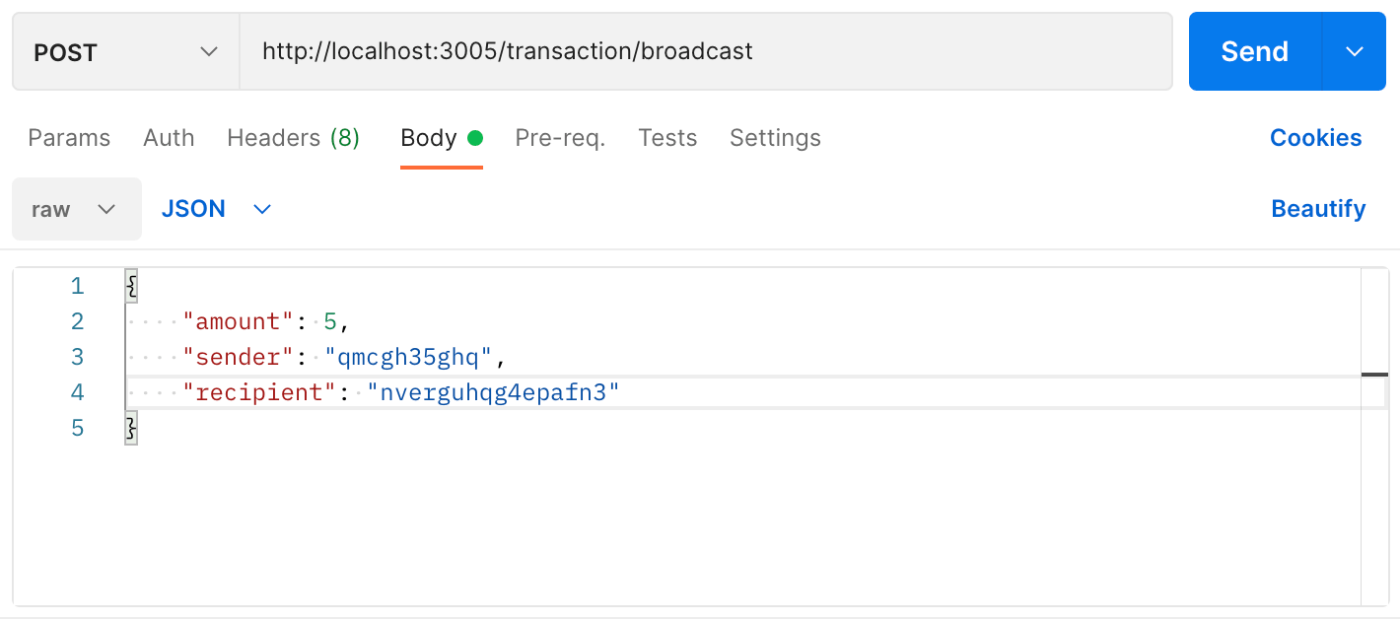
成功です!同じトランザクションが別ノードにもつくられています。ではもう一発トランザクションを作ってみます。今度は別ノードにリクエストを投げます。

{
  "chain": [
    {
      "index": 1,
      "timestamp": 1662183826041,
      "transactions": [

      ],
      "nonce": 100,
      "hash": "0",
      "previousBlockHash": "0"
    }
  ],
  "pendingTransactions": [
    {
      "amount": 10,
      "sender": "03q4fh80fqghy",
      "recipient": "q3w0f8uvfqry8g0",
      "transactionId": "17a4e4802b6f11edb69f615fa80fb353"
    },
    {
      "amount": 5,
      "sender": "qmcgh35ghq",
      "recipient": "nverguhqg4epafn3",
      "transactionId": "afba4da02b6f11ed95643d279feef678"
    }
  ],
  "currentNodeUrl": "http://localhost:3005",
  "networkNodes": [
    "http://localhost:3002",
    "http://localhost:3003",
    "http://localhost:3004",
    "http://localhost:3001"
  ]
}
{
  "chain": [
    {
      "index": 1,
      "timestamp": 1662183819969,
      "transactions": [

      ],
      "nonce": 100,
      "hash": "0",
      "previousBlockHash": "0"
    }
  ],
  "pendingTransactions": [
    {
      "amount": 10,
      "sender": "03q4fh80fqghy",
      "recipient": "q3w0f8uvfqry8g0",
      "transactionId": "17a4e4802b6f11edb69f615fa80fb353"
    },
    {
      "amount": 5,
      "sender": "qmcgh35ghq",
      "recipient": "nverguhqg4epafn3",
      "transactionId": "afba4da02b6f11ed95643d279feef678"
    }
  ],
  "currentNodeUrl": "http://localhost:3004",
  "networkNodes": [
    "http://localhost:3002",
    "http://localhost:3003",
    "http://localhost:3001",
    "http://localhost:3005"
  ]
}
これまた成功です。同じpendingTransactionが各ノードで同期されていますね。
ではマイニングしてみます。
{
  "note": "New block mined & broadcast successfully.",
  "block": {
    "index": 2,
    "timestamp": 1662284579401,
    "transactions": [
      {
        "amount": 10,
        "sender": "03q4fh80fqghy",
        "recipient": "q3w0f8uvfqry8g0",
        "transactionId": "17a4e4802b6f11edb69f615fa80fb353"
      },
      {
        "amount": 5,
        "sender": "qmcgh35ghq",
        "recipient": "nverguhqg4epafn3",
        "transactionId": "afba4da02b6f11ed95643d279feef678"
      }
    ],
    "nonce": 2698,
    "hash": "000044a081f99561999452288683cd4babb139bb9cba2a8cd372cd0a9547187f",
    "previousBlockHash": "0"
  }
}
マイニングは成功しました。では他のノードを見てみます。
{
  "chain": [
    {
      "index": 1,
      "timestamp": 1662183795756,
      "transactions": [

      ],
      "nonce": 100,
      "hash": "0",
      "previousBlockHash": "0"
    },
    {
      "index": 2,
      "timestamp": 1662284579401,
      "transactions": [
        {
          "amount": 10,
          "sender": "03q4fh80fqghy",
          "recipient": "q3w0f8uvfqry8g0",
          "transactionId": "17a4e4802b6f11edb69f615fa80fb353"
        },
        {
          "amount": 5,
          "sender": "qmcgh35ghq",
          "recipient": "nverguhqg4epafn3",
          "transactionId": "afba4da02b6f11ed95643d279feef678"
        }
      ],
      "nonce": 2698,
      "hash": "000044a081f99561999452288683cd4babb139bb9cba2a8cd372cd0a9547187f",
      "previousBlockHash": "0"
    }
  ],
  "pendingTransactions": [
    {
      "amount": 12.5,
      "sender": "00",
      "recipient": "59c46c602b4b11ed91a755425883e6e4",
      "transactionId": "f63990d02c3511ed91a755425883e6e4"
    }
  ],
  "currentNodeUrl": "http://localhost:3001",
  "networkNodes": [
    "http://localhost:3002",
    "http://localhost:3003",
    "http://localhost:3004",
    "http://localhost:3005"
  ]
}
同じブロックがちゃんとindexの2番目に追加されました。ばんざーい!!
ということで、Blockchainのコーディングでもう一つ大事なところで、ノード間でのデータ不整合が起こった時のリカバリ処理があるので、また時間がとれた時にこちらの処理の解説を投稿します!しかしもしかしたら次は別のBlogを更新しているかもしれません。


Discussion