Next.js のプロジェクトを開発しやすいようにするlintとformatterなどの設定
動機
結構 lint 系がアップデートされていたり、以前は必要だったものがいらなくなっていたりしていて自分が作った以前のテンプレートだとちょっと不要な設定などが増えていたので、
これを機に調査しながら設定を見直そうかなと。
今回作ったもの
この記事で設定をした Next.js のテンプレートはこちらに公開してあります。
前提
node: v18.17.1
next.js: 13 系
React: 18 系
Next.js
まずは Next.js のインストールから。どんなプロジェクトであれ TypeScript で開発をしたいから --ts をつけます。
$ npx create-next-app@latest --ts
あとは設問に答えていけば基本的なプロジェクトが作られます。基本的に全て Enter で問題ないです。
ちなみに Would you like to customize the default import alias? はデフォルトで No になっています。 Yes にするとインポートエイリアスをするときの接頭辞を任意のものにすることができます。
デフォルトだと @ になっているので例えば下記のように相対パスがなっている ../../../ を @/ に置き換えることができます。import の記述を減らせたり、そもそも読みにくくなってしまうのでインポートエイリアスは使った方が良いですね。
- import { SampleComponent } from "../../../components/SampleComponent"; // ↓にできる
+ import { SampleComponent } from "@/components/SampleComponent";
おそらく下記のような感じで設問に答えていけば問題ないです。
Need to install the following packages:
  create-next-app@13.4.19
Ok to proceed? (y)
✔ What is your project named? … next-template
✔ Would you like to use ESLint? … Yes
✔ Would you like to use Tailwind CSS? … Yes
✔ Would you like to use `src/` directory? … Yes
✔ Would you like to use App Router? (recommended) … Yes
✔ Would you like to customize the default import alias? … No
Creating a new Next.js app in /`path`

Using npm.

Initializing project with template: app-tw
このままでも十分開発を進めることはできます。ただ、実はちょっと使いにくい部分も現状あったります。なので基本ベースは Next.js の推奨のものにしてちょっと手を加えるくらいがちょうどいいかなと思います。
eslint
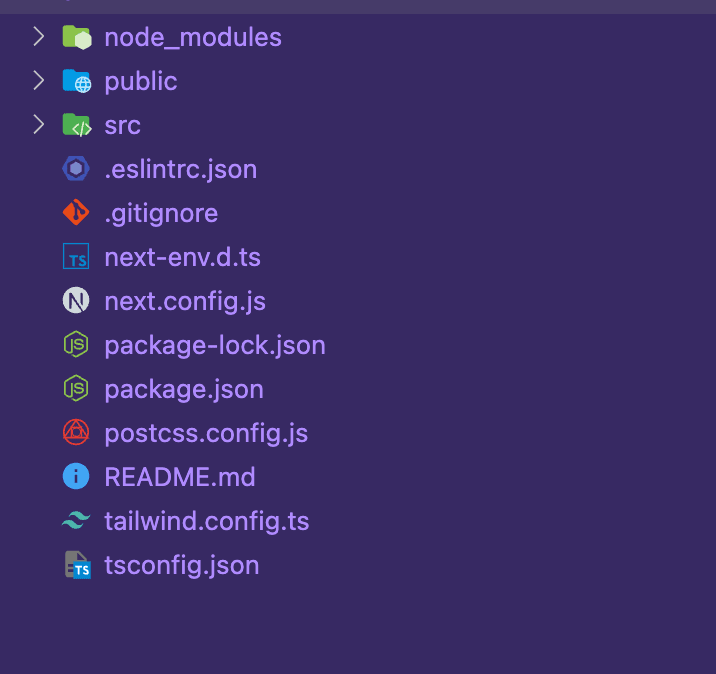
Next.js のデフォルトの ESLint 設定は .eslintrc.json ファイルを参照して行われます。プロジェクト直下にある .eslintrc.json を見てみるとすでに設定がされているのがわかります。
{
  "extends": "next/core-web-vitals"
}
Next.js 推奨設定
既存の設定では、 ESLint プラグインの推奨ルールセットはすべて eslint-config-next で使用されます。eslint-plugin-react,eslint-plugin-react-hooks,eslint-plugin-next が含まれています。
以前は下記のプラグインなんかもインストールして使っていたましたが eslint-config-next に含まれているのでインストールが不要になりました。
extends: [
  'plugin:react/recommended',
  'plugin:react-hooks/recommended',
  'plugin:@next/next/recommended',
],
plugins: ['import', 'react', 'jsx-a11y'],
さらに next/core-web-vitals にはより厳しい Core Web Vitals のルールセットを含みます。
公式
core-web-vitals とは
Google の Core Web Vitals は、ウェブページのパフォーマンスを測定するための主要な指標のセットです。これには、ロード時間(Largest Contentful Paint)、インタラクティビティ(First Input Delay)、視覚的な安定性(Cumulative Layout Shift)が含まれます。
例えば、<img> ではなく <Image> を使うようにルールが追加されています。
Using `<img>` could result in slower LCP and higher bandwidth. Consider using `<Image />` from `next/image` to automatically optimize images. This may incur additional usage or cost from your provider. See: https://nextjs.org/docs/messages/no-img-elementeslint@next/next/no-img-element
設定ファイル
次に eslint の設定ファイルをしていきます。ちなみに、設定ファイルが複数ある場合には上から順番に優先度が高くなります。
- .eslintrc.js
- .eslintrc.cjs
- .eslintrc.yaml
- .eslintrc.yml
- .eslintrc.json
- package.json
今回は next.js に倣って .eslintrc.json と行きたいところだけど優先度が高い.eslintrc.js にします。正直設定ファイルがいくつも作られるってことはないけどだからこそ優先度の高いものにしておきたい。
ESLint v9.0.0 からは上記は非推奨になる
eslint.config.jsを使うことになる
とのことなのでまた近いうちに設定ファイルを見直さないといけないかもしれません・・・
とりあえず今回はプロジェクト直下に .eslintrc.js を作成し、既存の .eslintrc.json は削除しましょう。.eslintrc.js の中身は下記のようにしてください。
module.exports = {
  root: true,
  extends: ["next/core-web-vitals"],
  plugins: [],
  rules: {},
};
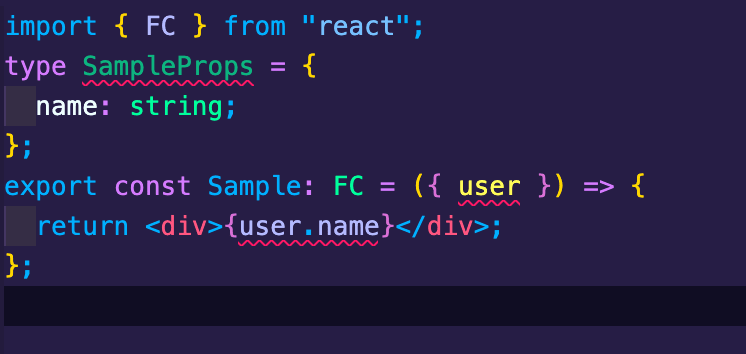
ルールについては基本的にはこのままで良いのですが、 実は TypeScript のエラーが通過してしまうんですよね。例えば下記のような React のコンポーネントがあったとして。。。
import { FC } from "react";
type SampleProps = {
  name: string;
};
export const Sample: FC = ({ user }) => {
  return <div>{user.name}</div>;
};
SampleProps を使用していなかったりしているんですけどエラーが通ります。lint を走らせてみて試してみます。
{
  "name": "test-next",
  "version": "0.1.0",
  "private": true,
  "scripts": {
    "dev": "next dev",
    "build": "next build",
    "start": "next start",
+   "lint": "eslint --ext .ts,.js,.tsx . "
  },
  "dependencies": {
    "@types/node": "20.6.1",
    "@types/react": "18.2.21",
    "@types/react-dom": "18.2.7",
    "autoprefixer": "10.4.15",
    "eslint": "8.49.0",
    "eslint-config-next": "13.4.19",
    "next": "13.4.19",
    "postcss": "8.4.29",
    "react": "18.2.0",
    "react-dom": "18.2.0",
    "tailwindcss": "3.3.3",
    "typescript": "5.2.2"
  }
}
$ npm run lint
特にエラーが発生しないかと思います。これでは eslint を入れている意味がないのでちゃんとエラーになるように設定をします。またルールの追加をしてより厳密に lint できるようにします。
no-unsafe-call, no-unsafe-member-access, no-unsafe-return のルールを追加するのですがその際 parserOptions.project にプロジェクトの tsconfig を指定する必要があります。また parser に @typescript-eslint/parser を指定しないと正常に lint が走らないのでこれも合わせて設定をします。
TypeScript 用の eslint 設定と parser のインストールをします。
npm i -D @typescript-eslint/eslint-plugin @typescript-eslint/parser
.eslintrc.js に設定を追加します。
module.exports = {
  root: true,
- extends: ["next/core-web-vitals"],
+ extends: ["plugin:@typescript-eslint/recommended", "next/core-web-vitals"],
  plugins: [],
+ parser: "@typescript-eslint/parser",
+  parserOptions: {
+   project: "./tsconfig.json",
+ },
  rules: {
+  "@typescript-eslint/no-unused-vars": "error",
+  "@typescript-eslint/no-explicit-any": "warn",
+  "@typescript-eslint/no-unsafe-call": "error",
+  "@typescript-eslint/no-unsafe-member-access": "error",
+  "@typescript-eslint/no-unsafe-return": "error",
  },
};
このままだと .eslintrc.js などの見なくてもいいファイルまでエラーになってしまうので .eslintignoreファイルを作成して除外します。
node_modules
.next
out
public
.prettierrc.js
.eslintrc.js
tailwind.config.js
next.config.js
postcss.config.js
これでコード上もちゃんとエラーになっています。
では次に lint を走らせてみます。
$ npm run lint
ちゃんとエラーが出ていますね。
./src/app/components/Sample.tsx
2:6  Warning: 'SampleProps' is defined but never used.  @typescript-eslint/no-unused-vars
6:16  Error: Unsafe member access .name on an `any` value.  @typescript-eslint/no-unsafe-member-access
参考
未使用の import 文を削除する設定
Component の開発やページを作成していると途中で使っていない import 文ってたくさん出ちゃいますよね。いちいち手動で消すのはめんどくさいので自動化します。eslint のプラグインで eslint-plugin-unused-imports というのがあるのでインストールをして設定します。
$ npm i -D eslint-plugin-unused-imports
.eslintrc.js の設定を変えます。
module.exports = {
  root: true,
  extends: ["plugin:@typescript-eslint/recommended", "next/core-web-vitals"],
- plugins: [],
+ plugins: ["unused-imports"],
  parser: "@typescript-eslint/parser",
  parserOptions: {
    project: "./tsconfig.json",
  },
  rules: {
    "@typescript-eslint/no-unused-vars": "error",
    "@typescript-eslint/no-explicit-any": "warn",
    "@typescript-eslint/no-unsafe-call": "error",
    "@typescript-eslint/no-unsafe-member-access": "error",
    "@typescript-eslint/no-unsafe-return": "error",
+   "unused-imports/no-unused-imports-ts": "warn",
  },
};
import/order
次に import 文の順番にルールを持してみやすくします。これも保存をすれば自動で並び替えをしてくれます。
module.exports = {
  root: true,
  extends: ["plugin:@typescript-eslint/recommended", "next/core-web-vitals"],
  plugins: ["unused-imports"],
  parser: "@typescript-eslint/parser",
  parserOptions: {
    project: "./tsconfig.json",
  },
  rules: {
    "@typescript-eslint/no-unused-vars": "error",
    "@typescript-eslint/no-explicit-any": "warn",
    "@typescript-eslint/no-unsafe-call": "error",
    "@typescript-eslint/no-unsafe-member-access": "error",
    "@typescript-eslint/no-unsafe-return": "error",
    "unused-imports/no-unused-imports-ts": "warn",
+   "import/order": [
+    "error",
+     {
+      groups: [
+       "builtin","external","internal","parent","sibling","index","object","type"],
+       pathGroups: [
+         {
+           pattern: "{react,react-dom/**,react-router-dom}",
+           group: "builtin",
+           position: "before",
+         },
+       ],
+       pathGroupsExcludedImportTypes: ["builtin"],
+       alphabetize: {
+        order: "asc",
+       },
+     },
+   ],
  },
};
prettier の設定
次に formatter として prettier を入れます。eslint でも prettier が作動するようにします。
$ npm i -D prettier eslint-config-prettier
.prettierrc
{
  "printWidth": 120,
  "jsxBracketSameLine": false,
  "tabWidth": 2,
  "trailingComma": "none",
  "semi": false,
  "singleQuote": true
}
さらに .eslintrc.js の extends に追加します。
module.exports = {
  root: true,
  extends: [
    "plugin:@typescript-eslint/recommended",
    "next/core-web-vitals",
+   "prettier",
  ],
  plugins: ["unused-imports"],
  parserOptions: {
    project: "./tsconfig.json",
  },
  rules: {
    "@typescript-eslint/no-unused-vars": "error",
    "@typescript-eslint/no-explicit-any": "warn",
    "@typescript-eslint/no-unsafe-call": "error",
    "@typescript-eslint/no-unsafe-member-access": "error",
    "@typescript-eslint/no-unsafe-return": "error",
    "unused-imports/no-unused-imports-ts": "warn",
    "import/order": [
      "error",
      {
        groups: [
          "builtin",
          "external",
          "internal",
          "parent",
          "sibling",
          "index",
          "object",
          "type",
        ],
        pathGroups: [
          {
            pattern: "{react,react-dom/**,react-router-dom}",
            group: "builtin",
            position: "before",
          },
        ],
        pathGroupsExcludedImportTypes: ["builtin"],
        alphabetize: {
          order: "asc",
        },
      },
    ],
  },
};
.prettierignore で prettier が発動して欲しくないものは除外をします。
node_modules
.next
dist
out
public/
stylelint
css や scss を書くときにも lint が聴くようにします。その場合は eslint ではなく stylelint を使用します。
$ npm i -D stylelint stylelint-config-standard-scss stylelint-config-recess-order
VSCode のエクステンションのインストールが必要
今回は scss の設定のみにしておきます。
"scss.validate": false,
"[scss]": {
  "editor.formatOnSave": false,
  "editor.codeActionsOnSave": {
    "source.fixAll.stylelint": true
  }
},
"stylelint.validate": ["scss"],
stylelint が動くか確認する
Sample.module.scss など適当な scss ファイルを作成して下記のようにコードを書いてみます。
.sample {
  color: palevioletred;
  font-size: 1.5em;
  text-align: center;
  flex: 1;
  display: flex;
  align-items: center;
}
するといくつか VSCode 上で赤い波線が入っていると思います。実際のエラーとしても下記のよう順番で怒っています。
src/app/components/Sample.module.scss
 3:3  ✖  Expected "font-size" to come before "color"  order/properties-order
 5:3  ✖  Expected "flex" to come before "text-align"  order/properties-order
 6:3  ✖  Expected "display" to come before "flex"     order/properties-order
これも保存をすれば並び替えをしてくれてエラーがなくなります。
tailwind の設定
すでに tailwind 自体は使えるように install されているのですが、tailwind の eslint もあってこれを使うと className 内の順番をいい感じにしてくれます。
$ npm i -D eslint-plugin-tailwindcss
extends に追加
module.exports = {
  root: true,
  extends: [
    "plugin:@typescript-eslint/recommended",
    "next/core-web-vitals",
+   "plugin:tailwindcss/recommended",
    "prettier",
  ],
  plugins: ["unused-imports"],
  parserOptions: {
    project: "./tsconfig.json",
  },
  rules: {
    "@typescript-eslint/no-unused-vars": "error",
    "@typescript-eslint/no-explicit-any": "warn",
    "@typescript-eslint/no-unsafe-call": "error",
    "@typescript-eslint/no-unsafe-member-access": "error",
    "@typescript-eslint/no-unsafe-return": "error",
    "unused-imports/no-unused-imports-ts": "warn",
    "import/order": [
      "error",
      {
        groups: [
          "builtin",
          "external",
          "internal",
          "parent",
          "sibling",
          "index",
          "object",
          "type",
        ],
        pathGroups: [
          {
            pattern: "{react,react-dom/**,react-router-dom}",
            group: "builtin",
            position: "before",
          },
        ],
        pathGroupsExcludedImportTypes: ["builtin"],
        alphabetize: {
          order: "asc",
        },
      },
    ],
  },
};
className の順番をいい感じにしてくれます。
husky & lint-staged
次は husky と lint-staged を使って commit する前に lint チェックをするようにします。
npx husky-init
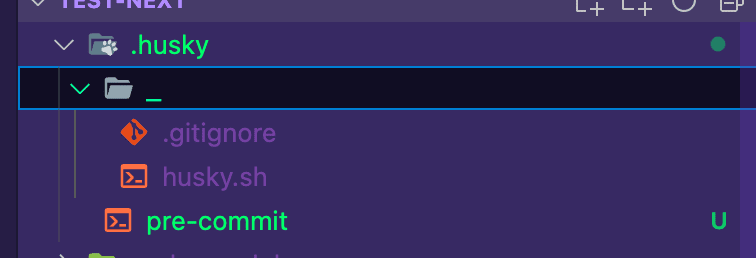
すると.husky ディレクトリが作成されます。
この中身は基本的に触らない方が良いです。(pre-commit は編集してもいいのですが、コマンドで管理できるのでそちらの方が安全です。)
package.json に "husky": "^8.0.0" が追加されているので install します。
npm i
さらに lint-staged も install します。
npm i --save-dev lint-staged
次に lint-staged を実行するよう設定します。
手動で編集しても問題はないですが、安全のためコマンドで編集することをおすすめします。
npx husky set .husky/pre-commit "npx lint-staged"
これによって、.husky/pre-commit が以下のように編集され、pre-commit フックで lint-staged が実行されるようになります。
#!/usr/bin/env sh
. "$(dirname -- "$0")/_/husky.sh"

npx lint-staged
次に package.jso に script を作っておきます。lint-staged で使うのは eslint と stylelint だけですが、合わせて fix と format も作っておきます。さらに lint-staged で使用するコマンドを記述しておきます。
今回は tsx,tsで lint が css,scssで stylelint が発動するようにします。
{
  "name": "test-next",
  "version": "0.1.0",
  "private": true,
  "scripts": {
    "dev": "next dev",
    "build": "next build",
    "start": "next start",
+   "lint": "eslint --ext .ts,.js,.tsx . && prettier --check \"./**/*.{ts,js,tsx}\"",
+   "lint:fix": "eslint --ext .ts,.js,.tsx . --fix && prettier --write \"./**/*.{ts,js,tsx,scss}\"",
+   "lint:style": "stylelint **/*.{css,scss}",
+   "format": "prettier --write './**/*.{js,ts,tsx,scss}'",
    "prepare": "husky install"
  },
  "dependencies": {
    ・・・
  },
  "devDependencies": {
    ・・・
  },
+ "lint-staged": {
+  "*.{tsx,ts}": "npm run lint",
+  "*.{css,scss}": "npm run lint:style"
+ }
}
上記の設定ができれば git に commit する際に lint が走るようになります。
まとめ
今回作成した Next.js のテンプレートはここに公開してあります。
やっぱり定期的にこういったテンプレートはアップデートしないとダメです。不要な記述になっているものがあったり、より便利なものがあったりします。
今回のテンプレートを作成で結構知識もアップデートされて良い経験になりました。


Discussion