Next.js × FastAPI × Docker × GitHub Actions でモノレポ開発環境を構築する手順
はじめに
個人開発に取り組んでいる中で、改めてNext.jsとFastAPIで環境構築を行なったところ、色々と学びがあったので備忘録の意味を込めて記事にします。Next.jsはESLint、StyleLint、PrettierでFastAPIはflake8、isort、mypy、blackで構成されます。また、DockerとGitHub Actions(リリースの自動化、CodeQL、Dependbot)を組み合わせた環境構築の手順も記載していきます。これから環境を整えようと考えている方や、既存の構成を見直したい方の参考になれば幸いです。
フロントエンド
まずは、Next.jsのリンター周りの設定を行います。当初はReactで実装を行なっていましたが、Create React Appが公式で非推奨となったようなので、Next.jsに切り替えました。
ESLint
ESLintの設定を行います。
import { FlatCompat } from "@eslint/eslintrc";
import typescriptEslint from "@typescript-eslint/eslint-plugin";
import tsParser from "@typescript-eslint/parser";
import eslintConfigPrettier from "eslint-config-prettier";
import unusedImports from "eslint-plugin-unused-imports";
import { dirname } from "path";
import { fileURLToPath } from "url";

const __filename = fileURLToPath(import.meta.url);
const __dirname = dirname(__filename);

const compat = new FlatCompat({
  baseDirectory: __dirname,
});

const eslintConfig = [
  ...compat.extends("next/core-web-vitals", "next/typescript"),
  {
    files: ["**/*.ts"],
  },
  {
    plugins: {
      "unused-imports": unusedImports /** 不要なimport文を削除*/,
      "@typescript-eslint": typescriptEslint,
    },
    languageOptions: {
      parser: tsParser,
      ecmaVersion: 2022,
      sourceType: "module",
    },
    rules: {
      "no-unused-vars": ["error", { /** コード内で使用されていない変数の禁止 */
        "vars": "all",
        "args": "after-used",
        "caughtErrors": "all",
        "ignoreRestSiblings": false,
        "reportUsedIgnorePattern": false
    }],
      "unused-imports/no-unused-imports": "error",
      "unused-imports/no-unused-vars": [
        "warn",
        {
          vars: "all",
          varsIgnorePattern: "^_",
          args: "after-used",
          argsIgnorePattern: "^_",
        },
      ],
      "@typescript-eslint/naming-convention": [
        "warn",
        {
          selector: "import",
          format: ["camelCase", "PascalCase"],
        },
      ],
      "@typescript-eslint/explicit-module-boundary-types":
        "error" /** 関数の戻り値と引数の明示的な型を追加する */,
      "@typescript-eslint/no-non-null-assertion":
        "error" /** 非 null アサーションの禁止 */,
      curly: "warn",
      eqeqeq: "warn",
      "no-throw-literal": "warn",
      semi: "warn",
    },
  },
  eslintConfigPrettier /** Prettierとの併用 */,
];

export default eslintConfig;
-
@typescript-eslint/no-non-null-assertion: 非nullアサーション演算子を禁止 -
@typescript-eslint/no-throw-literal: Errorオブジェクトの代わりとしてリテラルを投げることを禁止 -
@typescript-eslint/explicit-module-boundary-types: 戻り値に明示的に型をつけない関数の禁止 -
no-unused-vars: 実際にコード内で使用されていない変数の禁止 -
eslint-config-prettier:Prettierとの併用の為、コードフォーマットの設定はオフに設定
未使用のimportを自動で削除してくれるプラグインno-unused-importsをインストールしてeslintに適用します。
ESLintの設定には、新しい形式であるFlatConfigが推奨されています。v10ではFlatConfigしかサポートしない予定とのことであり、今後はFlatConfigで対応を進めていく必要があります。
overrideやexntendの概念がなくなり、代わりにconfiguration objectsと呼ばれる、各設定情報を要素とする配列で格納されます。ignores、processor、plugins、rulesなどをそこに記述します。適用するruleが重複した場合は後続のものが適用される仕組みとなります。また、pluginについては、javascriptのモジュールとして明示的にimportする必要があります。
FlatConfigに変更された理由として、これまでは、eslint側がconfigやpluginを独自で設定していた為、パスの解決を行う必要があり、ユーザーもlintコマンドを実行しないと、設定したpluginやconfigが有効なものなのか分かりませんでした。しかしFlatConfigではconfigやpluginの解決が全てJavaScriptのモジュールの仕組みになり、ESLintは設定ファイルを評価するだけで依存が全て解決された設定情報を得られるようになりました。
Stylelint
Stylelintの設定を行います。
import stylelintConfigRecessOrder from "stylelint-config-recess-order";
import stylelintConfigStandard from "stylelint-config-standard";

export default {
  extends: [
    stylelintConfigRecessOrder, // プロパティの並び替え
    stylelintConfigStandard,
  ],
  rules: {
    "no-descending-specificity": true, // ソース順序と詳細度
    "declaration-no-important": true, // !importantの禁止
    "string-no-newline": true, // 文字列内の無効な改行を禁止
    "property-no-unknown": true, // 不明なプロパティを禁止
    "declaration-block-no-duplicate-properties": true, // 重複するプロパティを禁止
    "block-no-empty": true, // 空ブロックを禁止
    "no-duplicate-selectors": true, // 重複セレクタを禁止
    "color-no-invalid-hex": true, // 無効な 16 進カラーを禁止
    "declaration-empty-line-before": "never", // 宣言の前の空行を禁止
  },
};
rulesはコメントに記載している通りで、eslintのと同様にFlatConfigで設定します。stylelint-config-recess-orderでプロパティの順番も指定します。
prettier
prettierの設定を行います。
const config = {
  plugins: [
    /**  importの順序を指定する */
    "@ianvs/prettier-plugin-sort-imports",
  ],
  trailingComma: "none" /** 末尾にカンマをつけない */,
  singleQuote: true,
  semi: false,
  printWidth: 100,
};

export default config;
@ianvs/prettier-plugin-sort-importsでimportの順番を指定します。
 ➜ git:(main) npm run format
> codezoo@0.0.1 format
> prettier --write src
[error] none is not defined
Prettier が .prettierrc や他の Prettier 設定ファイルで無効な設定 (none) を検出している可能性があるので、設定ファイルを確認しておきます。
バックエンド
次はFastAPIの環境構築を行います。
仮想環境の構築
まずは、仮想環境を構築します。仮想環境は異なるプロジェクト間でのライブラリの衝突を防ぐことや必要なパッケージのみをインストールするように整備することなどを目的としています。今回はPipenvで構築します。
pipでpipenvをインストールします。
pip install pipenv
新規のプロジェクトの初期化を行います。以下のコマンドを実行するとPipfileというファイルが生成され仮想環境が生成されます。
pipenv --python 3
パッケージのインストールを行います。pipfileファイルにパッケージが追加されます。
pipenv install fastapi pydantic pydantic_core uvicorn
requirements
requirements.txtを本番環境用と開発用に分けるため、 base(共通)・dev(開発)・prod(本番) の3つのファイルに分割します。
requirements.txtはパッケージの指定バージョンまたは最新バージョンを記述するファイルでrequirements.lockはインストールされたパッケージの厳密なバージョン(依存関係を含む)を固定するファイルです。
backend/
│── requirements.txt         # 共通パッケージ
│── requirements-dev.txt     # 開発用の追加パッケージ
│── requirements-prod.txt    # 本番用の追加パッケージ
requirements.txtには、開発・本番の両方で共通して必要なパッケージのみ記述します。
fastapi
pydantic
pydantic_core
uvicorn
開発環境専用のパッケージを-r requirements.txtで共通パッケージを読み込んで管理します。
-r requirements.txt  # 共通パッケージを含める
flake8
isort
mypy
black
VScodeとの連携(flake8、black、mypy、isort)
以前はVSCodeで静的解析が自動で動作させるためにsettings.jsonに以下の通り記述していましたが、現在は非推奨となっています。
{
  "python.linting.enabled": true,
  "python.linting.pylintEnabled": true,
  "python.linting.flake8Enabled": true,
  "python.linting.mypyEnabled": true
}
現在は、flake8, black, mypy, isortについてそれぞれpipe installを行うのではなく、VScodeの拡張機能で設定を行います。
"[python]": {
    "editor.defaultFormatter": "ms-python.black-formatter",
    "editor.formatOnSave": true
}
- editor.defaultFormatter → PythonのデフォルトフォーマッターをBlackに統一
- editor.formatOnSave → 保存時に Black を自動適用
-
--ignore=E203,W503,W504:前後にスペースがある場合と演算子の前と後に改行が有るとエラーになる部分を回避するために設定します。
--excludeや--force-excludeオプションを追加することで、Flake8 の実行対象から除外するフォルダを指定します。_pycache__やdistなどはチェック不要なので、設定に含めます。
isortで以下の文を設定すれば、import文を整形してくれますが、"source.organizeImports": "explicit"を設定すればimportの整形と使用していない場合は削除してくれるため、今回は設定しません。
"isort.args": ["--profile", "black"],
mypy.iniにも設定を追加します。
[mypy]
strict = True
python_version = 3.9
ignore_missing_imports = True
disallow_untyped_calls = True
disallow_untyped_defs = True
warn_return_any = True
warn_unused_ignores = True
setting.json全文は以下の通りとなります。
{
  "[typescript]": {
    "editor.defaultFormatter": "esbenp.prettier-vscode"
  },
  "[javascript]": {
    "editor.defaultFormatter": "esbenp.prettier-vscode"
  },
  "[json]": {
    "editor.defaultFormatter": "esbenp.prettier-vscode"
  },
  "files.exclude": {
    "**/node_modules": true,
    "**/*.module.scss.d.ts": true,
    "**/{dist,build}": true,
    "**/.mypy_cache": true,
    "**/__pycache__": true
  },
  "editor.codeActionsOnSave": {
    "source.fixAll.stylelint": "explicit", // 保存時に自動修正
    "source.fixAll.eslint": "explicit", // 保存時に自動修正
    "source.organizeImports": "explicit" // ファイル保存時に未使用のフォルダ削除 / import文を削除及び並べ替え
  },
  "cSpell.words": ["codezoo", "ianvs", "MASA", "yarnrc"],
  "[python]": {
    "editor.defaultFormatter": "ms-python.black-formatter",
    "editor.formatOnSave": true // 保存時に自動修正
  },
  "black-formatter.args": [
    "--line-length=88", // 最大文字数の指定(flake8と合わせた数字に設定)
    "--force-exclude", // 除外対象のフォーマット
    ".git|build|dist|.pytest_cache|.mypy_cache|__pycache__"
  ],
  "flake8.args": [
    "--max-line-length=88", // 最大文字数の指定
    "--ignore=E203,W503,W504,E501",
    "--exclude=.git,__pycache__,build,dist,.pytest_cache,.mypy_cache" // 除外対象のフォーマット
  ],
  "mypy-type-checker.args": ["--config-file=mypy.ini"] // mypyの設定
}
Blackと競合するE501は無視しておきます。E501はPythonの静的解析ツールflake8が検出する**「行が長すぎる」**という警告コードです。PEP8(Pythonのコーディング規約)で定められた「1行79文字以内」というルールに違反した場合に発生します。
Docker
続いて、Dockerの構築を行います。
Next.jsの設定
# syntax=docker/dockerfile:1
FROM node:20-alpine AS base
WORKDIR /src
RUN chown -R node:node /src && chmod -R 770 /src
# --- development for local ---
FROM base AS development
COPY ["package.json", "package-lock.json*", "./"]
# キャッシュディレクトリを指定
RUN \
\
npm install
COPY . .
EXPOSE 3000
ENTRYPOINT ["npm", "run", "dev"]
# --- builder ---
FROM base AS builder
COPY . .
COPY tsconfig.json .
COPY next.config.ts .
USER node
RUN npm install
RUN npm run build
# --- Production Stage ---
FROM base AS production
LABEL org.label-schema.name="frontend-prod"
ENV NODE_ENV=production
COPY /src/.next ./.next
COPY /src/public ./public
COPY ./package*.json ./
RUN npm install --omit=dev
USER node
ENTRYPOINT ["npm", "run", "start"]
EXPOSE 3000
- syntax=docker/dockerfile:1: このコメント文により最新のDocker構築機能を必ず利用するように設定します。
- WORKDIR /src: コンテナ内に作業ディレクトリ(/src)を作成します。
- RUN npm install: 必要なパッケージをインストールします。
- COPY . .: コンテナ内の作業ディレクトリにソースコードをコピーします。
- ENTRYPOINT命令: コンテナ起動時に実行するコマンドを指定します。
- RUN chown -R node:node /src && chmod -R 770 /arc: chownコマンドでsrcディレクトリに対して権限の設定します。(node ユーザーとグループに対しては読み書き実行の権限を与え、他のユーザーには権限を与えないようにする。)
- node:node は、ユーザー名が node、グループ名も node であることを意味します。コンテナ内で非 root ユーザーで実行されます。
マルチステージビルドを使用してimageを軽量化して、複数のビルドステージを1つのDockerfileに記述します。それぞれのステージ(build、staging、producttion...etc)はbaseを基盤にして新しいステージを作成することができ、開発用のイメージが必要なツールをすべて含む一方で、本番用のイメージは最小限のファイルのみを含むように設定するため、最終的なイメージを小さくすることが可能となります。
USER命令について:
イメージのビルド プロセス中とコンテナーの実行時の両方でコマンドを実行するユーザーを決定するツールのことを指します。デフォルトでは、 USER が指定されていない場合、Dockerはrootユーザーとしてコマンドを実行するため、セキュリティ上のリスクが大きくなリます。Dockerコンテナが侵害された場合に、コンテナがroot以外のユーザーとして実行されてれば、攻撃者の権限は制限されることになります。
Docker imageはalpineを選定します。
【選定理由】
- 使用するディスク容量が削減できる。
- 機能が制限される為、攻撃対象領域が小さくなる。
また、--mount=type=cacheも活用します。
# キャッシュディレクトリを指定
RUN \
\
npm install
上記キャッシュを指定すると、依存関係のインストールがキャッシュされ、再ビルド時のパフォーマンス向上が期待できます。
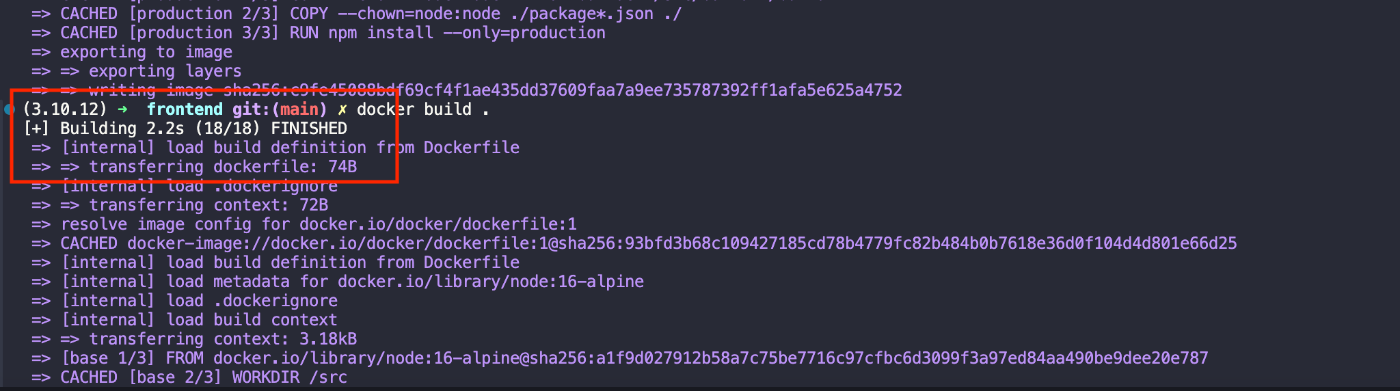
1回目

2回目以降はBuilding時間が2.2sとなっており、大幅に時間短縮されます。
ependenciesのみinstallするため、npm installに--omit=devを追記します。
コンテナのポート 3000 をホストの3000に指定して、docker runで起動できれば成功です。
docker run -p 3000:3000 healthmmlfront
FastAPIの設定
FastAPIのDocker環境を構築します。
# syntax=docker/dockerfile:1
FROM python:3.9-slim AS base
WORKDIR /app
ENV PYTHONUNBUFFERED=1 \
PIPENV_VENV_IN_PROJECT=1
RUN pip install --no-cache-dir pipenv
RUN adduser --disabled-password --gecos "" --uid 1001 api
# --- development for local ---
FROM base AS development
COPY Pipfile Pipfile.lock ./
RUN pipenv install --dev
COPY . .
EXPOSE 3002
CMD ["pipenv", "run", "uvicorn", "app.main:app", "--host", "0.0.0.0", "--port", "80", "--reload"]
# --- builder ---
FROM base AS builder
COPY Pipfile Pipfile.lock ./
RUN pipenv install --deploy
COPY . .
USER api
COPY . .
# --- Production Stage ---
FROM base AS production
COPY /app /app
WORKDIR /app
USER api
CMD ["pipenv", "run", "uvicorn", "app.main:app", "--host", "0.0.0.0", "--port", "80"]
まず依存関係だけのファイルをCOPYします。Dockerはコンテナイメージを段階的にビルドし、1つのレイヤーを他のレイヤーの上に追加しますが、その際にイメージをビルドする際に内部にキャッシュ(前回作成した同じレイヤーを再利用)します。パッケージ要件のファイルは頻度に変更されるものではなく、依存関係をインストールする命令のためにキャッシュを利用することができます。
Dockerfileの最終行の近くにて全てのコードをコピーします。最も頻繁に変更されるものなので、このステップの後にあるものはほとんどキャッシュを使用することができないのためです。
develop環境では、pipenv install --devで開発用のライブラリも含めてインストールを行い、product環境では開発環境の不要ファイルを含めずに、ビルド成果物のみコピーします。
アプリケーションを外部から(例:コンテナの外から)見えるようにするため、--host=0.0.0.0を指定します。
非rootユーザーでFastAPIを実行するするために、USE apiを配置しますが、その前にapiユーザーを作成します。adduserは新規ユーザーを作成し、設定を行うコマンドです。adduserを使用すると通常パスワードが設定されますが、コンテナ内のユーザーは ログインする必要がないため--disabled-passwordで無効化します。また、LinuxではユーザーID (UID) を指定しないと、自動的に次の使用可能なUIDが割り当てられます。コンテナで一貫性を保つために、1001を指定します。
docker build --target builder -t fastapi-dev .
docker run -p 8000:80 fastapi-dev
本番環境の場合
docker build --target production -t fastapi-prod .
docker run -p 8000:80 fastapi-prod
アクセス先
http://localhost:8000
buildが通れば設定完了です。
Docker componse
componseを指定していきます。
version: "3.7"
services:
  backend:
    build: ./backend
    ports:
      - "8000:80"
    working_dir: /app
    volumes:
      - ./backend:/app
      - /app/.venv
    environment:
      - PIPENV_VENV_IN_PROJECT=1
  frontend:
    build: ./frontend
    ports:
      - "3000:3000"
    working_dir: /src
    volumes:
      - ./frontend:/app
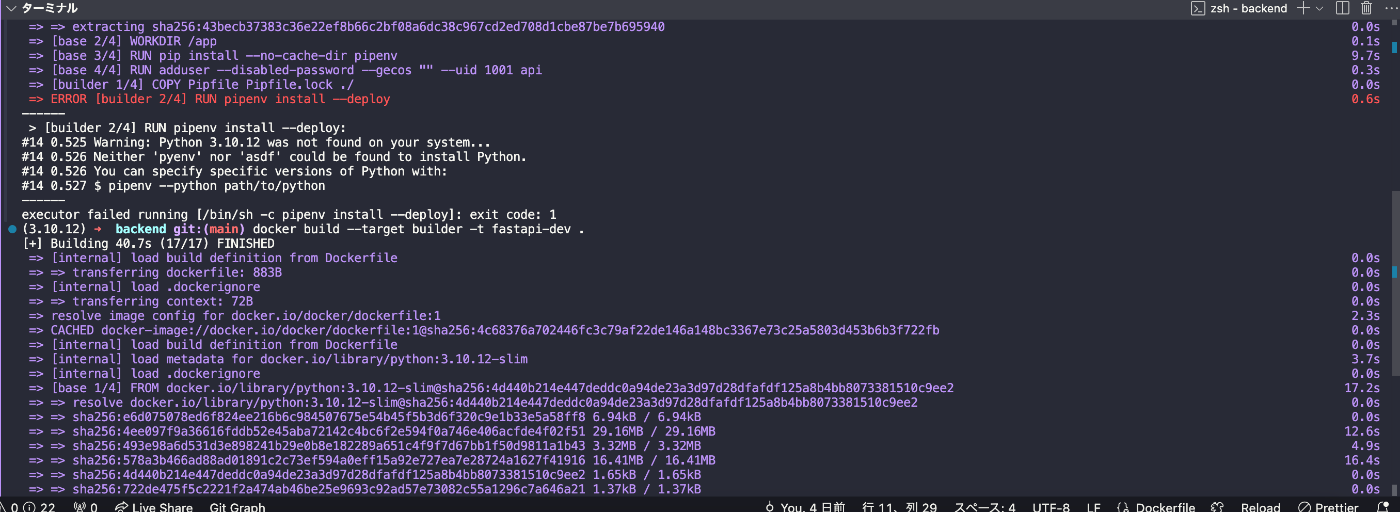
初回、Next.jsは立ち上がることを確認しましたが、FastAPIのDockerは起動せず、ログに以下のエラーが発生していました。
Loading .env environment variables...
Error: the command uvicorn could not be found within PATH or Pipfile's [scripts].
コンテナ実行ユーザーが非rootユーザーであるために起こっているものと推測でき、pipenv + PIPENV_VENV_IN_PROJECT=1 を使って .venv/ に仮想環境を作成している場合、docker-composeでボリュームをマウントしたことで .venv/ が上書きされて失われていることが起因していました。そのため、仮想環境をマウントしないようにvolumesに.venvを追加して再度起動させます。
volumes:
  - ./backend:/app
  - /app/.venv
Github Actions
CI/CDの設定を行います。フロントエンドとバックエンド別々に構築します。
name: frontend application ci

on:
  push:
    branches: ["main"]
  pull_request:
    branches: ["main"]
jobs:
  ci:
    runs-on: ${{ matrix.os }}
    defaults:
      run:
        working-directory: frontend
    strategy:
      matrix:
        os: [ubuntu-latest]
        node: [22]
    steps:
      - name: Checkout 🛎
        uses: actions/checkout@v4
      - name: Setup node env 🏗
        uses: actions/setup-node@v3
        with:
          node-version: ${{ matrix.node }}
          check-latest: true

      - name: Cache node_modules 📦
        uses: actions/cache@v4
        with:
          path: ~/.npm
          key: ${{ runner.os }}-${{ runner.arch }}-build-${{ hashFiles('**/package-lock.json') }}
          restore-keys: |
            ${{ runner.os }}-${{ runner.arch }}-build-
            ${{ runner.os }}-build-

      - name: Install dependencies 💾
        run: npm ci

      - name: Run ESLint 🔍
        run: npm run lint

      - name: Run Prettier 🖋
        run: npm run check-format

      - name: Run Stylelint 🎨
        run: npm run stylelint

      - name: Docker Test 🧪
        run: docker build -t test-frontend .
これまで設定したリンターとDockerをCI/CDで走らせるようにします。また、Github Actionsのキャッシュの設定を以下の通り追加してます。ファイルダウンロードなどに時間がかかる場合、キャッシュを活用することで実行時間を高速化することが可能です。
      - name: Cache node_modules 📦
        uses: actions/cache@v4
        with:
          path: ~/.npm
          key: ${{ runner.os }}-${{ runner.arch }}-build-${{ hashFiles('**/package-lock.json') }}
          restore-keys: |
            ${{ runner.os }}-${{ runner.arch }}-build-
            ${{ runner.os }}-build-
-
キャッシュキー:
キャッシュキーは生成と保存に使用する識別子です。例えばLinuxやwindowsでは同じキャッシュを使用できない可能性があり、共有してしまうと正常に動作しない可能性があるため、キャッシュはOSやCPUアーキテクチャごとに分離させる必要があります。${{ runner.arch }}をキーに追加することで、CPU アーキテクチャ(例: x64, arm64)を区別することが可能とができます。 -
依存関係更新時のキャッシュ:
hashFiles('**/package-lock.json')はpackage-lock.jsonのハッシュ値を計算します。ファイルハッシュをキャッシュキーに指定することで、依存関係を更新した時だけキャッシュを変更するように設定します。 -
restore-keysの設定:
キャッシュを段階的に復元するために、OS-アーキテクチャ 単位のキャッシュを試行。次に、OS単位のキャッシュを試行するように広いキーから狭いキーへの順序で指定しました。
バックエンド側のCI/CDの記述です。フロントエンド同様にリンターの設定と、Dockerを組み込みます。
name: backend application ci

on:
  push:
    branches: ["main"]
  pull_request:
    branches: ["main"]

permissions:
  contents: "read"
jobs:
  build:
    runs-on: ubuntu-latest
    steps:
      - name: Checkout 🛎
        uses: actions/checkout@v4
      - name: Set up Python 3.10 🏗
        uses: actions/setup-python@v3
        with:
          python-version: "3.10"
      - name: Install dependencies 💾
        run: |
          python -m pip install --upgrade pip
          pip install flake8 mypy isort black
          if [ -f backend/requirements.txt ]; then pip install -r backend/requirements.txt; fi
      - name: Lint with flake8 📟
        run: |
          flake8 . --count --select=E9,F63,F7,F82 --show-source --statistics
          flake8 . --count --exit-zero --max-complexity=10 --max-line-length=88 --statistics

      - name: Type check with mypy 🧠
        run: mypy backend

      - name: Check import order with isort 📚
        run: isort --check-only --diff backend

      - name: Check formatting with black 🎨
        run: black --check backend

      - name: Docker Test 🧪
        run: docker build -t test-backend ./backend
リリースノートの自動生成
Github Releasesは、前バージョンからの変更内容を記述するリリースノートを自動で生成してくる機能です。
Github Releasesを使用して、変更内容の告知を行います。
changelog:
  categories:
    - title: Enhancement
      labels:
        - enhancement
    - title: Bug Fixes
      labels:
        - bug
        - fixes
  exclude:
    labels: # 除外するラベル
      - dependencies
    authors: # 除外するプルリクエスト作成者
      - dependabot
categoriesキーを使用して、どのラベルとマッピングさせるかを指定します。excludeキーを使用して、Dependabotのプルリクエストを除外します。
ラベルを付与を自動化する
actions/labelerを使用します。
# NOTE: https://github.com/actions/labeler
name: 'Pull Request Labeler'
on:
  - pull_request_target

jobs:
  labeler:
    permissions:
      contents: read
      pull-requests: write
    runs-on: ubuntu-latest
    steps:
      - uses: actions/labeler@v5
        if: ${{ github.event.action == 'opened' }}
        with:
          configuration-path: .github/labeler-branch.yaml
バージョンの付与はgit tagコマンドを利用して管理します。
git tag v1.2.2
git push origin v1.2.2
CodeQLの設定
続いて、Github ActionsのCodeQLの設定を行います。コード内の脆弱性とエラーを特定するCode Scanning (with CodeQL) は、Publicリポジトリであれば無料で利用可能となります。
name: "CodeQL Advanced"

on:
  push:
    branches: ["main"]
  pull_request:
    branches: ["main"]
  schedule:
    - cron: "40 15 * * 5" # 毎週金曜日のAM 15:45に実行

jobs:
  analyze:
    name: Analyze (${{ matrix.language }})
    runs-on: ${{ (matrix.language == 'swift' && 'macos-latest') || 'ubuntu-latest' }}
    permissions:
      security-events: write
      packages: read
      actions: read
      contents: read
    strategy:
      fail-fast: false
      matrix:
        include:
          - language: javascript-typescript
            build-mode: none
          - language: python
            build-mode: none
    steps:
      - name: Checkout repository
        uses: actions/checkout@v4
      - name: Initialize CodeQL
        uses: github/codeql-action/init@v3
        with:
          languages: ${{ matrix.language }}
          build-mode: ${{ matrix.build-mode }}
      - if: matrix.build-mode == 'manual'
        shell: bash
        run: |
          echo 'If you are using a "manual" build mode for one or more of the' \
            'languages you are analyzing, replace this with the commands to build' \
            'your code, for example:'
          echo '  make bootstrap'
          echo '  make release'
          exit 1
      - name: Perform CodeQL Analysis
        uses: github/codeql-action/analyze@v3
        with:
          category: "/language:${{matrix.language}}"
PythonとtypeScriptの両方をスキャンするために、languageを指定します。Github上でPythonとtypeScriptの両方が解析されていれば、正しく動作しています。

fail-fastは、matrix内のjobが失敗した時のエラー制御を行うためのオプションです。falseに設定すると、jobの成功、失敗に関わらずmatrix内のすべてのjobが完了するまで実行して、falseのいずれかのjobが失敗した場合でも、ワークフロー全体のステータスは失敗となるため、失敗に気がつかないということはなくなります。
Trivyの設定
また今回はDockerを使用しているため、ついでにTrivyもCI/CDに組み込んでいきます。TrivyはDockerイメージやKubernetesリソースの脆弱性を検出するオープンソースです。
        # フロントエンドのDockerfileチェック
      - name: Run Trivy vulnerability scanner for frontend
        uses: aquasecurity/trivy-action@master
        with:
          scan-type: config
          scan-ref: ./frontend/Dockerfile
          format: table
          exit-code: 0
          ignore-unfixed: true
          severity: "CRITICAL,HIGH"
        # バックエンドのDockerfileチェック
      - name: Run Trivy vulnerability scanner for backend
        uses: aquasecurity/trivy-action@master
        with:
          scan-type: config
          scan-ref: ./backend/Dockerfile
          format: table
          exit-code: 0
          ignore-unfixed: true
          severity: "CRITICAL,HIGH"
フロントエンドとバックエンドのDockerfileをそれぞれ指定します。コンテナイメージには、まだ未修正の脆弱性や何らかの理由で修正を止めている脆弱性が含まれており、ignore-unfixed: trueでその場合は除外します。脆弱性の深刻度(対象レベル)はHIGH、CRITICALを指定します。
以下の通り結果が出力されていれば成功です。

Dependabotの設定
最後にGitHub Dependabotを使ったアップデート運用を設定していきます。DependabotはGitHub組み込みの機能で、プロジェクト内の依存関係に含まれる脆弱性やアップデートの有無を検知して自動でプルリクエストを作成したり、アラートを出すことができるサービスです。
.github/dependabot.ymlに記述を行います。アップデート可能なパッケージがある場合、Dependabotはこの設定を元に自動的にプルリクエストを作成します。
version: 2
updates:
  # frontend npm用の更新
  - package-ecosystem: "npm"
    directory: "/frontend"
    schedule:
      interval: "weekly"
      time: "00:00"
    open-pull-requests-limit: 10
    reviewers:
      - MASAKi-cell
    assignees:
      - MASAKi-cell
    commit-message:
      prefix: fix
      prefix-development: chore
      include: scope
    ignore: # バージョンアップの除外設定
      - dependency-name: "*"
        update-types:
          # メジャーバージョンは除外、本番運用している場合、気軽にupdateできない為
          - version-update:semver-major

  # backend: pipenv 用の更新
  - package-ecosystem: "pip"
    directory: "/backend"
    schedule:
      interval: "weekly"
      time: "00:00"
    open-pull-requests-limit: 10
    reviewers:
      - MASAKi-cell
    assignees:
      - MASAKi-cell
    commit-message:
      prefix: fix
      prefix-development: chore
      include: scope
    ignore:
      - dependency-name: "*"
        update-types:
          - version-update:semver-major
バージョンアップ戦略はZennに記述されている以下が良いかと思われます。
- major:Dependabot version updatesの対象外とする:majorのアップデートは情報として流れてきて気づくことも多い。本番運用している場合は、気軽にメジャーを上げられない。
- minor:デフォルトの動作とする(Dependabot version updatesがPRを作成し、自分でマージする):新しい機能が追加されたのであれば、自動マージするのではなく、どのような機能なのか確認した上でマージを行う。
- patch:自動的にマージする:バグFIXであれば、中身を1つ1つ知る重要度が低い。脆弱性に対するパッチであれば、速度を優先できる。パッチバージョンの変更はバグ修正がメインでソフトウェアが壊れるリスクは低いため。
除外設定を追加した場合は、除外理由をコメントやコミットメッセージに残します。
github Actionsの自動マージ設定を追加します。dependabotsは依存関係のバージョンアップを検知して、プルリクエストを出すことが仕事にはなりますが、依存関係が多いとレビュー、マージが大変あので、自動マージするフローを組み込みます。
gh pr merge [<number> | <url> | <branch>] [flags]
name: dependabot auto mage

on:
  pull_request:
    branches: ["main"]
jobs:
  merge:
    if: ${{ github.actor == 'dependabot[bot]' }} # Dependabotのプルリクエストのみ許可
    runs-on: ubuntu-latest
    permissions: # プルリクエスト・ソースコードの書き込み許可
      contents: write
      pull-requests: write
    steps:
      - uses: actions/checkout@v4
      - id: meta
        uses: dependabot/fetch-metadata@v2
        # patch、Github Actions向けの変更は自動マージする パッチバージョンの変更はバグ修正がメインでソフトウェアが壊れるリスクは低いため。
      - if:
          ${{ steps.meta.outputs.update-type == 'version-update:semver-patch' ||
          (steps.meta.outputs.package-ecosystem == 'github_actions' &&
          steps.meta.outputs.update-type != 'version-update:server-major') }}
        env:
          GH_TOKEN: ${{ secrets.GITHUB_TOKEN }}
        run: |
          gh pr review "${GITHUB_HEAD_REF}" --approve
          gh pr merge "${GITHUB_HEAD_REF}" --merge --auto
dependabotが起動したワークフローでは、 dependabot/fetch-metadataで依存関係のメタデータが取得できるため、update-typeなどのバージョンアップの種類が参照可能です。patchのみに絞込みを行い、Github Actions向けの変更もユーザーに影響がないため自動マージしておきます。
最後に
当初想定していた以上に記載することが多くなってしまいました。
何か間違いがあればご指摘下さい。
Discussion