【Angular】@ngrx/Componet-storeを試してみる
こんにちはマサキです。普段はフロントエンドエンジニアとしてJavaScript/TypeScript/Aangular/GraphQLをメインに開発業務を行なっています。
Angularの中でも比較的新しい@ngrx/component-storeというライブラリを使用してStar Wars APIから一覧リストを取得して表示するアプリを作成していきたいと思います。
これから記載するコードは全てGithubに記載しています。
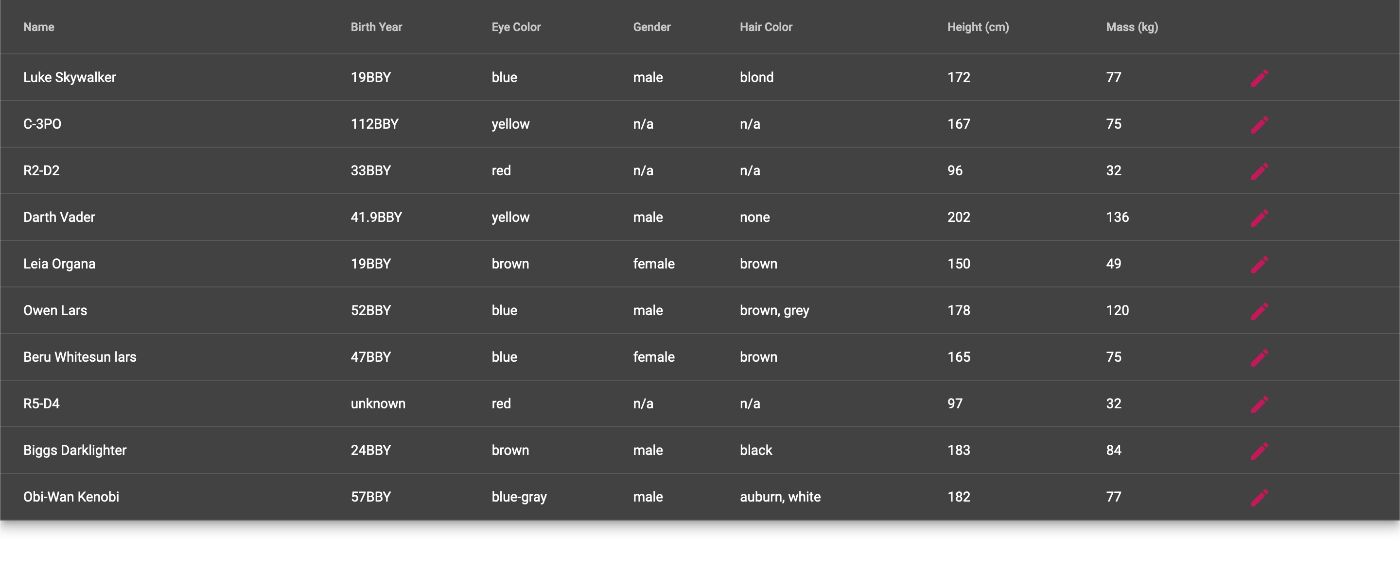
最終的な外観
Star Wars APIから取得したデータ一覧ページ
ディレクトリ構成
ディレクトリ構成は下記の通りです。
star-wars.web-service.tsでAPIからデータを取得して、person.store.tsでStoreを管理します。
├── src
│   ├── app
│   │   ├── app-routing.module.ts
│   │   ├── app.component.html
│   │   ├── app.component.scss
│   │   ├── app.component.spec.ts
│   │   ├── app.component.ts
│   │   ├── app.module.ts
│   │   ├── component
│   │   │   ├── person-list
│   │   │   │   ├── person-list.component.html
│   │   │   │   ├── person-list.component.scss
│   │   │   │   └── person-list.component.ts
│   │   ├── models
│   │   │   ├── person.ts
│   │   │   └── response.ts
│   │   ├── service
│   │   │   └── star-wars.web-service.ts
│   │   └── store
│   │       ├── person.store.spec.ts
│   │       └── person.store.ts
│   └── environments
│       ├── environment.prod.ts
│       └── environment.ts
@ngrx/Componet-storeとは
@ngrx/component-storeはコンポーネント間のデータ連携と、データの一元管理が容易に行うことができる状態管理ライブラリです。
AngularではReduxを参考に開発されたNgRXといった状態管理ライブラリが既に存在しますが、よりコンポーネント間のデータ連携に特化した仕様となっています。
コンポーネント間のデータ連携としてAngularでは「BehaviorSubect」も提供されていますが、信頼できるデータを一元管理するといった意味では@ngrx/component-storeが圧倒的に優れています。
コンポーネントがスコープ外(ユーザーがアプリケーションの別の部分に移動するなど)になると、全てのデータがクリーンアップされるため、開発者はデータをクリーンアップする方法を考える必要がないのも特徴です。
■ @ngrx/Componet-storeの公式ドキュメントはこちらになります。
先程触れたNgRXについてNgRXには実装されており@ngrx-component-storeにはない機能がいくつかあります。
一点目はAction機能です。Actionはユーザーがクリックするなどの動作で発行され、ストアのStateを変更する為のメッセージの役割を果たします。
また、CRUD操作を簡単にしてくれるEntitiyの機能も存在しません。(NgRXの詳細についてはまた改めて記事にしたいと思います。)
より多くのコンポーネント間でデータ連携を行う必要がある場合や、Entitiyを使用する必要がある場合は、NgRXを採用した方が良いかと思います。
Star WarsAPI
Star WarsAPIでは、Star Warsに登場する人物の体重、身長、乗り物などのデータを取得することができます。
例えば、「 https://swapi.dev/api/people/1/ 」と入力すると、ルークスカイウォーカーの情報を取得することが出来ます。今回はこのAPIを使用して取得したデータを画面に表示させたいと思います。
{
	"name": "Luke Skywalker",
	"height": "172",
	"mass": "77",
	"hair_color": "blond",
	"skin_color": "fair",
	"eye_color": "blue",
	"birth_year": "19BBY",
	"gender": "male",
	"homeworld": "https://swapi.dev/api/planets/1/",
	"films": [
		"https://swapi.dev/api/films/1/",
		"https://swapi.dev/api/films/2/",
		"https://swapi.dev/api/films/3/",
		"https://swapi.dev/api/films/6/"
	],
	"species": [],
	"vehicles": [
		"https://swapi.dev/api/vehicles/14/",
		"https://swapi.dev/api/vehicles/30/"
	],
	"starships": [
		"https://swapi.dev/api/starships/12/",
		"https://swapi.dev/api/starships/22/"
	],
	"created": "2014-12-09T13:50:51.644000Z",
	"edited": "2014-12-20T21:17:56.891000Z",
	"url": "https://swapi.dev/api/people/1/"
}
@ngrx/component-storeの実装
それでは、component-storeの実装を進めていきます。
公式ドキュメントに従って、ライブラリをインストールします。
npm install @ngrx/component-store --save
person.store.tsを作成
person.store.tsを作成します。
import { Injectable } from '@angular/core';
import { ComponentStore } from '@ngrx/component-store';
import { Observable } from 'rxjs';
import { Person } from 'src/app/models/person';

export interface PersonState {
  people: Person[];
}

// Storeの初期値を設定する。
const defaultState: PersonState = {
  people: [],
};

@Injectable()
export class CounterStore extends ComponentStore<counterNumber> {

  constructor() {
    super(defaultState);
  }

  // 現在のPersonの値をStoreから取得する。
  readonly people$: Observable<Person[]> = this.select(({ people }) =>
  people);

  // Personの値をアップデートする。
  readonly loadPeople = this.updater((state, people: Person[] | null) => ({
    ...state,
    people: people || [],
  }));

}
@component-storeをインポートすることで、componentStoreを取り込むことができます。今回は見やすさ重視の為、interfaceを同じファイルに記載してますが、基本的にinterfaceは別のフォルダにまとめた方が良いと思います。
また、@InjectableデコレータにprovideInは記載していません。providedInを記載してしまうと、他のサービスクラスやコンポーネントに依存性の注入が可能となる為、データの独立性が損なわれてしまう為です。
componentStoreではconstructorのsuperに、更新したいデータを格納し初期値を設定します。
インターフェイスで定義しているデータはselectorを使用して取得します。公式ドキュメントにはselectorは以下の通り定義されており、projectorには純粋関数を指定します。また戻り値はObservableとなります。また更新する際はupdatorを使用します。
  /**
   * Creates a selector.
   *
   * This supports combining up to 4 selectors. More could be added as needed.
   *
   * @param projector A pure projection function that takes the current state and
   *   returns some new slice/projection of that state.
   * @param config SelectConfig that changes the behavior of selector, including
   *   the debouncing of the values until the state is settled.
   * @return An observable of the projector results.
   */
  select<R>(projector: (s: T) => R, config?: SelectConfig): Observable<R>;
取得するデータの型
今回取得するデータの型は下記の通りです。
■ person.ts
export interface Person {
  name: string;
  birth_year: string;
  eye_color: string;
  gender: string;
  hair_color: string;
  height: string;
  mass: string;
  skin_color: string;
}
■ response.ts
レスポンス結果
import { Person } from './person';

export interface Response {
  results: Person[];
}
■ environment.ts
environment.tsで環境変数を管理します。
export const environment = {
  production:'',
  API_ROOT: 'https://swapi.dev/api',
};
サービスの作成
■ star-wars.web-service.ts
import { HttpClient } from '@angular/common/http';
import { Injectable } from '@angular/core';
import { Observable, of } from 'rxjs';
import { catchError, map } from 'rxjs/operators';
import { environment } from 'src/environments/environment';
import { Response } from '../models/response';
import { Person } from '../models/person';

@Injectable({
  providedIn: 'root',
})
export class StarsWarsWebService {
  constructor(private http: HttpClient) {}

  /**
   * Person情報をStarWarsAPIから取得する。
   * @returns {Person[]}
   */
  getPeople(): Observable<Person[]> {
    return this.http.get<Response>(`${environment.API_ROOT}/people`).pipe(
      map((response) => response.results),
      catchError(this.handleError<Person[]>(`getPerson`, []))
    );
  }

  /**
   * エラーハンドリング(失敗したHTTP操作を処理する。)
   * @param {string} operation
   * @param {T} result
   */
  private handleError<T>(operation = 'operation', result?: T) {
    return (error: any): Observable<T> => {
      // consoleに出力
      console.error(error);

      // 空の結果を返して、アプリを持続可能にする
      return of(result as T);
    };
  }
}
Web.seviceでデータを取得するように実装を進めます。データを取得する際は、HttpClientのgetで、Star Wars APIからデータを取得します。catchErrorオペレータを使用して、データ取得に失敗した場合はログを主力させるようにします。
コンポーネントの作成
Star Wars APIから取得した、一覧のデータを画面に表示させるようにコンポーネントを編集します。
import {
  ChangeDetectionStrategy,
  Component,
  EventEmitter,
  OnDestroy,
  OnInit,
} from '@angular/core';
import { PersonStore } from 'src/app/store/person.store';

@Component({
  selector: 'component-store-person-list',
  templateUrl: './person-list.component.html',
  styleUrls: ['./person-list.component.scss'],
  changeDetection: ChangeDetectionStrategy.OnPush,
})
export class personListComponent implements OnInit, OnDestroy {
  protected readonly onDestroy$ = new EventEmitter();

  // Storeから現在のPerson情報を取得して、Viewに表示させる。
  people$ = this.personStore.people$;

  // Person情報をStoreから呼び出しViewにに表示する。
  displayedColumns = [
    'name',
    'birth_year',
    'eye_color',
    'gender',
    'hair_color',
    'height',
    'mass',
    'controls',
  ];

  constructor(private personStore: PersonStore) {}

  ngOnDestroy(): void {
    this.onDestroy$.emit();
  }

  ngOnInit(): void {}
personStoreにデータが格納されており、peaple$変数に格納します。
データの表示にはAngular Materialのmat-tabelを使用します。
<div class="container mat-elevation-z8">
  <table mat-table [dataSource]="people$">
    <ng-container matColumnDef="name">
      <th mat-header-cell *matHeaderCellDef> Name </th>
      <td mat-cell *matCellDef="let element"> {{element.name}} </td>
    </ng-container>
    <ng-container matColumnDef="birth_year">
      <th mat-header-cell *matHeaderCellDef> Birth Year </th>
      <td mat-cell *matCellDef="let element"> {{element.birth_year}} </td>
    </ng-container>
    <ng-container matColumnDef="eye_color">
      <th mat-header-cell *matHeaderCellDef> Eye Color </th>
      <td mat-cell *matCellDef="let element"> {{element.eye_color}} </td>
    </ng-container>
    <ng-container matColumnDef="gender">
      <th mat-header-cell *matHeaderCellDef> Gender </th>
      <td mat-cell *matCellDef="let element"> {{element.gender}} </td>
    </ng-container>
    <ng-container matColumnDef="hair_color">
      <th mat-header-cell *matHeaderCellDef> Hair Color </th>
      <td mat-cell *matCellDef="let element"> {{element.hair_color}} </td>
    </ng-container>
    <ng-container matColumnDef="height">
      <th mat-header-cell *matHeaderCellDef> Height (cm) </th>
      <td mat-cell *matCellDef="let element"> {{element.height}} </td>
    </ng-container>
    <ng-container matColumnDef="mass">
      <th mat-header-cell *matHeaderCellDef> Mass (kg) </th>
      <td mat-cell *matCellDef="let element"> {{element.mass}} </td>
    </ng-container>
      <tr mat-header-row *matHeaderRowDef="displayedColumns; sticky: true"></tr>
      <tr mat-row *matRowDef="let row; columns: displayedColumns;"></tr>
  </table>
</div>
これで取得したデータ一覧を画面に表示できる様になります。
Discussion