Gemini 2.5 Computer Useを使って見よう
Gemini 2.5 Computer Useを使って見よう
はじめに

Gemini 2.5 Computer Use Model は、GUIを操作に特化したモデルであり、ユーザーに代わってブラウザなどでアクションを実行することが可能です。例えば、Eコマースサイトで商品を注文するためにウェブアプリケーションを操作するといったことが可能です。
Gemini 2.5 Computer Use Model は、モデルであると同時にツールでもあります。
- モデルとして: 現在の状態に基づいて、(x,y)地点をクリックする、または**(x,y)地点のテキストボックスにテキストを入力する**といった次のアクションを提案できます。
- ツールとして: 「Googleフライトを使って東京からシンガポールへの最適なフライトを見つけて」といったあなたの指示を解釈し、タスクが完了するまで次のステップを自動的に判断し、実行するツールとしても機能します。
Gemini 2.5 Computer Use モデルを使ってみる
現時点ではGemini 2.5 Computer UseモデルはVertex AIや aistudio.google.com でプレビューモデルとして利用可能です。 モデル正式名称は以下の通りです。
gemini-2.5-computer-use-preview-10-2025
基本ユースケース:ブラウザの簡単な操作(特定の要素をクリック)
Gemini 2.5 Computer Use モデルを利用しウェブページ要素(ボタンなど)の位置を特定することができその要素の上クリックやテキスト入力などのアクションを実行することが可能です。この例では、ウェブブラウザとPlaywrightを使い、ウェブブラウザ上でアクションを実行します。
ステップ 1: ブラウザのインスタンスを作成
async def create_playwright_session():
   playwright = await async_playwright().start()

   # Launch the browser in headless mode, which is required for this environment
   browser = await playwright.chromium.laugnch(headless=False)

   # Create a new page
   page = await browser.new_page()
   screen_width, screen_height = 1920, 1080
   await page.set_viewport_size({"width": screen_width, "height": screen_height})

   print("Playwright session started.")
   return page
ステップ 2:
https://pet-luxe-spa.web.app/ へ移動しブラウザの画面ショットを取得
async def get_screenshot(page):
   screenshot_bytes = await page.screenshot()
   return screenshot_bytes


async def navigate_to(page,url):
   await page.goto(url)


async def main():
   page = await create_playwright_session()
   await navigate_to(page,"https://pet-luxe-spa.web.app/")
   screenshot_bytes = await get_screenshot(page)
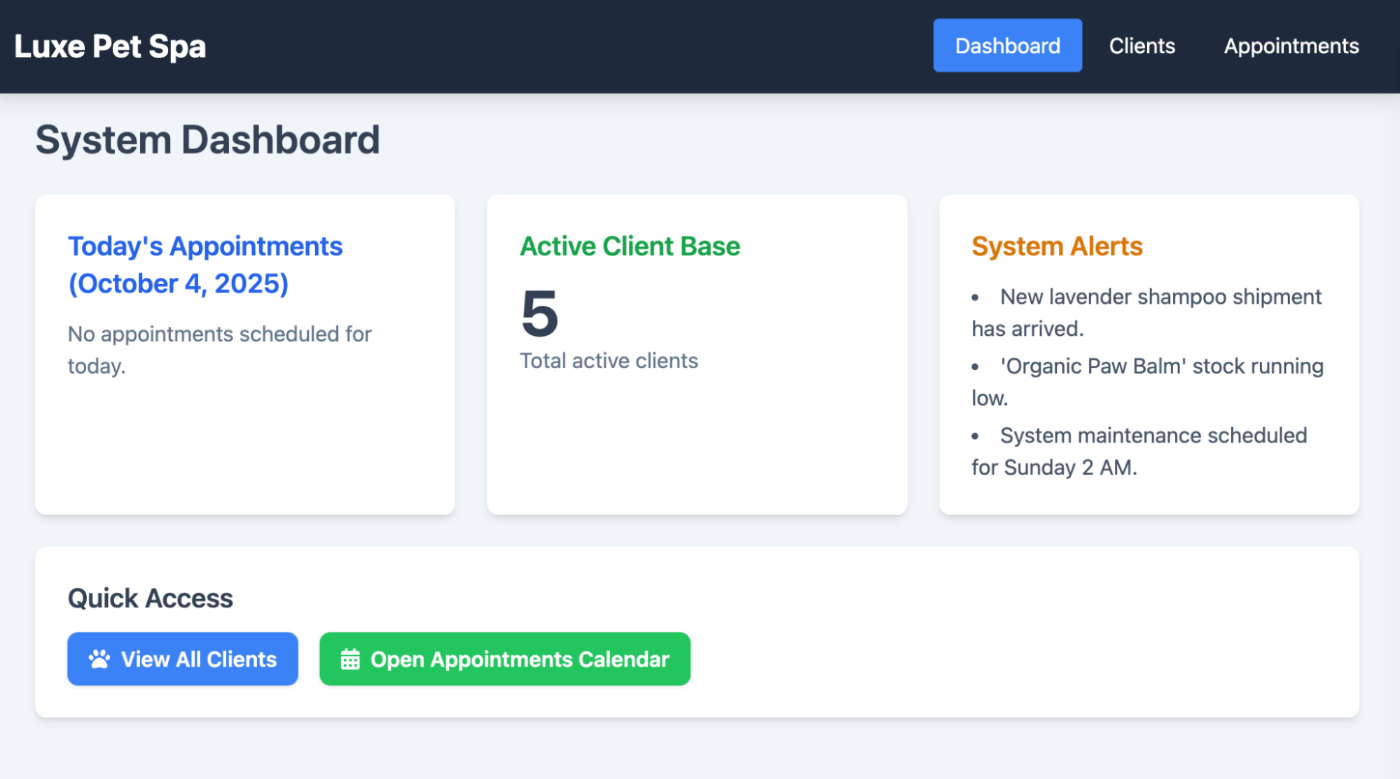
図 1: Luxe Pet Spa Pageの画面ショット
ステップ 3: Gemini 2.5 Computer Use Model からレスポンスの取得
async def call_gemini(contents):
   PROJECT_ID = ""  # @param {type: "string", placeholder: "[your-project-id]", isTemplate: true}
   LOCATION = "global"  # @param {type: "string"}
   # fmt: on
   client = genai.Client(vertexai=True, project=PROJECT_ID, location=LOCATION)
   MODEL_ID = "gemini-2.5-computer-use-preview-10-2025"
   # Configure Computer Use tool with browser environment
   config = GenerateContentConfig(
       tools=[
           Tool(
               computer_use=ComputerUse(
                   environment=Environment.ENVIRONMENT_BROWSER,
                   # Optional: Exclude specific predefined functions
                   excluded_predefined_functions=["drag_and_drop","open_web_browser"],
               )
           )
       ],
   )
   contents = contents
   # Generate content with the configured settings
   response = client.models.generate_content(
       model=MODEL_ID,
       contents=contents,
       config=config,
   )
   return response

async def call_computer_use_model(screenshot_bytes, instructions):
   contents=[
       Content(
           role="user",
           parts=[
               Part(
                   text=instructions,
               ),
               # Optional: include a screenshot of the initial state
               Part.from_bytes(
                   data=screenshot_bytes,
                   mime_type="image/png",
               ),
           ],
       )
   ]

   response=await call_gemini(contents)
   return response
ステップ 4: モデルからのレスポンスを確認
candidates=[Candidate(
  avg_logprobs=-0.3403618335723877,
  content=Content(
    parts=[
      Part(
        function_call=FunctionCall(
          args={
            'x': 807,
            'y': 33
          },
          name='click_at'
        )
      ),
    ],
    role='model'
  ),
上記でご覧いただいたように、「Clients」ボタンを含むブラウザの(x,y)座標が取得できます。次に、この座標を使ってPlaywrightでボタンをクリックします。
同じレスポンスの中に name='click_at' も含まれている点にご注目ください。これは、ユーザーがブラウザ上で行うべき推奨のアクションです。もちろん、ご自身で別のアクションを実行することも自由ですが、これを複数ステップから成るプロセスにしたい場合は、提案されたアクションをそのまま使用し、モデルからのレスポンスを連鎖させることで、複雑なタスクを達成できます。これについては次のセクションで解説します。
ステップ 5: ボタンをクリック
   candidate = response.candidates[0]
   function_call=candidate.content.parts[0].function_call
   screen_width, screen_height = 1920, 1080
   actual_x = normalize_x(function_call.args["x"], screen_width)
   actual_y = normalize_y(function_call.args["y"], screen_height)
   await page.mouse.click(actual_x, actual_y)
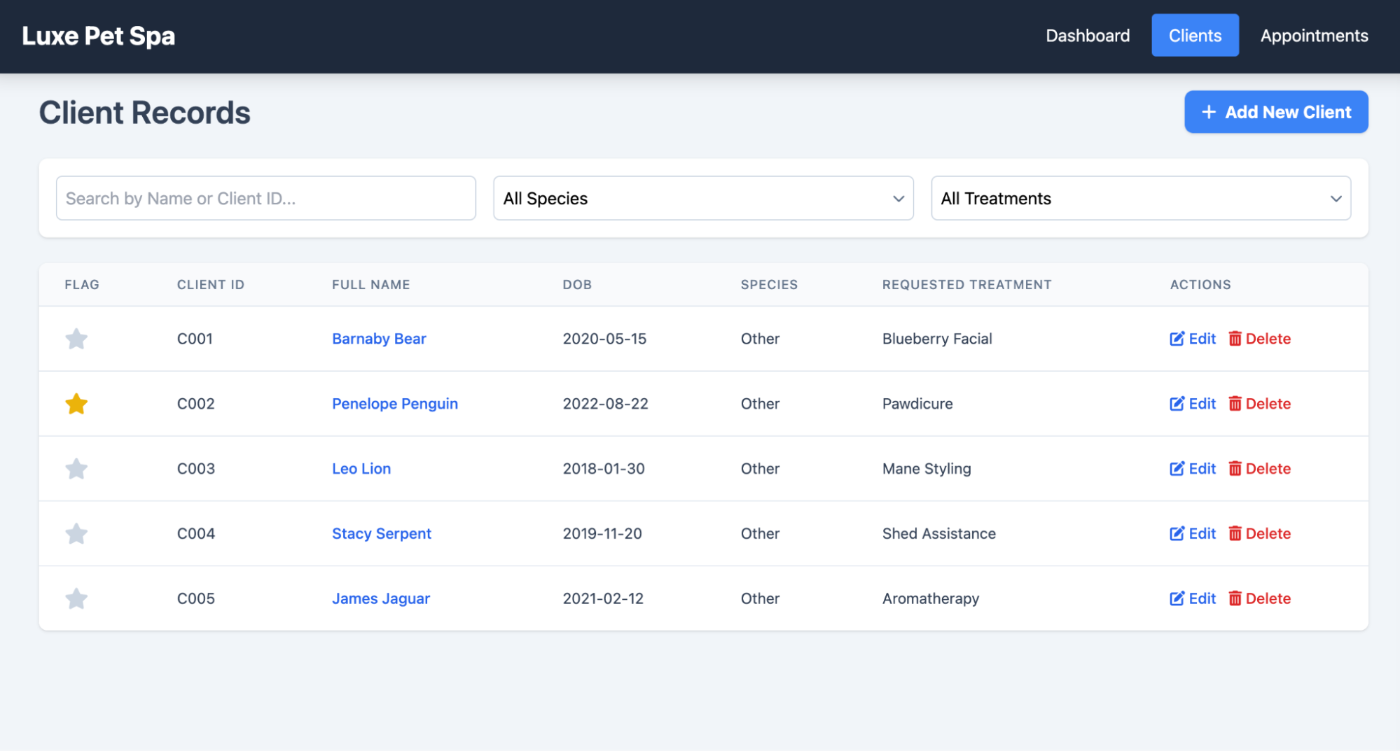
図2:Clientsをクリックした後の画面
ブラウザ操作を自動化: ブラウザでタスクを実行
前のセクションでは、スクリーンショットによる現在の状態と指示といった情報をGemini 2.5 Computer Useモデルに提供することで、次のアクション(click_atなど)や、クリックなどの操作を行うべき位置情報を取得できることを見てきました。
モデルによって提案されたアクションを実行し、その結果である新しいコンテキスト(ブラウザのスクリーンショット)を追加していくことで、モデルが提案する一連のアクションを連鎖させ、私たちの目的を達成することができます。
現時点では以下のアクションが提供されています
| Command Name | Description |
|---|---|
| open_web_browser | Open the web browser. |
| wait_5_seconds | Pauses execution for 5 seconds to allow dynamic content to load or animations to complete. |
| go_back | Navigates to the previous page in the browser's history. |
| go_forward | Navigates to the next page in the browser's history. |
| search | Navigates to the default search engine's homepage (e.g., Google). Useful for starting a new search task. |
| navigate | Navigates the browser directly to the specified URL. |
| click_at | Clicks at a specific coordinate on the webpage. The x and y values are based on a 1000x1000 grid and are scaled to the screen dimensions. |
| hover_at | Hovers the mouse at a specific coordinate on the webpage. Useful for revealing sub-menus. x and y are based on a 1000x1000 grid. |
| type_text_at | Types text at a specific coordinate, defaults to clearing the field first and pressing ENTER after typing, but these can be disabled. x and y are based on a 1000x1000 grid. |
| key_combination | Press keyboard keys or combinations, such as "Control+C" or "Enter". Useful for triggering actions (like submitting a form with "Enter") or clipboard operations. |
| scroll_document | Scrolls the entire webpage "up", "down", "left", or "right". |
| scroll_at | Scrolls a specific element or area at coordinate (x, y) in the specified direction by a certain magnitude. Coordinates and magnitude (default 800) are based on a 1000x1000 grid. |
| drag_and_drop | Drags an element from a starting coordinate (x, y) and drops it at a destination coordinate (destination_x, destination_y). All coordinates are based on a 1000x1000 grid. |
テーブル 1: 現在提供されているアクション
上記はあくまで提案されたアクションです。各アクションは、Playwrightのようなお好みのツールを使って、ご自身で実装する必要があります。

図 3: これは、プロセス全体の仕組みを示したものです。まずユーザーは、現在の状態(スクリーンショット)と指示をモデルに与えることから始めます。次にモデルは、実行すべきアクションのリストを提供します。アクションが実行されると、その結果の状態がコンテキストに追加されてモデルに送り返されます。このプロセスは、目的が達成されるまで繰り返されます。
イテレーション数(繰り返しの回数)を設定することで、このループをどれだけ実行するかを指定することが可能です。
async def main():
   screen_width, screen_height = 1920, 1080
   playwright_session = await create_playwright_session()
   page=playwright_session
   # Create the content with user message and initial screenshot
   screenshot_bytes = await playwright_session.screenshot()
   instructions="Find me a flight from SF to Hawaii on next Monday, coming back on next Friday. Start by navigating directly to flights.google.com, choose round trip option. On start enter or select SF and on destination select Hawaii"
   contents=[
       Content(
           role="user",
           parts=[
               Part(
                   text=instructions,
               ),
               # Optional: include a screenshot of the initial state
               Part.from_bytes(
                   data=screenshot_bytes,
                   mime_type="image/png",
               ),
           ],
       )
   ]

   #create a unique session id
   sessionid = str(uuid.uuid4())
   #100 iterations max
   for i in range(100):
       try:
           response=await call_gemini(playwright_session,instructions,contents)
           contents.append(response.candidates[0].content)
           results = await execute_function_calls(response, playwright_session, screen_width, screen_height)
           await capture_state(results,playwright_session,contents,sessionid)
       except:
           pass
この場合、Gemini 2.5 Computer Useモデルは、SF(サンフランシスコ)からハワイへのフライトを見つけるために必要な手順を自動的に判断します。目的地に到達するまでに必要なすべてのステップを、自動で見つけ出すのです。
コードの全体は、こちらでご確認いただけます。
https://github.com/haren-bh/webautomation
ユーザ確認を行う
このモデルを利用しアプリを構築する場合「Human in the loop」を前提にするとアプリの動きが安定し効率的あることを考えられます。場合によって以下のようにモデルがユーザのインプットを求められることもあります。
{
  "content": {
    "parts": [
      {
        "text": "I have evaluated step 2. It seems Google detected unusual traffic and is asking me to verify I'm not a robot. I need to click the 'I'm not a robot' checkbox located near the top left (y=98, x=95).",
      },
      {
        "function_call": {
          "name": "click_at",
          "args": {
            "x": 60,
            "y": 100,
            "safety_decision": {
              "explanation": "I have encountered a CAPTCHA challenge that requires interaction. I need you to complete the challenge by clicking the 'I'm not a robot' checkbox and any subsequent verification steps.",
              "decision": "require_confirmation"
            }
          }
        }
      }
    ]
  }
}
require_confirmationのような応答が返ってくることがあります。その場合は、ユーザーから承認を得て、その承認を(モデルに)返信する必要があります。これに関する詳細については、こちらをご確認ください。
https://ai.google.dev/gemini-api/docs/computer-use
まとめ
このブログでは、Gemini 2.5 Computer Useモデルの基本と、このモデルを使ってブラウザで高度な自動化を実行する方法について学びました。実行プロセスの各ステップを自分で制御することも、Gemini 2.5にタスク全体を自動で処理させることも可能です。どちらのアプローチが最適かは、あなたのユースケースによって異なります。
Discussion