【flutter】FirebaseAuth後にユーザー情報を登録する
実はVueでもユーザー情報の登録の実装はしたことがあるのですが、Firebase Authenticationは名前(displayName)やら、電話番号(phoneNumber)などは登録できるものの、住所だったり性別、etc...は登録することができないので、FireStoreやRealtime Databaseに登録する必要があります。
ちなみに今回もAndroidで実装していきます。iOSは別途記事を書いていきたいと思います。
環境
- Windows(10)
- Flutter(2.10.2)
- Dart(2.16.1)
- flutter_native_splash(^2.1.2+1)
事前準備
-
Firebase Authentication
- Firebaseのプロジェクト作成
-
flutterプロジェクトの生成
-
FirebaseAuthenticationで匿名登録するでユーザー登録まで完了させてください。
手順
FireStoreを準備する
1. FireStoreをスタートする
下記の順番で進めていく。
『テストモードで開始する』すると期間限定でオープンなDBになります。
Firestore>データベースの作成>テストモードで開始する
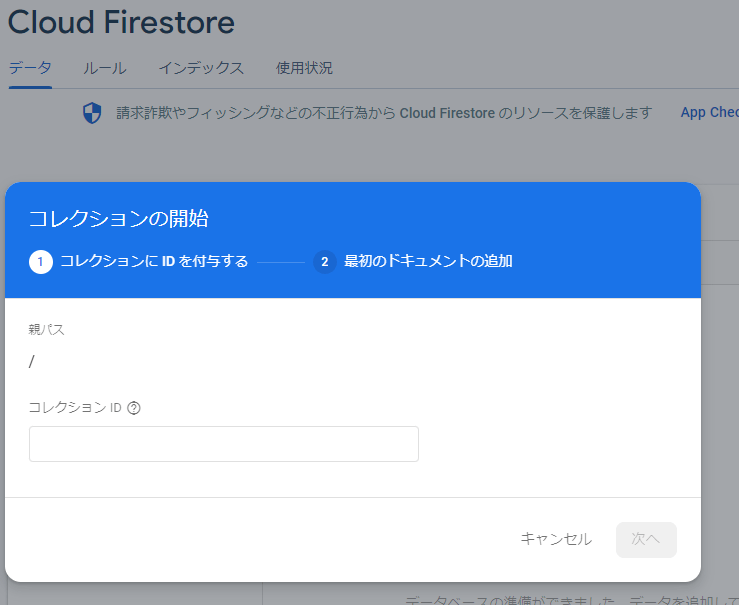
2. コレクションIDを作成する
RDBでいうところのテーブルにあたる部分ですかね。
を作成して、サンプルでデータを1件登録しときます。
-
コレクションIDは
users

-
ドキュメントIDは『自動ID』です。

flutterプロジェクトをメンテする
1. パッケージのインストール
下記コマンドを実行してパッケージのインストールします。
flutter pub add cloud_firestore
2. ユーザー登録処理の実装
メイン画面からユーザー登録画面へ遷移する処理を実装していきます。
main.dartに_MyHomePageStateクラスへfloatingActionButtonを追加する。
Widget build(BuildContext context) {
return Scaffold(
appBar: AppBar(
title: Text(widget.title),
),
body: Center(
child: Column(
mainAxisAlignment: MainAxisAlignment.center,
children: <Widget>[
const Text(
'登録結果:',
),
Text(
'$_result',
style: Theme.of(context).textTheme.headline4,
),
],
),
),
// ここから
floatingActionButton: FloatingActionButton(
child: const Icon(Icons.person_add_alt),
onPressed: () {
Navigator.push(
context,
MaterialPageRoute( builder: (context) => UsersEdits() )
);
},
),
// ここまで
);
}
import 'package:firebase_auth/firebase_auth.dart';
import 'package:flutter/material.dart';
import 'package:cloud_firestore/cloud_firestore.dart';
class UsersEdits extends StatefulWidget {
UsersEdits({Key? key}) : super(key: key);
State<UsersEdits> createState() => _UsersEditsState();
}
class _UsersEditsState extends State<UsersEdits> {
final TextEditingController _textContName = TextEditingController();
final TextEditingController _textContProf = TextEditingController();
String _editTextName = '';
String _editTextProf = '';
void initState() {
super.initState();
}
Widget build(BuildContext context) {
final bottomSpace = MediaQuery.of(context).viewInsets.bottom;
return Scaffold(
appBar: AppBar(
leading: IconButton(
icon: const Icon(Icons.close),
onPressed: () { Navigator.pop(context); },
),
centerTitle: true,
title: const Text('ユーザー登録'),
actions: [
Padding(
padding: const EdgeInsets.symmetric(vertical: 15.0, horizontal: 10.0),
child: OutlinedButton(
child: const Text(
'保存',
style: TextStyle(color: Colors.white)
),
onPressed: () async {
User? user = FirebaseAuth.instance.currentUser;
Map<String, dynamic> insertObj = {
'id': user!.uid,
'name': _textContName.text,
'note': _textContProf.text,
'vaild': true,
'created_at': FieldValue.serverTimestamp(),
'modified_at': FieldValue.serverTimestamp()
};
try {
var doc = await FirebaseFirestore.instance.collection('users').doc(user.uid);
await doc.set(insertObj);
Navigator.pop(context);
} catch ( e ) {
print('-----insert error----');
print(e);
}
},
)
)
],
),
resizeToAvoidBottomInset: false,
body: SafeArea(
child: SingleChildScrollView(
reverse: true,
child: Padding(
padding: EdgeInsets.only(bottom: bottomSpace),
child: Column(
children: [
Container(
padding: const EdgeInsets.symmetric(vertical: 15.0, horizontal: 10.0),
decoration: const BoxDecoration(
border: Border(
bottom: BorderSide( width: 1.0, color: Colors.grey )
)
),
child: Row( // 名前
mainAxisAlignment: MainAxisAlignment.spaceBetween,
children: <Widget> [
const Padding(
padding: EdgeInsets.only(top: 10.0, bottom: 10.0, right: 40.0),
child: Text('名前 '),
),
Flexible(
child: TextField(
autofocus: false,
controller: _textContName,
maxLines: 1,
decoration: const InputDecoration(
border: InputBorder.none,
),
onChanged: (String? val) {
if (val != null && val != '') {
_editTextName = val;
}
},
),
)
],
),
),
Container(
padding: const EdgeInsets.symmetric(vertical: 15.0, horizontal: 10.0),
decoration: const BoxDecoration(
border: Border(
bottom: BorderSide( width: 1.0, color: Colors.grey )
)
),
child: Row( // 自己紹介
mainAxisAlignment: MainAxisAlignment.spaceBetween,
children: <Widget> [
const Padding(
padding: EdgeInsets.only(top: 10.0, bottom: 10.0, right: 40.0),
child: Text('自己紹介'),
),
Flexible(
child: TextField(
autofocus: false,
controller: _textContProf,
maxLines: 2,
minLines: 1,
decoration: const InputDecoration(
border: InputBorder.none,
),
onChanged: (String? val) {
if (val != null && val != '') {
_editTextProf = val;
}
},
),
)
],
),
),
],
),
)
)
),
);
}
}
2. ビルドと確認
初回ビルド(+デバッグ)で匿名登録が成功すると、↓の画面になります。
既にビルドが済んでいても表示されます。

floatingActionButtonをタップすると・・・。

こんな感じの画面にいくので、適当に情報を入力して、保存ボタンをタップします。
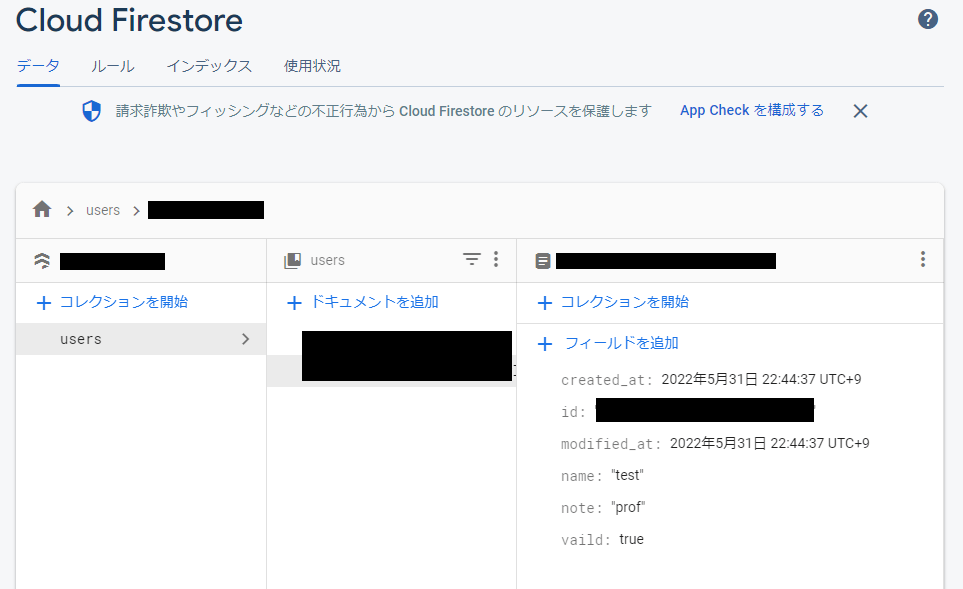
すると、FireStoreにこんな感じで登録されていれば成功です。

あとがき
この記事で方法としては上手く実装できるのですが、2つほど疑問というか憂いというかなんですが、FireStoreのDocumentにfirebase側で生成したuidを使っているのですが、セキュリティ的に使っていいのか?という疑問。
そして、FireStoreというよりは、NoSQLの設計上手くできず、RDB思考から脱出できない。
文章中でもRDBに脳内置換しようとして失敗している感・・・(笑)
他にも疑問点とかありますけど、徐々に自分の正解を発見していこうと思います。
参考記事
関連記事
Github
- 準備中
Discussion