📌
Cisco Nexus9000vを試してみた(準備編)
久しぶりにciscoに触る・・・
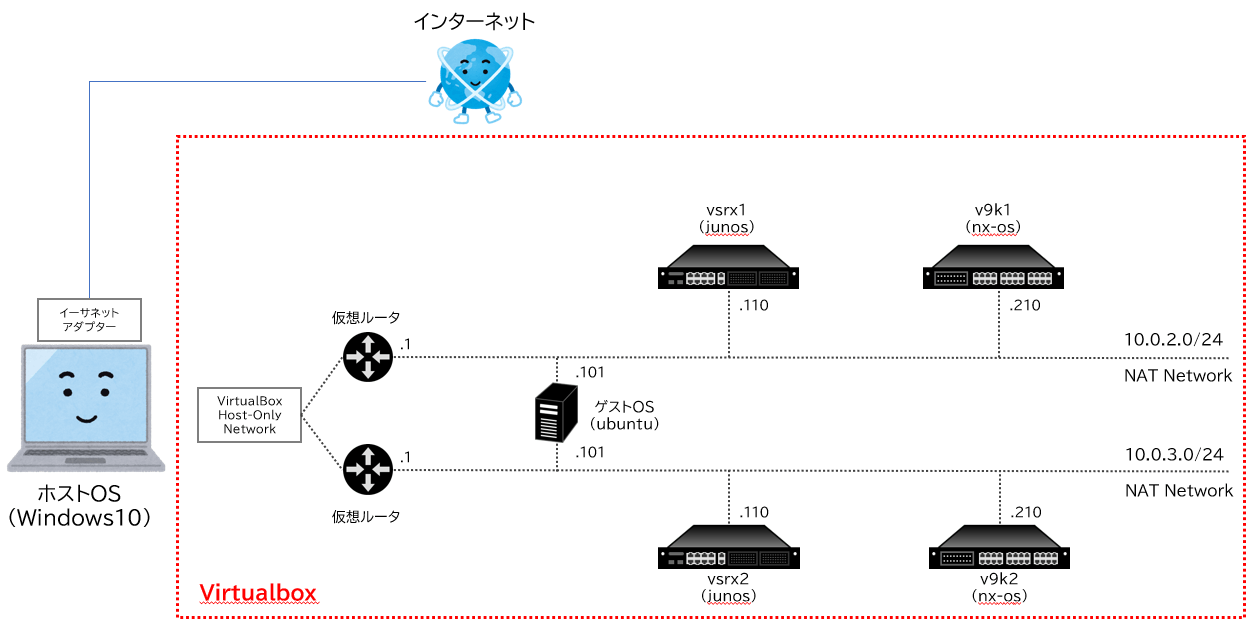
構成
マネージメントネットワークはこんな感じ
virtualboxの設定
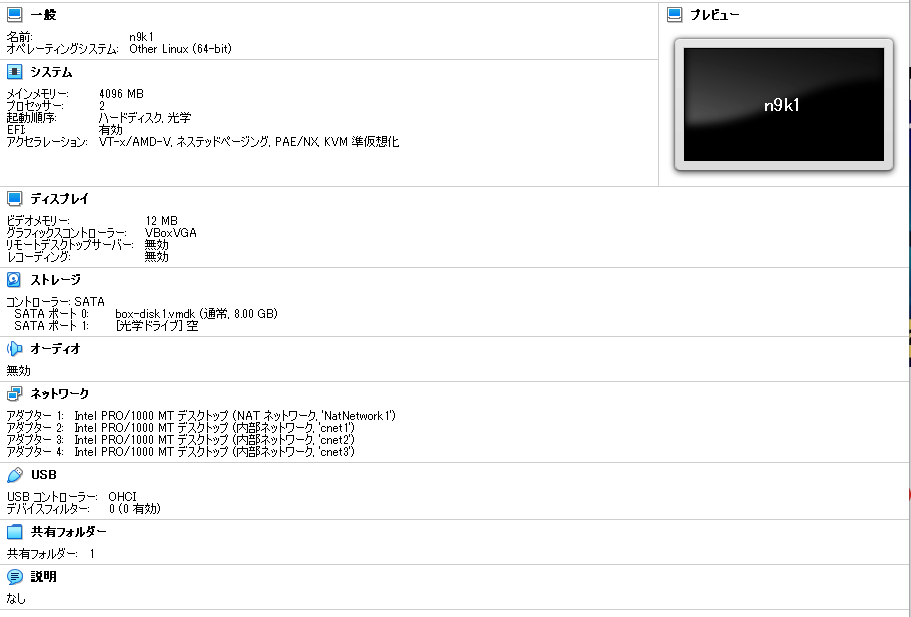
- ネットワークアダプタの設定
- アダプター1
- NATネットワーク
- v9k1は10.0.2.0/24のNetwork1
- v9k2は10.0.3.0/24のNetwork2
- NATネットワーク
- アダプター2
- 内部ネットワーク
- cnet1(新規で作成してv9k1、v9k2共に同じ設定)
- 内部ネットワーク
- アダプター3
- 内部ネットワーク
- cnet2(新規で作成してv9k1、v9k2共に同じ設定)
- 内部ネットワーク
- アダプター4
- 内部ネットワーク
- cnet3(新規で作成してv9k1、v9k2共に同じ設定)
- 内部ネットワーク
- アダプター1
こんな感じ(v9k1の場合)
n9k1の設定
- mgmtインターフェースにアドレスを設定
- 設定前
n9k1# show running-config interface mgmt 0

!Command: show running-config interface mgmt0
!Running configuration last done at: Wed Oct 19 09:40:58 2022
!Time: Wed Oct 19 09:42:25 2022

version 7.0(3)I7(6) Bios:version

interface mgmt0
  ip address dhcp
  vrf member management

n9k1#
n9k1# show interface mgmt 0 brief

--------------------------------------------------------------------------------
Port   VRF          Status IP Address                              Speed    MTU
--------------------------------------------------------------------------------
mgmt0  --           up     --                                      1000     1500
n9k1#
- 設定
n9k1# conf t
Enter configuration commands, one per line. End with CNTL/Z.
n9k1(config)# interface mgmt 0
n9k1(config-if)# ip address 10.0.2.210 255.255.255.0
n9k1(config-if)# exit
n9k1(config)#
- 設定後
n9k1# show running-config interface mgmt 0

!Command: show running-config interface mgmt0
!Running configuration last done at: Wed Oct 19 09:45:26 2022
!Time: Wed Oct 19 09:48:53 2022

version 7.0(3)I7(6) Bios:version

interface mgmt0
  vrf member management
  ip address 10.0.2.210/24

n9k1#
n9k1# show interface mgmt 0 brief

--------------------------------------------------------------------------------
Port   VRF          Status IP Address                              Speed    MTU
--------------------------------------------------------------------------------
mgmt0  --           up     10.0.2.210                              1000     1500
n9k1#
-
sshの設定
事前に公開キーと秘密キーを作っておく(Linuxでssh-keygenでもいいしお手軽にTeratermのsshkeyの生成でもいいし)
今回は rsa 2048bit で予め作成してある- 設定前
n9k1# show feature | grep ssh
sshServer              1          enabled
n9k1#
n9k1# conf t
Enter configuration commands, one per line. End with CNTL/Z.
n9k1(config)# fe
feature       feature-set

n9k1# show fea
feature       feature-set
n9k1# show feature | grep ssh
sshServer              1          enabled
n9k1#
n9k1# show user-account
user:admin
        this user account has no expiry date
        roles:network-admin
user:vagrant
        this user account has no expiry date
        roles:network-admin
        ssh public key: ssh-rsa hogehoge== vagrant insecure public key
n9k1#
- 設定
n9k1(config)# username ban password ***** #実際はベタ打ち
n9k1(config)#
n9k1(config)# no feature ssh
XML interface to system may become unavailable since ssh is disabled
n9k1(config)#
n9k1(config)# ssh key rsa 2048 force
deleting old rsa key.....
generating rsa key(2048 bits).....
..
generated rsa key
n9k1(config)#
n9k1(config)# feature ssh
n9k1(config)#
n9k1(config)# username ban sshkey ssh-rsa hogehoge #自分で生成した公開キーを入力
n9k1(config)#
n9k1# copy running-config startup-config
[########################################] 100%
Copy complete, now saving to disk (please wait)...
Copy complete.
n9k1#
- 設定後
n9k1# show ssh key
**************************************
rsa Keys generated:Wed Oct 19 10:01:50 2022

ssh-rsa hogehoge

bitcount:2048
fingerprint:
SHA256:hogehoge
**************************************
could not retrieve dsa key information
**************************************
n9k1#
n9k1# show user-account
user:admin
        this user account has no expiry date
        roles:network-admin
user:vagrant
        this user account has no expiry date
        roles:network-admin
        ssh public key: ssh-rsa hogehoge== vagrant insecure public key
user:ban
        this user account has no expiry date
        roles:network-operator
        ssh public key: ssh-rsa hogehoge== ban
n9k1#
- sshでログインしてみる

n9k2の設定
n9k1と同じ
mgmt 0のIPアドレスだけ変わる
n9k2# show running-config interface mgmt 0

!Command: show running-config interface mgmt0
!Running configuration last done at: Wed Oct 19 12:40:58 2022
!Time: Wed Oct 19 12:42:25 2022

version 7.0(3)I7(6) Bios:version

interface mgmt0
  ip address dhcp
  vrf member management

n9k2#
n9k2# show interface mgmt 0 brief

--------------------------------------------------------------------------------
Port   VRF          Status IP Address                              Speed    MTU
--------------------------------------------------------------------------------
mgmt0  --           up     --                                      1000     1500
n9k2#
- 設定
n9k2# conf t
Enter configuration commands, one per line. End with CNTL/Z.
n9k1(config)# interface mgmt 0
n9k1(config-if)# ip address 10.0.3.210 255.255.255.0
n9k1(config-if)# exit
n9k1(config)#
- 設定後
n9k2# show running-config interface mgmt 0

!Command: show running-config interface mgmt0
!Running configuration last done at: Wed Oct 19 12:45:26 2022
!Time: Wed Oct 19 12:48:53 2022

version 7.0(3)I7(6) Bios:version

interface mgmt0
  vrf member management
  ip address 10.0.3.210/24

n9k2#
n9k2# show interface mgmt 0 brief

--------------------------------------------------------------------------------
Port   VRF          Status IP Address                              Speed    MTU
--------------------------------------------------------------------------------
mgmt0  --           up     10.0.3.210                              1000     1500
n9k2#
user role
nx-osでは以下のコマンドを実行するためには権限レベル15の権限がないといけないらしいのでadminでログインして以下を実行(下の例はn9k1のもの)
n9k1(config)# username ban role network-admin

n9k1(config)#
n9k1# show user-account ban
user:ban
        this user account has no expiry date
        roles:network-operator network-admin
        ssh public key: ssh-rsa hogehoge== ban
n9k1#
ちなみにログインセッション確立時にここら辺の設定をロードするようでsshでログインしたあとにコンソールで設定変更しても再セッションを張らないとshow runが実行出来なかった
- sshログイン
n9v2# show run
% Permission denied for the role
n9v2#
Discussion