🐙
Cisco Nexus9000vを試してみた(セットアップ編)
CiscoだとCisco Packet Tracerを使うとお好きなネットワーク構成が作れるけど、virtualbox + vagrantで何やらNexus9000vをタダで使えるらしい
タダで使えるなら使ってみよーかなーくらいのお気持ちで試してみた
参考にしたサイト
基本的にこの手順のまま進めていけば難なくインストール可能
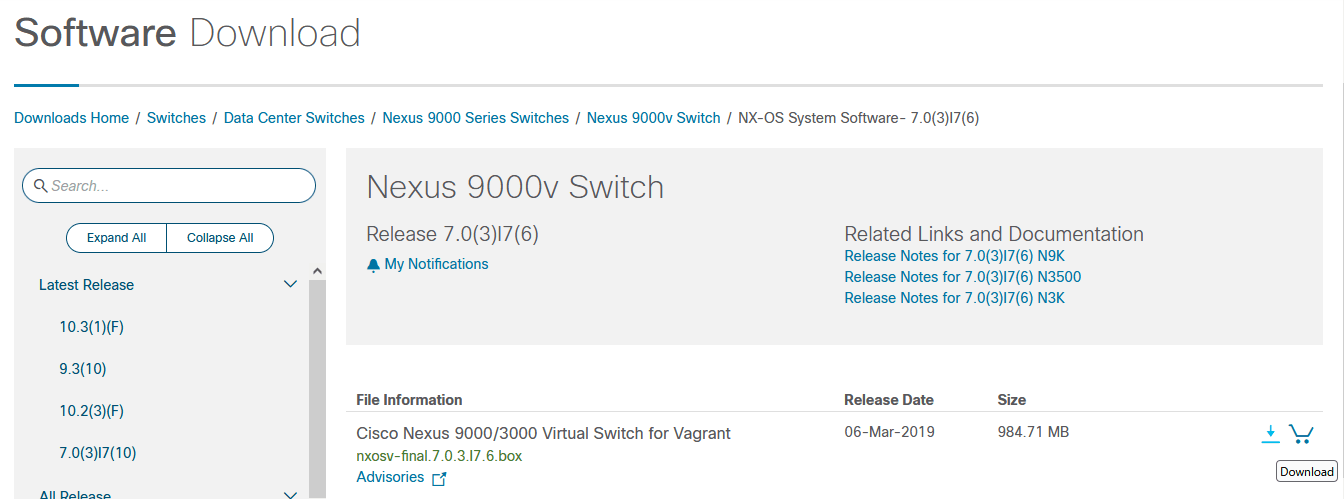
ダウンロード
↓のサイトからイメージをダウンロード
Cisco Nexus 9000/3000 Virtual Switch for Vagrant欄のダウンロードからダウンロード
※記事作成時点では nxosv-final.7.0.3.I7.6.box だった
CCIDを取得しておく必要があるのと、アカウントに住所の設定がされている必要がある
あと、ダウンロードするのに民間企業なのか軍事関係者なのかとか聞かれた
インストール
テキトーなディレクトリを作ってダウンロードしたboxファイルを移動しておく
今回は C:\Users\ban\vagrant を作ってその中にboxファイルを移動
- vagrant add実行
C:\Users\ban\vagrant>vagrant box add --name n9000v nxosv-final.7.0.3.I7.6.box
==> box: Box file was not detected as metadata. Adding it directly...
==> box: Adding box 'n9000v' (v0) for provider:
    box: Unpacking necessary files from: file://C:/Users/ban/vagrant/nxosv-final.7.0.3.I7.6.box
    box:
==> box: Successfully added box 'n9000v' (v0) for 'virtualbox'!

C:\Users\ban\vagrant>
- boxの確認
C:\Users\ban\vagrant>vagrant box list
n9000v                               (virtualbox, 0)

C:\Users\ban\vagrant>
-
ここでvirtualboxを起動しておく
-
vagrant init実行(vagrantfileの生成)
C:\Users\ban\vagrant>vagrant init n9000v
A `Vagrantfile` has been placed in this directory. You are now
ready to `vagrant up` your first virtual environment! Please read
the comments in the Vagrantfile as well as documentation on
`vagrantup.com` for more information on using Vagrant.

C:\Users\ban\vagrant>
- vagrantfileの確認
C:\Users\ban\vagrant>dir
 ドライブ C のボリューム ラベルがありません。

 C:\Users\ban\vagrant のディレクトリ

2022/10/19  08:20    <DIR>          .
2022/10/19  08:20    <DIR>          ..
2022/10/18  19:34     1,032,540,160 nxosv-final.7.0.3.I7.6.box
2022/10/19  08:20             3,082 Vagrantfile
               2 個のファイル       1,032,543,242 バイト
               2 個のディレクトリ  340,604,530,688 バイトの空き領域

C:\Users\ban\vagrant>
vagrantfileの中身はこんな感じ
# -*- mode: ruby -*-
# vi: set ft=ruby :

# All Vagrant configuration is done below. The "2" in Vagrant.configure
# configures the configuration version (we support older styles for
# backwards compatibility). Please don't change it unless you know what
# you're doing.
Vagrant.configure("2") do |config|
  # The most common configuration options are documented and commented below.
  # For a complete reference, please see the online documentation at
  # https://docs.vagrantup.com.

  # Every Vagrant development environment requires a box. You can search for
  # boxes at https://vagrantcloud.com/search.
  config.vm.box = "n9000v"

  # Disable automatic box update checking. If you disable this, then
  # boxes will only be checked for updates when the user runs
  # `vagrant box outdated`. This is not recommended.
  # config.vm.box_check_update = false

  # Create a forwarded port mapping which allows access to a specific port
  # within the machine from a port on the host machine. In the example below,
  # accessing "localhost:8080" will access port 80 on the guest machine.
  # NOTE: This will enable public access to the opened port
  # config.vm.network "forwarded_port", guest: 80, host: 8080

  # Create a forwarded port mapping which allows access to a specific port
  # within the machine from a port on the host machine and only allow access
  # via 127.0.0.1 to disable public access
  # config.vm.network "forwarded_port", guest: 80, host: 8080, host_ip: "127.0.0.1"

  # Create a private network, which allows host-only access to the machine
  # using a specific IP.
  # config.vm.network "private_network", ip: "192.168.33.10"

  # Create a public network, which generally matched to bridged network.
  # Bridged networks make the machine appear as another physical device on
  # your network.
  # config.vm.network "public_network"

  # Share an additional folder to the guest VM. The first argument is
  # the path on the host to the actual folder. The second argument is
  # the path on the guest to mount the folder. And the optional third
  # argument is a set of non-required options.
  # config.vm.synced_folder "../data", "/vagrant_data"

  # Provider-specific configuration so you can fine-tune various
  # backing providers for Vagrant. These expose provider-specific options.
  # Example for VirtualBox:
  #
  # config.vm.provider "virtualbox" do |vb|
  #   # Display the VirtualBox GUI when booting the machine
  #   vb.gui = true
  #
  #   # Customize the amount of memory on the VM:
  #   vb.memory = "1024"
  # end
  #
  # View the documentation for the provider you are using for more
  # information on available options.

  # Enable provisioning with a shell script. Additional provisioners such as
  # Ansible, Chef, Docker, Puppet and Salt are also available. Please see the
  # documentation for more information about their specific syntax and use.
  # config.vm.provision "shell", inline: <<-SHELL
  #   apt-get update
  #   apt-get install -y apache2
  # SHELL
end
- vagrant up実行(virtualboxへのインストール)
C:\Users\ban\vagrant>vagrant up
Bringing machine 'default' up with 'virtualbox' provider...
==> default: Importing base box 'n9000v'...
==> default: Matching MAC address for NAT networking...
==> default: Setting the name of the VM: vagrant_default_1666135837453_67685
Vagrant is currently configured to create VirtualBox synced folders with
the `SharedFoldersEnableSymlinksCreate` option enabled. If the Vagrant
guest is not trusted, you may want to disable this option. For more
information on this option, please refer to the VirtualBox manual:

  https://www.virtualbox.org/manual/ch04.html#sharedfolders

This option can be disabled globally with an environment variable:

  VAGRANT_DISABLE_VBOXSYMLINKCREATE=1

or on a per folder basis within the Vagrantfile:

  config.vm.synced_folder '/host/path', '/guest/path', SharedFoldersEnableSymlinksCreate: false
==> default: Clearing any previously set network interfaces...
==> default: Preparing network interfaces based on configuration...
    default: Adapter 1: nat
==> default: Forwarding ports...
    default: 22 (guest) => 2222 (host) (adapter 1)
==> default: Booting VM...
==> default: Waiting for machine to boot. This may take a few minutes...
    default: SSH address: 127.0.0.1:2222
    default: SSH username: vagrant
    default: SSH auth method: private key
- virtualboxで確認
virtualboxに追加出来た

セッティング
ここまでだとなんも繋がってないただのnx-osが起動しているだけなので微調整
- vagrant halt実行
なんかhaltしてもvirtualbox側で停止してくれなかったのでvirtualbox側で電源オフした
C:\Users\ban\vagrant>vagrant halt
==> default: Attempting graceful shutdown of VM...
The configured shell (config.ssh.shell) is invalid and unable
to properly execute commands. The most common cause for this is
using a shell that is unavailable on the system. Please verify
you're using the full path to the shell and that the shell is
executable by the SSH user.

C:\Users\ban\vagrant>
-
virtualbox設定変更
-
メモリは4GBで十分

-
シリアルポートの設定変更
- \\.\pipe\COM6を指定
- boxをコピーして使い回す場合はCOM*の値を変更しないと起動しない
- 例)v9k1は \\.\pipe\COM6 、v9k2は \\.\pipe\COM7 とか
- ポートモードを「ホストにパイプ」に変更することを忘れない(これやらないで全然起動してこなかった)
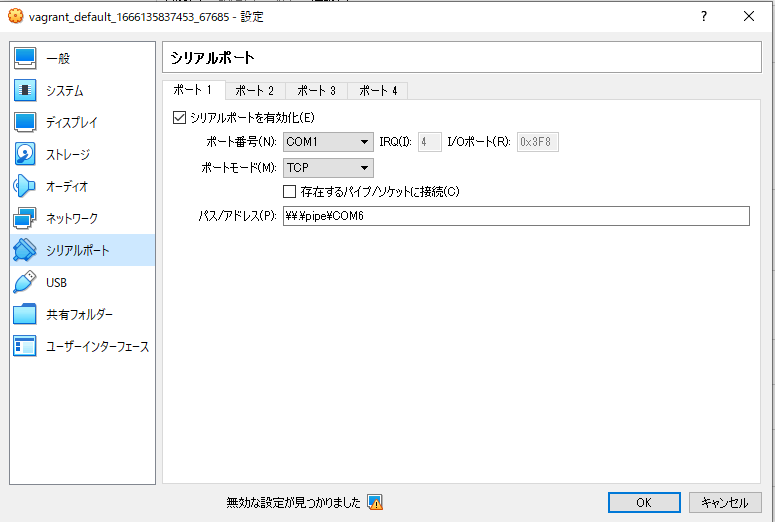
- \\.\pipe\COM6を指定
-
-
n9000v起動
- 起動はvagrant upでもvirtualboxからでもいいが、vagrant upするとNICが自動的にNAT指定になってしまってうざいのでvirtualboxから起動
- 通常起動で起動して画面を眺めているとこんな感じで上がってくる

-
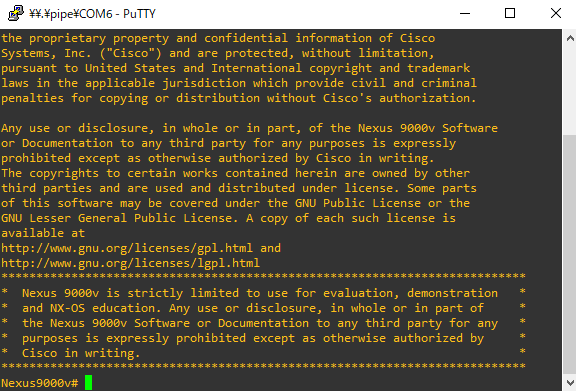
コンソール接続
-
serial接続の時に \\pipe.\COM6 に接続するのはTeratarmだとめんどくさいのでPuTTYで接続した

-
ログイン画面
- デフォルトは admin/admin

- デフォルトは admin/admin
-
ログインするとこんな感じ
-
-
boot imageの固定
- これをやらないと次回起動以降スタックするらしい
- imageの確認
Nexus9000v# show ver
Cisco Nexus Operating System (NX-OS) Software
TAC support: http://www.cisco.com/tac
Documents: http://www.cisco.com/en/US/products/ps9372/tsd_products_support_serie
s_home.html
Copyright (c) 2002-2019, Cisco Systems, Inc. All rights reserved.
The copyrights to certain works contained herein are owned by
other third parties and are used and distributed under license.
Some parts of this software are covered under the GNU Public
License. A copy of the license is available at
http://www.gnu.org/licenses/gpl.html.

Nexus 9000v is a demo version of the Nexus Operating System

Software
  BIOS: version
  NXOS: version 7.0(3)I7(6)
  BIOS compile time:
  NXOS image file is: bootflash:///nxos.7.0.3.I7.6.bin
  NXOS compile time:  3/5/2019 13:00:00 [03/05/2019 22:04:55]


Hardware
  cisco Nexus9000 9000v Chassis
  Intel(R) Core(TM) i5-9600 CPU @ 3.10GHz with 4030444 kB of memory.
  Processor Board ID 9GP0NQFSO0E

  Device name: Nexus9000v
  bootflash:    3509454 kB
Kernel uptime is 0 day(s), 0 hour(s), 11 minute(s), 8 second(s)

Last reset
  Reason: Unknown
  System version:
  Service:

plugin
  Core Plugin, Ethernet Plugin

Active Package(s):

Nexus9000v#
- imageの固定
Nexus9000v# conf t
Enter configuration commands, one per line. End with CNTL/Z.
Nexus9000v(config)#

Nexus9000v(config)# boot nxos nxos.7.0.3.I7.6.bin
Performing image verification and compatibility check, please wait....
Nexus9000v(config)#
- hostnameの変更
Nexus9000v(config)# hostname n9k1
n9k1(config)#
- 設定保存
n9k1# copy running-config startup-config
[########################################] 100%
Copy complete, now saving to disk (please wait)...
Copy complete.
n9k1#
Discussion