はじめに
ComfyUI を API サーバーとして利用し、画像生成の自動化や外部ツールとの連携を行う方法について解説します。
環境・準備
まずは ComfyUI をセットアップし、起動しておきます。
基本的には以下の手順で準備できます。
- GitHub リポジトリをクローン、またはオールインなどのダウンロード
- 必要な Python パッケージをインストール
- main.py を実行して起動
WebSocket接続:ComfyUIのステータス監視
WebSocket を利用して実行中のジョブや処理の進行状況をリアルタイムに監視できます。
ComfyUI の現在の状態(例:アイドル中、処理中、処理終了など)を取得できます。
import json
import threading
import time
import websocket
import keyboard

# === 設定 ===
SERVER_ADDRESS = "localhost:8188"

# === グローバル変数 ===
CLIENT_ID = "my_client_id"  # client_id=sid
ws = None                   # WebSocketインスタンス

# WebSocket接続完了を待機するためのイベント
ws_connected_event = threading.Event()

# === WebSocket イベントハンドラ ===

def on_open(ws):
    print("✅ WebSocket接続成功")
    ws_connected_event.set()

def on_message(ws, message):
    msg = json.loads(message)

    match msg.get("type"):
        case "status":
            print(f"📡 ステータス: {msg}")
            sid_candidate = msg.get('data', {}).get('sid')
            if sid_candidate is not None:
                print("  ⇨ sid:", sid_candidate)

        case _:
            print(f"📩 メッセージ: {msg}")

def on_error(ws, error):
    print(f"❌ WebSocket エラー: {error}")
    ws_connected_event.set()

def on_close(ws, code, reason):
    print("🔌 WebSocket切断")
    ws_connected_event.set()


# WebSocketを別スレッドで起動
def start_websocket():
    global ws
    print("✅ WebSocket接続開始")
    ws = websocket.WebSocketApp(
        f"ws://{SERVER_ADDRESS}/ws?clientId={CLIENT_ID}",
        on_open=on_open,
        on_message=on_message,
        on_error=on_error,
        on_close=on_close
    )
    threading.Thread(target=ws.run_forever, daemon=True).start()
    ws_connected_event.wait()  # 接続完了まで待機

# === メインループ ===

def main_loop():
    print("🔄 Q:終了")

    try:
        while True:
            if keyboard.is_pressed('q'):
                print("🛑 Qキーで終了します")
                break

            time.sleep(0.05)
    except KeyboardInterrupt:
        pass
    finally:
        if ws:
            ws.close()

# === 実行 ===

if __name__ == "__main__":
    # WebSocket接続開始
    start_websocket()

    # メインループ開始
    main_loop()
接続時のステータス
WebSocket接続直後、ComfyUIは以下のようなsid(clientId)を含むステータス情報を送信してきます。
{'type': 'status', 'data': {'status': {'exec_info': {'queue_remaining': 0}},'sid': '52fcc059d6b243498b0ccee5bc8ba145'}}
実行中のステータス更新
以降、ComfyUIやAPIを使用して画像生成を開始すると、queue_remaining の値が変化する形で、ジョブの進行状況がリアルタイムで通知されます。
{'type': 'status', 'data': {'status': {'exec_info': {'queue_remaining': 1}}}}
{'type': 'status', 'data': {'status': {'exec_info': {'queue_remaining': 0}}}}
queue_remaining が 0 になれば、アイドル状態です。
ComfyUI API用 Workflow の作成
ComfyUI の API を用いた画像生成には、専用の Workflow 形式が必要です。
UI上で利用する Workflow とは構造が異なるため、適切な手順でエクスポートを行う必要があります。
Workflowのエクスポート
-
ComfyUIで使用したいworkflowを開きます。
今回はデフォルトのシンプルなt2iのworkflowを使用します。

-
開発モードの有効化
まず、ComfyUIでAPI用Workflowを保存するには「開発モード」を有効にする必要があります。
「設定」 → 「開発モード」をON

-
Workflowのエクスポート
次に、ComfyUIのWorkflowビューで「エクスポート (API)」を実行します。
「Workflow」メニュー → 「エクスポート (API)」
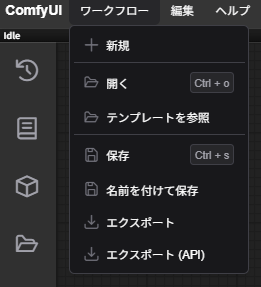
ここで出力された workflow のjsonファイルを使用していきます。
UI 用と API 用 Workflow の違い
| 項目 | UI用 | API用 |
|---|---|---|
| ノード定義形式 | "type": "KSampler" |
"class_type": "KSampler" |
| 全体構造 | 視覚レイアウトやGUI情報あり | 入力と型情報のみ |
| 目的 | GUI操作と保存 | API呼び出し専用 |
スクリプトなどで Workflow を動的に生成・加工する場合も、API 用の形式(class_type 指定や入出力構造)に準拠している必要があります。
ComfyUI APIを使った Workflow の実行
ComfyUI API を使って画像生成を実行するには、API 用 Workflow を読み込み、エンドポイント /prompt に送信します。
- API用Workflowの読み込み
保存された JSON ファイルを読み込みます。
def load_prompt_json(_path):
    with open(_path, "r", encoding="utf-8") as f:
        print("📩 workflow読み込み完了 ")
        return json.load(f)
- Workflow の送信(API 実行)
読み込んだ Workflow を、ComfyUI の /prompt エンドポイントに POST します。
"client_id" には、ws接続時の clientId と同じ物を設定しないとworkflow終了時の "executed" などが通知されてきません。
def comfyui_api_prompt(_prompt_data):
    payload = json.dumps({
        "client_id": CLIENT_ID,
        "prompt": _prompt_data
    }).encode('utf-8')

    try:
        req = request.Request(f"http://{SERVER_ADDRESS}/prompt", data=payload)
        with request.urlopen(req) as res:
            res_str = res.read().decode('utf-8')
            print(f"📥 サーバー応答: {res_str}")
            body = json.loads(res_str)
            _id = body.get("prompt_id")
            print("  ⇨ prompt_id:", _id)
            return _id
    except Exception as e:
        print(f"❌ workflow送信エラー: {e}")
        return None
- /prompt エンドポイントの応答
{
	"prompt_id": "0785c719-99d3-4d74-9d5a-b2528339e7df",
	"number": 1,
	"node_errors": {}
}
- prompt_id: QUEUEに登録されたジョブの識別子
- number: QUEUE番号
- node_errors: ノード単位のエラー情報
prompt_id は後でWebSocketから進行状況を追跡したり、履歴管理に使えるので記録しておく必要があります。
正常にジョブ登録できているとComfyUI上のQUEUEに処理状況が表示されます。

workflow進行状況の監視
画像生成ジョブの進行状況を WebSocket 経由で受信できます。
"progress" メッセージを受け取ることで、リアルタイムでworkflowの進捗を確認できます。
workflow進行状況の取得 ("progress")
WebSocket の on_message() ハンドラに "progress" メッセージを処理するロジックを追加します。
ジョブの進捗プログレスバーなどの表示の必要がなければpassしても問題ありません。
def on_message(ws, message):
    global sid, prompt_id, calling_api_flag
    msg = json.loads(message)

    match msg.get("type"):
        case "status":
            print(f"📡 ステータス: {msg}")
            sid_candidate = msg.get('data', {}).get('sid')
            if sid_candidate is not None:
                sid = sid_candidate

        case "progress":
            data = msg.get("data", {})
            if data.get('prompt_id') == prompt_id:
                value = data.get("value")
                max_value = data.get("max")

                # プログレスバー表示
                bar_length = 30
                filled_length = int(bar_length * value // max_value)
                bar = '█' * filled_length + '-' * (bar_length - filled_length)
                percent = (value / max_value) * 100
                print(f"\r📡 [{bar}] {percent:6.2f}% - prompt_id: {prompt_id}", end='')

                if value == max_value:
                    print(f"\n✅ workflow完了: prompt_id = {data.get('prompt_id')}")
        case _:
            print(f"📩 メッセージ: {msg}")
progress 通知内容
{'type': 'progress', 'data': {'value': 1, 'max': 20, 'prompt_id': '6bfceef7-796c-4064-9c02-887789979380', 'node': None}}
- value: 現在の進捗値
- max: 全体の進捗最大値(最終到達値)
- prompt_id: この進捗がどのジョブに対応しているか
- node: ノード
prompt_id を確認して、自分が送信したリクエストに対する進捗かどうかを判定します。
value = max までprogressは通知されてきます。
画像生成結果の取得 ("executed")
更に on_message() ハンドラに終了通知 "executed" メッセージで画像取得ロジックを追加します。
workflow完了時に保存された画像のパスも一緒に通知されます。
開始時の "execution_start" などのイベントも来ているので受け取りだけ追加。
- executed イベント追加
def on_message(ws, message):
    global prompt_id, calling_api_flag
    msg = json.loads(message)

    match msg.get("type"):
        case "status":
            print(f"📡 ステータス: {msg}")
            sid_candidate = msg.get('data', {}).get('sid')
            if sid_candidate is not None:
                print("  ⇨ sid:", sid_candidate)

        case "progress":
            data = msg.get("data", {})
            if data.get('prompt_id') == prompt_id:
                value = data.get("value")
                max_value = data.get("max")

                # プログレスバー表示
                bar_length = 30
                filled_length = int(bar_length * value // max_value)
                bar = '█' * filled_length + '-' * (bar_length - filled_length)
                percent = (value / max_value) * 100
                print(f"\r📡 [{bar}] {percent:6.2f}% - prompt_id: {prompt_id}", end='')

                if value == max_value:
                    print(f"\n✅ workflow完了: prompt_id = {data.get('prompt_id')}")

        case "executed":
            print(f"📥 executed: {msg}")
            data = msg.get("data", {})
            if data.get('prompt_id') == prompt_id:
                images = data.get('output', {}).get('images', [])
                if images[0]:
                        image_data = comfyui_api_view(images[0])
                        Image.open(io.BytesIO(image_data)).save("test.png")
                        print("💾 test.png に保存しました")
                calling_api_flag = False

        case "execution_start":
            print("▶️  ==== execution_start ====")
        case "execution_success":
            print("⏹️  ==== execution_success  ====")
        case "executing":
            pass
        case "execution_cached":
            pass

        case _:
            print(f"📩 メッセージ: {msg}")
executed 通知内容
{
	"type": "executed",
	"data": {
		"node": "9",
		"display_node": "9",
		"output": {
			"images": [
				{
					"filename": "ComfyUI_00429_.png",
					"subfolder": "",
					"type": "output"
				}
			]
		},
		"prompt_id": "faad8840-56e0-417b-88db-0bcf2f89cfc1"
	}
}
この中の "outputs" ノード内 "images" から以下の情報を取得します
| 項目 | 説明 |
|---|---|
filename |
生成された画像ファイル名 |
subfolder |
保存サブフォルダ(通常は空文字列) |
type |
"output" |
outputs 内には images, video, depth_maps など、使用するノードによって異なる形式の出力が含まれます。
- 画像データの取得 (/view API)
取得したファイル情報を元に、実際の画像データを /view API 経由で取得します。
def comfyui_api_view(file_data):
    url = (
        f"http://{SERVER_ADDRESS}/view?"
        f"filename={file_data['filename']}&"
        f"type={file_data['type']}&"
        f"subfolder={file_data['subfolder']}"
    )
    with request.urlopen(url) as response:
        return response.read()
これで一連の流れが完成しました
- WebSocket で進行状況を監視
- /prompt API で生成ジョブを送信
- on_message()より"executed"の終了判定
- /view API で画像バイナリを取得
プロンプト変更
同じWorkflowを繰り返しAPIに投げて実行しても、毎回同じ画像が生成されます。
これは、KSamplerノードのシード値とプロンプトの内容が固定されているためです。
異なる画像を生成するには、この2点を変更する必要があります。
UIのこの部分になります。

KSampler の中身はこの様なjsonになっています。
{
  "3": {
    "inputs": {
      "seed": 161063640881931,
      "steps": 20,
      "cfg": 8,
      "sampler_name": "euler",
      "scheduler": "normal",
      "denoise": 1,
      "model": [
        "4",
        0
      ],
      "positive": [
        "6",
        0
      ],
      "negative": [
        "7",
        0
      ],
      "latent_image": [
        "5",
        0
      ]
    },
    "class_type": "KSampler",
    "_meta": {
      "title": "Kサンプラー"
    }
  },
  ... 略 ...
}
KSamplerの持つ「シード」と「ポジティブプロンプト」を変化させてみます。
ポジティブプロンプトとシード値を変更
seed はランダム性を決定する値で毎回変更することで画像のバリエーションが生まれます。
ポジティブプロンプトが設定されている CLIPTextEncode ノードは通常、ポジティブ用とネガティブ用の2つがあり、どちらがポジティブ用かは KSampler ノードの "inputs" にアクセスし、"positive"が指すノードIDをたどることで判別可能です。
上記のKSamplerだと"6"がポジティブ用 CLIPTextEncode のノードIDになります。
参照したCLIPTextEncodeの"text" を書き換えることでプロンプトを変更できます。
def update_prompt_data(_prompt_data,positive_text, new_seed):
    for node_id, node in _prompt_data.items():
        if not isinstance(node, dict):
            continue

        class_type = node.get("class_type")
        inputs = node.get("inputs", {})

        if class_type == "KSampler":
            if "seed" in inputs:
                inputs["seed"] = new_seed
                print(f"🛠️ {node_id} の seed を {new_seed} に設定")
            positive_ref = inputs.get("positive")
            if isinstance(positive_ref, list) and positive_ref:
                ref_node = _prompt_data.get(positive_ref[0])
                if ref_node:
                    ref_inputs = ref_node.setdefault("inputs", {})
                    ref_inputs["text"] = positive_text
                    print(f"📝 Positiveプロンプト: {ref_inputs['text']}")
動作確認用にキー操作を使って任意タイミングで画像を生成
プロンプトが正常に変化しているかの動作確認のためキー入力に応じて、指定のプロンプトを設定し画像生成を開始する仕組みに変えてみます。
今回は prompt_id を複数管理したくないので実行中フラグ calling_api_flag で同時にAPIを呼ばないようにしています。
Aキー で「猫」、Sキー で「犬」の画像を生成してみます。
def main_loop():
    global prompt_id, calling_api_flag
    print("🔄 A:猫 S:犬 Q:終了")

    try:
        while True:
            if keyboard.is_pressed('a') and not calling_api_flag:
                print("▶️ 画像生成開始")
                calling_api_flag = True
                update_prompt_data(prompt_data,"cute cat.", random.randint(1, 9999999))
                prompt_id = comfyui_api_prompt(prompt_data)
                while keyboard.is_pressed('a'): time.sleep(0.05)

            elif keyboard.is_pressed('s') and not calling_api_flag:
                print("▶️ 画像生成開始")
                calling_api_flag = True
                update_prompt_data(prompt_data,"cute dog.", random.randint(1, 9999999))
                prompt_id = comfyui_api_prompt(prompt_data)
                while keyboard.is_pressed('s'): time.sleep(0.05)

            elif keyboard.is_pressed('q'):
                print("🛑 Qキーで終了します")
                break

            time.sleep(0.05)
    except KeyboardInterrupt:
        pass
    finally:
        if ws:
            ws.close()

おわりに
APIを活用すれば、ユーザーが自由に入力した内容で画像を生成したり、LLMと連携して自動的なプロンプトを生成させることができます。
最終的なコード
import asyncio
import json
import random
import threading
import time
import io
from urllib import request
from PIL import Image
import websocket
import keyboard

# === 設定 ===
SERVER_ADDRESS = "localhost:8188"

# === グローバル変数 ===
prompt_id = None            	# 現在使用中のプロンプトID
CLIENT_ID = "my_client_id"  	# client_id=sid
calling_api_flag = False    	# 実行中フラグ
ws = None                   	# WebSocketインスタンス
prompt_data = {}            	# 通常の画像生成プロンプト

# WebSocket接続完了を待機するためのイベント
ws_connected_event = threading.Event()

# === ComfyUI HTTP API 関数 ===

# プロンプトを送信し、生成されたprompt_idを返す
def comfyui_api_prompt(_prompt_data):
    payload = json.dumps({
		"client_id": CLIENT_ID,
        "prompt": _prompt_data
    }).encode('utf-8')

    try:
        req = request.Request(f"http://{SERVER_ADDRESS}/prompt", data=payload)
        with request.urlopen(req) as res:
            res_str = res.read().decode('utf-8')
            print(f"📥 サーバー応答: {res_str}")
            body = json.loads(res_str)
            _id = body.get("prompt_id")
            print("  ⇨ prompt_id:", _id)
            return _id
    except Exception as e:
        print(f"❌ workflow送信エラー: {e}")
        return None

# サーバーから画像データを取得
def comfyui_api_view(file_data):
    url = (
        f"http://{SERVER_ADDRESS}/view?"
        f"filename={file_data['filename']}&"
        f"type={file_data['type']}&"
        f"subfolder={file_data['subfolder']}"
    )
    print(f"✅ 画像取得: {url}")
    with request.urlopen(url) as response:
        return response.read()

# === プロンプト変更 ===

# プロンプト文とランダムシードを設定する
def update_prompt_data(_prompt_data, positive_text, new_seed):
    for node_id, node in _prompt_data.items():
        if not isinstance(node, dict):
            continue

        class_type = node.get("class_type")
        inputs = node.get("inputs", {})

        if class_type == "KSampler":
            # シード値を変更
            if "seed" in inputs:
                inputs["seed"] = new_seed
                print(f"🛠️ {node_id} の seed を {new_seed} に設定")

            # positiveプロンプトテキストを変更
            positive_ref = inputs.get("positive")
            if isinstance(positive_ref, list) and positive_ref:
                ref_node = _prompt_data.get(positive_ref[0])
                if ref_node:
                    ref_inputs = ref_node.setdefault("inputs", {})
                    ref_inputs["text"] = positive_text
                    print(f"📝 Positiveプロンプト: {ref_inputs['text']}")

# === WebSocket イベントハンドラ ===

def on_open(ws):
    print("✅ WebSocket接続成功")
    # ComfyUIとの接続を確立するための初期メッセージ
    ws_connected_event.set()

def on_message(ws, message):
    global prompt_id, calling_api_flag
    msg = json.loads(message)

    match msg.get("type"):
        case "status":
            print(f"📡 ステータス: {msg}")
            sid_candidate = msg.get('data', {}).get('sid')
            if sid_candidate is not None:
                print("  ⇨ sid:", sid_candidate)

        case "progress":
            data = msg.get("data", {})
            if data.get('prompt_id') == prompt_id:
                value = data.get("value")
                max_value = data.get("max")

                # プログレスバー表示
                bar_length = 30
                filled_length = int(bar_length * value // max_value)
                bar = '█' * filled_length + '-' * (bar_length - filled_length)
                percent = (value / max_value) * 100
                print(f"\r📡 [{bar}] {percent:6.2f}% - prompt_id: {prompt_id}", end='')

                if value == max_value:
                    print(f"\n✅ workflow完了: prompt_id = {data.get('prompt_id')}")

        case "executed":
            print(f"📥 executed: {msg}")
            data = msg.get("data", {})
            if data.get('prompt_id') == prompt_id:
                images = data.get('output', {}).get('images', [])
                if images[0]:
                        image_data = comfyui_api_view(images[0])
                        Image.open(io.BytesIO(image_data)).save("test.png")
                        print("💾 test.png に保存しました")
                calling_api_flag = False

        case "execution_start":
            print("▶️  ==== execution_start ====")
        case "execution_success":
            print("⏹️  ==== execution_success  ====")
        case "executing":
            pass
        case "execution_cached":
            pass

        case _:
            print(f"📩 メッセージ: {msg}")

def on_error(ws, error):
    print(f"❌ WebSocket エラー: {error}")
    ws_connected_event.set()

def on_close(ws, code, reason):
    print("🔌 WebSocket切断")
    ws_connected_event.set()

# === 初期化処理 ===

# プロンプトJSONを読み込む
def load_prompt_json(_path):
    with open(_path, "r", encoding="utf-8") as f:
        print("📩 workflow読み込み完了 ")
        return json.load(f)

# WebSocketを別スレッドで起動
def start_websocket():
    global ws
    print("✅ WebSocket接続開始")
    ws = websocket.WebSocketApp(
        f"ws://{SERVER_ADDRESS}/ws?clientId={CLIENT_ID}",
        on_open=on_open,
        on_message=on_message,
        on_error=on_error,
        on_close=on_close
    )
    threading.Thread(target=ws.run_forever, daemon=True).start()
    ws_connected_event.wait()  # 接続完了まで待機

# === メインループ ===

def main_loop():
    global prompt_id, calling_api_flag
    print("🔄 A:猫 S:犬 Q:終了")

    try:
        while True:
            if keyboard.is_pressed('a') and not calling_api_flag:
                print("▶️ 画像生成開始")
                calling_api_flag = True
                update_prompt_data(prompt_data,"cute cat.", random.randint(1, 9999999))
                prompt_id = comfyui_api_prompt(prompt_data)
                while keyboard.is_pressed('a'): time.sleep(0.05)

            elif keyboard.is_pressed('s') and not calling_api_flag:
                print("▶️ 画像生成開始")
                calling_api_flag = True
                update_prompt_data(prompt_data,"cute dog.", random.randint(1, 9999999))
                prompt_id = comfyui_api_prompt(prompt_data)
                while keyboard.is_pressed('s'): time.sleep(0.05)

            elif keyboard.is_pressed('q'):
                print("🛑 Qキーで終了します")
                break

            time.sleep(0.05)
    except KeyboardInterrupt:
        pass
    finally:
        if ws:
            ws.close()

# === 実行 ===

if __name__ == "__main__":
    # プロンプトデータを読み込み
    prompt_data = load_prompt_json("api_test_t2i.json")

    # WebSocket接続開始
    start_websocket()

    # メインループ開始
    main_loop()

Discussion