Freshを使ってみる
Deno Deployで使えるWebフレームワークとしてFreshがあります。多少興味はあるものの使う機会がなかったので手を出していなかったのですが、ちょっと作りたいページが出てきたので使ってみることにしました。
以下の内容を取り扱います。
- Freshの導入
- Deno Deployにデプロイ
Freshの導入
まずはDenoが必要なのでこれは最新版をインストールしているのが前提となります。
deno upgrade
deno --version
deno 1.35.1 (release, x86_64-pc-windows-msvc)
v8 11.6.189.7
typescript 5.1.6
次にFreshのGetting Startedを見つつ導入していきます。
まずはFreshのインストールです。
deno run -A -r https://fresh.deno.dev
プロジェクトネームを聞かれるので入力します。そのままEnterを押すとデフォルトの fresh-project になります。
このコマンドは実行したディレクトリにここで指定したプロジェクト名のディレクトリを作るので、もしリポジトリなどをcloneしてそこを指定する場合には以下のように続けても大丈夫か聞かれます。
  🍋 Fresh: the next-gen web framework.

Project Name [fresh-project]
今回はGitHubで作ったリポジトリをcloneしてきてそのディレクトリを指定しました。y を押して次に進みます。
READMEが上書きされるので注意してください。
The target directory is not empty (files could get overwritten). Do you want to continue anyway? [y/N]
次はTailwindを使うかどうかですね。今回は使わないので N にします。
Fresh has built in support for styling using Tailwind CSS. Do you want to use this? [y/N]
VS Codeで開発してるのでそのままEnterを押します。
Do you use VS Code? [y/N]
これでプロジェクトの設定は終了です。
The manifest has been generated for 3 routes and 1 islands.

Project initialized!

Enter your project directory using cd fresh-project.
Run deno task start to start the project. CTRL-C to stop.

Stuck? Join our Discord https://discord.gg/deno

Happy hacking! 🦕
ここで作られたディレクトリ構成を見てみます。
components/
islands/
routes/
static/
deno.json
dev.ts
fresh.gen.ts
main.ts
README.md
次はWebサーバーを立ち上げて実際にFreshを動かしていきます。
deno task start
Task start deno run -A --watch=static/,routes/ dev.ts
Watcher Process started.
The manifest has been generated for 3 routes and 1 islands.

 🍋 Fresh ready
    Local: http://localhost:8000/
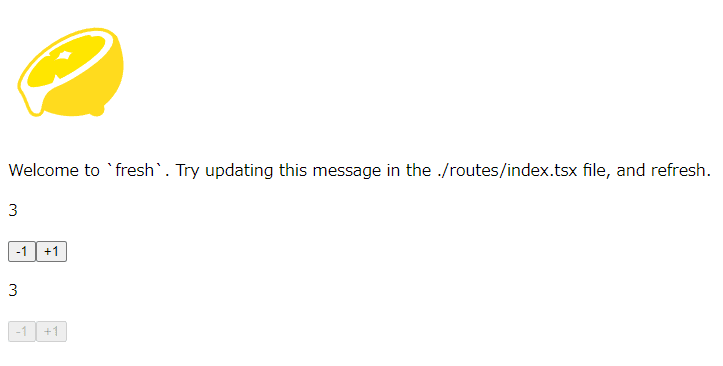
無事立ち上がったようなので確認してみましょう。最初からカウントアップできるサイトが実装済みのようです。

とりあえずファイルを見てみます。
deno.json
タスクは start と update があります。フレームワークのアップデートタスクがあるのは良いですね。他はimportとビルドの設定でfmtで使用するような設定は入ってないようです。
サーバー関連
スタート地点は dev.ts です。ここは基本編集不要でしょう。Freshの読み込みと main.ts の実行を行っています。
main.ts ではサーバーの構築と開始作業を行っています。ここも基本編集不要でしょう。重要なのはここで fresh.gen.ts を読み込んでいることです。
fresh.gen.ts はルート周りの設定を行っています。実際に中身を見てみると以下のようになっています。
// DO NOT EDIT. This file is generated by fresh.
// This file SHOULD be checked into source version control.
// This file is automatically updated during development when running `dev.ts`.

import * as $0 from './routes/[name].tsx';
import * as $1 from './routes/api/joke.ts';
import * as $2 from './routes/index.tsx';
import * as $$0 from './islands/Counter.tsx';

const manifest = {
  routes: {
    './routes/[name].tsx': $0,
    './routes/api/joke.ts': $1,
    './routes/index.tsx': $2,
  },
  islands: {
    './islands/Counter.tsx': $$0,
  },
  baseUrl: import.meta.url,
};

export default manifest;
routes はルートですね。静的なページやAPIのルートがここに列挙されています。見慣れないものがあるとすれば islands ですね。
これはFreshがIslands Architectureというものを採用しているので恐らくそのパーツだと思われます。Islands Architectureは全然詳しくないのですがとりあえず静的な結果として返すものの、動的コンテンツに関しては後から動作を加えられるようにする際、大きな塊で指定しておこうみたいに見えます。実際の挙動は後で見てみます。
ちなみにですがサイトには以下のように書かれていました。
-
dev.tsはエントリーポイントで、startのタスクで実行されます。 -
main.tsはエントリーポイントで、Deno DeployでLinkする場合はこのファイルを指定してください。 -
fresh.gen.tsはマニフェストファイルで、routes/とislands/から自動的に生成されます。
基本的にどれも触ることはなさそうですね。
routes/index.tsx
http://localhost:8000/ を開いたときのページです。ページはJSXで書かれています。
import { Head } from "$fresh/runtime.ts";
import { useSignal } from "@preact/signals";
import Counter from "../islands/Counter.tsx";

export default function Home() {
  const count = useSignal(3);
  return (
    <>
      <Head>
        <title>Fresh App</title>
      </Head>
      <div>
        <img
          src="/logo.svg"
          width="128"
          height="128"
          alt="the fresh logo: a sliced lemon dripping with juice"
        />
        <p>
          Welcome to `fresh`. Try updating this message in the
          ./routes/index.tsx file, and refresh.
        </p>
        <Counter count={count} />
      </div>
    </>
  );
}
Counter は islands/Counter.tsx で定義されたコンポーネントですね。
islands/Counter.tsx
import type { Signal } from "@preact/signals";
import { Button } from "../components/Button.tsx";

interface CounterProps {
  count: Signal<number>;
}

export default function Counter(props: CounterProps) {
  return (
    <div>
      <p>{props.count}</p>
      <Button onClick={() => props.count.value -= 1}>-1</Button>
      <Button onClick={() => props.count.value += 1}>+1</Button>
    </div>
  );
}
Buttonコンポーネントを使ってカウントを増減させるコンポーネントです。ただし islands/ というディレクトリに入っていますね。
routes/[name].tsx
こちらは http://localhost:8000/任意の名前 のページを開いたときのページです。実際にこのページにアクセスすると Hello 任意の名前 と表示されます。
import { PageProps } from "$fresh/server.ts";

export default function Greet(props: PageProps) {
  return <div>Hello {props.params.name}</div>;
}
[変数名] をファイルパスにした場合 props.params.変数名 でその値にアクセスできるようです。
実際の挙動
大まかにファイル構成と中身を見たので、実際に挙動を見てみます。
まずブラウザに返されるHTMLを見てみます。
<!DOCTYPE html>
<html lang="en">
  <head>
    <meta charSet="UTF-8" />
    <meta name="viewport" content="width=device-width, initial-scale=1.0" />
    <link
      rel="modulepreload"
      href="/_frsh/js/8da4be105acc5e866d96dbd1367699fea082142b/deserializer.js"
    />
    <link
      rel="modulepreload"
      href="/_frsh/js/8da4be105acc5e866d96dbd1367699fea082142b/signals.js"
    />
    <link
      rel="modulepreload"
      href="/_frsh/js/8da4be105acc5e866d96dbd1367699fea082142b/chunk-VTXBOFTR.js"
    />
    <link
      rel="modulepreload"
      href="/_frsh/js/8da4be105acc5e866d96dbd1367699fea082142b/chunk-UGFDDSOV.js"
    />
    <link
      rel="modulepreload"
      href="/_frsh/js/8da4be105acc5e866d96dbd1367699fea082142b/main.js"
    />
    <link
      rel="modulepreload"
      href="/_frsh/js/8da4be105acc5e866d96dbd1367699fea082142b/chunk-VZY3WYKC.js"
    />
    <link
      rel="modulepreload"
      href="/_frsh/js/8da4be105acc5e866d96dbd1367699fea082142b/island-counter.js"
    />
    <script
      src="/_frsh/refresh.js"
      nonce="f868c6161ea54083951ce6cdfc2b9aa3"
      type="module"
    ></script>
    <title>Fresh App</title>
  </head>
  <body>
    <div>
      <img
        src="/logo.svg?__frsh_c=8da4be105acc5e866d96dbd1367699fea082142b"
        width="128"
        height="128"
        alt="the fresh logo: a sliced lemon dripping with juice"
      />
      <p>
        Welcome to `fresh`. Try updating this message in the ./routes/index.tsx
        file, and refresh.
      </p>
      <!--frsh-counter:0-->
      <div>
        <p>3</p>
        <button disabled>-1</button>
        <button disabled>+1</button>
      </div>
      <!--/frsh-counter:0-->
    </div>
    <script id="__FRSH_STATE" type="application/json">
      { "v": [[{ "count": { "_f": "s", "v": 3 } }], []] }
    </script>
    <script type="module" nonce="1616f11d9c9f439e95400a2c55e3bf78">
      import { deserialize } from '/_frsh/js/8da4be105acc5e866d96dbd1367699fea082142b/deserializer.js';
      import { signal } from '/_frsh/js/8da4be105acc5e866d96dbd1367699fea082142b/signals.js';
      const ST = document.getElementById('__FRSH_STATE').textContent;
      const STATE = deserialize(ST, signal);
      import { revive } from '/_frsh/js/8da4be105acc5e866d96dbd1367699fea082142b/main.js';
      import Counter from '/_frsh/js/8da4be105acc5e866d96dbd1367699fea082142b/island-counter.js';
      revive({ counter: Counter }, STATE[0]);
    </script>
  </body>
</html>
前後に色々コードとかがありますがここらへんはフレームワークの部分なのでスルーしてみると、メインコンテンツは見覚えあるHTML構造になっていると思います。
まず面白い点としては <button> が disabled になっていることでしょうか。ローカルだと一瞬で動くようになるのでわかりませんが、動的な状態になるまでUIが使えないようになっているようです。
その他気になる点としてはコメントで挟まれた部分でしょう。
<!--frsh-counter:0-->
<div>
  <p>3</p>
  <button disabled>-1</button>
  <button disabled>+1</button>
</div>
<!--/frsh-counter:0-->
メインの内容は islands/Counter.tsx ですがコンポーネントとして使われている <Button> はただただ展開されて <button> になってコメントなどがありません。
このようにHTMLとして返す場合動的な部分である <Counter> は初期値3で設定したコンポーネントのレンダリング結果を返していますが、後から動的に変更できるように挙動を追加しているようです。
試しに Counter.ts を components/ にコピーして DeadCounter として追加してみたいと思います。
import type { Signal } from "@preact/signals";
import { Button } from "../components/Button.tsx";

interface CounterProps {
  count: Signal<number>;
}

export default function DeadCounter(props: CounterProps) {
  return (
    <div>
      <p>{props.count}</p>
      <Button onClick={() => props.count.value -= 1}>-1</Button>
      <Button onClick={() => props.count.value += 1}>+1</Button>
    </div>
  );
}
import { Head } from "$fresh/runtime.ts";
import { useSignal } from "@preact/signals";
import Counter from "../islands/Counter.tsx";
import DeadCounter from "../components/DeadCounter.tsx";

export default function Home() {
  const count = useSignal(3);
  const count2 = useSignal(3);
  return (
    <>
      <Head>
        <title>Fresh App</title>
      </Head>
      <div>
        <img
          src="/logo.svg"
          width="128"
          height="128"
          alt="the fresh logo: a sliced lemon dripping with juice"
        />
        <p>
          Welcome to `fresh`. Try updating this message in the
          ./routes/index.tsx file, and refresh.
        </p>
        <Counter count={count} />
        <DeadCounter count={count2}/>
      </div>
    </>
  );
}
実行すると表示はされますがボタンコンポーネントが動作しませんね。実際にHTMLを見てみます。
<!--frsh-counter:0-->
<div>
  <p>3</p>
  <button disabled>-1</button>
  <button disabled>+1</button>
</div>
<!--/frsh-counter:0-->
<div>
  <p>3</p>
  <button disabled>-1</button>
  <button disabled>+1</button>
</div>
この通り動的にコンテンツが書き換えられる部分と認識されていないのでHTMLとしてのみ出力されていますね。
また上にも少し書きましたが最初から disabled で無効化しているので、それが有効化されずに残ったままとなります。
何となくIslands Architectureの挙動を理解したところで次に進んでみます。
環境変数の利用
Deno Deploy等では環境変数を設定できるので、環境変数を利用してみます。まずは環境変数の設定です。今開発している環境はWindowsでターミナルがPowerShellなので以下のように設定します。
$env:AUTHOR = "test"
次にこれを利用するコンポーネントを作ります。
export default function Footer() {
  const author = Deno.env.get('AUTHOR') || '';
  return (
    <footer>
      {author}
    </footer>
  );
}
import { Head } from "$fresh/runtime.ts";
import { useSignal } from "@preact/signals";
import Counter from "../islands/Counter.tsx";
import Footer from "../components/Footer.tsx";

export default function Home() {
  const count = useSignal(3);
  return (
    <>
      <Head>
        <title>Fresh App</title>
      </Head>
      <div>
        <img
          src="/logo.svg"
          width="128"
          height="128"
          alt="the fresh logo: a sliced lemon dripping with juice"
        />
        <p>
          Welcome to `fresh`. Try updating this message in the
          ./routes/index.tsx file, and refresh.
        </p>
        <Counter count={count} />
      </div>
      <Footer />
    </>
  );
}
これで再度実行してみたところ、無事環境変数の値が表示されました。Deno Deployでは環境変数も設定できるので一部の値はこれで変更できそうですね。
新規ルートの追加
次にルートを追加してみます。説明によれば routes/ 以下を更新すれば自動的に fresh.gen.ts が更新されるということなので、次のようなパスを用意してみます。
-
routes/-
[name]/detail.tsx
-
これで /任意の名前/detail というパスが追加されるはずです。やってみましょう。
まず [name] という名前のディレクトリを作って、その中に [name].tsx をコピーして detail.html にリネームします。
後はわかりやすいようにHelloをDetailに書き換えて保存します。
import { PageProps } from "$fresh/server.ts";

export default function Greet(props: PageProps) {
  return <div>Detail {props.params.name}</div>;
}
ここで fresh.gen.ts を見てみると以下のようになっていました。
// DO NOT EDIT. This file is generated by fresh.
// This file SHOULD be checked into source version control.
// This file is automatically updated during development when running `dev.ts`.

import * as $0 from "./routes/[name]/detail.tsx";
import * as $1 from "./routes/[name].tsx";
import * as $2 from "./routes/api/joke.ts";
import * as $3 from "./routes/index.tsx";
import * as $$0 from "./islands/Counter.tsx";

const manifest = {
  routes: {
    "./routes/[name]/detail.tsx": $0,
    "./routes/[name].tsx": $1,
    "./routes/api/joke.ts": $2,
    "./routes/index.tsx": $3,
  },
  islands: {
    "./islands/Counter.tsx": $$0,
  },
  baseUrl: import.meta.url,
};

export default manifest;
確かに自動更新されているようです。確認したページでも無事 [name] の部分のデータを props.params で受け取れています。
静的レスポンスに処理の追加
さて、APIのような動的実行部分に関してはすでにサンプルが用意されているのでさらっと確認してみます。
import { HandlerContext } from "$fresh/server.ts";

// Jokes courtesy of https://punsandoneliners.com/randomness/programmer-jokes/
const JOKES = [
  "Why do Java developers often wear glasses? They can't C#.",
  "A SQL query walks into a bar, goes up to two tables and says “can I join you?”",
  "Wasn't hard to crack Forrest Gump's password. 1forrest1.",
  "I love pressing the F5 key. It's refreshing.",
  "Called IT support and a chap from Australia came to fix my network connection.  I asked “Do you come from a LAN down under?”",
  "There are 10 types of people in the world. Those who understand binary and those who don't.",
  "Why are assembly programmers often wet? They work below C level.",
  "My favourite computer based band is the Black IPs.",
  "What programme do you use to predict the music tastes of former US presidential candidates? An Al Gore Rhythm.",
  "An SEO expert walked into a bar, pub, inn, tavern, hostelry, public house.",
];

export const handler = (_req: Request, _ctx: HandlerContext): Response => {
  const randomIndex = Math.floor(Math.random() * JOKES.length);
  const body = JOKES[randomIndex];
  return new Response(body);
};
handler というメソッドで色々やってますね。これはメソッドを特に指定せず全て受け取る場合のやり方のようです。
では静的ページにヘッダーを追加するにはどうすればいいでしょうか。
import { PageProps } from "$fresh/server.ts";
import { Handlers } from "$fresh/server.ts";

export const handler: Handlers = {
  async GET(_req, ctx) {
    const resp = await ctx.render();
    resp.headers.set("X-Custom-Header", "Hello");
    return resp;
  },
};

export default function Greet(props: PageProps) {
  return <div>Detail {props.params.name}</div>;
}
今回も handler を使っていますが、今回はオブジェクトですね。こちらは先程のサンプルAPIとは異なりメソッド名のキーに応じて実行可能なようです。
GETの場合にはまず ctx.render() で結果をレンダリングしたレスポンスを作成します。大雑把には色々あった後下の Greet() が実行されるわけですね。
そしてレスポンスを作成後にHTTPヘッダーに X-Custom-Header を追加して、そのまま返しています。

ボタン押下時にAPIを呼び出す
サンプルに /api/joke があるのでこれを呼び出してみましょう。まず動的なので islands/ にコンポーネントを追加します。
import type { Signal } from "@preact/signals";
import { Button } from "../components/Button.tsx";

interface CallJokeProps {
  joke: Signal<string>;
}

export default function CallJoke(props: CallJokeProps) {
  return (
    <div>
      <p>Joke:{props.joke}</p>
      <Button onClick={() => {
        fetch('/api/joke').then((response) => {
          return response.text();
        }).then((joke) => {
          props.joke.value = joke;
        }).catch(() => {
          props.joke.value = 'ERROR!';
        });
      }}>Call joke</Button>
    </div>
  );
}
ボタンを押したらfetchでAPIを叩いて値を設定するだけです。これを実際に埋め込んで使ってみます。
import { PageProps } from "$fresh/server.ts";
import { Handlers } from "$fresh/server.ts";
import { useSignal } from "@preact/signals";
import CallJoke from "../../islands/CallJoke.tsx";

export const handler: Handlers = {
  async GET(_req, ctx) {
    const resp = await ctx.render();
    resp.headers.set("X-Custom-Header", "Hello");
    return resp;
  },
};

export default function Greet(props: PageProps) {
  const joke = useSignal('');
  return <div>
    <h2>Detail {props.params.name}</h2>
    <CallJoke joke={joke}></CallJoke>
  </div>;
}
これでうまくAPIを呼び出せました。後はガイドに <form> を使ったサンプルもあったのでそれもやってみましょう。
まず handler 経由でレンダリングした場合ですが、 ctx.render() の第一引数経由でデータを送れます。
今回はPOSTで送りたいので、GETとPOSTで同じ構造のデータを送れるように工夫し、データのやり取りを行ってみます。
import { PageProps } from "$fresh/server.ts";
import { Handlers } from "$fresh/server.ts";
import { useSignal } from "@preact/signals";
import CallJoke from "../../islands/CallJoke.tsx";

interface PostData {
  joke: string;
}

function createPostData(joke = ''): PostData {
  return {
    joke: joke,
  };
}

export const handler: Handlers = {
  async GET(_req, ctx) {
    const data = createPostData();
    const resp = await ctx.render(data);
    resp.headers.set("X-Custom-Header", "Hello");
    return resp;
  },
  async POST(req, ctx) {
    const formData = await req.formData();
    const data = createPostData((formData.get('joke') as string) || '');
    const resp = await ctx.render(data);
    resp.headers.set("X-Custom-Header", "Hello");
    return resp;
  },
};

export default function Greet(props: PageProps<PostData>) {
  const joke = useSignal(props.data.joke);
  return <div>
    <h2>Detail {props.params.name}</h2>
    <CallJoke joke={joke}></CallJoke>
    <form method='POST'>
      <input placeholder='Joke' name='joke'></input>
      <button>Submit</button>
    </form>
  </div>;
}
主な対応は以下です。
-
createPostData()で共通のデータ構造で渡せるように共通化- GETの時は空文字列
- POSTの時はリクエストから
FormDataを受け取り、その中のデータを指定する
- GETもPOSTも
ctx.render()にデータを渡す - レンダーの
PagePropsに渡すデータの型を指定する-
props.dataの型が指定される
-
Deno Deployにデプロイ
さて、Freshのサーバーサイドとクライアントサイドの挙動はだいたい把握できたので、実際にデプロイしていきたいと思います。
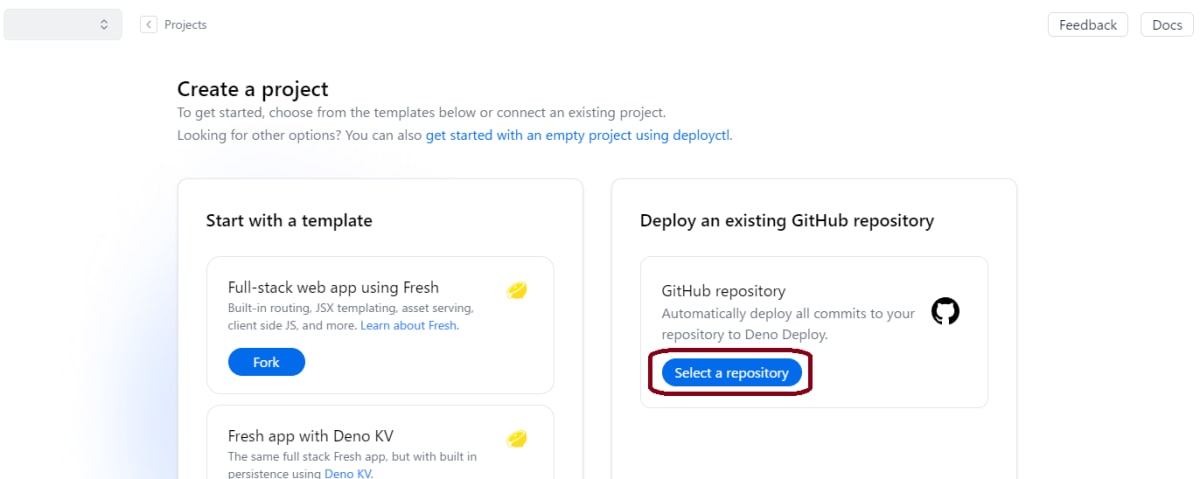
まずは New Project からプロジェクトを作ります。

今回はGitHubのリポジトリを使っているので、Select a repository からリポジトリを選択します。
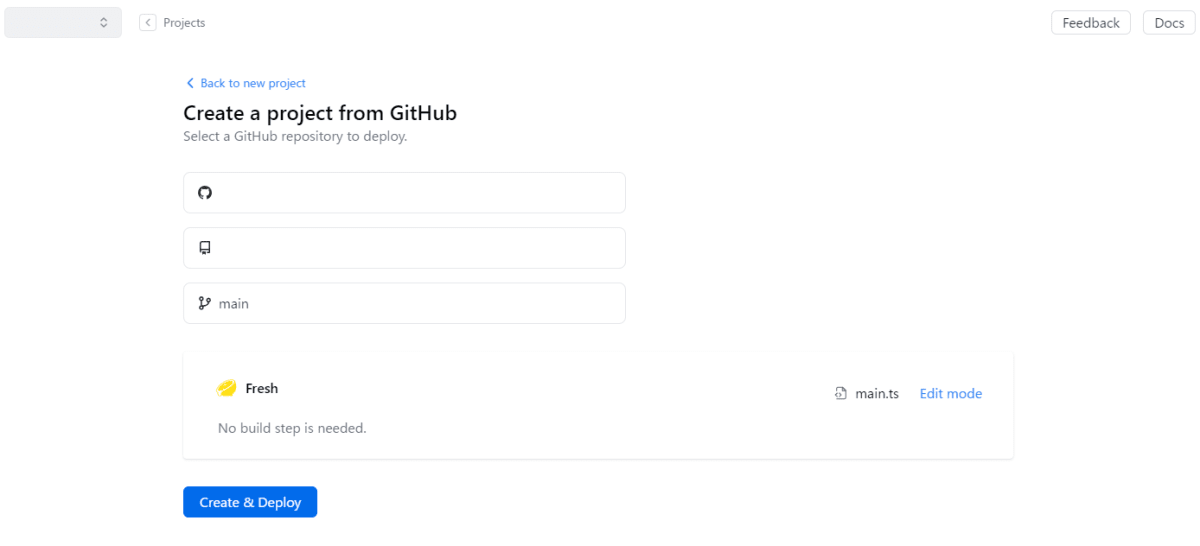
今回はほぼデフォルトでカスタマイズのない状態なので、何も設定を変えずに Create and Deploy ボタンを押せば完了です。
デプロイ後に確認するとローカルと同じものが動けば問題ないです。
まとめ
今回はDeno Deployで使われることを想定したWebフレームワークのFreshを使ってみました。事前情報無しだったのでpreactを使ってるとは思いませんでしたね。
思想的にはSSRしやすくするために変化がない場所はユーザーが明示せよというIslands Architectureが個人的に初出だったものの、そこまで複雑なものでもないのでちゃんとどこが動くか分かればそんなに難しくはないかと思います。
データのやり取りはガイドになかったのでその近辺も追加調査しました。これで大体やりたいことはできるのではないかと思います。
使ってみた感想としては環境構築がめちゃくちゃ楽なので、ちょっとAPIあるReact使いたいみたいな場合には手軽に使えて良いなと思いました。 ただWebComponentsが使えなさそうなので、コンポーネントの再利用はできなさそうですね。(preactの方法を試したりしたがうまく動かず。そもそもIslands Architectureと相性が悪そう。) ちょっと工夫は必要ですがFreshでもWebComponentsは使えることがわかりました。
またデフォルトだと動的なコンポーネントが動くようになるまで無効化するような挙動も入ってたのでそこら辺は親切で良いですね。
とりあえず今回作りたいものはFreshを使って実装してみて、何かつまりどころなどあったら追加記事を書きたいと思います。
Discussion