Webpack5 Module Federation で始めるマイクロフロントエンド
Module Federation とは
Module Federation は Webpack 5 からコア機能として導入されました。
Module Federation を使用すると、異なる JavaScript アプリケーションから動的にコードをロードすることができます。これは複数の個別のビルドによって単一のアプリケーションを構築する手段を目的としています。
これはマイクロフロントエンドという言葉でよく知られていると思いますが Module Federation の目的としてはそれに限定されません。
マイクロフロントエンドとは?
マイクロフロントエンドについてうまく説明できる自信はないので説明は委ねます。
マイクロフロントエンドアプリケーションを作成する
それでは、実際に Module Federation を使ってアプリケーションを作成してみましょう。
例として、以下の3つのフロントエンドチームが存在すると仮定しましょう。
- ヘッダーチーム:ヘッダー部分を作成するチーム。React
- フッターチーム:フッター部分を作成するチーム。Vue.js
- メインコンテンツチーム:ヘッダーチームとフッターチームの作成したコンポーネントを使用してメインコンテンツを作成するチーム。React
ヘッダーチームのコンポーネントの作成
まずはアプリケーションのヘッダー部分を作成しましょう。
初めはいつもと同じように React アプリケーションを作成します。
npm create-react-app header-app
次に Header コンポーネントを作成して App.js で読み込んで表示させてみます。ここも通常の流れとかわりありません。
const Header = () => {
  return (
    <header
      style={{
        backgroundColor: "deepskyblue",
        color: "white",
        margin: 0,
        padding: "4px",
      }}
    >
      <h1>This is excellent header!</h1>
    </header>
  );
};

export default Header;
import "./App.css";
import Header from "./components/Header";

function App() {
  return (
    <div className="App">
      <Header />
    </div>
  );
}

export default App;
アプリケーションを起動します。ヘッダーチームの作成した素晴らしいヘッダーが表示されています。
cd header-app
yarn start

Module Federation の設定
ここまでは通常通りの React アプリケーションの作成であり、あまり面白みのないセクションです。ここでは作成したヘッダーコンポーネントを異なるアプリケーションから使用できるように Wepback の設定を行います。
初めに create-react-app で作成した wepback の設定を上書き必要があるのでその作業を行います。
yarn add -D webpack webpack-cli webpack-dev-server html-webpack-plugin serve
yarn add -D babel-loader @babel/core @babel/preset-env @babel/preset-react
yarn add -D css-loader style-loader @svgr/webpack style-loader url-loader
webpack.config.js ファイルを作成しましょう
const path = require("path");
const HtmlWebpackPlugin = require("html-webpack-plugin");

const PORT = 3001;

module.exports = {
  entry: path.resolve(__dirname, "./src/index.js"),
  devServer: {
    port: PORT,
  },
  output: {
    publicPath: "auto",
  },
  resolve: {
    extensions: [".js", ".jsx"],
  },
  module: {
    rules: [
      {
        test: /\.css$/i,
        use: ["style-loader", "css-loader"],
      },
      {
        test: /\.svg$/,
        use: ['@svgr/webpack', 'url-loader'],
      },
      {
        test: /\.(js|jsx)$/,
        exclude: /node_modules/,
        use: ["babel-loader"],
      },
    ],
  },
  plugins: [
    new HtmlWebpackPlugin({
      manifest: "./public/manifest.json",
      favicon: "./public/favicon.ico",
      template: "./public/index.html",
    }),
  ],
};
続いて Module Federation の設定を記述していきます。引き続き webpack.config.js ファイルを編集します。
const HtmlWebpackPlugin = require("html-webpack-plugin");
const ModuleFederationPlugin = require("webpack/lib/container/ModuleFederationPlugin");

module.exports = {
  // other webpack configs...
  plugins: [
    new ModuleFederationPlugin({
      name: "header_app",
      filename: "remoteEntry.js",
      exposes: {
        "./Header": "./src/components/Header.js",
      },
    }),
  ]
}
Module Federation を使用するには ModuleFederationPlugin というプラグインが必要になるので、初めにこれをインポートします。
const ModuleFederationPlugin = require("webpack/lib/container/ModuleFederationPlugin");
plugins の配列に new ModuleFederationPlugin({}) を追加してプラグインとして追加します。ModuleFederationPlugin の各プロパティを次のように設定します。
-
name- exporse するモジュールの名前。例えば
header_appという名前で expose すると別のアプリケーションからで指定するときheader_app@${URL}のような名前を使うことになる。exposesを指定するときには必須になる。
- exporse するモジュールの名前。例えば
-
filename- 出力されるファイル名
-
exposes- モジュールとして公開したいファイルをオブジェクト形式で指定する。キーが公開される際に使われるパス名で、値がこのアプリケーションからの相対パス。
次に babel.config.json ファイルを作成します。
{
  "presets": ["@babel/preset-env", ["@babel/preset-react", {
     "runtime": "automatic"
  }]]
}
最後に package.json の scripts を webpack を使用するように修正しましょう。
  "scripts": {
    "start": "webpack serve --open --mode development",
    "build": "webpack --mode production"
  },
ここまで完了したら、アプリケーションを再起動する必要があります。
yarn start
うまく設定の修正が完了していたら変わらずヘッダーコンポーネントが表示されているはずです。
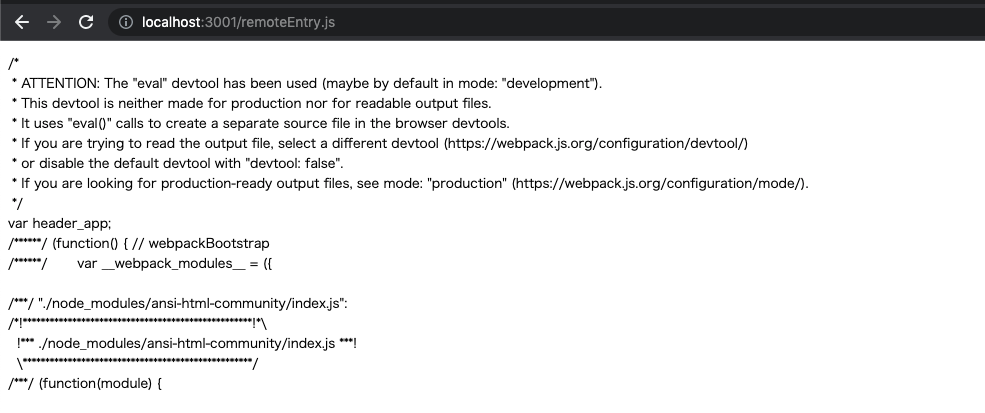
ここで http://localhost:3001/remoteEntry.js にアクセスしてみてください。 Module Federation の設定がうまくできていた場合は、次のようにファイルが出力されています。
メインコンテンツチーム
続いて、メインコンテンツチームのアプリケーションを作成しましょう。ヘッダーチームが expose したヘッダーコンポーネントをアプリケーション内に取り込みます。
ヘッダーアプリケーションを作成したときと同じく create-react-app で React アプリケーションを作成して webpack の設定を上書きしましょう。
npx create-react-app main-contents
yarn add -D webpack webpack-cli webpack-dev-server html-webpack-plugin serve
yarn add -D babel-loader @babel/core @babel/preset-env @babel/preset-react
yarn add -D css-loader style-loader @svgr/webpack style-loader url-loader
const path = require("path");
const HtmlWebpackPlugin = require("html-webpack-plugin");

const PORT = 3000; // ヘッダーアプリケーションとは port 番号を変更する必要がある

module.exports = {
  entry: path.resolve(__dirname, "./src/index.js"),
  devServer: {
    port: PORT,
  },
  output: {
    publicPath: "auto",
  },
  resolve: {
    extensions: [".js", ".jsx"],
  },
  module: {
    rules: [
      {
        test: /\.css$/i,
        use: ["style-loader", "css-loader"],
      },
      {
        test: /\.svg$/,
        use: ['@svgr/webpack', 'url-loader'],
      },
      {
        test: /\.(js|jsx)$/,
        exclude: /node_modules/,
        use: ["babel-loader"],
      },
    ],
  },
  plugins: [
    new HtmlWebpackPlugin({
      manifest: "./public/manifest.json",
      favicon: "./public/favicon.ico",
      template: "./public/index.html",
    }),
  ],
};
{
  "presets": ["@babel/preset-env", ["@babel/preset-react", {
     "runtime": "automatic"
  }]]
}
  "scripts": {
    "start": "webpack serve --open --mode development",
    "build": "webpack --mode production"
  },
次に webpack.config.js に Module Federation の設定を追加しましょう。
const ModuleFederationPlugin = require("webpack/lib/container/ModuleFederationPlugin");

module.exports = {
  // other webpack configs...
  plugins: [
    new ModuleFederationPlugin({
      name: "main_contents",
      filename: "remoteEntry.js",
      remotes: {
        header_app: "header_app@http://localhost:3001/remoteEntry.js",
      }
    }),
  ]
}
ヘッダーアプリケーションの時とは設定に変更点があります。メインコンテンツアプリケーションではモジュールを公開しないので expose の設定は記載しておりません。その代わりに異なるアプリケーションからもモジュールをローカルで使用できるようにするために remotes プロパティを指定しています。
remote プロパティはオブジェクト形式で指定し、取り込みたい名前をキーとし Module Federation によって出力したファイルを値に設定します。
もう一つ変更する点があります。src/index.js ファイルの内容をそのままsrc/bootstrap.js ファイルを作成してペーストします。
import React from "react";
import ReactDOM from "react-dom";
import "./index.css";
import App from "./App";
import reportWebVitals from "./reportWebVitals";

ReactDOM.render(
  <React.StrictMode>
    <App />
  </React.StrictMode>,
  document.getElementById("root")
);

// If you want to start measuring performance in your app, pass a function
// to log results (for example: reportWebVitals(console.log))
// or send to an analytics endpoint. Learn more: https://bit.ly/CRA-vitals
reportWebVitals();
src/index.js ファイルは src/bootstrap.js ファイルを import するように修正します。
import('./bootstrap.js')
これは bootstrap.js ファイルの処理を非同期実行するようにするためです。Webpack が header_app のファイルをフェッチしてくるまで待つ必要があります。
この設定によってヘッダーアプリケーションからヘッダーコンポーネントを import することが可能です。App.js ファイルを編集しましょう。
import Header from "header_app/Header";

function App() {
  return (
    <div className="App">
      <Header />
      <main>
        <h1>Main contents</h1>
      </main>
    </div>
  );
}

export default App;
ヘッダーアプリケーションを起動したままメインコンテンツアプリケーションを起動してください。
cd main_contents
yarn start
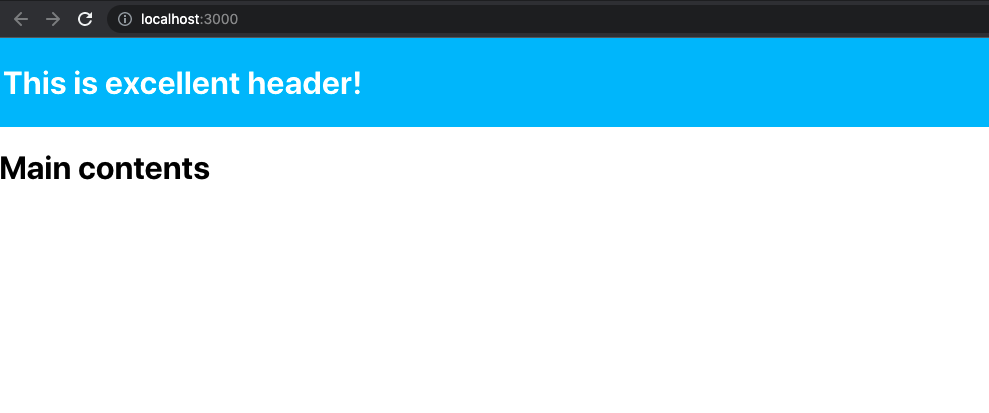
http://localhost:3000 を見てください!ヘッダーチームが作成したコンポーネントがしっかりと表示されています!!
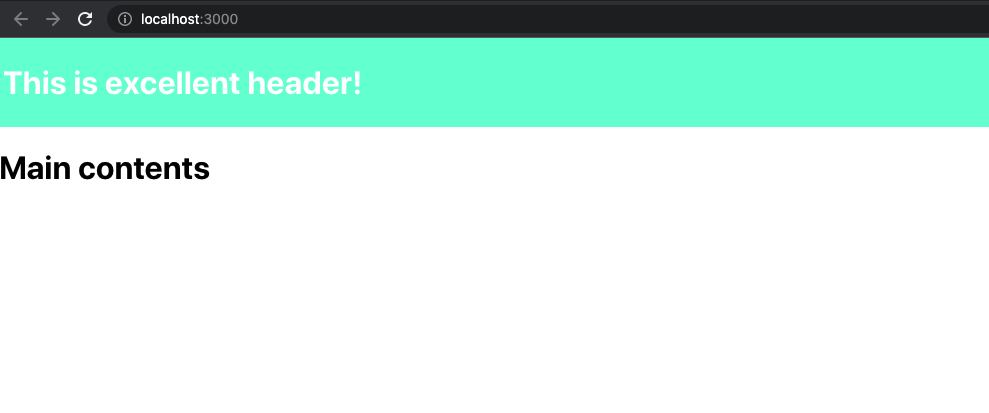
さらに、ヘッダーコンポーネントを編集してみましょう。
 const Header = () => {
   return (
     <header
       style={{
-        backgroundColor: "deepskyblue",
+        backgroundColor: "aquamarine",
         color: "white",
         margin: 0,
         padding: "4px",
       }}
     >
       <h1>This is excellent header!</h1>
     </header>
   );
 };

 export default Header;
メインコンテンツ側ではホットリロードは効かないのでブラウザを更新する必要があります。先程ヘッダーコンポーネントで行った変更が反映されているはずです!
依存関係の共有
メインコンテンツアプリケーションとヘッダーアプリケーションは互いに React に依存していますが、どちらのアプリケーションでも React のソースコードを読み込んでしまうので結果的にファイルサイズが大きくなってしまいます。
shared というプロパティを設定することで依存関係を共有することができます。このオプションを設定するとヘッダーアプリケーションはメインコンテンツアプリケーションの依存関係を優先的に参照します。メインコンテンツアプリケーション依存関係が存在しない場合には、ヘッダーアプリケーションが独自にソースコードのダウンロードを行います。
メインコンテンツアプリケーションとヘッダーアプリケーションのどちらにも以下のコードを追加します。
const deps = require("./package.json").dependencies;

module.exports = {
  plugins: [
    new ModuleFederationPlugin({
      shared: {
        react: {
          requiredVersion: deps.react,
          singleton: true
        },
        "react-dom": {
          requiredVersion: deps["react-dom"],
          singleton: true
        },
      },
    }),
  ],
};
shared は配列形式またはオブジェクト形式で指定します。キーには package.json の dependencies または devDependencies に指定しているライブラリ名を記述します。
値にはオプションを設定できます。
-
requiredVersion- 実際に依存しているライブラリのバージョンを記載しています。
-
singleton-
trueにすると1つのバージョンのみのライブラリをシェアするように強制することができます。例としてはreactやreact-domなどのグルーバルな内部状態を持つライブラリはこのオプションを指定するべきです。
-
また shared を設定した場合ヘッダーアプリケーションも bootstrap.js を作成してアプリケーションが非同期に開始するようにする必要があります。
import('./bootstrap')
フッターチームのコンポーネントの作成
最後にフッターコンポーネントを作成してメインコンテンツアプリケーションから呼び出すようにしましょう。
フッターチームは長年 Vue.js の経験があるので Vue.js を使用してアプリケーションを作成することに決めました。
今回は Webpack の設定を楽に行うために create-mf-app を使用してアプリケーションを作成します。
npx create-mf-app
? Pick the name of your app: (host) footer-app # アプリケーションの名前
? Project Type: (Use arrow keys) # Application を選択
❯ Application
  API Server
  Library
? Port number: (8080) # ポート番号はそのまま
? Framework: # フレームワークは vue3 を選択
  svelte
  vanilla
  vue2
❯ vue3
  inferno
  lit-html
  mithril
? Language: (Use arrow keys) # 言語は javascript
  typescript
❯ javascript
? CSS: (Use arrow keys) # 普通の CSS を選択
❯ CSS
  Tailwind
セットアップが完了したら通常通り Vue.js のコンポーネントを作成します。少し違うのは後ほど Vue.js のコンポーネントを Web Components に変換する必要があるのでファイル名の最後を .ce.vue にする必要があります。
<script setup>
defineProps({
  title: {
    type: String,
    default: "The Footer",
  },
});
</script>

<template>
  <footer class="footer">
    <h1>{{ title }}</h1>
    <p>This is awesome footer</p>
  </footer>
</template>

<style scoped>
.footer {
  background-color: #424242;
  color: white;
  padding: 4px;
}
</style>
Vue.js のコンポーネントは React アプリケーションでそのまま使用することができないので Web Components に変換する必要があります。同ディレクトリ内に TheFooter.js ファイルを作成します。
import { defineCustomElement } from "vue";
import TheFooter from "./TheFooter.ce.vue";

const TheFooterElement = defineCustomElement(TheFooter);

customElements.define("the-footer", TheFooterElement);
Vue.js の defineCustomElement を呼び出せば Vue.js コンポーネントを Web Components に変換することができます。 Web Components に変換した要素を customElements.define で登録して使用できるようにしています。Vue.js と Web Components の関係についてもう少し詳しく知りたい場合には以下を参照してください。
webpack.config.js を編集して作成したフッターコンポーネントを expose します。
   plugins: [
     new VueLoaderPlugin(),
     new ModuleFederationPlugin({
       name: "footer_app",
       filename: "remoteEntry.js",
-      exposes: {},
+      exposes: {
+        "./TheFooter": "./src/components/TheFooter.js",
+      },
       shared: require("./package.json").dependencies,
     }),
これで準備は完了したのでフッターアプリケーションを起動しましょう。
cd footer-app
npm i
npm start
続いてメインコンテンツアプリケーションを編集してフッターアプリケーションの提供するコンポーネントを使用できるようにします。
webpack.config.js を編集して footer_app を追加します。
       remotes: {
         header_app: "header_app@http://localhost:3001/remoteEntry.js",
+        footer_app: "footer_app@http://localhost:8080/remoteEntry.js",
       },
App.js でフッターコンポーネントを import しましょう。(インターフェイスが異なるのが微妙なのでもう少し工夫したほうが良いかもしれません)
 import Header from "header_app/Header";
+ import "footer_app/TheFooter";

 function App() {
   return (
     <div className="App">
       <Header />
       <main>
         <h1>Main contents</h1>
       </main>
+      <the-footer title="micro-frontend app" />
     </div>
   );
 }

 export default App;
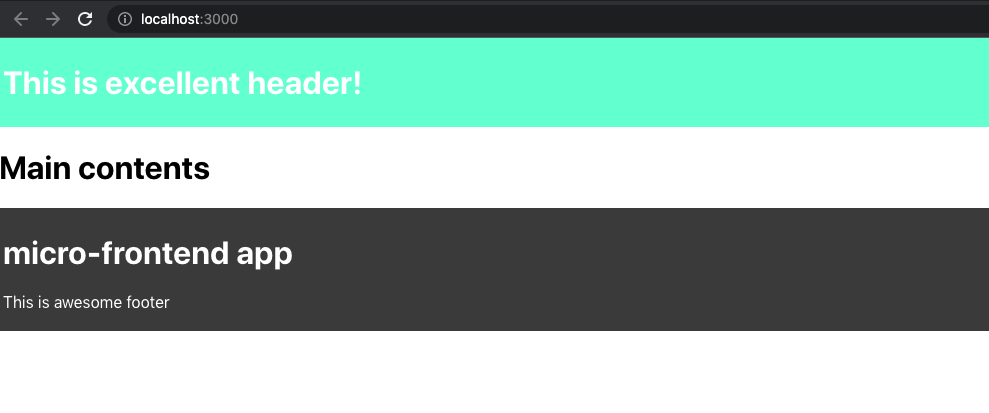
メインコンテンツアプリケーションを再起動してみてください。望み通り、フッターコンポーネントが表示されているはずです!!
今回作成したアプリケーションは以下のレポジトリから確認できます。
参考
- https://webpack.js.org/concepts/module-federation/
- https://webpack.js.org/plugins/module-federation-plugin/
- https://medium.com/swlh/webpack-5-module-federation-a-game-changer-to-javascript-architecture-bcdd30e02669
- https://blog.hiroppy.me/entry/module-federation
- https://www.youtube.com/watch?v=lKKsjpH09dU
Discussion