【Map Compose】 デバイスの現在地と方位を取得してGoogle Map公式アプリみたいな現在地マーカーを表示する
デフォルトのGoogle Map ComposeでもisMyLocationEnabledをtrueにすれば現在地マーカーは表示されるのですが方位矢印の動きがカクカクなのが嫌だったので自分で実装することにしました。
完成系
今回作ったやつとGoogleMap公式アプリで同じ場所を歩いて比較してみました(個人情報笑
多分問題なさそう。
| 作ったもの | GoogleMap公式アプリ |
|---|---|
 |
 |
位置情報の取得
権限の取得
Accompanistを使います
@OptIn(ExperimentalPermissionsApi::class)
  @Composable
  private fun LocationPermissionEffect(permissionState: MultiplePermissionsState) {
    LaunchedEffect(permissionState) {
      snapshotFlow {
        permissionState.allPermissionsGranted
      }
        .distinctUntilChanged()
        .collect {
        if (!permissionState.allPermissionsGranted) {
          permissionState.launchMultiplePermissionRequest()
        }
        locationManager.updateLocationPermissionStatus(it)
      }
    }
  }
現在地の取得
Fused Location Provider APIを使います。
位置情報の更新はrequestLocationUpdatesにcallbackを渡すことで受け取れるようになります。
flowで受け取れるようにしたいので callbackFlowでflowに変換します。
requestLocationUpdatesの第3引数のLooperはなにも指定しないとデフォルトは実行元のスレッド(ここだとメイン)のルーパーになるので、別スレッドのLooperを渡してバックグラウンドで更新されるようにします。
※アプリがバックグラウンドの時も位置情報を取得したい場合はServiceを利用する必要があります
今回は、lastLocation を使ってますが、locations を利用すると前回取得した地点からすべての位置情報が返ってくるのでもっとスムーズにマーカーを移動させたい場合はこちらを使うのがいいと思います。
@ApplicationScope
@Inject
class LocationManager(context: Context, private val externalScope: CoroutineScope) {
  private val locationClient: FusedLocationProviderClient =
    LocationServices.getFusedLocationProviderClient(context)
  private val locationRequest = LocationRequest.Builder(1000)
    .setPriority(Priority.PRIORITY_HIGH_ACCURACY)
    .build()

  private val _hasLocationPermission = MutableStateFlow(false)

  @OptIn(ExperimentalCoroutinesApi::class)
  @SuppressLint("MissingPermission")
  val location = _hasLocationPermission.flatMapLatest { hasPermission ->
    if (!hasPermission) {
      flowOf(null)
    } else callbackFlow {
      val locationCallback = object : LocationCallback() {
        override fun onLocationResult(result: LocationResult) {
          result.lastLocation?.let {
            trySend(it)
          }
        }
      }
      val handlerThread = HandlerThread("location").apply { start() }
      locationClient.requestLocationUpdates(
        locationRequest,
        locationCallback,
        handlerThread.looper
      ).addOnFailureListener {
        cancel("Error requesting location updates", it)
      }
      awaitClose {
        handlerThread.quit()
        locationClient.removeLocationUpdates(locationCallback)
      }
    }.distinctUntilChanged()
      .shareIn(
        externalScope,
        replay = 1,
        started = SharingStarted.WhileSubscribed()
      )
  }

  fun updateLocationPermissionStatus(hasPermission: Boolean) {
    _hasLocationPermission.value = hasPermission
  }
}
ちなみにワンショットで現在位置が欲しいだけなら、拡張ライブラリのkotlinx-coroutines-play-services を使えば await でsuspendしてくれるので、以下のようにとれます
suspend fun getLocation(): Location? =
    LocationServices.getFusedLocationProviderClient(context).lastLocation.await()
デバイスの方位の取得
デバイスが向いている方向を取得します。0度北が基準で時計回りに90度ごとに東、南、西です。
最初はSensor APIの加速度計センサと磁場センサを使って自力で実装していたのですが、ロールとピッチの補正がうまくいかず悩んでいました。
色々調べていたところ、最近Googleが Fused Orientation ProivderAPIというデバイスのorigintationを返却してくれるAPIを公開しており、これを使うようにしました。
Google Map公式アプリでも使われているようです。
We’ve heard from developers that orientation is challenging to get right, with frequent user complaints when orientation is incorrect.
開発者からは、向きを正しくするのは難しく、向きが間違っているとユーザーから頻繁に苦情が寄せられると聞いています。
わかるなぁと思いました笑 むずかしい
@ApplicationScope
@Inject
class DeviceOrientationProvider(context: Context, externalScope: CoroutineScope) {

  private val fusedOrientationProviderClient: FusedOrientationProviderClient =
    LocationServices.getFusedOrientationProviderClient(context)
  private val request =
    DeviceOrientationRequest.Builder(DeviceOrientationRequest.OUTPUT_PERIOD_DEFAULT).build()

  val bearing = callbackFlow {
  val orientationCallback = DeviceOrientationListener { orientation ->
  trySend(orientation.headingDegrees)
    }

  val executor = Executors.newSingleThreadExecutor()
    fusedOrientationProviderClient.requestOrientationUpdates(request, executor, orientationCallback)
      .addOnFailureListener {
        cancel("Error requesting device orientation updates", it)
      }
  awaitClose {
  executor.shutdown()
      fusedOrientationProviderClient.removeOrientationUpdates(orientationCallback)
    }
 }.distinctUntilChanged()
    .shareIn(
      externalScope,
      replay = 1,
      started = SharingStarted.WhileSubscribed()
    )

}
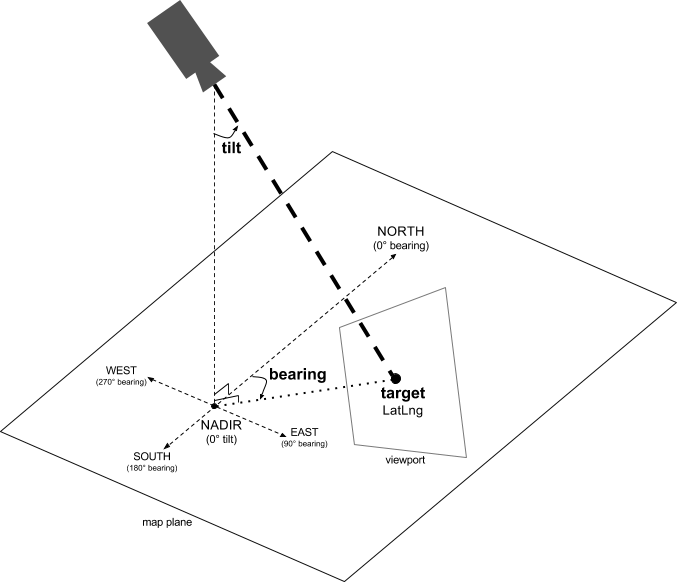
カメラの方位を加味して補正
ここまでで現在位置とデバイスの方位が取得できたので、実際にマーカーが示す方位を設定します。
デフォルトのカメラ(bearing=0)だと表示されているマップの上は北を指しますが、ユーザージェスチャーなどで地図が回転してbearingが変化することもありえます。
そのため、回転した分補正した値をマーカーの回転角に指定することでユーザーが実際にどの方向を向いているかを正確に示すようにします。
地図のカメラのviewに関しては以下の図が非常にわかりやすいです
引用:カメラの位置
今回はユーザーの現在地情報を格納するカスタムのState Holderをつくり、そこに MarkerStateも持たせました。
@Stable
class CurrentLocationState(
  initialLocation: Location?,
  val markerState: MarkerState,
  initialBearing: Float
) {
  var location by mutableStateOf(initialLocation)
    private set

  var heading by mutableFloatStateOf(initialBearing)
    private set

  fun update(location: Location, heading: Float) {
    this.location = location
    this.heading = heading
    markerState.position = LatLng(location.latitude, location.longitude)
  }
}
cameraのBearing/ 現在地のLocation / デバイスのheadingの3点をcombineして上記で作ったstateにセットします。
val userLocationState = rememberUserLocationState()
val cameraPositionState = rememberCameraPositionState()

LaunchedEffect(Unit) {
  val cameraBearing = snapshotFlow {
    mapState.cameraPositionState.position.bearing
  }
  combine(
    locationManager.location.filterNotNull(),
    deviceOrientationProvider.bearing,
    cameraBearing,
    ::Triple
  ).collect { (location, deviceBearing, cameraBearing) ->
    val correctedBearing = (deviceBearing - cameraBearing + 360) % 360 // 補正
    currentLocationState.update(location, correctedBearing)
  }
}
View側では以下のように使います。
GoogleMap() {
  with(state.currentLocationState) {
    if (location != null) {
      UserLocationMarker(
        markerState = markerState,
        heading = heading
      )
    }
  }
}}
カスタムマーカーの作成
カスタムのマーカーを表示するにはデフォルトのスタイルが当たった Marker / AdvancedMarkerを利用するか、ComposeでスクラッチでUIを構築できる MarkerComposableを使います。
今回はComposeで作りたいので後者を利用し、以下のようなマーカーを作ります。

drawArcとdrawCircleを使って、方位を示す扇形、白線の円、内側の青い円を重ねて配置し、扇形にradicalGradientでグラデーションを適用します。
参考:Composeのグラフィック / ブラシ: グラデーションとシェーダー
@Composable
@Preview
private fun UserLocationMarkerInner() {
  Canvas(modifier = Modifier.size(100.dp)) {
    val center = Offset(size.width / 2, size.height / 2)
    val circleBorder = 3.dp.toPx()
    val circleRadius = 6.dp.toPx()
    val gradient = Brush.radialGradient(
      colorStops = arrayOf(
        0.0f to Blue,
        0.2f to Blue.copy(alpha = 0.3f),
        1f to Color.Transparent,
      ),
    ) // 外側に行くほど透明にする
    drawArc(
      brush = gradient,
      startAngle = 235f, //孤の描画開始角度。3時が0度
      sweepAngle = 70f,  //何度描画するか。ここでは235度から305度の弧になる。
      useCenter = true,
      size = Size(size.width, size.height + circleRadius * 2 + circleBorder * 2), // 孤の中心点が円のbottomにくるようにする
    )

    drawCircle(
      center = center,
      color = Color.White,
      radius = circleRadius + circleBorder,
    )
    drawCircle(
      center = center,
      color = Blue,
      radius = circleRadius
    )
  }
}
これを以下のようにMarkerComposableのラムダに渡せば表示されます。
anchorはMarkerStateが持っているpositionをMarkerのどの位置に置くか、と言う指定でデフォルトだとbottomCenter(0.5f, 1.0f)ですがここでは真ん中にしています。
rotationにheading(さきほど補正した値)を指定すれば、その角度にMarkerが回転します。
@GoogleMapComposable
@Composable
fun UserLocationMarker(
  heading: Float,
  markerState: MarkerState
) {
  MarkerComposable(
    state = markerState,
    anchor = Offset(0.5f, 0.5f),
    rotation = heading
  ) {
    UserLocationMarkerInner()
  }
}
以上で、GoogleMapと同じようなマーカーを作成することできました!
Discussion